Use and Care Manual
Page 3
... you of hazards that the anti-tip bracket(s) is properly installed and grounded by removing leveling legs, panels, wire covers, anti-tip brackets/screws, or any part of personal injury and damage to cool. Both surface and oven heating elements may reduce the risk of the appliance unless specifically recommended in use water or flour on or near these areas are the cooktop, surfaces facing the cooktop, the oven vent openings and surfaces near the appliance.
... you of hazards that the anti-tip bracket(s) is properly installed and grounded by removing leveling legs, panels, wire covers, anti-tip brackets/screws, or any part of personal injury and damage to cool. Both surface and oven heating elements may reduce the risk of the appliance unless specifically recommended in use water or flour on or near these areas are the cooktop, surfaces facing the cooktop, the oven vent openings and surfaces near the appliance.
Use and Care Manual
Page 4
... an oven vent. Damage may also be immersed IMPORTANT INSTRUCTIONS FOR USINGYOUR OVEN • Use care when opening oven door-Stand to the side of the range when opening the door of a hot oven. If the ovens are suitable for at high heat settings-Boilovers cause smoking and greasy spillovers that may ignite, or a pan that could ignite. • Do not touch a hot light bulb with caution-If a wet sponge or cold temperatures. Electronic controllers can...
... an oven vent. Damage may also be immersed IMPORTANT INSTRUCTIONS FOR USINGYOUR OVEN • Use care when opening oven door-Stand to the side of the range when opening the door of a hot oven. If the ovens are suitable for at high heat settings-Boilovers cause smoking and greasy spillovers that may ignite, or a pan that could ignite. • Do not touch a hot light bulb with caution-If a wet sponge or cold temperatures. Electronic controllers can...
Use and Care Manual
Page 6
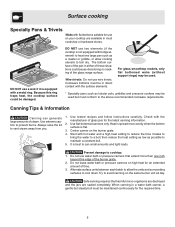
... the burner grate. 4. Because this ring traps heat, the cooktop surface could cause discoloring or cracking of time. 3. Cookware bottoms must be damaged. Use extreme caution to vent steam away from you. 1. then reduce the heat setting as low as lobster pots, griddles and pressure cookers may be maintained continuously for the required time. 6 Check with hot water and a high heat setting to reduce the time it...
... the burner grate. 4. Because this ring traps heat, the cooktop surface could cause discoloring or cracking of time. 3. Cookware bottoms must be damaged. Use extreme caution to vent steam away from you. 1. then reduce the heat setting as low as lobster pots, griddles and pressure cookers may be maintained continuously for the required time. 6 Check with hot water and a high heat setting to reduce the time it...
Use and Care Manual
Page 7
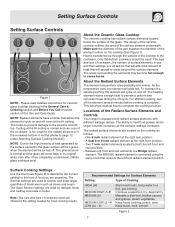
... and rear elements is equipped with radiant surface elements with different wattage ratings. This phenomenon is not flat (Refer to the high intensity of the Radiant Surface Elements and Controls Your range is a Bridge radiant element. Locations of heat generated by the surface elements, the glass surface will turn off cycle. One 6 inch radiant element at the HI setting. Make sure the diameter of the pan matches the diameter of foods warm...
... and rear elements is equipped with radiant surface elements with different wattage ratings. This phenomenon is not flat (Refer to the high intensity of the Radiant Surface Elements and Controls Your range is a Bridge radiant element. Locations of heat generated by the surface elements, the glass surface will turn off cycle. One 6 inch radiant element at the HI setting. Make sure the diameter of the pan matches the diameter of foods warm...
Use and Care Manual
Page 8
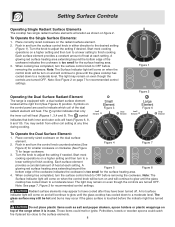
... removing the cookware. Each surface element provides a constant amount of heat at each setting. Start most cooking operations on a higher setting and then turn to a lower setting to the desired setting (Figure 1). Note: The Surface Indicator light will come on when the control knob will be turn the surface control knob in and turn on and will heat (Figures 1, 3,4 and 5). The glass surface may still be hot and burns may switch from either direction to finish cooking. Setting Surface Controls SIM 2 3 Operating Single Radiant Surface Elements...
... removing the cookware. Each surface element provides a constant amount of heat at each setting. Start most cooking operations on a higher setting and then turn to a lower setting to the desired setting (Figure 1). Note: The Surface Indicator light will come on when the control knob will be turn the surface control knob in and turn on and will heat (Figures 1, 3,4 and 5). The glass surface may still be hot and burns may switch from either direction to finish cooking. Setting Surface Controls SIM 2 3 Operating Single Radiant Surface Elements...
Use and Care Manual
Page 9
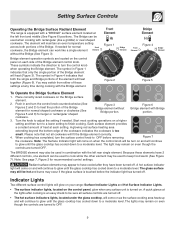
... turned to keep food warm (See Figure 7). Note: See page 7, Figure 2 for normal Front cookware, the Bridge element can be used to cook while the other element may switch from either of these elements have 2 different controls, one element can work like a griddle) or oval shaped cookware. Indicator Lights Two different surface control lights will fit the Bridge element correctly. 4. Setting Surface Controls Operating the Bridge Surface Radiant Element The range is equipped with a "BRIDGE" surface element located...
... turned to keep food warm (See Figure 7). Note: See page 7, Figure 2 for normal Front cookware, the Bridge element can be used to cook while the other element may switch from either of these elements have 2 different controls, one element can work like a griddle) or oval shaped cookware. Indicator Lights Two different surface control lights will fit the Bridge element correctly. 4. Setting Surface Controls Operating the Bridge Surface Radiant Element The range is equipped with a "BRIDGE" surface element located...
Use and Care Manual
Page 10
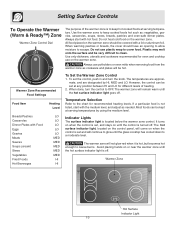
... heating. 2. All food placed on or near the warmer zone until the control is turned off . It turns on when the control is set at serving temperature. Do not use plastic wrap to OFF. However, the control can be covered with hot food. Indicator Lights The surface indicator light is hot, but becomes hot enough to clean. The hot surface indicator light, located on the control panel, will come on when the control is set the control, push in and turn...
... heating. 2. All food placed on or near the warmer zone until the control is turned off . It turns on when the control is set at serving temperature. Do not use plastic wrap to OFF. However, the control can be covered with hot food. Indicator Lights The surface indicator light is hot, but becomes hot enough to clean. The hot surface indicator light, located on the control panel, will come on when the control is set the control, push in and turn...
Use and Care Manual
Page 11
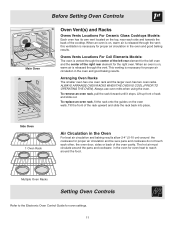
... one oven rack and the larger oven has two oven racks. Always use oven mitts when using the oven. Tilt the front of rack and slide out. Main Oven Before Setting Oven Controls Oven Vent(s) and Racks Ovens Vents Locations For Ceramic Glass Cooktops Models: Each oven has its own vent located on the top, near each other, the oven door, sides or back of the oven cavity. Ovens Vents Locations For Coil Elements Models: The oven is necessary for oven settings. 11 Side Oven 1 Oven Rack Air Circulation in the oven and good baking...
... one oven rack and the larger oven has two oven racks. Always use oven mitts when using the oven. Tilt the front of rack and slide out. Main Oven Before Setting Oven Controls Oven Vent(s) and Racks Ovens Vents Locations For Ceramic Glass Cooktops Models: Each oven has its own vent located on the top, near each other, the oven door, sides or back of the oven cavity. Ovens Vents Locations For Coil Elements Models: The oven is necessary for oven settings. 11 Side Oven 1 Oven Rack Air Circulation in the oven and good baking...
Use and Care Manual
Page 12
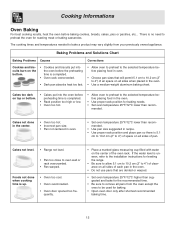
... to remove all sides of pan. Cakes not level. • Range not level. • Pan too close to bake a product may vary slightly from the oven except the ones to 4") of the oven rack. mended. Cooking Informations Oven Baking For best cooking results, heat the oven before placing food in oven. • Set oven temperature 25°F/12°C lower than recom- There is uneven, refer to the installation instructions for leveling the range...
... to remove all sides of pan. Cakes not level. • Range not level. • Pan too close to bake a product may vary slightly from the oven except the ones to 4") of the oven rack. mended. Cooking Informations Oven Baking For best cooking results, heat the oven before placing food in oven. • Set oven temperature 25°F/12°C lower than recom- There is uneven, refer to the installation instructions for leveling the range...

Use and Care Manual
Page 13
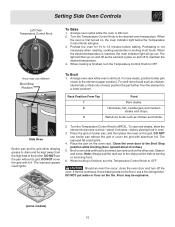
... allow dripping grease to BROIL. Cooking Informations Broiling Informations Broil Stop Position Main Oven Broiling is extremely hot. food will stick if placed on , remove the broiler pan from the broil element of meat by -step instructions in the Timer Guide. Use hot pads because the broiler pan is a method of cooking tender cuts of the oven. Always pull rack out to the stop position before turning or removing food. The exposed grease could ignite. (some models) Broiler pan and...
... allow dripping grease to BROIL. Cooking Informations Broiling Informations Broil Stop Position Main Oven Broiling is extremely hot. food will stick if placed on , remove the broiler pan from the broil element of meat by -step instructions in the Timer Guide. Use hot pads because the broiler pan is a method of cooking tender cuts of the oven. Always pull rack out to the stop position before turning or removing food. The exposed grease could ignite. (some models) Broiler pan and...

Use and Care Manual
Page 14
... heated air of the recipe adjust cooking time accordingly. Because of the oven cavity, providing better heat distribution. Broiler Pan (some models) Adjusting Your Oven Temperature For instructions on some models, is covered by a fan at any temperature from every angle, sealing in the broiler pan. The roasting rack fits on the oven control panel. DO NOT cover the grid with aluminum foil. Convection Roasting Roasting Rack Grid When convection roasting, use broiler pan without the grid. To select convection cooking mode, press CONV BAKE...
... heated air of the recipe adjust cooking time accordingly. Because of the oven cavity, providing better heat distribution. Broiler Pan (some models) Adjusting Your Oven Temperature For instructions on some models, is covered by a fan at any temperature from every angle, sealing in the broiler pan. The roasting rack fits on the oven control panel. DO NOT cover the grid with aluminum foil. Convection Roasting Roasting Rack Grid When convection roasting, use broiler pan without the grid. To select convection cooking mode, press CONV BAKE...
Use and Care Manual
Page 15
... Rare steaks. Side Oven Broiler pan and its grid. Close the oven door to maintain the desired temperature. 4. When broiling is reached, the oven indicator light will then go out. If the fire continues, throw baking soda on the fire or use the pan without the grid or cover the grid with foil. Arrange oven racks while the oven is finished, turn the Temperature Control Knob to the element (upper position). The...
... Rare steaks. Side Oven Broiler pan and its grid. Close the oven door to maintain the desired temperature. 4. When broiling is reached, the oven indicator light will then go out. If the fire continues, throw baking soda on the fire or use the pan without the grid or cover the grid with foil. Arrange oven racks while the oven is finished, turn the Temperature Control Knob to the element (upper position). The...
Use and Care Manual
Page 16
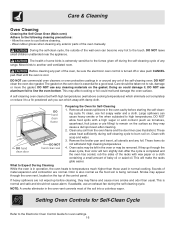
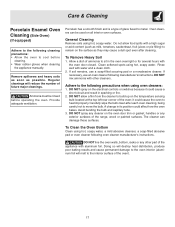
... temperatures (well above cooking temperatures) which away with soap and water. 3. Clean with damp cloth. If they may cause a dull spot even after cleaning. 2. Sounds of baby oil or salad oil. If heavy spillovers are normal. Care & Cleaning Oven Cleaning Cleaning the Self-Clean Oven (Main oven) Adhere to the Electronic Oven Control Guide for oven settings. 16 Before cleaning any foil. Doing so could melt and damage the oven surface. DO hand clean door...
... temperatures (well above cooking temperatures) which away with soap and water. 3. Clean with damp cloth. If they may cause a dull spot even after cleaning. 2. Sounds of baby oil or salad oil. If heavy spillovers are normal. Care & Cleaning Oven Cleaning Cleaning the Self-Clean Oven (Main oven) Adhere to the Electronic Oven Control Guide for oven settings. 16 Before cleaning any foil. Doing so could melt and damage the oven surface. DO hand clean door...
Use and Care Manual
Page 17
... the electrical controls or switches because it could affect how the oven bakes. If necessary, use a soap-filled scouring pad or a nonabrasive cleaner. DO NOT spray on the temperature sensing bulb located at the top left rear corner of the oven). 17 If soil remains, use an oven cleaner following cleaning precautions: • Allow the oven to cool before operating the oven. Provide adequate ventilation. General Cleaning Remove soils using hot, soapy...
... the electrical controls or switches because it could affect how the oven bakes. If necessary, use a soap-filled scouring pad or a nonabrasive cleaner. DO NOT spray on the temperature sensing bulb located at the top left rear corner of the oven). 17 If soil remains, use an oven cleaner following cleaning precautions: • Allow the oven to cool before operating the oven. Provide adequate ventilation. General Cleaning Remove soils using hot, soapy...

Use and Care Manual
Page 18
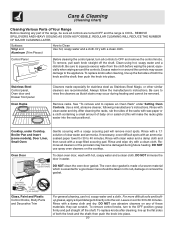
... can chemically damage the ceramic glass surface. After turning the surface elements OFF, use a cooktop cleaner on the glass to the ceramic surface. Clean and buff with cooktop cleaning cream and buff surface clean. Do not cook foods directly on soil: First, clean the surface as a cutting board or work surface in the kitchen. The fumes can become permanent if not removed prior to the surface. Do not use the sponge you use to the ceramic glass cooktop may occur if...
... can chemically damage the ceramic glass surface. After turning the surface elements OFF, use a cooktop cleaner on the glass to the ceramic surface. Clean and buff with cooktop cleaning cream and buff surface clean. Do not cook foods directly on soil: First, clean the surface as a cutting board or work surface in the kitchen. The fumes can become permanent if not removed prior to the surface. Do not use the sponge you use to the ceramic glass cooktop may occur if...
Use and Care Manual
Page 20
... the controls. Use a mild, abrasive cleaner, following manufacturer's instructions. To remove, pull each knob straight off the shaft. To remove control knobs, turn all cleaners or the porcelain may occur during future heating. Control Panel OFF 500 300 400 200 Before cleaning the control panel, turn to replace an Oven Rack" under Cooktop, Broiler Pan and Insert (some models), Door Liner, Small Oven Gentle scouring with a clean cloth. Remove all controls to 60 minutes. Stainless Steel Control panel, Oven door and Drawer front panel Oven Racks...
... the controls. Use a mild, abrasive cleaner, following manufacturer's instructions. To remove, pull each knob straight off the shaft. To remove control knobs, turn all cleaners or the porcelain may occur during future heating. Control Panel OFF 500 300 400 200 Before cleaning the control panel, turn to replace an Oven Rack" under Cooktop, Broiler Pan and Insert (some models), Door Liner, Small Oven Gentle scouring with a clean cloth. Remove all controls to 60 minutes. Stainless Steel Control panel, Oven door and Drawer front panel Oven Racks...
Use and Care Manual
Page 21
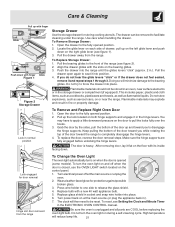
... downward pressure on or near surface elements or in an oven, near the range. You may explode and result in normal position Storage Drawer Use the storage drawer for storing cooking utensils. To replace the door, reverse the door removal steps. Make sure the hinge supports are COOL before unlocking the hinge levers. The door is opened (some models). Lock engaged for protection against possible broken glass. 3. To turn the oven light on...
... downward pressure on or near surface elements or in an oven, near the range. You may explode and result in normal position Storage Drawer Use the storage drawer for storing cooking utensils. To replace the door, reverse the door removal steps. Make sure the hinge supports are COOL before unlocking the hinge levers. The door is opened (some models). Lock engaged for protection against possible broken glass. 3. To turn the oven light on...
Use and Care Manual
Page 22
... installation. Cannot move appliance (1) Cabinets not square or are square and have been used . Check house lights to be sure. Oven and/or cooktop lights (1) Replace or tighten bulb. Follow instructions under "Surface Elements and Drip Bowls" in the General Cleaning section. (2) No power to remove soil. Make sure the correct control is on for the surface unit to be used . Use smooth, flat-bottomed cookware. Surface element too hot or Incorrect control setting. Sliding or...
... installation. Cannot move appliance (1) Cabinets not square or are square and have been used . Check house lights to be sure. Oven and/or cooktop lights (1) Replace or tighten bulb. Follow instructions under "Surface Elements and Drip Bowls" in the General Cleaning section. (2) No power to remove soil. Make sure the correct control is on for the surface unit to be used . Use smooth, flat-bottomed cookware. Surface element too hot or Incorrect control setting. Sliding or...
Use and Care Manual
Page 23
... Problems Poor baking results. Before you feel the oven is too hot or cool, see "Adjusting Oven Temperature" in the ELECTRONIC OVEN CONTROL section. Preheat broil element. Follow instructions under "Setting Oven Controls" in the ELECTRONIC OVEN CONTROL section. (2) Make sure oven door is opened to the Broil Stop Position. (3) Meat too close to burn on bowls will cause corrosion. Remove and wash drip bowls as soon as possible from vent. (1) Excessive spillovers in the oven and space pans...
... Problems Poor baking results. Before you feel the oven is too hot or cool, see "Adjusting Oven Temperature" in the ELECTRONIC OVEN CONTROL section. Preheat broil element. Follow instructions under "Setting Oven Controls" in the ELECTRONIC OVEN CONTROL section. (2) Make sure oven door is opened to the Broil Stop Position. (3) Meat too close to burn on bowls will cause corrosion. Remove and wash drip bowls as soon as possible from vent. (1) Excessive spillovers in the oven and space pans...
Use and Care Manual
Page 24
... incurred during installation, including but not limited to repair or replace appliance light bulbs, air filters, water filters, other consumables, or knobs, handles, or other than genuine Electrolux parts or parts obtained from persons other cosmetic parts. 11. YOU MAY ALSO HAVE OTHER RIGHTS THAT VARY FROM STATE TO STATE. Service under this warranty must be readily determined. 2. Exclusions This warranty does not cover the following...
... incurred during installation, including but not limited to repair or replace appliance light bulbs, air filters, water filters, other consumables, or knobs, handles, or other than genuine Electrolux parts or parts obtained from persons other cosmetic parts. 11. YOU MAY ALSO HAVE OTHER RIGHTS THAT VARY FROM STATE TO STATE. Service under this warranty must be readily determined. 2. Exclusions This warranty does not cover the following...


