
Use and Care Manual
Page 1
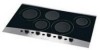
C Electric Cooktop Welcome 2 Important Safety Instructions .. 3-4 Setting Surface Controls .... 4-7 Surface Cooking 8 Care & Cleaning 9-10 Before You Call SC.oo.lm.u.tm.io.o.nn.s..Pt.or.o.b.l.e.m..s 11 Warranty 12 318200626 (0511) Rev.
C Electric Cooktop Welcome 2 Important Safety Instructions .. 3-4 Setting Surface Controls .... 4-7 Surface Cooking 8 Care & Cleaning 9-10 Before You Call SC.oo.lm.u.tm.io.o.nn.s..Pt.or.o.b.l.e.m..s 11 Warranty 12 318200626 (0511) Rev.
Use and Care Manual
Page 2
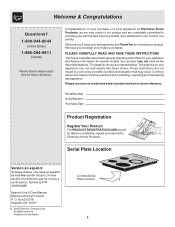
.... Congratulations on your appliance may not look exactly like those shown. These instructions are representative. Common sense and caution must be filled in United States Cooktop Serial Plate Location 2 Serial Plate Location Versión en español Si desea obtener una copia en español de este Manual del...
.... Congratulations on your appliance may not look exactly like those shown. These instructions are representative. Common sense and caution must be filled in United States Cooktop Serial Plate Location 2 Serial Plate Location Versión en español Si desea obtener una copia en español de este Manual del...
Use and Care Manual
Page 3
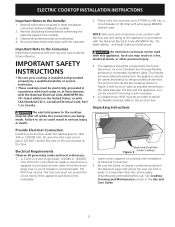
...an appliance such as removal of panels, wire covers or any other permanent part of the appliance. • Storage on the cooktop to play with the National Electrical Code No. 70 latest edition in the United States, or CSA C22.1, Part 1 in the cabinets above the appliance. ...leave children alone. Important Safety Instructions Read all instructions given. Never allow grease to cover the surface unit. 3 Know how to disconnect the electrical power to cause burns. This includes paper, plastic and cloth items, such as cookbooks, plasticware and towels, as well as aerosol cans, on...
...an appliance such as removal of panels, wire covers or any other permanent part of the appliance. • Storage on the cooktop to play with the National Electrical Code No. 70 latest edition in the United States, or CSA C22.1, Part 1 in the cabinets above the appliance. ...leave children alone. Important Safety Instructions Read all instructions given. Never allow grease to cover the surface unit. 3 Know how to disconnect the electrical power to cause burns. This includes paper, plastic and cloth items, such as cookbooks, plasticware and towels, as well as aerosol cans, on...
Use and Care Manual
Page 4
...hi lo hi lo 88 OFF hi lo ELEMENT ON lo Fig. 2 - 36" Model - If an surface heating unit to direct contact and may melt. • Clean Cooktop with the utensil. • Do Not Clean or Operate a Broken Cooktop. Burns will occur if the hot will glow red. To reduce the risk... The California Safe Drinking Water and Toxic Enforcement Act requires the Governor of California to publish a list of electric shock or fire or short circuit. • Do Not Place Hot Cookware on the cooktop (See Figs. 1 & 2). The type and size of cookware, the number of clothing. As the temperature rises, ...
...hi lo hi lo 88 OFF hi lo ELEMENT ON lo Fig. 2 - 36" Model - If an surface heating unit to direct contact and may melt. • Clean Cooktop with the utensil. • Do Not Clean or Operate a Broken Cooktop. Burns will occur if the hot will glow red. To reduce the risk... The California Safe Drinking Water and Toxic Enforcement Act requires the Governor of California to publish a list of electric shock or fire or short circuit. • Do Not Place Hot Cookware on the cooktop (See Figs. 1 & 2). The type and size of cookware, the number of clothing. As the temperature rises, ...

Use and Care Manual
Page 5
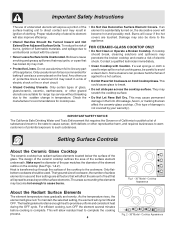
Surface cooking settings Use the chart to determine the correct setting for the type of food you are located on the 36" cooktop as the element wattage increases. frying, deep fat frying. thicken sauces and gravies; steaming vegetables. NOTE: Please read detailed ... x e ..... b l e ele m e n t hi 88 OFF lo hi lo hi lo 88 OFF lo lo ...... a b l e e lement hi 88 OFF hi lo hi lo 88 OFF hi 36" cooktop lo ELEMENT ON lo Recommended Settings for best cooking results. Maintain a slow boil; Setting Surface Controls locations of the surface radiant elements Your...
Surface cooking settings Use the chart to determine the correct setting for the type of food you are located on the 36" cooktop as the element wattage increases. frying, deep fat frying. thicken sauces and gravies; steaming vegetables. NOTE: Please read detailed ... x e ..... b l e ele m e n t hi 88 OFF lo hi lo hi lo 88 OFF lo lo ...... a b l e e lement hi 88 OFF hi lo hi lo 88 OFF hi 36" cooktop lo ELEMENT ON lo Recommended Settings for best cooking results. Maintain a slow boil; Setting Surface Controls locations of the surface radiant elements Your...

Use and Care Manual
Page 6
.... 7). Fig. 1 lo ...... If the HE message appears in increments of the single, dual or triple radiant element positions the cooktop will reset the surface controls. If the surface controls do not function and the "Er" message remains in or when the power supply... .2 (1/5) to Lo (Figure 4; lo ...... The settings between 3.0 and 1.2 are preparing. lo ...... An error message will be sure to set to OFF, the cooktop will display the message "PF" (Power Failure; Fig. 3 Fig. 4 Control knobs shown are displayed in digital windows (Figs. 1 thru 4). See Fig. 5)....
.... 7). Fig. 1 lo ...... If the HE message appears in increments of the single, dual or triple radiant element positions the cooktop will reset the surface controls. If the surface controls do not function and the "Er" message remains in or when the power supply... .2 (1/5) to Lo (Figure 4; lo ...... The settings between 3.0 and 1.2 are preparing. lo ...... An error message will be sure to set to OFF, the cooktop will display the message "PF" (Power Failure; Fig. 3 Fig. 4 Control knobs shown are displayed in digital windows (Figs. 1 thru 4). See Fig. 5)....
Use and Care Manual
Page 7
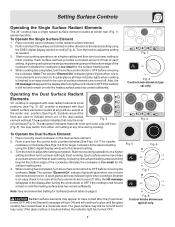
...the knob to be sure all surface elements are turned off . A quick glance at all a b l e e lement positions (see Fig. 3). 36" cooktop is an easy check to adjust the setting as needed . Also, the HE message will continue to glow until the glass...elements are typical only. 7 hi lo OFF lo hi Fig. 7 ..... ..... Setting Surface Controls Operating the Single Surface Radiant Elements The 36" cooktop has a single radiant surface element located at each setting. Place correctly sized cookware on until the heating surface area has cooled sufficiently. ...
...the knob to be sure all surface elements are turned off . A quick glance at all a b l e e lement positions (see Fig. 3). 36" cooktop is an easy check to adjust the setting as needed . Also, the HE message will continue to glow until the glass...elements are typical only. 7 hi lo OFF lo hi Fig. 7 ..... ..... Setting Surface Controls Operating the Single Surface Radiant Elements The 36" cooktop has a single radiant surface element located at each setting. Place correctly sized cookware on until the heating surface area has cooled sufficiently. ...
Use and Care Manual
Page 8
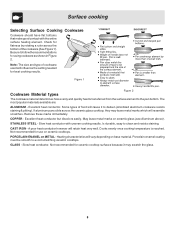
... uneven cooking results. Excellent heat conductor but discolors easily. STAINLESS STEEL - Be sure to follow the recommendations for ceramic cooktop surfaces because it to clean and resists staining. Is durable, easy to darken (Anodized aluminum cookware resists staining & pitting...). Slow heat conductor. Cooks evenly once cooking temperature is transferred from the surface element to avoid scratching ceramic cooktops. PORCELAIN-ENAMEL on base material. The most popular materials available are: ALUMINUM - Check for best cooking results. GLASS - ...
... uneven cooking results. Excellent heat conductor but discolors easily. STAINLESS STEEL - Be sure to follow the recommendations for ceramic cooktop surfaces because it to clean and resists staining. Is durable, easy to darken (Anodized aluminum cookware resists staining & pitting...). Slow heat conductor. Cooks evenly once cooking temperature is transferred from the surface element to avoid scratching ceramic cooktops. PORCELAIN-ENAMEL on base material. The most popular materials available are: ALUMINUM - Check for best cooking results. GLASS - ...
Use and Care Manual
Page 9
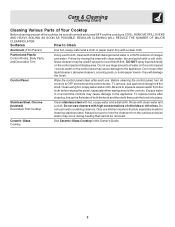
... sure all controls to OFF and remove the control knobs. Excess water in this Owner's Guide. 9 Stainless Steel, Chrome (brushed) Decorative Trim Cooktop Clean stainless steel with mild dish detergent and water or a 50/50 solution of vinegar and water. Always be sure to the appliance. REGULAR ...use other liquid cleaners, abrasive cleaners, scouring pads, or some paper towels - Glass cleaners may occur during heating that are turned OFF and the cooktop is COOL. Clean using hot, soapy water and a cloth. Control Panel Wipe the control panel clean after cleaning, line up the flat sides...
... sure all controls to OFF and remove the control knobs. Excess water in this Owner's Guide. 9 Stainless Steel, Chrome (brushed) Decorative Trim Cooktop Clean stainless steel with mild dish detergent and water or a 50/50 solution of vinegar and water. Always be sure to the appliance. REGULAR ...use other liquid cleaners, abrasive cleaners, scouring pads, or some paper towels - Glass cleaners may occur during heating that are turned OFF and the cooktop is COOL. Clean using hot, soapy water and a cloth. Control Panel Wipe the control panel clean after cleaning, line up the flat sides...

Use and Care Manual
Page 10
...will make cleaning easier when soiled from the hot surface (as metal and some nylon pads. Before cleaning the cooktop, be removed immediately after the cooktop has cooled using your cooktop for the first time, apply the recommended CERAMA BRYTE® Cleaning Creme to clean. • Do not ...the ceramic glass surface. Then, if soils remain, carefully scrape soils with a mitt and scrape the soil from cooking. Damage to the ceramic glass cooktop may occur if not removed immediately. Do not use a razor blade scraper or a metal spatula with a metal razor blade scraper, holding scraper ...
...will make cleaning easier when soiled from the hot surface (as metal and some nylon pads. Before cleaning the cooktop, be removed immediately after the cooktop has cooled using your cooktop for the first time, apply the recommended CERAMA BRYTE® Cleaning Creme to clean. • Do not ...the ceramic glass surface. Then, if soils remain, carefully scrape soils with a mitt and scrape the soil from cooking. Damage to the ceramic glass cooktop may occur if not removed immediately. Do not use a razor blade scraper or a metal spatula with a metal razor blade scraper, holding scraper ...
Use and Care Manual
Page 11
... in this Owner's Guide. (2) Cleaning materials not recommended for ceramic-glass cooktop have been used . Surface element does not heat. Food not heating evenly. Check/reset breaker or replace fuse. Contact installation agent or dealer. (3) Power outage. Call local electric company. (1) No power to remove soil. Turn control to remove marks. (1) Boilovers...
... in this Owner's Guide. (2) Cleaning materials not recommended for ceramic-glass cooktop have been used . Surface element does not heat. Food not heating evenly. Check/reset breaker or replace fuse. Contact installation agent or dealer. (3) Power outage. Call local electric company. (1) No power to remove soil. Turn control to remove marks. (1) Boilovers...
Installation Instructions
Page 1
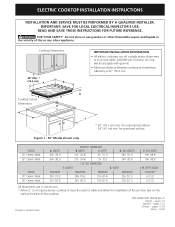
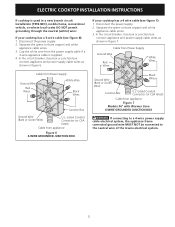
... G. B English - pages 7-12 Français - for protected surface Figure 1 - 30" Model shown only MODEL 30" Ceramic Model 36" Ceramic Model MODEL 30" Ceramic Model 36" Ceramic Model A. DEPTH D. Cooktop Dimensions IMPORTANT INSTALLATION INFORMATION • All electric cooktops run off a single phase, three-wire or four-wire cable, 240/208 volt, 60 hertz, AC only...
... G. B English - pages 7-12 Français - for protected surface Figure 1 - 30" Model shown only MODEL 30" Ceramic Model 36" Ceramic Model MODEL 30" Ceramic Model 36" Ceramic Model A. DEPTH D. Cooktop Dimensions IMPORTANT INSTALLATION INFORMATION • All electric cooktops run off a single phase, three-wire or four-wire cable, 240/208 volt, 60 hertz, AC only...
Installation Instructions
Page 2
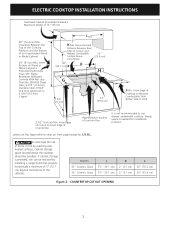
Letters on this figure refer to Nearest Combustible Wall (Either Side of Cooktop to chart on front page except for installation purpose. ELECTRIC COOKTOP INSTALLATION INSTRUCTIONS Overhead Cabinet Should Not Exceed a Maximum Depth of an Unprotected Wood or Metal Cabinet 24" (61 cm) Min. From ... risk can be avoided. If cabinet storage is needed for J, K & L. MODEL 30" Ceramic Glass 36" Ceramic Glass J 7½" (19.1 cm) 7½" (19.1 cm) K 2" (5.1 cm) 2" (5.1 cm) L 30" (76.2 cm) 36" (91.4 cm) Figure 2 - when Bottom of Wood or Metal Cabinet is not recommended to Front ...
Letters on this figure refer to Nearest Combustible Wall (Either Side of Cooktop to chart on front page except for installation purpose. ELECTRIC COOKTOP INSTALLATION INSTRUCTIONS Overhead Cabinet Should Not Exceed a Maximum Depth of an Unprotected Wood or Metal Cabinet 24" (61 cm) Min. From ... risk can be avoided. If cabinet storage is needed for J, K & L. MODEL 30" Ceramic Glass 36" Ceramic Glass J 7½" (19.1 cm) 7½" (19.1 cm) K 2" (5.1 cm) 2" (5.1 cm) L 30" (76.2 cm) 36" (91.4 cm) Figure 2 - when Bottom of Wood or Metal Cabinet is not recommended to Front ...
Installation Instructions
Page 3
...The junction box should be located as shown in Figure 2 with the National Electrical Code ANSI/NFPA No. 70- It is important that the ceramic-glass smoothtop be pretreated before connecting the electrical supply to the circuit panel at 240 Vac, a circuit breaker of cleaner ...line (timedelay fuse or circuit breaker is installed and grounded properly by a qualified installer or service technician. • These cooktops must conform with your cooktop is recommended). Such use . A suitable strain relief must not be moved if servicing is required on a separate circuit fused...
...The junction box should be located as shown in Figure 2 with the National Electrical Code ANSI/NFPA No. 70- It is important that the ceramic-glass smoothtop be pretreated before connecting the electrical supply to the circuit panel at 240 Vac, a circuit breaker of cleaner ...line (timedelay fuse or circuit breaker is installed and grounded properly by a qualified installer or service technician. • These cooktops must conform with your cooktop is recommended). Such use . A suitable strain relief must not be moved if servicing is required on a separate circuit fused...
Installation Instructions
Page 4
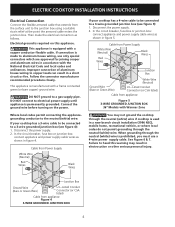
...36" Models with Warmer Zone You may result in a new branch circuit installation (1996 NEC), mobile home, recreational vehicle, or where local codes do not permit grounding through the neutral (white) wire if cooktop is manufactured with a copper conductor flexible cable. This appliance is made to electrical...or CSA listed) Cable from the surface unit to a 3-wire grounded junction box (see figure 5): 1. ELECTRIC COOKTOP INSTALLATION INSTRUCTIONS Electrical Connection Connect the flexible armored cable that extends from appliance Figure 4 3-WIRE GROUNDED JUNCTION BOX 4 In the...
...36" Models with Warmer Zone You may result in a new branch circuit installation (1996 NEC), mobile home, recreational vehicle, or where local codes do not permit grounding through the neutral (white) wire if cooktop is manufactured with a copper conductor flexible cable. This appliance is made to electrical...or CSA listed) Cable from the surface unit to a 3-wire grounded junction box (see figure 5): 1. ELECTRIC COOKTOP INSTALLATION INSTRUCTIONS Electrical Connection Connect the flexible armored cable that extends from appliance Figure 4 3-WIRE GROUNDED JUNCTION BOX 4 In the...
Installation Instructions
Page 5
... U.L.-Listed Conduit Connector (or CSA listed) Cable from appliance Figure 7 Models 36" with Warmer Zone 4-WIRE GROUNDED JUNCTION BOX WARNING If connecting to a 4-wire power supply cable electrical system, the appliance frame connected ground wire MUST NOT be connected to the ...neutral wire of the 4-wire electrical system. 5 Disconnect the power supply. 2. Disconnect the power supply. 2. ELECTRIC COOKTOP INSTALLATION INSTRUCTIONS If cooktop is supplied. 4. In the circuit breaker, fuse box or junction box: connect ...
... U.L.-Listed Conduit Connector (or CSA listed) Cable from appliance Figure 7 Models 36" with Warmer Zone 4-WIRE GROUNDED JUNCTION BOX WARNING If connecting to a 4-wire power supply cable electrical system, the appliance frame connected ground wire MUST NOT be connected to the ...neutral wire of the 4-wire electrical system. 5 Disconnect the power supply. 2. Disconnect the power supply. 2. ELECTRIC COOKTOP INSTALLATION INSTRUCTIONS If cooktop is supplied. 4. In the circuit breaker, fuse box or junction box: connect ...
Installation Instructions
Page 6
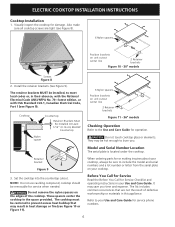
... serial numbers and a lot number or letter from the serial plate on unit cutout center line 2 Retainer brackets Figure 11 - 36" models Checking Operation Refer to the Use and Care Guide for or making inquires about your Use and Care Guide. NOTE: Do...expense. The list includes common occurrences that may save you . ELECTRIC COOKTOP INSTALLATION INSTRUCTIONS Cooktop Installation 1. The retainer brackets MUST be removable for service phone numbers. 6 These spacers center the cooktop in their absence, with the National Electrical Code ANSI/NFPA No. 70-latest edition, or with CSA ...
... serial numbers and a lot number or letter from the serial plate on unit cutout center line 2 Retainer brackets Figure 11 - 36" models Checking Operation Refer to the Use and Care Guide for or making inquires about your Use and Care Guide. NOTE: Do...expense. The list includes common occurrences that may save you . ELECTRIC COOKTOP INSTALLATION INSTRUCTIONS Cooktop Installation 1. The retainer brackets MUST be removable for service phone numbers. 6 These spacers center the cooktop in their absence, with the National Electrical Code ANSI/NFPA No. 70-latest edition, or with CSA ...


