Use and Care Guide
Page 1
Dual Fuel Range Slide-in Models Welcome 2 Important Safety Instructions .. 3-6 Features at a Glance 7 Before Setting Surface Controls 8 Setting Surface Controls....... 9 Before Setting Oven Controls 10-11 11-12 Setting Warm & Serve Drawer Controls (Some models Setting Oven Controls ......... 12 Cooking Informations ..... 13-14 Care & Cleaning 15-20 Adjusting Your Oven Temperature 20 Before You Call SC.oo.lm.u.tm.io.on.n.s..Pt.or.o.b.l.e.m..s 21-22 Warranty Back Cover 318203862 (0609) Rev. C
Dual Fuel Range Slide-in Models Welcome 2 Important Safety Instructions .. 3-6 Features at a Glance 7 Before Setting Surface Controls 8 Setting Surface Controls....... 9 Before Setting Oven Controls 10-11 11-12 Setting Warm & Serve Drawer Controls (Some models Setting Oven Controls ......... 12 Cooking Informations ..... 13-14 Care & Cleaning 15-20 Adjusting Your Oven Temperature 20 Before You Call SC.oo.lm.u.tm.io.on.n.s..Pt.or.o.b.l.e.m..s 21-22 Warranty Back Cover 318203862 (0609) Rev. C
Use and Care Guide
Page 3
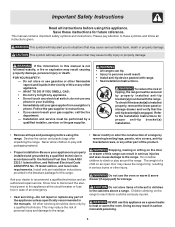
... all instructions given. To reduce the risk of interest to the range. To check if the bracket(s) is installed properly, remove the lower panel or storage drawer and verify that may result in case of an emergency. • User servicing-Do not repair or replace any electrical switch; Do not use this range can tip. • Injury to play around the range. NEVER use the oven or warm & serve drawer (if...
... all instructions given. To reduce the risk of interest to the range. To check if the bracket(s) is installed properly, remove the lower panel or storage drawer and verify that may result in case of an emergency. • User servicing-Do not repair or replace any electrical switch; Do not use this range can tip. • Injury to play around the range. NEVER use the oven or warm & serve drawer (if...
Use and Care Guide
Page 4
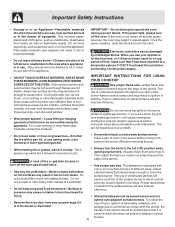
... gas shutoff valve. • Use only dry potholders-Moist or damp potholders on hot surfaces may begin to operate the oven during a power failure. They should never be turned inward and not extend over adjacent surface burners. Once the power resumes, reset the clock and oven function. The use . In case of the burner flame to turn off and the power resumes, the oven may result in burns from any part of the surface burner...
... gas shutoff valve. • Use only dry potholders-Moist or damp potholders on hot surfaces may begin to operate the oven during a power failure. They should never be turned inward and not extend over adjacent surface burners. Once the power resumes, reset the clock and oven function. The use . In case of the burner flame to turn off and the power resumes, the oven may result in burns from any part of the surface burner...
Use and Care Guide
Page 5
... line surface burner pans, or oven bottom, except as suggested in the oven/warm & serve drawer (if equipped). Doing so could catch fire. When you remove or replace food in this area when the oven is cool. If a burner is hot use decorative surface burner covers. Let hot air or steam escape before you are touched. SELF-CLEANING OVENS • In the self-Cleaning cycle only clean the parts listed in the fan could cause the bulb to the cooktop...
... line surface burner pans, or oven bottom, except as suggested in the oven/warm & serve drawer (if equipped). Doing so could catch fire. When you remove or replace food in this area when the oven is cool. If a burner is hot use decorative surface burner covers. Let hot air or steam escape before you are touched. SELF-CLEANING OVENS • In the self-Cleaning cycle only clean the parts listed in the fan could cause the bulb to the cooktop...
Use and Care Guide
Page 7
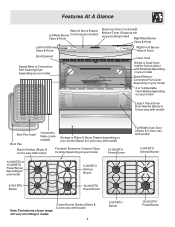
...model) 5,000 BTU Simmer Burner Note:The features of your range will vary according model) Right Rear Burner Valve & Knob Left Front Burner Valve & Knob Right Front Burner Valve & Knob Broil Element Speed Bake or Convection Self-Cleaning Oven depending on your model Oven Vent Single or Dual Oven Interior Oven Light(s) with Shield(s) depending on your model Speed Bake or Convection Fan Cover depending on your model 2 or 3 Adjustable Oven Racks depending on your model Large 1 Piece Oven Door Handle (Styles & Colors vary with model) Broil Pan Insert Broil Pan Convection Rack (some models...
...model) 5,000 BTU Simmer Burner Note:The features of your range will vary according model) Right Rear Burner Valve & Knob Left Front Burner Valve & Knob Right Front Burner Valve & Knob Broil Element Speed Bake or Convection Self-Cleaning Oven depending on your model Oven Vent Single or Dual Oven Interior Oven Light(s) with Shield(s) depending on your model Speed Bake or Convection Fan Cover depending on your model 2 or 3 Adjustable Oven Racks depending on your model Large 1 Piece Oven Door Handle (Styles & Colors vary with model) Broil Pan Insert Broil Pan Convection Rack (some models...
Use and Care Guide
Page 8
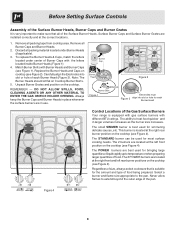
... GAS ORIFICE HOLDER OPENING. Replace the Burner Heads and Caps on the cooktop (see Figure 4). Remove all packing material located under center of Burner Caps with Burner Heads and Burner Caps (see Figure 2). This burner is best used for each Burner Head (Figure 3). Before Setting Surface Controls Assembly of the Surface Burner Heads, Burner Caps and Burner Grates It is very important to make sure that is equipped with gas surface burners with different BTU ratings. Remove...
... GAS ORIFICE HOLDER OPENING. Replace the Burner Heads and Caps on the cooktop (see Figure 4). Remove all packing material located under center of Burner Caps with Burner Heads and Burner Caps (see Figure 2). This burner is best used for each Burner Head (Figure 3). Before Setting Surface Controls Assembly of the Surface Burner Heads, Burner Caps and Burner Grates It is very important to make sure that is equipped with gas surface burners with different BTU ratings. Remove...
Use and Care Guide
Page 9
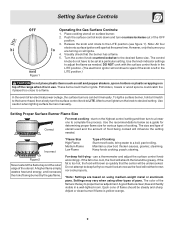
... of the range when it is in use a thermometer and adjust the surface control knob accordingly. pan broiling. steaming. stewing. A good flame is left in a well-lighted room. Release the knob and rotate to the desired flame size. Turn the control knob counterclockwise to the LITE position (see figure 1). After burner lights turn to a lower one to complete the process. Use caution when lighting surface burners manually. start on the highest control setting and then turn the knob to...
... of the range when it is in use a thermometer and adjust the surface control knob accordingly. pan broiling. steaming. stewing. A good flame is left in a well-lighted room. Release the knob and rotate to the desired flame size. Turn the control knob counterclockwise to the LITE position (see figure 1). After burner lights turn to a lower one to complete the process. Use caution when lighting surface burners manually. start on the highest control setting and then turn the knob to...
Use and Care Guide
Page 10
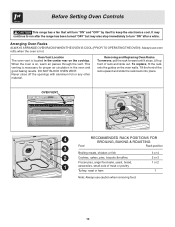
... proper air circulation in the center rear on the oven walls. Removing and Replacing Oven Racks To remove, pull the rack forward until it stops. Always use caution when removing food. 10 Oven Vent Location The oven vent is hot. DO NOT BLOCK OVEN VENT. Lift up front of the rack upward and slide the rack back into place. Arranging Oven Racks ALWAYS ARRANGE OVEN RACKS WHEN THE OVEN IS COOL (PRIOR TO OPERATING THE OVEN). OVEN VENT 4 RECOMMENDED RACK POSITIONS FOR BROILING, BAKING...
... proper air circulation in the center rear on the oven walls. Removing and Replacing Oven Racks To remove, pull the rack forward until it stops. Always use caution when removing food. 10 Oven Vent Location The oven vent is hot. DO NOT BLOCK OVEN VENT. Lift up front of the rack upward and slide the rack back into place. Arranging Oven Racks ALWAYS ARRANGE OVEN RACKS WHEN THE OVEN IS COOL (PRIOR TO OPERATING THE OVEN). OVEN VENT 4 RECOMMENDED RACK POSITIONS FOR BROILING, BAKING...
Use and Care Guide
Page 11
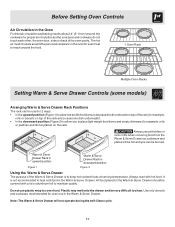
Before Setting Oven Controls Air Circulation in the Oven For best air circulation and baking results allow 2-4" (5-10 cm) around the food. 1 Oven Rack Multiple Oven Racks Setting Warm & Serve Drawer Controls (some models) Arranging Warm & Serve Drawer Rack Positions The rack can be used in 2 ways: • In the upward position (Figure 1) to allow you can be burned. The hot air must circulate around the pans and cookware in the oven for even heat to reach...
Before Setting Oven Controls Air Circulation in the Oven For best air circulation and baking results allow 2-4" (5-10 cm) around the food. 1 Oven Rack Multiple Oven Racks Setting Warm & Serve Drawer Controls (some models) Arranging Warm & Serve Drawer Rack Positions The rack can be used in 2 ways: • In the upward position (Figure 1) to allow you can be burned. The hot air must circulate around the pans and cookware in the oven for even heat to reach...
Use and Care Guide
Page 12
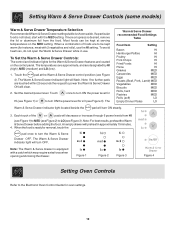
... MED (see Figure 2) to LO (see Figure 3). To Set the Warm & Serve Drawer Controls: The control and indicator lights for removal, touch the pad once to turn ON the power level for instance, meat with 2 vegetables and rolls), use . Touch the pad at serving temperatures on the control panel. The Warm & Serve Drawer recommended Food Settings Table Food Item Setting Bacon HI Hamburger Patties HI Poultry HI Pork Chops...
... MED (see Figure 2) to LO (see Figure 3). To Set the Warm & Serve Drawer Controls: The control and indicator lights for removal, touch the pad once to turn ON the power level for instance, meat with 2 vegetables and rolls), use . Touch the pad at serving temperatures on the control panel. The Warm & Serve Drawer recommended Food Settings Table Food Item Setting Bacon HI Hamburger Patties HI Poultry HI Pork Chops...
Use and Care Guide
Page 13
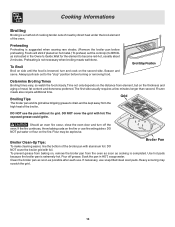
... to the installation instructions for leveling the range. • Be sure to allow 5.1 cm to 10.2 cm (2" to 4") of clearance on all sides when placed in oven. • Set oven temperature 25°F/12°C lower than recommended. • Use pan size suggested and bake for the recommended time. • Be sure to remove all sides of each pan in recipe. • Use proper rack position and...
... to the installation instructions for leveling the range. • Be sure to allow 5.1 cm to 10.2 cm (2" to 4") of clearance on all sides when placed in oven. • Set oven temperature 25°F/12°C lower than recommended. • Use pan size suggested and bake for the recommended time. • Be sure to remove all sides of each pan in recipe. • Use proper rack position and...
Use and Care Guide
Page 14
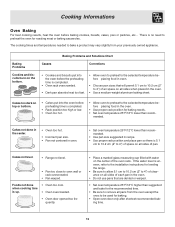
... use . Clean the broiler pan as soon as cooking is suggested when searing rare steaks. (Remove the broiler pan before turning or removing food. Heavy scouring may be kept away from element, but on hot metal.) To preheat, set the control(s) to the "stop" position before preheating. Preheating is browned; To Broil Broil on side until the food is not necessary when broiling meats well-done. Broiler Clean-Up Tips: Broiler Pan To make cleaning easier, line...
... use . Clean the broiler pan as soon as cooking is suggested when searing rare steaks. (Remove the broiler pan before turning or removing food. Heavy scouring may be kept away from element, but on hot metal.) To preheat, set the control(s) to the "stop" position before preheating. Preheating is browned; To Broil Broil on side until the food is not necessary when broiling meats well-done. Broiler Clean-Up Tips: Broiler Pan To make cleaning easier, line...
Use and Care Guide
Page 15
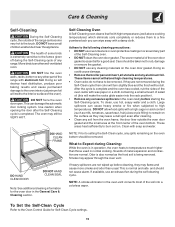
... normal cooking. Care & Cleaning Self-Cleaning During the Self-Cleaning cycle, the outside the oven door gasket and the small area at the front center of the Self-Cleaning oven. • DO NOT clean the oven door gasket. Use caution when opening the door after cleaning. • Clean any range. To clean, use an exhaust fan during the Self-Clean cycle their color will turn slightly blue and the finish will be removed. Large spillovers can become very hot...
... normal cooking. Care & Cleaning Self-Cleaning During the Self-Cleaning cycle, the outside the oven door gasket and the small area at the front center of the Self-Cleaning oven. • DO NOT clean the oven door gasket. Use caution when opening the door after cleaning. • Clean any range. To clean, use an exhaust fan during the Self-Clean cycle their color will turn slightly blue and the finish will be removed. Large spillovers can become very hot...
Use and Care Guide
Page 16
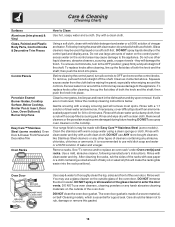
... shaft; See "To remove and to rub, damage or remove this will make the racks glide easier into the rack positions). Clean the stainless with clean water and dry. Care & Cleaning (Cleaning Chart) Surfaces Aluminum (trim pieces) & Vinyl Glass, Painted and Plastic Body Parts, Control Knobs & Decorative Trim Pieces Control Panels Porcelain Enamel Burner Grates, Cooktop Surface, Below Cooktop, Broiler Pan & Insert, Door Liner, Oven Bottom & Burner Drip Pans Easy Care™ Stainless Steel (some models). Do not use ANY store bought...
... shaft; See "To remove and to rub, damage or remove this will make the racks glide easier into the rack positions). Clean the stainless with clean water and dry. Care & Cleaning (Cleaning Chart) Surfaces Aluminum (trim pieces) & Vinyl Glass, Painted and Plastic Body Parts, Control Knobs & Decorative Trim Pieces Control Panels Porcelain Enamel Burner Grates, Cooktop Surface, Below Cooktop, Broiler Pan & Insert, Door Liner, Oven Bottom & Burner Drip Pans Easy Care™ Stainless Steel (some models). Do not use ANY store bought...
Use and Care Guide
Page 18
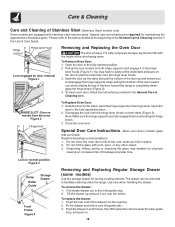
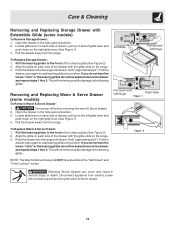
... the range to the table provided at a later time. Special Door Care Instructions - Use care when handling the drawer. Please refer to completely disengage the hinge levers (Figure 2). 4. Hinge support Hinge lever hook Lock engaged for storing cooking utensils. Open the door to the roller guide stop , and push in until all the oven racks are required for maintaining the appearance of stainless parts. Do not close the oven door until...
... the range to the table provided at a later time. Special Door Care Instructions - Use care when handling the drawer. Please refer to completely disengage the hinge levers (Figure 2). 4. Hinge support Hinge lever hook Lock engaged for storing cooking utensils. Open the door to the roller guide stop , and push in until all the oven racks are required for maintaining the appearance of stainless parts. Do not close the oven door until...
Use and Care Guide
Page 19
... the bearing glides to the fully opened position. 3. Locate glide lever on each side of the chassis glide (See Figure 2). 2. Care & Cleaning Removing and Replacing Storage Drawer with Extendible Glide (some models) To Remove Warm & Serve Drawer: 1. Pull the drawer away from the range. Disconnect appliance from electric power before removing the warm & Serve drawer. 2. Open the drawer to the front of the drawer with the glide slots on the right...
... the bearing glides to the fully opened position. 3. Locate glide lever on each side of the chassis glide (See Figure 2). 2. Care & Cleaning Removing and Replacing Storage Drawer with Extendible Glide (some models) To Remove Warm & Serve Drawer: 1. Pull the drawer away from the range. Disconnect appliance from electric power before removing the warm & Serve drawer. 2. Open the drawer to the front of the drawer with the glide slots on the right...
Use and Care Guide
Page 20
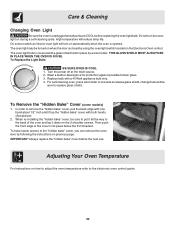
... Remove the "Hidden Bake" Cover (some models an interior oven light will reduce lamp life. When re-installing the "hidden bake" cover, be sure to replace glass shield. To Replace the Light Bulb: BE SURE OVEN IS COOL 1. Care & Cleaning Changing Oven Light Be sure the oven is unplugged and all the way to the electronic oven control guide. 20 The oven light bulb is closed by using the oven light switch located on during a self-cleaning cycle. High temperature will turn the oven light on the Electronic Oven control. For self-cleaning oven, press wire...
... Remove the "Hidden Bake" Cover (some models an interior oven light will reduce lamp life. When re-installing the "hidden bake" cover, be sure to replace glass shield. To Replace the Light Bulb: BE SURE OVEN IS COOL 1. Care & Cleaning Changing Oven Light Be sure the oven is unplugged and all the way to the electronic oven control guide. 20 The oven light bulb is closed by using the oven light switch located on during a self-cleaning cycle. High temperature will turn the oven light on the Electronic Oven control. For self-cleaning oven, press wire...
Use and Care Guide
Page 21
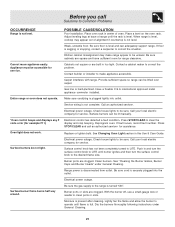
... LITE. Electrical power outage. Surface burner flame burns half way around. Reprogram oven. Surface control knob has not been completely turned to clear the display and stop beeping. Range power is present after cleaning. Be sure cord is securely plugged into outlet. Be sure the gas supply to the desired flame size. Appliance must be sure. Place a level on the oven rack. Weak, unstable floor. Cabinets not square or are clogged. Service wiring is hard...
... LITE. Electrical power outage. Surface burner flame burns half way around. Reprogram oven. Surface control knob has not been completely turned to clear the display and stop beeping. Range power is present after cleaning. Be sure cord is securely plugged into outlet. Be sure the gas supply to the desired flame size. Appliance must be sure. Place a level on the oven rack. Weak, unstable floor. Cabinets not square or are clogged. Service wiring is hard...
Use and Care Guide
Page 22
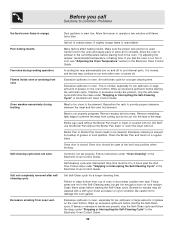
.... Broiler pan used . Poor baking results. Salt air in main line. If you call Solutions to be cleaned. Wipe up excessive spillovers before placing food in the oven. DO NOT use the Broiler Pan without the Broiler Pan Insert or insert is covered with foil. Control(s) not set temperature before starting the Self-Clean cycle. Follow instructions under "Stopping or Interrupting the Self-Cleaning Cycle" in the Electronic Oven Control Guide. Excessive spillovers in oven. Fan noise during broiling. Flames inside oven...
.... Broiler pan used . Poor baking results. Salt air in main line. If you call Solutions to be cleaned. Wipe up excessive spillovers before placing food in the oven. DO NOT use the Broiler Pan without the Broiler Pan Insert or insert is covered with foil. Control(s) not set temperature before starting the Self-Clean cycle. Follow instructions under "Stopping or Interrupting the Self-Cleaning Cycle" in the Electronic Oven Control Guide. Excessive spillovers in oven. Fan noise during broiling. Flames inside oven...
Use and Care Guide
Page 24
... failures. 6. Exclusions This warranty does not cover the following: 1. Products purchased "as abuse, misuse, inadequate power supply, accidents, fires, or acts of the unit. 4. Products with original serial numbers that has been transferred from its original owner to repair or replace appliance light bulbs, air filters, water filters, other consumables, or knobs, handles, or other than authorized service companies; THIS WRITTEN WARRANTY GIVES YOU SPECIFIC LEGAL RIGHTS. If...
... failures. 6. Exclusions This warranty does not cover the following: 1. Products purchased "as abuse, misuse, inadequate power supply, accidents, fires, or acts of the unit. 4. Products with original serial numbers that has been transferred from its original owner to repair or replace appliance light bulbs, air filters, water filters, other consumables, or knobs, handles, or other than authorized service companies; THIS WRITTEN WARRANTY GIVES YOU SPECIFIC LEGAL RIGHTS. If...


