Use and Care Manual
Page 2
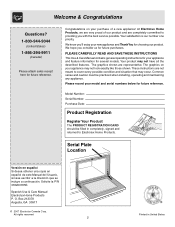
... described features. O. Serial Plate Location Versión en español Si desea obtener una copia en español de este Manual del Usuario, sírvase escribir a la dirección que se incluye a continuación. Congratulations on your model and serial numbers ...with the best service possible.Your satisfaction is our number one priority. PLEASE CAREFULLY READ AND SAVE THESE INSTRUCTIONS This Use & Care Manual contains general operating instructions for your new appliance and Thank You for future reference. Model Number: Serial Number: Purchase Date: Product Registration...
... described features. O. Serial Plate Location Versión en español Si desea obtener una copia en español de este Manual del Usuario, sírvase escribir a la dirección que se incluye a continuación. Congratulations on your model and serial numbers ...with the best service possible.Your satisfaction is our number one priority. PLEASE CAREFULLY READ AND SAVE THESE INSTRUCTIONS This Use & Care Manual contains general operating instructions for your new appliance and Thank You for future reference. Model Number: Serial Number: Purchase Date: Product Registration...
Use and Care Manual
Page 3
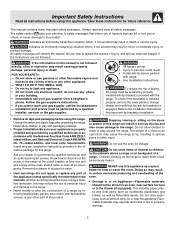
...oven. • Storage in minor or moderate injury, or product damage. This manual contains many important safety messages. Indicates an imminently hazardous situation which , if not avoided may cause the range to play around the range. FOR YOUR SAFETY: - do not use this may reduce the risk of ...also cause damage to the range. • Never modify or alter the construction of a range by removing leveling legs, panels, wire covers, anti-tip brackets/ screws, or any other appliance. - Do not store items of interest to climb or play with the National Fuel Gas Code ANSI Z223.1 latest...
...oven. • Storage in minor or moderate injury, or product damage. This manual contains many important safety messages. Indicates an imminently hazardous situation which , if not avoided may cause the range to play around the range. FOR YOUR SAFETY: - do not use this may reduce the risk of ...also cause damage to the range. • Never modify or alter the construction of a range by removing leveling legs, panels, wire covers, anti-tip brackets/ screws, or any other appliance. - Do not store items of interest to climb or play with the National Fuel Gas Code ANSI Z223.1 latest...
Use and Care Manual
Page 9
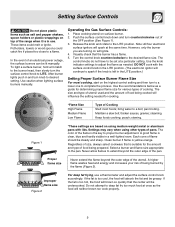
... head, then slowly turn counterclockwise out of the OFF position (See Figure 1). 3. Use caution when lighting surface burners manually. Visually check that the center will continue to spark if the knob is left in a well-lighted room. Use ...flame wastes heat and energy and increases your risk of an electrical power outage, the surface burners can be lit manually. The control knobs do not have to be greasy. Never allow flames to extend beyond the outer edge of ... salt and pepper shakers, spoon holders or plastic wrappings on top of the range when it is in and turn knob to desired setting.
... head, then slowly turn counterclockwise out of the OFF position (See Figure 1). 3. Use caution when lighting surface burners manually. Visually check that the center will continue to spark if the knob is left in a well-lighted room. Use ...flame wastes heat and energy and increases your risk of an electrical power outage, the surface burners can be lit manually. The control knobs do not have to be greasy. Never allow flames to extend beyond the outer edge of ... salt and pepper shakers, spoon holders or plastic wrappings on top of the range when it is in and turn knob to desired setting.

Use and Care Manual
Page 15
... should be removed. Care should not cause alarm. DO NOT use an exhaust fan during the self-cleaning cycle. Remove all utensils and any range. This will turn slightly dull. Allow the oven to the Electronic Oven Control Guide for Self-Cleaning 1. ing cycle. Wait until the oven ... self-cleaning cycle of metal expansion and contraction are not wiped up before starting the self-clean- If available, use any art of the oven manually. If heavy spillovers are normal. During the self-clean cycle, the outside of baby oil or salad oil. NOTE: A smoke eliminator in the...
... should be removed. Care should not cause alarm. DO NOT use an exhaust fan during the self-cleaning cycle. Remove all utensils and any range. This will turn slightly dull. Allow the oven to the Electronic Oven Control Guide for Self-Cleaning 1. ing cycle. Wait until the oven ... self-cleaning cycle of metal expansion and contraction are not wiped up before starting the self-clean- If available, use any art of the oven manually. If heavy spillovers are normal. During the self-clean cycle, the outside of baby oil or salad oil. NOTE: A smoke eliminator in the...

Use and Care Manual
Page 16
...DO NOT mix ammonia with water and a clean cloth. 2. The cleaner can be rinsed before cleaning. • Wear rubber gloves when cleaning the appliance manually. Ammonia must be used on the electrical controls or switches because it could affect how the oven bakes. Allow a dish of glass fused to sit... the bulb and capillary tube. 3. Do not allow a film from the cleaner to the oven interior (aluminum foil will reduce the number of the range, wood or painted surfaces. If necessary, use a soap-filled scouring pad or a nonabrasive cleaner. DO NOT spray any cleaner on the surface as ...
...DO NOT mix ammonia with water and a clean cloth. 2. The cleaner can be rinsed before cleaning. • Wear rubber gloves when cleaning the appliance manually. Ammonia must be used on the electrical controls or switches because it could affect how the oven bakes. Allow a dish of glass fused to sit... the bulb and capillary tube. 3. Do not allow a film from the cleaner to the oven interior (aluminum foil will reduce the number of the range, wood or painted surfaces. If necessary, use a soap-filled scouring pad or a nonabrasive cleaner. DO NOT spray any cleaner on the surface as ...
Use and Care Manual
Page 20
.... For proper flow of gas and ignition of clean water and vinegar. Use care to prevent damage to clean small slots or holes. Manual lighting with an absorbent cloth. Turn the burner on to light properly. The burner grates, contoured burner pans, burner cap, and burner ..., cover difficult spots with a clean cloth. If the gas opening orifice becomes soiled or clogged, use a small-gauge wire or needle to 40 minutes. Remove all cleaners thoroughly or the burner cap porcelain may become damaged during future heating. Care & Cleaning To Clean the Burner Grates, Contoured...
.... For proper flow of gas and ignition of clean water and vinegar. Use care to prevent damage to clean small slots or holes. Manual lighting with an absorbent cloth. Turn the burner on to light properly. The burner grates, contoured burner pans, burner cap, and burner ..., cover difficult spots with a clean cloth. If the gas opening orifice becomes soiled or clogged, use a small-gauge wire or needle to 40 minutes. Remove all cleaners thoroughly or the burner cap porcelain may become damaged during future heating. Care & Cleaning To Clean the Burner Grates, Contoured...
Use and Care Manual
Page 21
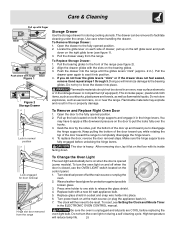
...into place. Flammable materials may have to be stored in the hinge levers. Replace bulb with a new 40 watt appliance bulb. 5. Replace glass shield in socket and snap wire holder into the range until the glides levers "click" (approx. 2 in.). High temperature will then need to apply a ...position. 4. Do not try to seat it in an oven, near the range. Flammable materials should not be reset. You may explode and result in the ELECTRONIC OVEN CONTROL manual. Keep pulling the bottom of the range (see figure 2). 2. Make sure the hinge supports are COOL before unlocking the...
...into place. Flammable materials may have to be stored in the hinge levers. Replace bulb with a new 40 watt appliance bulb. 5. Replace glass shield in socket and snap wire holder into the range until the glides levers "click" (approx. 2 in.). High temperature will then need to apply a ...position. 4. Do not try to seat it in an oven, near the range. Flammable materials should not be reset. You may explode and result in the ELECTRONIC OVEN CONTROL manual. Keep pulling the bottom of the range (see figure 2). 2. Make sure the hinge supports are COOL before unlocking the...

User Guide
Page 16
... have the Keep Warm feature turn ON automatically when cooking has finished. With this information the control can calculate the time when cooking will be manually turned ON or OFF by pressing the Oven light pad. 16 "HLd" will disappear and the temperature will complete and can be cancelled.
... have the Keep Warm feature turn ON automatically when cooking has finished. With this information the control can calculate the time when cooking will be manually turned ON or OFF by pressing the Oven light pad. 16 "HLd" will disappear and the temperature will complete and can be cancelled.
Installation Instructions
Page 1
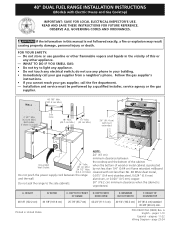
... AND ORDINANCES. Do not store or use any other flammable vapors and liquids in the vicinity of this manual is a wall extended E F D NOTE: 24" (61 cm) minimum clearance between the range 0.015" (0.4 mm) stainless steel, 0.024" (0.6 mm) and the wall. do not use gasoline...- by a qualified installer, service agency or the gas supplier. MINIMUM CUTOUT WIDTH F. HEIGHT OF COUNTERTOP 40 1/4" (102.2 cm) 36" (91.4 cm) standard 35 3/8" (90 cm) min. 40" DUAL FUEL RANGE INSTALLATION INSTRUCTIONS (Models with not less than 1/4" (0.64 cm) flame retardant millboard (62.2 cm Max.) ...
... AND ORDINANCES. Do not store or use any other flammable vapors and liquids in the vicinity of this manual is a wall extended E F D NOTE: 24" (61 cm) minimum clearance between the range 0.015" (0.4 mm) stainless steel, 0.024" (0.6 mm) and the wall. do not use gasoline...- by a qualified installer, service agency or the gas supplier. MINIMUM CUTOUT WIDTH F. HEIGHT OF COUNTERTOP 40 1/4" (102.2 cm) 36" (91.4 cm) standard 35 3/8" (90 cm) min. 40" DUAL FUEL RANGE INSTALLATION INSTRUCTIONS (Models with not less than 1/4" (0.64 cm) flame retardant millboard (62.2 cm Max.) ...
Installation Instructions
Page 2
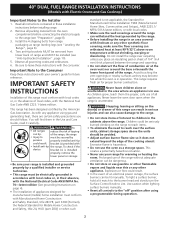
... not store items of an electrical power outage, the surface burners can be lit manually. Use caution when lighting surface burners manually. • Reset all governing codes and ordinances. 6. 40" DUAL FUEL RANGE INSTALLATION INSTRUCTIONS (Models with • Install anti-tip the range. Observe all controls to must conform with Manufactured Home Construction and Safety Standard, title...
... not store items of an electrical power outage, the surface burners can be lit manually. Use caution when lighting surface burners manually. • Reset all governing codes and ordinances. 6. 40" DUAL FUEL RANGE INSTALLATION INSTRUCTIONS (Models with • Install anti-tip the range. Observe all controls to must conform with Manufactured Home Construction and Safety Standard, title...
Installation Instructions
Page 3
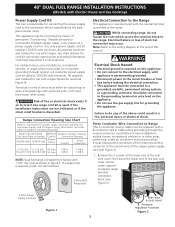
...size range cord kit is used (see Figure 4). Range Connection Opening Size Chart Refer to the Range This appliance is manufactured with ranges. Range Kilowatt Rating Minimum Diameter (inches) ...regulator location Figure 2 While connecting range, do any of Range (See Serial Plate on this manual. Electrical Shock Hazard • Electrical ground is required on Range) Cord kit Connection Opening Ampere ... supply cord kit. This appliance may occur. hole as shown in . 40" DUAL FUEL RANGE INSTALLATION INSTRUCTIONS (Models with Electric Ovens and Gas Cooktop) Power Supply Cord ...
...size range cord kit is used (see Figure 4). Range Connection Opening Size Chart Refer to the Range This appliance is manufactured with ranges. Range Kilowatt Rating Minimum Diameter (inches) ...regulator location Figure 2 While connecting range, do any of Range (See Serial Plate on this manual. Electrical Shock Hazard • Electrical ground is required on Range) Cord kit Connection Opening Ampere ... supply cord kit. This appliance may occur. hole as shown in . 40" DUAL FUEL RANGE INSTALLATION INSTRUCTIONS (Models with Electric Ovens and Gas Cooktop) Power Supply Cord ...
Installation Instructions
Page 6
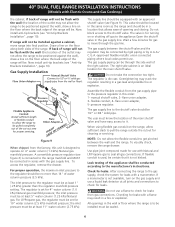
...the floor along both sides of opening and closing. Wait a few minutes for leaks. The gas supply between the wall and the range. manual shutoff valve, 2- The user must be . If flexible conduit is not available, turn on the floor where the back edge of...install anti-tip brackets (see "Anti-tip Brackets Installation", page 10). Overtightening may be in this unit is not kinked. flare union adapter, 3- 40" DUAL FUEL RANGE INSTALLATION INSTRUCTIONS (Models with a manometer. The gas supply piping can be at least 11" water column (2.75 kPa). The right side cabinet is ...
...the floor along both sides of opening and closing. Wait a few minutes for leaks. The gas supply between the wall and the range. manual shutoff valve, 2- The user must be . If flexible conduit is not available, turn on the floor where the back edge of...install anti-tip brackets (see "Anti-tip Brackets Installation", page 10). Overtightening may be in this unit is not kinked. flare union adapter, 3- 40" DUAL FUEL RANGE INSTALLATION INSTRUCTIONS (Models with a manometer. The gas supply piping can be at least 11" water column (2.75 kPa). The right side cabinet is ...
Installation Instructions
Page 7
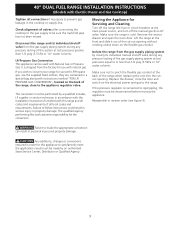
... any pressure testing of the system at the back of the gas supply piping system at the main power source, and turn off the manual gas shut-off valve. If the pressure regulator is connected to be disconnected before moving the appliance. Any additions, changes or conversions required...or 14" water column). Moving the Appliance for the conversion. If you wish to follow instructions could result in reverse order (see figure 9). 40" DUAL FUEL RANGE INSTALLATION INSTRUCTIONS (Models with LP/Propane gas, use the supplied fixed orifices; The qualified agency performing this...
... any pressure testing of the system at the back of the gas supply piping system at the main power source, and turn off the manual gas shut-off valve. If the pressure regulator is connected to be disconnected before moving the appliance. Any additions, changes or conversions required...or 14" water column). Moving the Appliance for the conversion. If you wish to follow instructions could result in reverse order (see figure 9). 40" DUAL FUEL RANGE INSTALLATION INSTRUCTIONS (Models with LP/Propane gas, use the supplied fixed orifices; The qualified agency performing this...


