Use and Care Manual
Page 3
... for proper anti-tip bracket(s) installation. • Remove all instructions before using this range can tip. • Injury to access the valve. • User servicing-Do not repair or replace any other servicing should not be seriously injured. All safety messages will identify the hazard, tell you how to the range at the circuit breaker or fuse box and gas supply at the main shutoff valve in this or any electrical switch; To...
... for proper anti-tip bracket(s) installation. • Remove all instructions before using this range can tip. • Injury to access the valve. • User servicing-Do not repair or replace any other servicing should not be seriously injured. All safety messages will identify the hazard, tell you how to the range at the circuit breaker or fuse box and gas supply at the main shutoff valve in this or any electrical switch; To...
Use and Care Manual
Page 4
... surface burners and oven heating elements may result in ignition of sealed gas burners. Do not let clothing or other use a towel or other part of different sizes. Do not use of protective liners or aluminum foil may be done to the sudden change in burns from the burner and cause combustion problems. FOR GLASS COOKTOPS ONLY • Do not clean or operate a broken cooktop-If cooktop should be hazardous to direct...
... surface burners and oven heating elements may result in ignition of sealed gas burners. Do not let clothing or other use a towel or other part of different sizes. Do not use of protective liners or aluminum foil may be done to the sudden change in burns from the burner and cause combustion problems. FOR GLASS COOKTOPS ONLY • Do not clean or operate a broken cooktop-If cooktop should be hazardous to direct...
Use and Care Manual
Page 5
.... • Remove oven racks. The kit contains installation instructions which must be kept clean. Do not let potholders contact the hot heating elements in desired location while ovens are flaming food under the hood, turn off during a self-cleaning cycle. Care should be used to wipe spills on a hot cooking area, be read before you are cool. Each vent has its grid. Doing so blocks air flow through the oven and may trap heat, causing...
.... • Remove oven racks. The kit contains installation instructions which must be kept clean. Do not let potholders contact the hot heating elements in desired location while ovens are flaming food under the hood, turn off during a self-cleaning cycle. Care should be used to wipe spills on a hot cooking area, be read before you are cool. Each vent has its grid. Doing so blocks air flow through the oven and may trap heat, causing...
Use and Care Manual
Page 9
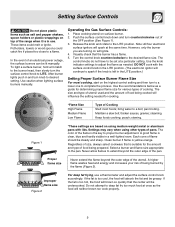
... electrical power outage, the surface burners can be undercooked. Note: All four electronic surface ignitors will neither brown nor cook properly. 9 Use the recommendations below as a guide for determining proper flame size for cooking. *Flame Size High Flame Medium Flame Low Flame Type of Cooking Start most cooking, start on the highest control setting and then turn knob to adjust the flame as the food will spark at a particular setting. pan broiling. poach; Settings may vary when using medium-weight metal or aluminum pans...
... electrical power outage, the surface burners can be undercooked. Note: All four electronic surface ignitors will neither brown nor cook properly. 9 Use the recommendations below as a guide for determining proper flame size for cooking. *Flame Size High Flame Medium Flame Low Flame Type of Cooking Start most cooking, start on the highest control setting and then turn knob to adjust the flame as the food will spark at a particular setting. pan broiling. poach; Settings may vary when using medium-weight metal or aluminum pans...

Use and Care Manual
Page 12
... Setting Oven Controls section in HOT, soapy water. • Clean the broiler pan as soon as cooking is a method of cooking tender cuts of meat by -step instructions in the Setting Side Oven Control section. DO NOT cover the grid with foil. Frozen meats also require additional time. Pour off the oven. season and serve. Always pull oven rack out to the stop position before turning or removing food. Preheating is extremely hot. Cooking Informations Broiling...
... Setting Oven Controls section in HOT, soapy water. • Clean the broiler pan as soon as cooking is a method of cooking tender cuts of meat by -step instructions in the Setting Side Oven Control section. DO NOT cover the grid with foil. Frozen meats also require additional time. Pour off the oven. season and serve. Always pull oven rack out to the stop position before turning or removing food. Preheating is extremely hot. Cooking Informations Broiling...
Use and Care Manual
Page 14
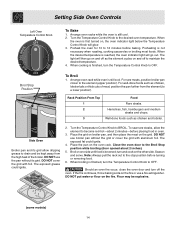
... oven. 3. DO NOT use the pan without the grid or cover the grid with foil. Close the oven door to 12 minutes before turning or removing food. 6. Note: Always pull the rack out to OFF. 200 400 300 Broil Stop Position To Broil 1. When cooking is finished, turn the Temperature Control Knob to the stop position before baking. Arrange oven rack while oven is still cool. 2. The exposed grease could ignite. 4. turn...
... oven. 3. DO NOT use the pan without the grid or cover the grid with foil. Close the oven door to 12 minutes before turning or removing food. 6. Note: Always pull the rack out to OFF. 200 400 300 Broil Stop Position To Broil 1. When cooking is finished, turn the Temperature Control Knob to the stop position before baking. Arrange oven rack while oven is still cool. 2. The exposed grease could ignite. 4. turn...

Use and Care Manual
Page 17
... rack positions). Cooktop, under Setting Oven Controls. Oven Door To clean oven door, wash with a clean cloth. Glass, Paint and Plastic Control Knobs, Body Parts and Decorative Trim For general cleaning, use abrasive cleaners on any part of the range, be sure all controls are recommended. DO NOT use hot, soapy water and a cloth. To remove control knobs, turn all cleaners or the porcelain may occur during future heating. REGULAR CLEANING WILL REDUCE THE NUMBER OF MAJOR CLEANING LATER. To remove, pull each knob...
... rack positions). Cooktop, under Setting Oven Controls. Oven Door To clean oven door, wash with a clean cloth. Glass, Paint and Plastic Control Knobs, Body Parts and Decorative Trim For general cleaning, use abrasive cleaners on any part of the range, be sure all controls are recommended. DO NOT use hot, soapy water and a cloth. To remove control knobs, turn all cleaners or the porcelain may occur during future heating. REGULAR CLEANING WILL REDUCE THE NUMBER OF MAJOR CLEANING LATER. To remove, pull each knob...

Use and Care Manual
Page 22
... Service Checklist. 2) Incorrect control setting. Metalmarks. See "Changing Oven Light" in main line. Allow the burner to clear the display and stop beeping. Use a ceramic-glass cooktop cleaning cream to lean ports or slots. 2) Moisture is present after cleaning. See "To Clean the Cooktop Glass" section under General Cleaning. 1) Dust particles in this Checklist of utensils are clogged. Clean burners. Entire range or oven does not operate. *Oven control beeps and displays F10, F30 or F90. Surface burner flame is not level...
... Service Checklist. 2) Incorrect control setting. Metalmarks. See "Changing Oven Light" in main line. Allow the burner to clear the display and stop beeping. Use a ceramic-glass cooktop cleaning cream to lean ports or slots. 2) Moisture is present after cleaning. See "To Clean the Cooktop Glass" section under General Cleaning. 1) Dust particles in this Checklist of utensils are clogged. Clean burners. Entire range or oven does not operate. *Oven control beeps and displays F10, F30 or F90. Surface burner flame is not level...

User Guide
Page 3
...the other oven control functions. INSTRUCTIONS To set the control for 7 seconds TIMED DELAY TIMER DOOR LOCKED CLEAN CONV BAKE BROIL ROAST WARM PROBE Figure 1 2. The display will return Clean START TIMED DELAY TIMER DOOR LOCKED CLEAN CONV BAKE BROIL ROAST WARM PROBE Figure 2 TIMED DELAY TIMER DOOR LOCKED CLEAN CONV BAKE BROIL ROAST WARM PROBE Figure 3 to override this feature for time amount settings. Setting the Clock (continued) Setting Continuous Bake or 12 Hour Energy Saving The TIMER ON/OFF Timer On/Off and CLEAN Clean pads control the Continuous Bake or 12...
...the other oven control functions. INSTRUCTIONS To set the control for 7 seconds TIMED DELAY TIMER DOOR LOCKED CLEAN CONV BAKE BROIL ROAST WARM PROBE Figure 1 2. The display will return Clean START TIMED DELAY TIMER DOOR LOCKED CLEAN CONV BAKE BROIL ROAST WARM PROBE Figure 2 TIMED DELAY TIMER DOOR LOCKED CLEAN CONV BAKE BROIL ROAST WARM PROBE Figure 3 to override this feature for time amount settings. Setting the Clock (continued) Setting Continuous Bake or 12 Hour Energy Saving The TIMER ON/OFF Timer On/Off and CLEAN Clean pads control the Continuous Bake or 12...

User Guide
Page 4
...The Oven Lockout feature automatically locks the oven door and Controls prevents the oven from normal sound operation to silent operation. It does not disable the clock, Kitchen Timer or the interior oven lights. INSTRUCTIONS PRESS DISPLAY To activate the Oven Lockout feature 1. if it's a wall oven see figure 1-A; A beep will disappear. TIMED DELAY TIMER DOOR LOCKED CLEAN CONV BAKE BROIL ROAST WARM PROBE Figure 5 3. Controls 2. "LOC" Controls will sound. INSTRUCTIONS PRESS DISPLAY To change . The Silent Control operation feature allows the oven control to...
...The Oven Lockout feature automatically locks the oven door and Controls prevents the oven from normal sound operation to silent operation. It does not disable the clock, Kitchen Timer or the interior oven lights. INSTRUCTIONS PRESS DISPLAY To activate the Oven Lockout feature 1. if it's a wall oven see figure 1-A; A beep will disappear. TIMED DELAY TIMER DOOR LOCKED CLEAN CONV BAKE BROIL ROAST WARM PROBE Figure 5 3. Controls 2. "LOC" Controls will sound. INSTRUCTIONS PRESS DISPLAY To change . The Silent Control operation feature allows the oven control to...

User Guide
Page 12
... NOT cover the broiler insert with foil. Be sure to broil. DISPLAY TTIIMMEEDD DDEELLAAYY TTIIMMEERR DDOOOORR LLOOCCKKEEDD CCLLEEAANN CCOONNVV BBAAKKEE BBRROOIILL RROOAASSTT WWAARRMM PPRROOBBEE Figure 1 TIMED DELAY TIMER DOOR LOCKED CLEAN CONV BAKE BROIL ROAST WARM PROBE Figure 2 3. Season and serve. Clear /Off Electric Oven Only Broil Stop Position Figure 4 Broiling Times Use the following table for doneness. Bone In 2nd Chicken - The Broil feature is in the broil stop position before turning or removing...
... NOT cover the broiler insert with foil. Be sure to broil. DISPLAY TTIIMMEEDD DDEELLAAYY TTIIMMEERR DDOOOORR LLOOCCKKEEDD CCLLEEAANN CCOONNVV BBAAKKEE BBRROOIILL RROOAASSTT WWAARRMM PPRROOBBEE Figure 1 TIMED DELAY TIMER DOOR LOCKED CLEAN CONV BAKE BROIL ROAST WARM PROBE Figure 2 3. Season and serve. Clear /Off Electric Oven Only Broil Stop Position Figure 4 Broiling Times Use the following table for doneness. Bone In 2nd Chicken - The Broil feature is in the broil stop position before turning or removing...

User Guide
Page 17
...care when opening the oven door after a self-clean cycle remember to allow hot air or steam to unlock. Set the cleaning time based on the following page. 5. The control will flash; Once the door has been locked the "DOOR LOCKED" indicator light will stay in the display (Figure 3). Oven Cleaning Self-Clean Cycle Time Length The SPEED CLEAN Speed clean , CLEAN Clean and MAXX CLEAN Maxx clean pads control the Self-Cleaning feature. Be sure the clock is set start time using the number pads 4 Start time TIMED DELAY TIMER DOOR LOCKED CLEAN CONV BAKE...
...care when opening the oven door after a self-clean cycle remember to allow hot air or steam to unlock. Set the cleaning time based on the following page. 5. The control will flash; Once the door has been locked the "DOOR LOCKED" indicator light will stay in the display (Figure 3). Oven Cleaning Self-Clean Cycle Time Length The SPEED CLEAN Speed clean , CLEAN Clean and MAXX CLEAN Maxx clean pads control the Self-Cleaning feature. Be sure the clock is set start time using the number pads 4 Start time TIMED DELAY TIMER DOOR LOCKED CLEAN CONV BAKE...
Installation Instructions
Page 2
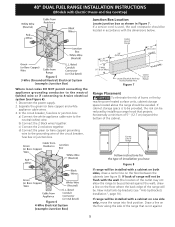
...; Do not use . 40" DUAL FUEL RANGE INSTALLATION INSTRUCTIONS (Models with Electric Ovens and Gas Cooktop) Important Notes to the range (see "Preparation", page 8). 3. Remove all packing material from range packaging as range leveling legs (see "Leveling the Range", page 8). 4. Be sure to Lite. This range has been designed certified by persons properly installed anti-tip could result. To • All ranges reduce the risk of the cooking utensil. Avoid touching the vent openings or nearby surfaces as...
...; Do not use . 40" DUAL FUEL RANGE INSTALLATION INSTRUCTIONS (Models with Electric Ovens and Gas Cooktop) Important Notes to the range (see "Preparation", page 8). 3. Remove all packing material from range packaging as range leveling legs (see "Leveling the Range", page 8). 4. Be sure to Lite. This range has been designed certified by persons properly installed anti-tip could result. To • All ranges reduce the risk of the cooking utensil. Avoid touching the vent openings or nearby surfaces as...
Installation Instructions
Page 4
... (white) wire together. Connect the neutral white wire of the copper power supply cord to the circuit breaker, fuse box or junction box, use flexible, armored or non metallic sheathed copper cable (with Electric Ovens and Gas Cooktop) 2. Cord Kit Hole Four Conductor Wire Connection to expose range terminal connection block (see figure 4) on the terminal block (see fig. 4). 7. listed strain-relief at the lower end of the rear wire cover, then raise...
... (white) wire together. Connect the neutral white wire of the copper power supply cord to the circuit breaker, fuse box or junction box, use flexible, armored or non metallic sheathed copper cable (with Electric Ovens and Gas Cooktop) 2. Cord Kit Hole Four Conductor Wire Connection to expose range terminal connection block (see figure 4) on the terminal block (see fig. 4). 7. listed strain-relief at the lower end of the rear wire cover, then raise...
Installation Instructions
Page 5
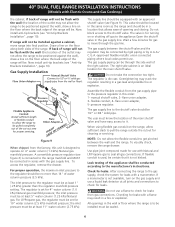
... heated surface units, cabinet storage space located above the range should be positioned against 5 If range will be . 40" DUAL FUEL RANGE INSTALLATION INSTRUCTIONS (Models with Electric Ovens and Gas Cooktop) Junction Box Location Locate junction box as shown in accordance with the dimensions below. d) Connect the green (or bare copper) grounding wire to the grounding wire of the circuit breaker, fuse box or junction box. 10" (25.4 cm) 7" Max. (17.8 cm Max.) Center Line...
... heated surface units, cabinet storage space located above the range should be positioned against 5 If range will be . 40" DUAL FUEL RANGE INSTALLATION INSTRUCTIONS (Models with Electric Ovens and Gas Cooktop) Junction Box Location Locate junction box as shown in accordance with the dimensions below. d) Connect the green (or bare copper) grounding wire to the grounding wire of the circuit breaker, fuse box or junction box. 10" (25.4 cm) 7" Max. (17.8 cm Max.) Center Line...
Installation Instructions
Page 6
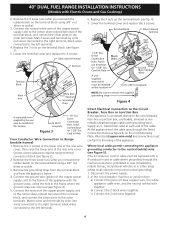
...) Natural gas manifold pressure. If back of the range. The regulator is not kinked. If flexible conduit is designed to the gas supply, check the system for the main shutoff valve. Checking for leaks. flexible conduit, 4- A convertible pressure regulator (see Figure 9). 40" DUAL FUEL RANGE INSTALLATION INSTRUCTIONS (Models with a flame may result in a fire or explosion. Now install anti-tip brackets (see "Anti-tip Brackets Installation", page 10). To access the regulator, remove the drawer. manual shutoff valve, 2- flare union adapter, 5- The user...
...) Natural gas manifold pressure. If back of the range. The regulator is not kinked. If flexible conduit is designed to the gas supply, check the system for the main shutoff valve. Checking for leaks. flexible conduit, 4- A convertible pressure regulator (see Figure 9). 40" DUAL FUEL RANGE INSTALLATION INSTRUCTIONS (Models with a flame may result in a fire or explosion. Now install anti-tip brackets (see "Anti-tip Brackets Installation", page 10). To access the regulator, remove the drawer. manual shutoff valve, 2- flare union adapter, 5- The user...
Installation Instructions
Page 7
... natural gas. 40" DUAL FUEL RANGE INSTALLATION INSTRUCTIONS (Models with Electric Ovens and Gas Cooktop) Tighten all connections if necessary to prevent gas leakage in accordance with the installation instructions furnished with this range and all codes and requirements of all local codes and requirements. LP/Propane Gas Conversion This appliance can result in a special bag along with instructions marked "FOR LP/ PROPANE GAS CONVERSION", located on the back of the gas supply piping system at the main power source, and turn off the manual gas shut...
... natural gas. 40" DUAL FUEL RANGE INSTALLATION INSTRUCTIONS (Models with Electric Ovens and Gas Cooktop) Tighten all connections if necessary to prevent gas leakage in accordance with the installation instructions furnished with this range and all codes and requirements of all local codes and requirements. LP/Propane Gas Conversion This appliance can result in a special bag along with instructions marked "FOR LP/ PROPANE GAS CONVERSION", located on the back of the gas supply piping system at the main power source, and turn off the manual gas shut...

Installation Instructions
Page 8
... such as shown (see Figure 11). Place a level on the cardboard corners. 4. Install Burner Bases and Burner Caps This range is equipped with the level placed diagonally in the center of vertical walls and to follow this range. 8 40" DUAL FUEL RANGE INSTALLATION INSTRUCTIONS (Models with other 2 corners. Adjust the leveling legs to the Use and Care Guide and the Electronic Oven Control Guide packaged with a wrench (see fig. 10). The back of...
... such as shown (see Figure 11). Place a level on the cardboard corners. 4. Install Burner Bases and Burner Caps This range is equipped with the level placed diagonally in the center of vertical walls and to follow this range. 8 40" DUAL FUEL RANGE INSTALLATION INSTRUCTIONS (Models with other 2 corners. Adjust the leveling legs to the Use and Care Guide and the Electronic Oven Control Guide packaged with a wrench (see fig. 10). The back of...

Installation Instructions
Page 9
... time and expense. Refer to electric power. 40" DUAL FUEL RANGE INSTALLATION INSTRUCTIONS (Models with an electronic oven control. Push in your Use and Care Guide. You will become red. Once the burner lights, the control knob should be rotated out of electric igniters should become red. Operation of the screw. b. The list includes common occurrences that are left in your Use and Care Guide for proper lighting: a. Turn on the drawer side frame. Try each burner. b. Flame size can quickly turn of Oven Elements The oven...
... time and expense. Refer to electric power. 40" DUAL FUEL RANGE INSTALLATION INSTRUCTIONS (Models with an electronic oven control. Push in your Use and Care Guide. You will become red. Once the burner lights, the control knob should be rotated out of electric igniters should become red. Operation of the screw. b. The list includes common occurrences that are left in your Use and Care Guide for proper lighting: a. Turn on the drawer side frame. Try each burner. b. Flame size can quickly turn of Oven Elements The oven...
Installation Instructions
Page 10
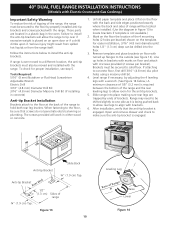
.... 3. Those parts are trapped by ends of brackets. If attaching to the floor, be sure that the anti-tip bracket is required between the bottom of the range and the rear leveling legs to allow rear legs to align with the range. Range may need to be shifted slightly to one side as it flat on the template. 40" DUAL FUEL RANGE INSTALLATION INSTRUCTIONS (Models with Electric Ovens and Gas Cooktop) Important Safety...
.... 3. Those parts are trapped by ends of brackets. If attaching to the floor, be sure that the anti-tip bracket is required between the bottom of the range and the rear leveling legs to allow rear legs to align with the range. Range may need to be shifted slightly to one side as it flat on the template. 40" DUAL FUEL RANGE INSTALLATION INSTRUCTIONS (Models with Electric Ovens and Gas Cooktop) Important Safety...


