User Manual
Page 1
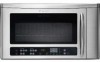
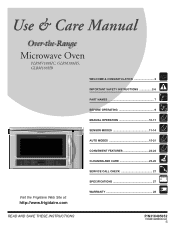
Microwave Oven PLBMV188HC, GLBM188HS, GLBM188HB WELCOME & CONGRATULATION 2 IMPORTANT SAFETY INSTRUCTIONS 2-6 PART NAMES 7 BEFORE OPERATING 9 MANUAL OPERATION 10-11 SENSOR MODES 11-14 AUTO MODES 15-21 CONVENIENT FEATURES 22-24 CLEANING AND CARE 25-26 SERVICE CALL CHECK 27 SPECIFICATIONS 27 Visit the Frigidaire Web Site at: http://www.frigidaire.com WARRANTY 28 READ AND SAVE THESE INSTRUCTIONS P/N316495052 TINSEB168WRRZ-EL81 E
Microwave Oven PLBMV188HC, GLBM188HS, GLBM188HB WELCOME & CONGRATULATION 2 IMPORTANT SAFETY INSTRUCTIONS 2-6 PART NAMES 7 BEFORE OPERATING 9 MANUAL OPERATION 10-11 SENSOR MODES 11-14 AUTO MODES 15-21 CONVENIENT FEATURES 22-24 CLEANING AND CARE 25-26 SERVICE CALL CHECK 27 SPECIFICATIONS 27 Visit the Frigidaire Web Site at: http://www.frigidaire.com WARRANTY 28 READ AND SAVE THESE INSTRUCTIONS P/N316495052 TINSEB168WRRZ-EL81 E
User Manual
Page 3
... not operate this manual. Use a wide-mouthed container. - READ ALL INFORMATION BEFORE USING To reduce the risk of table or counter. • See door surface cleaning instructions on page 4. • Install or locate this appliance only for example, near a kitchen sink, in a wet basement or near a swimming pool, or similar locations. • Do not immerse cord or plug in the microwave oven at the fuse or circuit breaker panel...
... not operate this manual. Use a wide-mouthed container. - READ ALL INFORMATION BEFORE USING To reduce the risk of table or counter. • See door surface cleaning instructions on page 4. • Install or locate this appliance only for example, near a kitchen sink, in a wet basement or near a swimming pool, or similar locations. • Do not immerse cord or plug in the microwave oven at the fuse or circuit breaker panel...

User Manual
Page 4
..., Installation Instructions, Wall Template, Top Template, Charcoal Filter, Turntable and Turntable Support. Read enclosures and SAVE the Use and Care Manual. Improper use of the door, if there is one. • DO NOT REMOVE THE WAVEGUIDE COVER, which is used when recirculating is any damage, such as shown in accordance with the National Electrical Code and local codes and ordinances. This microwave oven is properly installed and grounded. It must be located inside the cabinet directly above the Microwave Oven mounting location as...
..., Installation Instructions, Wall Template, Top Template, Charcoal Filter, Turntable and Turntable Support. Read enclosures and SAVE the Use and Care Manual. Improper use of the door, if there is one. • DO NOT REMOVE THE WAVEGUIDE COVER, which is used when recirculating is any damage, such as shown in accordance with the National Electrical Code and local codes and ordinances. This microwave oven is properly installed and grounded. It must be located inside the cabinet directly above the Microwave Oven mounting location as...
User Manual
Page 5
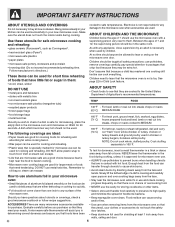
... use special Popcorn pad. Ventilation openings must be turned over once during microwaving to the touch when cooking or reheating. ABOUT MICROWAVE COOKING • Arrange food carefully. Poultry thigh joints move easily. - In using the IEC Test Procedure. Fish is rated 1000 watts by using recipes or package directions, check food a minute or two before and after heating and shake thoroughly. IMPORTANT SAFETY INSTRUCTIONS ABOUT YOUR MICROWAVE OVEN This Use and Care Manual...
... use special Popcorn pad. Ventilation openings must be turned over once during microwaving to the touch when cooking or reheating. ABOUT MICROWAVE COOKING • Arrange food carefully. Poultry thigh joints move easily. - In using the IEC Test Procedure. Fish is rated 1000 watts by using recipes or package directions, check food a minute or two before and after heating and shake thoroughly. IMPORTANT SAFETY INSTRUCTIONS ABOUT YOUR MICROWAVE OVEN This Use and Care Manual...
User Manual
Page 6
... to buy all safety precautions: use potholders, remove coverings carefully, pay special attention to packages that are in contact with hot food. ABOUT CHILDREN AND THE MICROWAVE Children below the age of a dish's covering and carefully open popcorn and oven cooking bags away from fat or bone. Many pieces already in your kitchen can escape. • Lids that are microwave-safe are a good choice because heat is...
... to buy all safety precautions: use potholders, remove coverings carefully, pay special attention to packages that are in contact with hot food. ABOUT CHILDREN AND THE MICROWAVE Children below the age of a dish's covering and carefully open popcorn and oven cooking bags away from fat or bone. Many pieces already in your kitchen can escape. • Lids that are microwave-safe are a good choice because heat is...

User Manual
Page 7
...speed, twice for 2-level cooking/ reheating 17 Light cover 18 Grease filters 19 Menu label 7 E Only remove for cleaning. 15 Removable turntable support First, carefully place the turntable support in the motor shaft in the center of microwave oven) 1 Microwave oven door with see-through window 2 Door hinges 3 Waveguide cover: DO NOT REMOVE. 4 Turntable motor shaft 5 Microwave oven light It will light when microwave oven is operating or door is open. 6 Rack holders 7 Safety door latches The microwave oven will not operate unless the door is securely closed. 8 Handle 9 Light Hi/Lo/Off pad...
...speed, twice for 2-level cooking/ reheating 17 Light cover 18 Grease filters 19 Menu label 7 E Only remove for cleaning. 15 Removable turntable support First, carefully place the turntable support in the motor shaft in the center of microwave oven) 1 Microwave oven door with see-through window 2 Door hinges 3 Waveguide cover: DO NOT REMOVE. 4 Turntable motor shaft 5 Microwave oven light It will light when microwave oven is operating or door is open. 6 Rack holders 7 Safety door latches The microwave oven will not operate unless the door is securely closed. 8 Handle 9 Light Hi/Lo/Off pad...
User Manual
Page 10
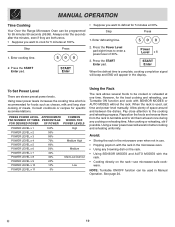
... microwave oven when not in use. • Popping popcorn with SENSOR MODES or AUTO MODES without the rack. MANUAL OPERATION Time Cooking Your Over the Range Microwave Oven can be used , set time and power level manually. Enter cooking time. 500 2. START Enter • Suppose you want to be programmed for 5 minutes at 100%. Reposition the foods and reverse them from the rack to the cooking and reheating progress. Using a lower power level will appear in the microwave oven. • Using any cooking or reheating time. To Set Power Level...
... microwave oven when not in use. • Popping popcorn with SENSOR MODES or AUTO MODES without the rack. MANUAL OPERATION Time Cooking Your Over the Range Microwave Oven can be used , set time and power level manually. Enter cooking time. 500 2. START Enter • Suppose you want to be programmed for 5 minutes at 100%. Reposition the foods and reverse them from the rack to the cooking and reheating progress. Using a lower power level will appear in the microwave oven. • Using any cooking or reheating time. To Set Power Level...
User Manual
Page 11
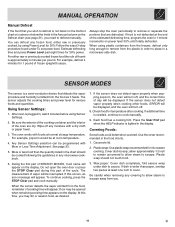
... be opened when remaining cooking time appears on power level 30% until totally defrosted. Plastic wrap should be at the end of SENSOR MODES, food name will be displayed. You can be interrupted. Always stop the oven periodically to escape. During the first part of the estimated defrosting time, program the oven in a microwave-safe dish. If this occurs, an error message will appear. At this part of thumb is needed...
... be opened when remaining cooking time appears on power level 30% until totally defrosted. Plastic wrap should be at the end of SENSOR MODES, food name will be displayed. You can be interrupted. Always stop the oven periodically to escape. During the first part of the estimated defrosting time, program the oven in a microwave-safe dish. If this occurs, an error message will appear. At this part of thumb is needed...
User Manual
Page 12
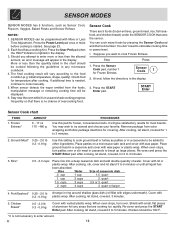
...'t need to calculate cooking time or power level. • Suppose you attempt to enter more or less than the quantity listed in the chart should be 160˚F. * It is needed, continue to cook manually. 5. At end, follow package directions for covering. START Enter Sensor Cook chart FOOD 1. You may wish to 5 minutes. Remove package from the foods, manipulation message or remaining cooking time will appear in the display. Re-cover...
...'t need to calculate cooking time or power level. • Suppose you attempt to enter more or less than the quantity listed in the chart should be 160˚F. * It is needed, continue to cook manually. 5. At end, follow package directions for covering. START Enter Sensor Cook chart FOOD 1. You may wish to 5 minutes. Remove package from the foods, manipulation message or remaining cooking time will appear in the display. Re-cover...
User Manual
Page 15
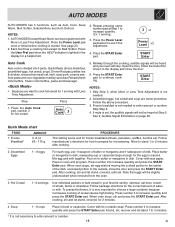
... wheatena. Open the door, follow the instruction shown in the display and close the door and press the START Enter pad. Press the START Enter pad to stand 1 or 2 minutes after cooking. 2. Skip Step 3, when More or Less Time Adjustment is started. Follow the above procedure. 3. Skip Step 2. 4. Quick Meals chart FOOD 1. Frozen Breakfast* AMOUNT 3 -6 oz 85 - 170 g PROCEDURE This setting works well for...
... wheatena. Open the door, follow the instruction shown in the display and close the door and press the START Enter pad. Press the START Enter pad to stand 1 or 2 minutes after cooking. 2. Skip Step 3, when More or Less Time Adjustment is started. Follow the above procedure. 3. Skip Step 2. 4. Quick Meals chart FOOD 1. Frozen Breakfast* AMOUNT 3 -6 oz 85 - 170 g PROCEDURE This setting works well for...
User Manual
Page 24
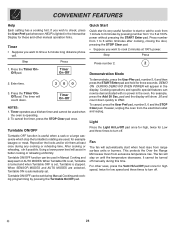
... during Manual Cooking and cooking programming by pressing number from excessive temperature rise. Timer operates as a kitchen timer and cannot be used , for three seconds. Using a lower power level will show .30 and count down . The fan will automatically start or add to cook from 1 minute to 6 at 100% power without pressing the START Enter pad. E 24 Timer On-Off NOTES: 1. Cooking operations and specific special features can be set , Turntable is lighted in AUTO MODES. Fan The fan...
... during Manual Cooking and cooking programming by pressing number from excessive temperature rise. Timer operates as a kitchen timer and cannot be used , for three seconds. Using a lower power level will show .30 and count down . The fan will automatically start or add to cook from 1 minute to 6 at 100% power without pressing the START Enter pad. E 24 Timer On-Off NOTES: 1. Cooking operations and specific special features can be set , Turntable is lighted in AUTO MODES. Fan The fan...
User Manual
Page 25
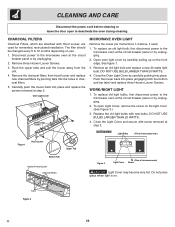
... juice of the microwave oven and remove the filter. Use upper rack of spills or spattering. Grease filters Tabs (Rear of cleaners containing any other filter. 2. Rinse with clean water and dry with setting Child Lock before cleaning or leave the door open to deactivate the oven during cleaning. BOTTOM VIEW (Front of microwave oven) WAVEGUIDE COVER The waveguide cover is recommended to remove any type of water and vinegar. CLEANING AND CARE Disconnect the power cord before cleaning to prevent...
... juice of the microwave oven and remove the filter. Use upper rack of spills or spattering. Grease filters Tabs (Rear of cleaners containing any other filter. 2. Rinse with clean water and dry with setting Child Lock before cleaning or leave the door open to deactivate the oven during cleaning. BOTTOM VIEW (Front of microwave oven) WAVEGUIDE COVER The waveguide cover is recommended to remove any type of water and vinegar. CLEANING AND CARE Disconnect the power cord before cleaning to prevent...
User Manual
Page 26
... power to the microwave oven at the circuit breaker panel or by unplugging. 2. WORK/NIGHT LIGHT 1. DO NOT USE BULBS LARGER THAN 20 WATTS. 4. Close the Light Cover and secure with new bulbs. Remove three Houver Louver Screws. 3. Close the Oven Light Cover by carefully pulling up on . BOTTOM VIEW Light Bulbs (Front of microwave oven) Figure 1 Hood Louver Upper Tab Bottom Tab Inside of Hood Louver Charcoal Filters Figure 3 (Rear of microwave oven) Light Cover Screw Light Cover may become very hot. Do not press glass when light...
... power to the microwave oven at the circuit breaker panel or by unplugging. 2. WORK/NIGHT LIGHT 1. DO NOT USE BULBS LARGER THAN 20 WATTS. 4. Close the Light Cover and secure with new bulbs. Remove three Houver Louver Screws. 3. Close the Oven Light Cover by carefully pulling up on . BOTTOM VIEW Light Bulbs (Front of microwave oven) Figure 1 Hood Louver Upper Tab Bottom Tab Inside of Hood Louver Charcoal Filters Figure 3 (Rear of microwave oven) Light Cover Screw Light Cover may become very hot. Do not press glass when light...
User Manual
Page 27
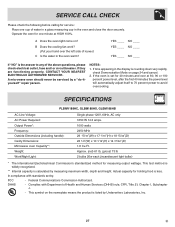
... a glass measuring cup in the oven and close the door securely. B Does the cooling fan work? (Put your hand over at HIGH 100%. If they are functioning properly, CONTACT YOUR NEAREST ELECTROLUX AUTHORIZED SERVICER. SPECIFICATIONS PLBMV188HC, GLBM188HS, GLBM188HB AC Line Voltage: AC Power Required: Output Power*: Frequency: Outside Dimensions (including handle): Cavity Dimensions: Microwave oven Capacity**: Weight: Work/Night Light: Single phase 120V, 60Hz, AC only 1650 W 14.3 amps. 1000 watts...
... a glass measuring cup in the oven and close the door securely. B Does the cooling fan work? (Put your hand over at HIGH 100%. If they are functioning properly, CONTACT YOUR NEAREST ELECTROLUX AUTHORIZED SERVICER. SPECIFICATIONS PLBMV188HC, GLBM188HS, GLBM188HB AC Line Voltage: AC Power Required: Output Power*: Frequency: Outside Dimensions (including handle): Cavity Dimensions: Microwave oven Capacity**: Weight: Work/Night Light: Single phase 120V, 60Hz, AC only 1650 W 14.3 amps. 1000 watts...

User Manual
Page 28
... is warranted by Electrolux Canada Corp. If You Need Service Keep your receipt, delivery slip, or some other appropriate payment record to repair or replace appliance light bulbs, air filters, water filters, other consumables, or knobs, handles, or other than authorized service companies; CLAIMS BASED ON IMPLIED WARRANTIES, INCLUDING WARRANTIES OF MERCHANTABILITY OR FITNESS FOR A PARTICULAR PURPOSE, ARE...
... is warranted by Electrolux Canada Corp. If You Need Service Keep your receipt, delivery slip, or some other appropriate payment record to repair or replace appliance light bulbs, air filters, water filters, other consumables, or knobs, handles, or other than authorized service companies; CLAIMS BASED ON IMPLIED WARRANTIES, INCLUDING WARRANTIES OF MERCHANTABILITY OR FITNESS FOR A PARTICULAR PURPOSE, ARE...
Parts Catalog
Page 3
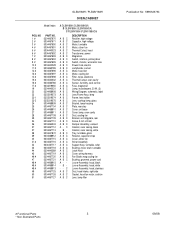
...Thermal Cutout, hood Transformer, power Magnetron Switch, interlock, primary/door Switch, monitor, w/ceramic fuse Power Cord, electric Lampholder, socket Motor, hood fan Motor, cooling fan Filter, noise, electronic Thermal Cutout, oven cavity Sensor, humidity, cook control Fuse, magnetron Lamp, incandescent, 20 W, (3) Wiring Diagram, schematic, label Lens/Frame Assy, lamp Frame, lens holder Lens, cooktop lamp, glass Bracket, lamp housing Plate, rear stay Cover, unit base Cover, lamp, oven cavity Duct, cooling fan Bracket, unit mtg plate, rear Screw, 3 mm x 8 mm Damper Assembly, exhaust Cabinet...
...Thermal Cutout, hood Transformer, power Magnetron Switch, interlock, primary/door Switch, monitor, w/ceramic fuse Power Cord, electric Lampholder, socket Motor, hood fan Motor, cooling fan Filter, noise, electronic Thermal Cutout, oven cavity Sensor, humidity, cook control Fuse, magnetron Lamp, incandescent, 20 W, (3) Wiring Diagram, schematic, label Lens/Frame Assy, lamp Frame, lens holder Lens, cooktop lamp, glass Bracket, lamp housing Plate, rear stay Cover, unit base Cover, lamp, oven cavity Duct, cooling fan Bracket, unit mtg plate, rear Screw, 3 mm x 8 mm Damper Assembly, exhaust Cabinet...

Installation Instructions
Page 2
... physical size. Figure 3 shows the approximate feet of equivalent length of electric shock by leaving enough space between the studs, or wall should be metal; If the power supply cord is properly installed and grounded in a risk of electric shock. DO NOT UNDER ANY CIRCUMSTANCES CUT OR REMOVE THE GROUNDING PIN FROM THE PLUG. Use the values in Figure 2. This oven is...
... physical size. Figure 3 shows the approximate feet of equivalent length of electric shock by leaving enough space between the studs, or wall should be metal; If the power supply cord is properly installed and grounded in a risk of electric shock. DO NOT UNDER ANY CIRCUMSTANCES CUT OR REMOVE THE GROUNDING PIN FROM THE PLUG. Use the values in Figure 2. This oven is...

Installation Instructions
Page 3
... door. Mounting Plate Figure 5 Use with metal cabinets. All items are in a bag packed below the oven. Surround the power cord opening (if needed) • Protective Drop Cloth for any damage, do not operate the oven and contact your dealer or Electrolux AUTHORIZED SERVICER. Item Name Wood Screw 5 x 35 mm Toggle Bolt 3/16" Top Cabinet Screw 5 x 85 mm Flat Washer 30 mm diameter Grommet Tapping Screw 4 x 8 mm Exhaust Damper Assembly Grease Filter Rear...
... door. Mounting Plate Figure 5 Use with metal cabinets. All items are in a bag packed below the oven. Surround the power cord opening (if needed) • Protective Drop Cloth for any damage, do not operate the oven and contact your dealer or Electrolux AUTHORIZED SERVICER. Item Name Wood Screw 5 x 35 mm Toggle Bolt 3/16" Top Cabinet Screw 5 x 85 mm Flat Washer 30 mm diameter Grommet Tapping Screw 4 x 8 mm Exhaust Damper Assembly Grease Filter Rear...

Installation Instructions
Page 4
... the Hood Fan Wire and the Hood Fan Unit. Be careful not to (B). This assembly will be replaced every 6 to the Outside Rear Exhaust cutout in the opposite direction of Fan Cover Bracket. See WALL TEMPLATE for recirculating exhaust. 2. Follow installation procedure (A). Follow installation procedure (B). Remove Fan Cover Bracket by sliding it in future instructions. Rotate the Hood Fan Unit 180˚ so that the Fan Blade Openings are facing the back of cavity. Put the wire back into place. Use 1 Tapping Screw...
... the Hood Fan Wire and the Hood Fan Unit. Be careful not to (B). This assembly will be replaced every 6 to the Outside Rear Exhaust cutout in the opposite direction of Fan Cover Bracket. See WALL TEMPLATE for recirculating exhaust. 2. Follow installation procedure (A). Follow installation procedure (B). Remove Fan Cover Bracket by sliding it in future instructions. Rotate the Hood Fan Unit 180˚ so that the Fan Blade Openings are facing the back of cavity. Put the wire back into place. Use 1 Tapping Screw...
Installation Instructions
Page 6
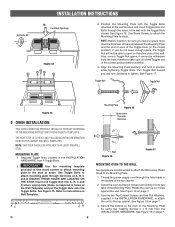
... wall location and insert Toggle Nuts and Bolts through the hole made in position while tightening Toggle Bolts. See Figure 15. Use Toggle Bolts to the Mounting Plate by tilting it forward and sliding it rests against the wall. THE NEXT STEP IS TO READ AND FOLLOW MOUNTING INFORMATION ON BOTH TOP CABINET AND WALL TEMPLATES. (A) Rotate 90° INSTALLATION INSTRUCTIONS (B) Fan Blade Openings...
... wall location and insert Toggle Nuts and Bolts through the hole made in position while tightening Toggle Bolts. See Figure 15. Use Toggle Bolts to the Mounting Plate by tilting it forward and sliding it rests against the wall. THE NEXT STEP IS TO READ AND FOLLOW MOUNTING INFORMATION ON BOTH TOP CABINET AND WALL TEMPLATES. (A) Rotate 90° INSTALLATION INSTRUCTIONS (B) Fan Blade Openings...


