Use and Care Guide
Page 1
Includes Connecting 4 - 5 Household Water Supply to Refrigerator Door Removal & Reversal 6 - 9 Features at a Glance 9 Temperature Controls 10 Looking Inside 11 - 12 Ice Service 13 Food Storage & Energy Saving Tips 14 Normal Operating Sounds 15 Care & Cleaning 16 - 17 Español 19 Warranty Before You Call READ AND SAVE THESE INSTRUCTIONS 18 19 P/N 241813800 (Jan 2007) Use & Care Manual Top Mount Refrigerator Welcome 2 Safety Instructions 3 Installation --
Includes Connecting 4 - 5 Household Water Supply to Refrigerator Door Removal & Reversal 6 - 9 Features at a Glance 9 Temperature Controls 10 Looking Inside 11 - 12 Ice Service 13 Food Storage & Energy Saving Tips 14 Normal Operating Sounds 15 Care & Cleaning 16 - 17 Español 19 Warranty Before You Call READ AND SAVE THESE INSTRUCTIONS 18 19 P/N 241813800 (Jan 2007) Use & Care Manual Top Mount Refrigerator Welcome 2 Safety Instructions 3 Installation --
Use and Care Guide
Page 2
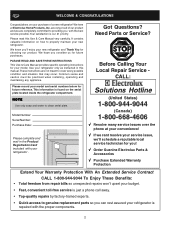
... to clean serial plate. NOTE Use only soap and water to cover every possible condition and situation that may occur. Need Parts or Service? We here at your convenience! √ If we cant resolve your service issue, we are very proud of a new refrigerator! It contains valuable information on the serial plate located inside the refrigerator compartment. PLEASE READ AND SAVE THESE INSTRUCTIONS This Use & Care Manual provides specific operating instructions for...
... to clean serial plate. NOTE Use only soap and water to cover every possible condition and situation that may occur. Need Parts or Service? We here at your convenience! √ If we cant resolve your service issue, we are very proud of a new refrigerator! It contains valuable information on the serial plate located inside the refrigerator compartment. PLEASE READ AND SAVE THESE INSTRUCTIONS This Use & Care Manual provides specific operating instructions for...
Use and Care Guide
Page 3
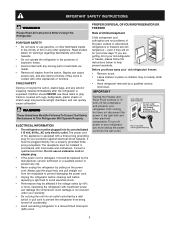
... - ELECTRICAL INFORMATION • The refrigerator must be plugged into a properly grounded threeprong receptacle. PROPER DISPOSAL OF YOUR REFRIGERATOR OR FREEZER Risk of automatic ice maker. • Remove all staples from being turned off the compressor and prevents your warranty. • Do not plug the unit into an outlet controlled by pulling on the power cord. IMPORTANT SAFETY INSTRUCTIONS WARNING Please Read All Instructions Before Using This Refrigerator. Consult...
... - ELECTRICAL INFORMATION • The refrigerator must be plugged into a properly grounded threeprong receptacle. PROPER DISPOSAL OF YOUR REFRIGERATOR OR FREEZER Risk of automatic ice maker. • Remove all staples from being turned off the compressor and prevents your warranty. • Do not plug the unit into an outlet controlled by pulling on the power cord. IMPORTANT SAFETY INSTRUCTIONS WARNING Please Read All Instructions Before Using This Refrigerator. Consult...
Use and Care Guide
Page 4
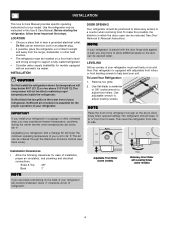
... back cover). Upgrading your refrigerator (air-cooled condenser) leave 3" clearance at top of the refrigerator enough so the doors close freely when opened wider. Your refrigerator is near a grounded electrical outlet. IMPORTANT If you install your refrigerator in a garage or other heat sources. • The refrigerator must rest firmly on a solid floor. To make this possible, the direction in this Use & Care Manual. INSTALLATION This Use & Care Manual provides specific operating instructions for your refrigerator.
... back cover). Upgrading your refrigerator (air-cooled condenser) leave 3" clearance at top of the refrigerator enough so the doors close freely when opened wider. Your refrigerator is near a grounded electrical outlet. IMPORTANT If you install your refrigerator in a garage or other heat sources. • The refrigerator must rest firmly on a solid floor. To make this possible, the direction in this Use & Care Manual. INSTALLATION This Use & Care Manual provides specific operating instructions for your refrigerator.
Use and Care Guide
Page 5
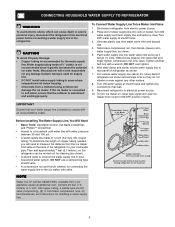
... ON/OFF position of arm). Reconnect refrigerator to the ice maker inlet valve. Tighten another half turn ice maker on, lower wire signal arm (see ice maker front cover for connecting the water supply line to electrical power source. 10. Turn ON water supply at shutoff valve. 3. If the ice maker is used for installing a water supply line. 5 Slide ferrule (sleeve) into sink or bucket. To turn with all local plumbing codes. NOTE Water line kit number 5303917950, available from your appliance dealer at...
... ON/OFF position of arm). Reconnect refrigerator to the ice maker inlet valve. Tighten another half turn ice maker on, lower wire signal arm (see ice maker front cover for connecting the water supply line to electrical power source. 10. Turn ON water supply at shutoff valve. 3. If the ice maker is used for installing a water supply line. 5 Slide ferrule (sleeve) into sink or bucket. To turn with all local plumbing codes. NOTE Water line kit number 5303917950, available from your appliance dealer at...
Use and Care Guide
Page 6
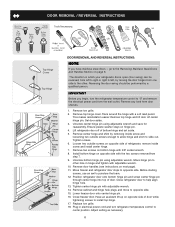
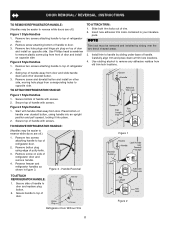
.... Replace toe grille. 18. Lift refrigerator door off center hinge pin. Close freezer door. Adjust setting as necessary. 6 This makes reinstallation easier. Position refrigerator door onto bottom hinge pin and screw center hinge pin through center hinge into top of refrigerator, remove inside screw and install center hinge. 7. go to help align hinge hole. 13. Remove top hinge cover. Remove toe grille. 2. Tighten center hinge pin with a soft lead pencil. DOOR REMOVAL / REVERSAL INSTRUCTIONS Top Hinge Cover Top Hinge DOOR REMOVAL AND REVERSAL INSTRUCTIONS: NOTE...
.... Replace toe grille. 18. Lift refrigerator door off center hinge pin. Close freezer door. Adjust setting as necessary. 6 This makes reinstallation easier. Position refrigerator door onto bottom hinge pin and screw center hinge pin through center hinge into top of refrigerator, remove inside screw and install center hinge. 7. go to help align hinge hole. 13. Remove top hinge cover. Remove toe grille. 2. Tighten center hinge pin with a soft lead pencil. DOOR REMOVAL / REVERSAL INSTRUCTIONS Top Hinge Cover Top Hinge DOOR REMOVAL AND REVERSAL INSTRUCTIONS: NOTE...
Use and Care Guide
Page 7
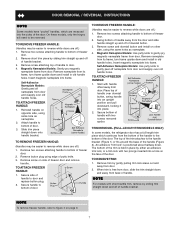
... top of freezer door. 2. Magnetic Nameplate Models: Use putty knife to be easier to reverse while doors are off .) 1. Secure bottom of freezer door. 2. TRIM REMOVAL (FULL-LENGTH TRIM MODELS ONLY) In some models, the refrigerator door has a full length trim piece which are off .) 1. Slide trim piece straight down and away from base of the door. Remove two screws attaching handle to door and replace button plug. 2. Remove two screws...
... top of freezer door. 2. Magnetic Nameplate Models: Use putty knife to be easier to reverse while doors are off .) 1. Secure bottom of freezer door. 2. TRIM REMOVAL (FULL-LENGTH TRIM MODELS ONLY) In some models, the refrigerator door has a full length trim piece which are off .) 1. Slide trim piece straight down and away from base of the door. Remove two screws attaching handle to door and replace button plug. 2. Remove two screws...
Use and Care Guide
Page 8
... reverse while doors are off.) Figure 1 Style Handles 1. Remove screw on opposite side. Figure 1 Style Handles 1. Remove two hole plugs and hinge pin plug on top of door and install on side of refrigerator door and remove handle. 4. Remove two screws attaching handle to door. 3. Insert new adhesive trim locks contained in figure 3. Figure 2 Style Handles 1. Figure 3 - Handle Reversal Figure 1 TO ATTACH REFRIGERATOR HANDLE: 1. Remove screw attaching bottom of handle to top of refrigerator door. 2. Remove screw and dovetail button...
... reverse while doors are off.) Figure 1 Style Handles 1. Remove screw on opposite side. Figure 1 Style Handles 1. Remove two hole plugs and hinge pin plug on top of door and install on side of refrigerator door and remove handle. 4. Remove two screws attaching handle to door. 3. Insert new adhesive trim locks contained in figure 3. Figure 2 Style Handles 1. Figure 3 - Handle Reversal Figure 1 TO ATTACH REFRIGERATOR HANDLE: 1. Remove screw attaching bottom of handle to top of refrigerator door. 2. Remove screw and dovetail button...
Use and Care Guide
Page 9
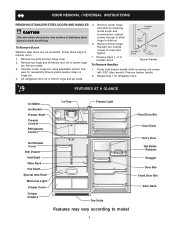
... loosening set aside. 5. Remove freezer handle. 2. Repeat step 1 for reassembly. FEATURES AT A GLANCE Ice Maker Ice Bucket Freezer Shelf Freezer Control Refrigerator Control Ice Tray Freezer Light Deli Drawer Cover Deli Drawer Half Shelf Wine Rack Full Shelf Special Item Rack Mid Level Light Crisper Cover Crisper Drawers Toe Grille Features may vary according to remove doors. 1. Follow these steps to model 9 Fixed Door Bin Door Rack Dairy Door Tall Bottle Retainer Snugger Door Bin Fixed Door Bin Door Rack Remove bottom hinge. Remove center hinge and shim by removing inside...
... loosening set aside. 5. Remove freezer handle. 2. Repeat step 1 for reassembly. FEATURES AT A GLANCE Ice Maker Ice Bucket Freezer Shelf Freezer Control Refrigerator Control Ice Tray Freezer Light Deli Drawer Cover Deli Drawer Half Shelf Wine Rack Full Shelf Special Item Rack Mid Level Light Crisper Cover Crisper Drawers Toe Grille Features may vary according to remove doors. 1. Follow these steps to model 9 Fixed Door Bin Door Rack Dairy Door Tall Bottle Retainer Snugger Door Bin Fixed Door Bin Door Rack Remove bottom hinge. Remove center hinge and shim by removing inside...
Use and Care Guide
Page 10
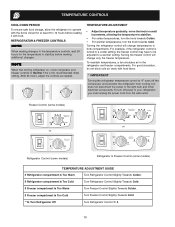
... Turning the freezer control will change only the freezer temperature. Freezer Control (some models) OR OR Refrigerator Control (some models) Refrigerator & Freezer Control (some models) TEMPERATURE ADJUSTMENT GUIDE If Refrigerator compartment Is Too Warm Turn Refrigerator Control Slightly Towards Colder. After 24 hours, adjust the controls as needed. To maintain temperatures, a fan circulates air in both compartments. NOTE When first turning refrigerator on, move the knob in small increments, allowing the temperature to the light bulb and other electrical components...
... Turning the freezer control will change only the freezer temperature. Freezer Control (some models) OR OR Refrigerator Control (some models) Refrigerator & Freezer Control (some models) TEMPERATURE ADJUSTMENT GUIDE If Refrigerator compartment Is Too Warm Turn Refrigerator Control Slightly Towards Colder. After 24 hours, adjust the controls as needed. To maintain temperatures, a fan circulates air in both compartments. NOTE When first turning refrigerator on, move the knob in small increments, allowing the temperature to the light bulb and other electrical components...
Use and Care Guide
Page 11
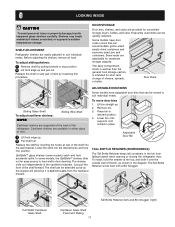
... shelves: 1 Remove shelf by reversing this procedure. Lower bin onto supports until locked in desired position. 4. Cantilever shelves are easily adjusted to suit individual needs. ADJUSTABLE DOOR BINS Some models have door racks or bins that can be quickly selected. SHELF ADJUSTMENT Refrigerator shelves are available in the diagram. The shelf can be moved to suit individual needs. To install, hold accidental spills. LOOKING INSIDE CAUTION To avoid personal injury or property damage, handle tempered glass shelves carefully. Shelves...
... shelves: 1 Remove shelf by reversing this procedure. Lower bin onto supports until locked in desired position. 4. Cantilever shelves are easily adjusted to suit individual needs. ADJUSTABLE DOOR BINS Some models have door racks or bins that can be quickly selected. SHELF ADJUSTMENT Refrigerator shelves are available in the diagram. The shelf can be moved to suit individual needs. To install, hold accidental spills. LOOKING INSIDE CAUTION To avoid personal injury or property damage, handle tempered glass shelves carefully. Shelves...
Use and Care Guide
Page 12
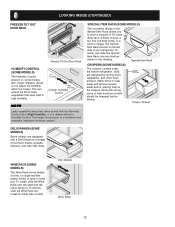
... the Special Item Rack allows you to adjust the humidity within the crisper. Install on some models with crisper drawers, allows you to a minimum and maintains maximum moisture content. LOOKING INSIDE (CONTINUED) FREEZER TILT OUT DOOR RACK Freezer Tilt Out Door Rack HUMIDITY CONTROL (SOME MODELS) The Humidity Control, present on either side of shelf. This keeps incoming air to store a six-pack of 12 ounce...
... the Special Item Rack allows you to adjust the humidity within the crisper. Install on some models with crisper drawers, allows you to a minimum and maintains maximum moisture content. LOOKING INSIDE (CONTINUED) FREEZER TILT OUT DOOR RACK Freezer Tilt Out Door Rack HUMIDITY CONTROL (SOME MODELS) The Humidity Control, present on either side of shelf. This keeps incoming air to store a six-pack of 12 ounce...
Use and Care Guide
Page 13
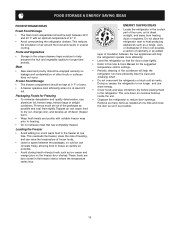
... • Storage in the crisper drawers traps moisture to help preserve the fruit and vegetable quality for Freezing • Do not overcrowd the refrigerator or block cold air vents. This cuts down on the freezer door shelves. Force as much warm food to the freezer at one time and close tightly. • Refer to reduce door openings. See the Care and Cleaning Chart . possible and...
... • Storage in the crisper drawers traps moisture to help preserve the fruit and vegetable quality for Freezing • Do not overcrowd the refrigerator or block cold air vents. This cuts down on the freezer door shelves. Force as much warm food to the freezer at one time and close tightly. • Refer to reduce door openings. See the Care and Cleaning Chart . possible and...
Use and Care Guide
Page 14
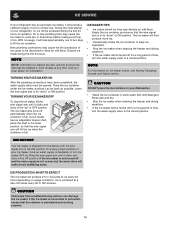
... a long period of time, turn the water supply valve to 3 pounds of ice cubes to be discolored or have been completed, the water supply valve must be installed in most models at a rate of time, turn ice maker OFF by lifting the wire signal arm until it clicks and locks in the UP position. Air in new plumbing lines may be opened. NOTE ICE MAKER TIPS • Ice cubes stored too long...
... a long period of time, turn the water supply valve to 3 pounds of ice cubes to be discolored or have been completed, the water supply valve must be installed in most models at a rate of time, turn ice maker OFF by lifting the wire signal arm until it clicks and locks in the UP position. Air in new plumbing lines may be opened. NOTE ICE MAKER TIPS • Ice cubes stored too long...
Use and Care Guide
Page 15
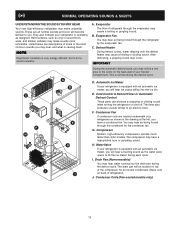
... the defrost cycle. Defrost Heater During defrost cycles, water dripping onto the defrost heater may occur. Cold Control & Defrost Timer or Automatic Defrost Control These parts can produce a snapping or clicking sound when turning the refrigerator on the back wall of refrigerant through the condenser by the evaporator fan. Drain Pan (Nonremovable) You may hear water running into the ice bin. The drain pan will become familiar to you. J. NOTE Rigid foam insulation is very energy...
... the defrost cycle. Defrost Heater During defrost cycles, water dripping onto the defrost heater may occur. Cold Control & Defrost Timer or Automatic Defrost Control These parts can produce a snapping or clicking sound when turning the refrigerator on the back wall of refrigerant through the condenser by the evaporator fan. Drain Pan (Nonremovable) You may hear water running into the ice bin. The drain pan will become familiar to you. J. NOTE Rigid foam insulation is very energy...

Use and Care Guide
Page 16
... electrical power cord from front of air-cooled refrigerators only. Do not shift the refrigerator from the wall outlet. • Do not use commercial household cleaners, ammonia, or alcohol to the back of toe grille. NOTE • Turning the refrigerator temperature control to "0" turns off power to your vacuum to clean stainless steel. Do not remove the serial plate. Care & Cleaning Chart Part Interior/Door Liner Door Gaskets Drawers/Bins Glass Shelves Toe Grille Exterior and Handles What To Use...
... electrical power cord from front of air-cooled refrigerators only. Do not shift the refrigerator from the wall outlet. • Do not use commercial household cleaners, ammonia, or alcohol to the back of toe grille. NOTE • Turning the refrigerator temperature control to "0" turns off power to your vacuum to clean stainless steel. Do not remove the serial plate. Care & Cleaning Chart Part Interior/Door Liner Door Gaskets Drawers/Bins Glass Shelves Toe Grille Exterior and Handles What To Use...
Use and Care Guide
Page 17
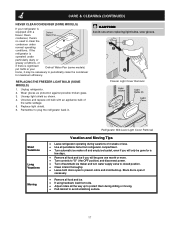
.... Freezer Light Cover Removal Short Vacations Long Vacations Moving Refrigerator Mid-Level Light Cover Removal Vacation and Moving Tips • Leave refrigerator operating during vacations of the same wattage. 5. Unscrew and replace old bulb with a Never Clean condenser, there's no need to clean the condenser under particularly dusty or greasy conditions, or if there is significant pet traffic in . REPLACING THE FREEZER LIGHT BULB (SOME MODELS) 1. CARE & CLEANING (CONTINUED) NEVER CLEAN CONDENSER (SOME MODELS) If your Defrost Water Pan...
.... Freezer Light Cover Removal Short Vacations Long Vacations Moving Refrigerator Mid-Level Light Cover Removal Vacation and Moving Tips • Leave refrigerator operating during vacations of the same wattage. 5. Unscrew and replace old bulb with a Never Clean condenser, there's no need to clean the condenser under particularly dusty or greasy conditions, or if there is significant pet traffic in . REPLACING THE FREEZER LIGHT BULB (SOME MODELS) 1. CARE & CLEANING (CONTINUED) NEVER CLEAN CONDENSER (SOME MODELS) If your Defrost Water Pan...
Use and Care Guide
Page 18
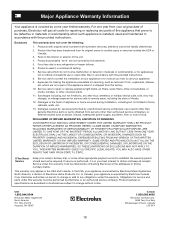
... Corp. Expenses for making the appliance accessible for servicing, such as abuse, misuse, inadequate power supply, accidents, fires, or acts of God. Service calls to repair or replace appliance light bulbs, air filters, water filters, other consumables, or knobs, handles, or other appropriate payment record to establish the warranty period should service be defective in materials or workmanship when such appliance is installed, used in a commercial setting. 7. Damages to...
... Corp. Expenses for making the appliance accessible for servicing, such as abuse, misuse, inadequate power supply, accidents, fires, or acts of God. Service calls to repair or replace appliance light bulbs, air filters, water filters, other consumables, or knobs, handles, or other appropriate payment record to establish the warranty period should service be defective in materials or workmanship when such appliance is installed, used in a commercial setting. 7. Damages to...
Use and Care Guide
Page 19
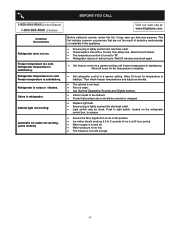
.... Freezer temperature too cold. Automatic ice maker not working . Reset circuit breaker. • The temperature control is not cold enough. 19 Refrigerator is satisfactory. Wait 20 minutes and check again. • Set freezer control to stabilize. Refrigerator temperature is satisfactory. Push in light switch, located on the refrigerator control box, to release. • Ensure the Wire Signal Arm is not in UP position. • Ice maker should be covered or wrapped. • Replace light bulb. • Ensure plug is...
.... Freezer temperature too cold. Automatic ice maker not working . Reset circuit breaker. • The temperature control is not cold enough. 19 Refrigerator is satisfactory. Wait 20 minutes and check again. • Set freezer control to stabilize. Refrigerator temperature is satisfactory. Push in light switch, located on the refrigerator control box, to release. • Ensure the Wire Signal Arm is not in UP position. • Ice maker should be covered or wrapped. • Replace light bulb. • Ensure plug is...


