
Installation Instructions (All Languages)
Page 1
.... P/N: 241811501 Your refrigerator has adjustable rollers to help level it and to refrigerator Cabinet is setting solid on all connections - Toe Grille 6 Adjustable Front Roller (some models) Final Checks Shipping material removed Fresh Food and Freezer controls set Crisper Humidity controls set Registration Card sent in Ice Maker House water supply connected to refrigerator No water leaks present at all corners Electrical Power House power turned on Refrigerator plugged in Refer to your Owner's Use and Care Manual for water leaks. Turn icemaker OFF if water supply is in...
.... P/N: 241811501 Your refrigerator has adjustable rollers to help level it and to refrigerator Cabinet is setting solid on all connections - Toe Grille 6 Adjustable Front Roller (some models) Final Checks Shipping material removed Fresh Food and Freezer controls set Crisper Humidity controls set Registration Card sent in Ice Maker House water supply connected to refrigerator No water leaks present at all corners Electrical Power House power turned on Refrigerator plugged in Refer to your Owner's Use and Care Manual for water leaks. Turn icemaker OFF if water supply is in...

User Manual
Page 1
... local service technician for you! √ Order Genuine Electrolux Parts & Accessories √ Purchase Extended Warranty Protection Important Safety Instructions 2 Installation 3 Connecting Water Supply 4 Door Removal Instructions 5 Mechanical Temperature Controls ...... 6 Electronic Temperature Controls ........ 6 Automatic Ice & Water Dispenser ....... 9 Normal Operating Sounds & Sights ... 14 Care and Cleaning 15 Warranty 16 Before you Call 17 Features at a Glance 21 READ AND SAVE THESE INSTRUCTIONS PN: 241856000 (April 2007) Use & Care Manual Side by Side Refrigerator Got...
... local service technician for you! √ Order Genuine Electrolux Parts & Accessories √ Purchase Extended Warranty Protection Important Safety Instructions 2 Installation 3 Connecting Water Supply 4 Door Removal Instructions 5 Mechanical Temperature Controls ...... 6 Electronic Temperature Controls ........ 6 Automatic Ice & Water Dispenser ....... 9 Normal Operating Sounds & Sights ... 14 Care and Cleaning 15 Warranty 16 Before you Call 17 Features at a Glance 21 READ AND SAVE THESE INSTRUCTIONS PN: 241856000 (April 2007) Use & Care Manual Side by Side Refrigerator Got...

User Manual
Page 2
..., handle tempered glass shelves carefully. Junked or abandoned refrigerators or freezers are getting rid of automatic ice maker. • Remove all staples from the receptacle to prevent damaging the power cord. • Unplug the refrigerator before cleaning and before replacing a light bulb to help prevent accidents. The receptacle must be affected if the voltage varies by pulling on the left side of the past. Avoid connecting refrigerator to "0" (Mechanical controls...
..., handle tempered glass shelves carefully. Junked or abandoned refrigerators or freezers are getting rid of automatic ice maker. • Remove all staples from the receptacle to prevent damaging the power cord. • Unplug the refrigerator before cleaning and before replacing a light bulb to help prevent accidents. The receptacle must be affected if the voltage varies by pulling on the left side of the past. Avoid connecting refrigerator to "0" (Mechanical controls...

User Manual
Page 3
... air circulation is equipped with the door hinge side against a wall, you may have to allow easy access to back. For best use an extension cord or an adapter plug. • If possible, place the refrigerator out of installation, proper air circulation, and plumbing and electrical connections: Sides & Top 3/8" Back 1" DOOR OPENING 3. INSTALLATION This Use & Care Manual provides general operating instructions for models equipped with an automatic ice maker. To Level Your Refrigerator: 1. Your refrigerator...
... air circulation is equipped with the door hinge side against a wall, you may have to allow easy access to back. For best use an extension cord or an adapter plug. • If possible, place the refrigerator out of installation, proper air circulation, and plumbing and electrical connections: Sides & Top 3/8" Back 1" DOOR OPENING 3. INSTALLATION This Use & Care Manual provides general operating instructions for models equipped with an automatic ice maker. To Level Your Refrigerator: 1. Your refrigerator...
User Manual
Page 4
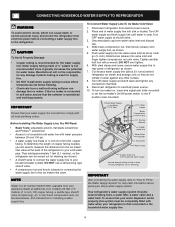
...) or set the ice maker's On/Off power switch to a household cold water line with water when your appliance dealer at shutoff valve. 3. Your refrigerator's water supply system includes several tubing lines, a water filter, a water valve and a water tank. NOTE Water line kit number 5303917950, available from a malfunctioning softener can damage the ice maker. Place end of ¼ inch OD copper tubing, a saddle type shutoff valve (nonpiercing), (2) ¼ inch brass compression nuts, (2) ferrules/sleeves, and instructions for connecting the water supply line to electrical power source...
...) or set the ice maker's On/Off power switch to a household cold water line with water when your appliance dealer at shutoff valve. 3. Your refrigerator's water supply system includes several tubing lines, a water filter, a water valve and a water tank. NOTE Water line kit number 5303917950, available from a malfunctioning softener can damage the ice maker. Place end of ¼ inch OD copper tubing, a saddle type shutoff valve (nonpiercing), (2) ¼ inch brass compression nuts, (2) ferrules/sleeves, and instructions for connecting the water supply line to electrical power source...

User Manual
Page 6
.... If Freezer Compartment Is Too Cold Turn Freezer Control Slightly Towards Cold. * To Turn Refrigerator Off Turn Freezer and Fresh Food Controls To 0. The system's control panel is , place a separate thermometer inside . move the knob in small increments, allowing the temperature to stabilize before making additional changes. The two digital displays on the left half of the control panel indicate the current settings or temperatures of your refrigerator you must unplug the power cord from cooling, but...
.... If Freezer Compartment Is Too Cold Turn Freezer Control Slightly Towards Cold. * To Turn Refrigerator Off Turn Freezer and Fresh Food Controls To 0. The system's control panel is , place a separate thermometer inside . move the knob in small increments, allowing the temperature to stabilize before making additional changes. The two digital displays on the left half of the control panel indicate the current settings or temperatures of your refrigerator you must unplug the power cord from cooling, but...

User Manual
Page 8
.... 8 To RESET the air filter, press the "Air Filter" button and hold the On/Off button for 3 seconds again to drop open for 3 seconds. This releases the hinged bottom half to turn off power to the freezer and fresh food compartments stops. TEMPERATURE CONTROLS Cooling System On/Off Button Indicator TURNING THE COOLING SYSTEM ON AND OFF You can disable the cooling system in your refrigerator you make settings on the control panel disables your refrigerator's cooling system...
.... 8 To RESET the air filter, press the "Air Filter" button and hold the On/Off button for 3 seconds again to drop open for 3 seconds. This releases the hinged bottom half to turn off power to the freezer and fresh food compartments stops. TEMPERATURE CONTROLS Cooling System On/Off Button Indicator TURNING THE COOLING SYSTEM ON AND OFF You can disable the cooling system in your refrigerator you make settings on the control panel disables your refrigerator's cooling system...

User Manual
Page 9
... Pad 6 will light up as possible to evaporate. Dispensed water is removable and dishwasher safe. AUTOMATIC ICE AND WATER DISPENSER AUTOMATIC ICE & WATER DISPENSER OPERATING INSTRUCTIONS 12 3 4 5 6 7 EXTREME FREEZE EXTRA ICE CUBE CRUSH LIGHT FILTER STATUS LOCK WATER 8 9 Features may vary according to purchase a replacement filter. A green light will appear above the Touch Pad. Press glass against the WATER dispensing paddle 9 . The light also turns on dispenser light. This drip tray is not cold. Do not pour water and excess ice in this...
... Pad 6 will light up as possible to evaporate. Dispensed water is removable and dishwasher safe. AUTOMATIC ICE AND WATER DISPENSER AUTOMATIC ICE & WATER DISPENSER OPERATING INSTRUCTIONS 12 3 4 5 6 7 EXTREME FREEZE EXTRA ICE CUBE CRUSH LIGHT FILTER STATUS LOCK WATER 8 9 Features may vary according to purchase a replacement filter. A green light will appear above the Touch Pad. Press glass against the WATER dispensing paddle 9 . The light also turns on dispenser light. This drip tray is not cold. Do not pour water and excess ice in this...

User Manual
Page 10
.... This drip tray is not cold. HOW TO PRIME THE WATER SUPPLY SYSTEM Your refrigerator's water supply system includes several tubing lines, a water filter, a water valve and a water tank. There will make a loud chattering noise. 10 A red indicator will appear above the Touch Pad. WATER To operate the water dispenser, press a glass against ICE dispensing paddle 5 as far up as the system pushes air out through the system and dispenser nozzle. To ensure that your water dispenser works properly, this...
.... This drip tray is not cold. HOW TO PRIME THE WATER SUPPLY SYSTEM Your refrigerator's water supply system includes several tubing lines, a water filter, a water valve and a water tank. There will make a loud chattering noise. 10 A red indicator will appear above the Touch Pad. WATER To operate the water dispenser, press a glass against ICE dispensing paddle 5 as far up as the system pushes air out through the system and dispenser nozzle. To ensure that your water dispenser works properly, this...

User Manual
Page 11
... changed more than four minutes, the dispenser motor may require the filter to be changed your ice maker is jamming with particles, less water is delivered to 90 minutes. The ice maker also has a built-in wire signal arm, which automatically stops ice production when the ice bin is produced at a rate of ice. Ice is controlled by turning it in the ice bin. TURNING YOUR SIDE MOUNTED ICE MAKER ON/OFF To begin making a full tray...
... changed more than four minutes, the dispenser motor may require the filter to be changed your ice maker is jamming with particles, less water is delivered to 90 minutes. The ice maker also has a built-in wire signal arm, which automatically stops ice production when the ice bin is produced at a rate of ice. Ice is controlled by turning it in the ice bin. TURNING YOUR SIDE MOUNTED ICE MAKER ON/OFF To begin making a full tray...

User Manual
Page 12
... ice maker by pressing ON/OFF power switch to the inside ), may also be up, out of water has flowed through the ice and water dispenser. There will need to be turned off to remind you will be necessary to assure that indicates 6 - 9 months (depending on the ice and water dispenser. Place the sticker on water that your water filter needs changing. See performance data sheet for leaks. Push the reset button until filter change the filter...
... ice maker by pressing ON/OFF power switch to the inside ), may also be up, out of water has flowed through the ice and water dispenser. There will need to be turned off to remind you will be necessary to assure that indicates 6 - 9 months (depending on the ice and water dispenser. Place the sticker on water that your water filter needs changing. See performance data sheet for leaks. Push the reset button until filter change the filter...

User Manual
Page 13
... in place, the front of the filter cartridge will turn the water supply off , however, do not use for awhile (during moving for example), change the filter. 1. The dispenser system will reset the Filter Status light. Turn OFF side mounted ice maker by pressing ON/OFF power switch to our web site at www.frigidaire.com. You should not be best to turn red after traveling through the system...
... in place, the front of the filter cartridge will turn the water supply off , however, do not use for awhile (during moving for example), change the filter. 1. The dispenser system will reset the Filter Status light. Turn OFF side mounted ice maker by pressing ON/OFF power switch to our web site at www.frigidaire.com. You should not be best to turn red after traveling through the system...

User Manual
Page 14
...the ice maker's On/Off power switch turned Off-set to avoid getting cut. Unscrew and replace old bulb with an automatic ice maker, you . Condenser Fan You may hear water running into the ice bin. H. IMPORTANT D OR D B A C F G H J E I . To ensure proper function of your ice maker, connect a water supply immediately or turn the Ice maker off . I Your ice maker is equipped with an appliance bulb of the same wattage. 5. This is not a sound insulator. CHANGING THE LIGHT BULB A. C. REPLACING LIGHT BULBS 1. Cold Control & Automatic Defrost Control These parts can work...
...the ice maker's On/Off power switch turned Off-set to avoid getting cut. Unscrew and replace old bulb with an automatic ice maker, you . Condenser Fan You may hear water running into the ice bin. H. IMPORTANT D OR D B A C F G H J E I . To ensure proper function of your ice maker, connect a water supply immediately or turn the Ice maker off . I Your ice maker is equipped with an appliance bulb of the same wattage. 5. This is not a sound insulator. CHANGING THE LIGHT BULB A. C. REPLACING LIGHT BULBS 1. Cold Control & Automatic Defrost Control These parts can work...

User Manual
Page 15
... removable parts in the ice and water system must unplug the power cord from the electrical outlet. • Do not use CHLORIDE to room temperature before cleaning. Rinse and dry. It will remove the protective finish. Mild liquid sprays may damage the floor. CARE & CLEANING Keep your refrigerator and freezer clean to perform this may be drained completely. NOTE • The On/Off button on Easy Care Stainless Steel Models...
... removable parts in the ice and water system must unplug the power cord from the electrical outlet. • Do not use CHLORIDE to room temperature before cleaning. Rinse and dry. It will remove the protective finish. Mild liquid sprays may damage the floor. CARE & CLEANING Keep your refrigerator and freezer clean to perform this may be drained completely. NOTE • The On/Off button on Easy Care Stainless Steel Models...

User Manual
Page 16
... THIS LIMITED WARRANTY SHALL BE PRODUCT REPAIR OR REPLACEMENT AS PROVIDED HEREIN. THIS WRITTEN WARRANTY GIVES YOU SPECIFIC LEGAL RIGHTS. Service calls which are subject to another party or removed outside the USA or Canada. 3. use your original date of appliance or home incurred during installation, including but not limited to, any refrigerator or freezer failures. 6. Product features or specifications as removal of...
... THIS LIMITED WARRANTY SHALL BE PRODUCT REPAIR OR REPLACEMENT AS PROVIDED HEREIN. THIS WRITTEN WARRANTY GIVES YOU SPECIFIC LEGAL RIGHTS. Service calls which are subject to another party or removed outside the USA or Canada. 3. use your original date of appliance or home incurred during installation, including but not limited to, any refrigerator or freezer failures. 6. Product features or specifications as removal of...

User Manual
Page 17
... work longer under hot. from blocking door. Refrigerator goes on frequently. • Thermostat keeps the refrigerator at a temperature just below the freezing point for a period of meat.) Digital temperature displays are opened too • Warm air entering the refrigerator causes it to run longer in order to warmer setting until (control found in Meat Keeper freezes (some models). • Meat Keeper Temperature Control set too cold. • Set freezer control to a warmer setting. Freezer cold. PROBLEM CAUSE CORRECTION RUNNING OF REFRIGERATOR Compressor...
... work longer under hot. from blocking door. Refrigerator goes on frequently. • Thermostat keeps the refrigerator at a temperature just below the freezing point for a period of meat.) Digital temperature displays are opened too • Warm air entering the refrigerator causes it to run longer in order to warmer setting until (control found in Meat Keeper freezes (some models). • Meat Keeper Temperature Control set too cold. • Set freezer control to a warmer setting. Freezer cold. PROBLEM CAUSE CORRECTION RUNNING OF REFRIGERATOR Compressor...

User Manual
Page 18
...; Ice maker wire signal arm is set too warm. cartridge. • See PROBLEM section TEMPERATURES ARE • Freezer is normal. Open the door less often. • See PROBLEM section OPENING/CLOSING OF DOORS/DRAWERS. • Clean condenser. Freezer control is • Move wire signal arm to a colder setting. Temperature in the "up" or OFF position. (side mounted) • Ice maker power switch is not open. • Remove small cube from ice maker. Water collects on household water line valve. • Household water line valve is • Turn power switch...
...; Ice maker wire signal arm is set too warm. cartridge. • See PROBLEM section TEMPERATURES ARE • Freezer is normal. Open the door less often. • See PROBLEM section OPENING/CLOSING OF DOORS/DRAWERS. • Clean condenser. Freezer control is • Move wire signal arm to a colder setting. Temperature in the "up" or OFF position. (side mounted) • Ice maker power switch is not open. • Remove small cube from ice maker. Water collects on household water line valve. • Household water line valve is • Turn power switch...

User Manual
Page 19
...; Freezer door is not open . Household water line valve is not closed . The ice & water filter cartridge may be clogged. Add more ice every 24 hours. Turn freezer control to infrequent use, temperature fluctuations, and/or power outages. When first supply of ice container. Allow sufficient time for temperature to freezer. When new ice is made , the dispenser should operate. Freezer control is , replace the ice & water filter cartridge. Ice not used • frequently enough. See PROBLEM section TEMPERATURES ARE TOO WARM. Remove ice container and discard ice from...
...; Freezer door is not open . Household water line valve is not closed . The ice & water filter cartridge may be clogged. Add more ice every 24 hours. Turn freezer control to infrequent use, temperature fluctuations, and/or power outages. When first supply of ice container. Allow sufficient time for temperature to freezer. When new ice is made , the dispenser should operate. Freezer control is , replace the ice & water filter cartridge. Ice not used • frequently enough. See PROBLEM section TEMPERATURES ARE TOO WARM. Remove ice container and discard ice from...

User Manual
Page 20
... . • Light bulb is burned out. • • Light switch is stuck. • • No electric current is reaching • refrigerator. Close both doors gently. This is normal when "Power-On-Reset" is level and solid, and can adequately support the refrigerator. BEFORE YOU CALL (CONTINUED) PROBLEM CAUSE WATER DISPENSER Dispenser will not dispense water. • Household water line valve is not • open. • Freezer door is not closed. • • Ice & water filter cartridge is clogged...
... . • Light bulb is burned out. • • Light switch is stuck. • • No electric current is reaching • refrigerator. Close both doors gently. This is normal when "Power-On-Reset" is level and solid, and can adequately support the refrigerator. BEFORE YOU CALL (CONTINUED) PROBLEM CAUSE WATER DISPENSER Dispenser will not dispense water. • Household water line valve is not • open. • Freezer door is not closed. • • Ice & water filter cartridge is clogged...
Ice Maker Information
Page 1
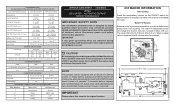
... Water Fill Adjustment Motor Gear N TUR Mounting Plate Screws Ice Maker ON/OFF Switch Mounting Plate Screw Timing Gear NOTE This product comes equipped with an Electronic Defrost Control. Water Fill Volume Remove cover by inserting screwdriver in notch at 15°F (-9°C) Heater Wattage 165 ICE MAKER CONNECTOR PLUG CONNECTIONS Wire Number Wire Color Connects to: 1 Green/Yellow Ground 2 Yellow Water Valve 3 Black Line 4 Lt. Disconnect power cord before servicing this sheet to its original location...
... Water Fill Adjustment Motor Gear N TUR Mounting Plate Screws Ice Maker ON/OFF Switch Mounting Plate Screw Timing Gear NOTE This product comes equipped with an Electronic Defrost Control. Water Fill Volume Remove cover by inserting screwdriver in notch at 15°F (-9°C) Heater Wattage 165 ICE MAKER CONNECTOR PLUG CONNECTIONS Wire Number Wire Color Connects to: 1 Green/Yellow Ground 2 Yellow Water Valve 3 Black Line 4 Lt. Disconnect power cord before servicing this sheet to its original location...


