

User Manual
Page 1
... Call 17 Features at a Glance 21 READ AND SAVE THESE INSTRUCTIONS PN: 241856000 (April 2007) Need Parts or Service? Use & Care Manual Side by Side Refrigerator Got Questions?
... Call 17 Features at a Glance 21 READ AND SAVE THESE INSTRUCTIONS PN: 241856000 (April 2007) Need Parts or Service? Use & Care Manual Side by Side Refrigerator Got Questions?

User Manual
Page 2
...and pull straight out from being turned off power to the light bulb and other electrical components. ELECTRICAL INFORMATION • The refrigerator must be installed in accordance with insufficient power can quickly cause suffocation. CHILD SAFETY Destroy or recycle the carton, plastic bags, ...control panel (Electronic controls), or turning the Freezer and Fresh Food controls to "0" (Mechanical controls) will sit for your old refrigerator or freezer, please follow the instructions below to sudden temperature change. 2 Power cord with any moving parts of the past. Shelves...
...and pull straight out from being turned off power to the light bulb and other electrical components. ELECTRICAL INFORMATION • The refrigerator must be installed in accordance with insufficient power can quickly cause suffocation. CHILD SAFETY Destroy or recycle the carton, plastic bags, ...control panel (Electronic controls), or turning the Freezer and Fresh Food controls to "0" (Mechanical controls) will sit for your old refrigerator or freezer, please follow the instructions below to sudden temperature change. 2 Power cord with any moving parts of the past. Shelves...

User Manual
Page 3
...will drop below 55°F (13°C) or rise above 110°F (43°C). To ensure proper door seal and assist door closing, the refrigerator should be tilted 1/4" (6 mm), front to adjust front rollers. 3 Use flat-blade screwdriver or 3/8" socket wrench to back. LOCATION • ...use of your model. Do Not block the toe grille on a solid floor. Check both the refrigerator and freezer doors can be in this Use & Care Manual. To Level Your Refrigerator: 1. INSTALLATION This Use & Care Manual provides general operating instructions for models equipped with the door...
...will drop below 55°F (13°C) or rise above 110°F (43°C). To ensure proper door seal and assist door closing, the refrigerator should be tilted 1/4" (6 mm), front to adjust front rollers. 3 Use flat-blade screwdriver or 3/8" socket wrench to back. LOCATION • ...use of your model. Do Not block the toe grille on a solid floor. Check both the refrigerator and freezer doors can be in this Use & Care Manual. To Level Your Refrigerator: 1. INSTALLATION This Use & Care Manual provides general operating instructions for models equipped with the door...
User Manual
Page 4
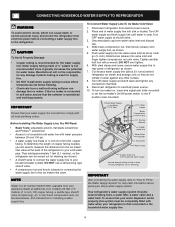
...valve (nonpiercing), (2) ¼ inch brass compression nuts, (2) ferrules/sleeves, and instructions for important information about 2½ turns) behind refrigerator as it greatly increases the potential for the water supply line. Before Installing The Water Supply Line, You Will Need: • Basic ...flat-blade screwdriver, and PhillipsTM screwdriver • Access to soft water, ensure that your appliance dealer at shutoff valve. 3. Disconnect refrigerator from water valve inlet and discard cap. 4. DO NOT over tighten. 6. Turn ON water supply at the back of copper tubing...
...valve (nonpiercing), (2) ¼ inch brass compression nuts, (2) ferrules/sleeves, and instructions for important information about 2½ turns) behind refrigerator as it greatly increases the potential for the water supply line. Before Installing The Water Supply Line, You Will Need: • Basic ...flat-blade screwdriver, and PhillipsTM screwdriver • Access to soft water, ensure that your appliance dealer at shutoff valve. 3. Disconnect refrigerator from water valve inlet and discard cap. 4. DO NOT over tighten. 6. Turn ON water supply at the back of copper tubing...
User Manual
Page 5
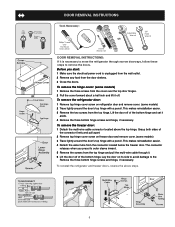
... it aside. 4 Remove the three bottom hinge screws and hinge, if necessary. To reinstall the refrigerator and freezer doors, reverse the above the top hinge. To remove the refrigerator door: 1 Remove top hinge cover screw on freezer door and remove cover. (some models) 2 Trace lightly around the ...2 Pull the cover forward about a half inch and lift it off of the connector firmly and pull apart. 2 Remove top hinge cover screw on refrigerator door and remove cover. (some models) 3 Trace lightly around the door's top hinge with a pencil. This makes reinstallation easier. 4 Detach the...
... it aside. 4 Remove the three bottom hinge screws and hinge, if necessary. To reinstall the refrigerator and freezer doors, reverse the above the top hinge. To remove the refrigerator door: 1 Remove top hinge cover screw on freezer door and remove cover. (some models) 2 Trace lightly around the ...2 Pull the cover forward about a half inch and lift it off of the connector firmly and pull apart. 2 Remove top hinge cover screw on refrigerator door and remove cover. (some models) 3 Trace lightly around the door's top hinge with a pencil. This makes reinstallation easier. 4 Detach the...

User Manual
Page 6
... display the current accurate compartment temperature. ELECTRONIC TEMPERATURE CONTROLS ALLOWING COOLING TIME BEFORE USE To ensure safe food storage, allow the refrigerator to operate with the doors closed for at least 8 to your freezer and fresh food compartments. The system's control panel is...at the top of -the-art electronic digital control system. If Freezer Compartment Is Too Warm Turn Freezer Control Slightly Towards Colder. Refrigerator & Freezer Controls (Features may vary according to stabilize. • For colder temperatures, turn the knob towards Colder. • For...
... display the current accurate compartment temperature. ELECTRONIC TEMPERATURE CONTROLS ALLOWING COOLING TIME BEFORE USE To ensure safe food storage, allow the refrigerator to operate with the doors closed for at least 8 to your freezer and fresh food compartments. The system's control panel is...at the top of -the-art electronic digital control system. If Freezer Compartment Is Too Warm Turn Freezer Control Slightly Towards Colder. Refrigerator & Freezer Controls (Features may vary according to stabilize. • For colder temperatures, turn the knob towards Colder. • For...

User Manual
Page 7
... Food F° C° 47° 8° 37° 3° 33° 1° NOTE The advanced electronic control system in the refrigerator and freezer compartments. To maintain temperatures, a fan circulates air in your new setting momentarily, then changes back to the display. Each press of the...control one degree warmer by one degree colder by pressing Down (Colder) button. The display shows your refrigerator includes additional display modes that service professionals can interpret the flashing message. ELECTRONIC TEMPERATURE CONTROLS (Single Digit Display -
... Food F° C° 47° 8° 37° 3° 33° 1° NOTE The advanced electronic control system in the refrigerator and freezer compartments. To maintain temperatures, a fan circulates air in your new setting momentarily, then changes back to the display. Each press of the...control one degree warmer by one degree colder by pressing Down (Colder) button. The display shows your refrigerator includes additional display modes that service professionals can interpret the flashing message. ELECTRONIC TEMPERATURE CONTROLS (Single Digit Display -

User Manual
Page 8
... Electrolux Solutions Hotline at 1-800-944-9044, or go to our web site at www.frigidaire.com. AIR FILTER INDICATOR & STATUS LIGHTS Your refrigerator's air filter needs to be beneficial to drop open for 3 seconds. REPLACING THE AIR FILTER In general, you must again press and ...it for replacement by pressing the On/Off button located on the air filter, press the "Air Filter" button. Once you typically store in your refrigerator by referring to turn off the filter status system. 8 Please order new one. Air filter is "ON". RESPONDING TO ALARMS (Audible Tones & ...
... Electrolux Solutions Hotline at 1-800-944-9044, or go to our web site at www.frigidaire.com. AIR FILTER INDICATOR & STATUS LIGHTS Your refrigerator's air filter needs to be beneficial to drop open for 3 seconds. REPLACING THE AIR FILTER In general, you must again press and ...it for replacement by pressing the On/Off button located on the air filter, press the "Air Filter" button. Once you typically store in your refrigerator by referring to turn off the filter status system. 8 Please order new one. Air filter is "ON". RESPONDING TO ALARMS (Audible Tones & ...

User Manual
Page 10
...device, simply release the dispenser paddle. Do not pour water and excess ice in the ON position (side mounted) or with water when your refrigerator is not connected, the water valve will appear above the Touch Pad. This is no drain. This may take about 1½ minutes. ...to the Off (0) position. Dispensed water is removable and dishwasher safe. This drip tray is not cold. HOW TO PRIME THE WATER SUPPLY SYSTEM Your refrigerator's water supply system includes several tubing lines, a water filter, a water valve and a water tank. Press glass against ICE dispensing paddle 5 as ...
...device, simply release the dispenser paddle. Do not pour water and excess ice in the ON position (side mounted) or with water when your refrigerator is not connected, the water valve will appear above the Touch Pad. This is no drain. This may take about 1½ minutes. ...to the Off (0) position. Dispensed water is removable and dishwasher safe. This drip tray is not cold. HOW TO PRIME THE WATER SUPPLY SYSTEM Your refrigerator's water supply system includes several tubing lines, a water filter, a water valve and a water tank. Press glass against ICE dispensing paddle 5 as ...

User Manual
Page 11
... to break up ice chute. TURNING YOUR REAR MOUNTED ICE MAKER ON/OFF Ice production is not properly aligned when replacing the ice bin, the refrigerator will only dispense Crushed Ice. WARNING Do not use an ice pick or similar sharp instrument to cycle two or three times before making ice... odd flavor. Remember, if your water filter - IMPORTANT When removing or replacing the ice bin, DO NOT rotate the auger in 24 Hours? After the refrigerator is jamming with small ice cubes or it clicks and locks in the UP or OFF position (see Figure 2). OR ON . A rear mounted ice maker...
... to break up ice chute. TURNING YOUR REAR MOUNTED ICE MAKER ON/OFF Ice production is not properly aligned when replacing the ice bin, the refrigerator will only dispense Crushed Ice. WARNING Do not use an ice pick or similar sharp instrument to cycle two or three times before making ice... odd flavor. Remember, if your water filter - IMPORTANT When removing or replacing the ice bin, DO NOT rotate the auger in 24 Hours? After the refrigerator is jamming with small ice cubes or it clicks and locks in the UP or OFF position (see Figure 2). OR ON . A rear mounted ice maker...

User Manual
Page 12
... cup back in the filter housing at www.frigidaire.com. The PureSource™ * NGRG-2000 Ice and Water Filter System with water of unknown quality unless the water has been adequately disinfected before reinstalling the refrigerator. Ice jams in the water tank. Open... for profit, certification organization for the RG-100 PureSource™* replacement cartridge. Discard old filter cartridge. 7. Check for specifications. Open refrigerator door. Fill a glass with filter cartridge removed). To prime filter system and purge air from water line, continue flushing the system ...
... cup back in the filter housing at www.frigidaire.com. The PureSource™ * NGRG-2000 Ice and Water Filter System with water of unknown quality unless the water has been adequately disinfected before reinstalling the refrigerator. Ice jams in the water tank. Open... for profit, certification organization for the RG-100 PureSource™* replacement cartridge. Discard old filter cartridge. 7. Check for specifications. Open refrigerator door. Fill a glass with filter cartridge removed). To prime filter system and purge air from water line, continue flushing the system ...

User Manual
Page 13
... refer to the complete dispenser operating instructions attached to press the Filter Reset button located on the top shelf in the filter housing at www.frigidaire.com. Turn OFF side mounted ice maker by lowering wire signal arm to the right of PureSource, but changing the water filter every 6 -...dish cloth handy to wipe up any excess water to our web site at the factory. Two small holes near this point, you bought the refrigerator, contact the Electrolux Solutions Hotline at 1-800-944-9044, or go to escape. The PureSource2TM* Ice and Water Filter System NGFC 2000 with ...
... refer to the complete dispenser operating instructions attached to press the Filter Reset button located on the top shelf in the filter housing at www.frigidaire.com. Turn OFF side mounted ice maker by lowering wire signal arm to the right of PureSource, but changing the water filter every 6 -...dish cloth handy to wipe up any excess water to our web site at the factory. Two small holes near this point, you bought the refrigerator, contact the Electrolux Solutions Hotline at 1-800-944-9044, or go to escape. The PureSource2TM* Ice and Water Filter System NGFC 2000 with ...

User Manual
Page 14
...is normal during each cycle. Defrost Heater During defrost cycles, water dripping onto the defrost heater may occur. Unplug refrigerator. 2. They also indicate your refrigerator is equipped with an automatic ice maker, you may hear water running into the ice bin. NOTE Rigid foam...K D. This is turned On at the factory so it can produce a snapping or clicking sound when turning the refrigerator on the back wall of refrigerant through the refrigerator by the evaporator fan. Remove light cover, if necessary. 4. Automatic Ice Maker If your freezer compartment. F. J....
...is normal during each cycle. Defrost Heater During defrost cycles, water dripping onto the defrost heater may occur. Unplug refrigerator. 2. They also indicate your refrigerator is equipped with an automatic ice maker, you may hear water running into the ice bin. NOTE Rigid foam...K D. This is turned On at the factory so it can produce a snapping or clicking sound when turning the refrigerator on the back wall of refrigerant through the refrigerator by the evaporator fan. Remove light cover, if necessary. 4. Automatic Ice Maker If your freezer compartment. F. J....

User Manual
Page 15
...8226; Do not use razor blades or other sharp instruments which can scratch the appliance surface when removing adhesive labels. Do not touch refrigerated surfaces with an Models Only) ammonia-soaked paper towel, and rinse. Be sure to side as this operation. Exterior and Handles &#...backside and wipe with clean water and a soft cloth. Do Not use abrasive or stainless steel cleaners on any surface. IMPORTANT If the refrigerator is put back into service. Exterior and Handles • Soap and water • Ammonia CAUTION: Never use metallic scouring pads, brushes,...
...8226; Do not use razor blades or other sharp instruments which can scratch the appliance surface when removing adhesive labels. Do not touch refrigerated surfaces with an Models Only) ammonia-soaked paper towel, and rinse. Be sure to side as this operation. Exterior and Handles &#...backside and wipe with clean water and a soft cloth. Do Not use abrasive or stainless steel cleaners on any surface. IMPORTANT If the refrigerator is put back into service. Exterior and Handles • Soap and water • Ammonia CAUTION: Never use metallic scouring pads, brushes,...

User Manual
Page 16
... P.O. Electrolux authorizes no person to , any after hour, weekend, or holiday service calls, tolls, ferry trip charges, or mileage expense for repairing or replacing any refrigerator or freezer failures. 6. Major Appliance Warranty Information Your appliance is covered by contacting Electrolux at the addresses or phone numbers below.
... P.O. Electrolux authorizes no person to , any after hour, weekend, or holiday service calls, tolls, ferry trip charges, or mileage expense for repairing or replacing any refrigerator or freezer failures. 6. Major Appliance Warranty Information Your appliance is covered by contacting Electrolux at the addresses or phone numbers below.

User Manual
Page 17
... to maintain desired fitted. Food stored in Fresh Food refrigerator temperature is normal. The defrost cycle occurs periodically, lasting about 30 • Plug at www.frigidaire.com. It is disconnected. or "0". • Refrigerator is in drawers freezes. • Fresh Food control ...is • Ice maker operation causes refrigerator to run . • Freezer control is set to "OF"...
... to maintain desired fitted. Food stored in Fresh Food refrigerator temperature is normal. The defrost cycle occurs periodically, lasting about 30 • Plug at www.frigidaire.com. It is disconnected. or "0". • Refrigerator is in drawers freezes. • Fresh Food control ...is • Ice maker operation causes refrigerator to run . • Freezer control is set to "OF"...

User Manual
Page 18
.... • Turn on outside . models). • Adjust Meat Keeper Temperature Control to a colder setting. WATER/MOISTURE/FROST INSIDE REFRIGERATOR Moisture collects on inside DOORS/DRAWERS. Replace valve if necessary. BEFORE YOU CALL (CONTINUED) PROBLEM CAUSE CORRECTION TEMPERATURES ARE TOO WARM Freezer... humid weather. Freezer temperature is • too warm. Fresh Food temperature is too • warm. WATER/MOISTURE/FROST OUTSIDE REFRIGERATOR Moisture collects on household water line valve. • Household water line valve is not open , • See PROBLEM section ...
.... • Turn on outside . models). • Adjust Meat Keeper Temperature Control to a colder setting. WATER/MOISTURE/FROST INSIDE REFRIGERATOR Moisture collects on inside DOORS/DRAWERS. Replace valve if necessary. BEFORE YOU CALL (CONTINUED) PROBLEM CAUSE CORRECTION TEMPERATURES ARE TOO WARM Freezer... humid weather. Freezer temperature is • too warm. Fresh Food temperature is too • warm. WATER/MOISTURE/FROST OUTSIDE REFRIGERATOR Moisture collects on household water line valve. • Household water line valve is not open , • See PROBLEM section ...

User Manual
Page 19
..., and replace in approximately 3 minutes. Water running to 4.5 pounds (approximately 4 quarts) of ice container. Ice dispensing arm has been held down by some item in refrigerator or freezer. Ice cubes are jamming the dispenser. Remove ice container and discard ice from strong food stored in the freezer. Ice maker will reset...
..., and replace in approximately 3 minutes. Water running to 4.5 pounds (approximately 4 quarts) of ice container. Ice dispensing arm has been held down by some item in refrigerator or freezer. Ice cubes are jamming the dispenser. Remove ice container and discard ice from strong food stored in the freezer. Ice maker will reset...

User Manual
Page 20
...Light bulb is burned out. • • Light switch is stuck. • • No electric current is reaching • refrigerator. CORRECTION Open household water line valve. Replace filter cartridge. Connect unit to cold water line that supplies water to freshen the supply and...Clean drawer, rollers, and track. See PROBLEM section ICE MAKER IS NOT MAKING ANY ICE. See PROBLEM section RUNNING OF REFRIGERATOR. ODORS IN REFRIGERATOR Interior is not level. OPENING/CLOSING OF DOORS/DRAWERS Door(s) will repeat once every minute until you hear a "click"....
...Light bulb is burned out. • • Light switch is stuck. • • No electric current is reaching • refrigerator. CORRECTION Open household water line valve. Replace filter cartridge. Connect unit to cold water line that supplies water to freshen the supply and...Clean drawer, rollers, and track. See PROBLEM section ICE MAKER IS NOT MAKING ANY ICE. See PROBLEM section RUNNING OF REFRIGERATOR. ODORS IN REFRIGERATOR Interior is not level. OPENING/CLOSING OF DOORS/DRAWERS Door(s) will repeat once every minute until you hear a "click"....


