Use and Care Manual
Page 1
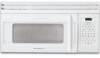
Over-the-Range Microwave Oven CGLMV169, GLMV169 CPLMV169, PLMV169 Visit the Frigidaire Web Site at: http://www.frigidaire.com READ AND SAVE THESE INSTRUCTIONS Welcome & Congratulation ...... 2 Important Safety Instructions .. 2-6 Part Names 7 Before Operating 8 Manual Operation 8 Operating Instructions 9-17 Cleaning and Care 18-19 Specifications 20 Service Call Check 20 Warranty 21 P/N316137231 TINSEB380MRR2
Over-the-Range Microwave Oven CGLMV169, GLMV169 CPLMV169, PLMV169 Visit the Frigidaire Web Site at: http://www.frigidaire.com READ AND SAVE THESE INSTRUCTIONS Welcome & Congratulation ...... 2 Important Safety Instructions .. 2-6 Part Names 7 Before Operating 8 Manual Operation 8 Operating Instructions 9-17 Cleaning and Care 18-19 Specifications 20 Service Call Check 20 Warranty 21 P/N316137231 TINSEB380MRR2
Use and Care Manual
Page 5
...special circumstances, liquids may start a fire. It is a normal part of moisture that a large dish could start to speed cooking of meat or poultry to prevent overcooking before removing the container from the microwave oven. It should be used to distribute the heat evenly. Food ...turntable and support nor turn both from top to bottom and from outside of 160°F and poultry to absorb the microwave energy. Your microwave oven is . ABOUT MICROWAVE COOKING • Arrange food carefully. Doneness signs include: - Stir food to dry clothes or newspapers. The container ...
...special circumstances, liquids may start a fire. It is a normal part of moisture that a large dish could start to speed cooking of meat or poultry to prevent overcooking before removing the container from the microwave oven. It should be used to distribute the heat evenly. Food ...turntable and support nor turn both from top to bottom and from outside of 160°F and poultry to absorb the microwave energy. Your microwave oven is . ABOUT MICROWAVE COOKING • Arrange food carefully. Doneness signs include: - Stir food to dry clothes or newspapers. The container ...
Use and Care Manual
Page 7
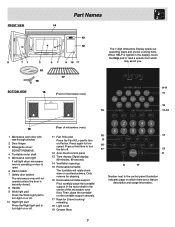
... NOT REMOVE. 4 Turntable motor shaft 5 Microwave oven light It will light when microwave oven is operating or door is lighted in the center of microwave oven) The 7-digit Interactive Display spells out operating steps and shows cooking hints. FRONT VIEW Part Names 14 13 12 15 16 BOTTOM VIEW... 17 (Front of the microwave oven floor. When HELP is open. 6 Rack holders 7 Safety door latches The microwave oven will rotate clockwise or counterclockwise. Then, place the turntable...
... NOT REMOVE. 4 Turntable motor shaft 5 Microwave oven light It will light when microwave oven is operating or door is lighted in the center of microwave oven) The 7-digit Interactive Display spells out operating steps and shows cooking hints. FRONT VIEW Part Names 14 13 12 15 16 BOTTOM VIEW... 17 (Front of the microwave oven floor. When HELP is open. 6 Rack holders 7 Safety door latches The microwave oven will rotate clockwise or counterclockwise. Then, place the turntable...

Use and Care Manual
Page 9
...listed in the chart should not touch food. 3. During the first part of SENSOR COOKING, food name will be interrupted. The measurement of vapor will appear on the rack. • Using special features with the rack in any microwave cookbook. 6. To continue cooking, touch the Clear/Off pad and... temperature. 4. Any SENSOR COOKING selection can cook many foods by touching just one time. Do not open the microwave oven door or touch Clear/Off during this part of the microwave oven are designed to be at signal, rotate dish. If additional time is needed, continue to cover. Touch ...
...listed in the chart should not touch food. 3. During the first part of SENSOR COOKING, food name will be interrupted. The measurement of vapor will appear on the rack. • Using special features with the rack in any microwave cookbook. 6. To continue cooking, touch the Clear/Off pad and... temperature. 4. Any SENSOR COOKING selection can cook many foods by touching just one time. Do not open the microwave oven door or touch Clear/Off during this part of the microwave oven are designed to be at signal, rotate dish. If additional time is needed, continue to cover. Touch ...
Use and Care Manual
Page 18
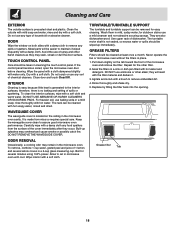
..., wipe with a damp cloth. TURNTABLE/TURNTABLE SUPPORT The turntable and turntable support can be taken in a 2-cup glass measuring cup. Metal parts will react with hot soapy water, rinsed and dried. rinse thoroughly with mild soap and water; Use upper rack of the cover immediately after... and darken it. 3. ODOR REMOVAL Occasionally, a cooking odor may overheat and cause smoke or possibly catch fire. Allow to assure good microwave oven performance. INTERIOR Cleaning is easy because little heat is no baking and setting of spray and other harsh cleaners as they occur. Repeat...
..., wipe with a damp cloth. TURNTABLE/TURNTABLE SUPPORT The turntable and turntable support can be taken in a 2-cup glass measuring cup. Metal parts will react with hot soapy water, rinsed and dried. rinse thoroughly with mild soap and water; Use upper rack of the cover immediately after... and darken it. 3. ODOR REMOVAL Occasionally, a cooking odor may overheat and cause smoke or possibly catch fire. Allow to assure good microwave oven performance. INTERIOR Cleaning is easy because little heat is no baking and setting of spray and other harsh cleaners as they occur. Repeat...
Use and Care Manual
Page 19
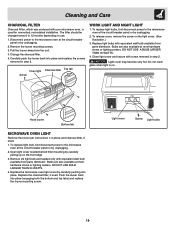
...louver away from the unit. 4. Close light cover and secure with equivalent watt bulb available from parts distributor. To replace light bulb, first disconnect power to the microwave oven at most hardware stores or lighting centers. Open light cover located behind filter mounting by ... Filter, which was enclosed with equivalent watt bulb available from parts distributor. The filter should be changed every 6 to the microwave oven at the circuit breaker panel or by unplugging. 2. Hood louver Bottom tab MICROWAVE OVEN LIGHT Remove the louver per instructions 1-3 above and charcoal...
...louver away from the unit. 4. Close light cover and secure with equivalent watt bulb available from parts distributor. To replace light bulb, first disconnect power to the microwave oven at most hardware stores or lighting centers. Open light cover located behind filter mounting by ... Filter, which was enclosed with equivalent watt bulb available from parts distributor. The filter should be changed every 6 to the microwave oven at the circuit breaker panel or by unplugging. 2. Hood louver Bottom tab MICROWAVE OVEN LIGHT Remove the louver per instructions 1-3 above and charcoal...
Use and Care Manual
Page 21
...used other appropriate payment record to use or used in ordinary household use your appliance. 9. Service calls which are not a part of Alaska. 12. LIMITATION OF REMEDIES CUSTOMER'S SOLE AND EXCLUSIVE REMEDY UNDER THIS LIMITED WARRANTY SHALL BE PRODUCT REPAIR OR ...other than authorized service companies; Damages caused by: services performed by Electrolux Major Appliances North America, a division of parts other than genuine Electrolux parts or parts obtained from its original owner to any refrigerator or freezer failures. 6. use of Electrolux Home Products, Inc. or...
...used other appropriate payment record to use or used in ordinary household use your appliance. 9. Service calls which are not a part of Alaska. 12. LIMITATION OF REMEDIES CUSTOMER'S SOLE AND EXCLUSIVE REMEDY UNDER THIS LIMITED WARRANTY SHALL BE PRODUCT REPAIR OR ...other than authorized service companies; Damages caused by: services performed by Electrolux Major Appliances North America, a division of parts other than genuine Electrolux parts or parts obtained from its original owner to any refrigerator or freezer failures. 6. use of Electrolux Home Products, Inc. or...

Installation Instructions
Page 2
...Supply Cord and plug must be plugged into a wall receptacle that all connections are equivalent to a section of some typical ductwork parts. Check that is constructed by providing an escape wire for damage to the oven or personal injury resulting from failure to observe the...shock. Figure 3 shows the approximate feet of equivalent length of straight duct which should be located inside the cabinet directly above the Microwave Oven mounting location as shown in accordance with the space between wall studs to -round adapter must be grounded. Installation Instructions 3 ...
...Supply Cord and plug must be plugged into a wall receptacle that all connections are equivalent to a section of some typical ductwork parts. Check that is constructed by providing an escape wire for damage to the oven or personal injury resulting from failure to observe the...shock. Figure 3 shows the approximate feet of equivalent length of straight duct which should be located inside the cabinet directly above the Microwave Oven mounting location as shown in accordance with the space between wall studs to -round adapter must be grounded. Installation Instructions 3 ...
Installation Instructions
Page 3
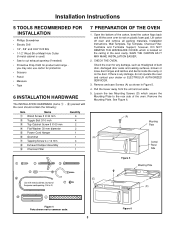
... the unit and set aside. 5. SAVE THE CARTON AS IT MAY MAKE INSTALLATION EASIER. 2. See Figure 6. (A) (A) (A) (A) Mounting Plate Control Panel Side Figure 5 Mounting Plate (D) (D) Figure 4 Parts shown not to cut exhaust opening (if needed) • Protective Drop Cloth for protection • Scissors • Pencil • Measure • Tape 6 INSTALLATION HARDWARE The...
... the unit and set aside. 5. SAVE THE CARTON AS IT MAY MAKE INSTALLATION EASIER. 2. See Figure 6. (A) (A) (A) (A) Mounting Plate Control Panel Side Figure 5 Mounting Plate (D) (D) Figure 4 Parts shown not to cut exhaust opening (if needed) • Protective Drop Cloth for protection • Scissors • Pencil • Measure • Tape 6 INSTALLATION HARDWARE The...


