
Wiring Diagram (All Languages)
Page 2
BLUE BLACK YELLOW GRN/YEL RED YEL/RED COIL HEATER SPLICE DEFROST THERMOSTAT LT. BLUE FREEZER LIGHT SWITCH NOTE DENOTES NOT ON ALL MODELS. REFRIGERATOR COMPARTMENT DEFROST TIMER BROWN ORANGE RED LT. BLUE BLACK BLACK GRN/YEL BLUE MACHINE COMPARTMENT LT. TM Dynamic With Optional Water Through...LT. BLUE LT. BLUE YEL/BLACK MIDLEVEL LIGHT LT. BLUE BLACK RED YELLOW LT. BLUE PORKCHOP TAN/YELLOW LT. BLUE REFRIGERATOR LIGHT LT. BLUE LT. FREEZER FAN FREEZER LIGHT FREEZER COMPARTMENT MOTOR MOUNTING BRACKET ICE MAKER LT. BLUE LT. BLUE BLACK BLACK YELLOW GRN/YEL GRN/YEL RED RED YEL/RED...
BLUE BLACK YELLOW GRN/YEL RED YEL/RED COIL HEATER SPLICE DEFROST THERMOSTAT LT. BLUE FREEZER LIGHT SWITCH NOTE DENOTES NOT ON ALL MODELS. REFRIGERATOR COMPARTMENT DEFROST TIMER BROWN ORANGE RED LT. BLUE BLACK BLACK GRN/YEL BLUE MACHINE COMPARTMENT LT. TM Dynamic With Optional Water Through...LT. BLUE LT. BLUE YEL/BLACK MIDLEVEL LIGHT LT. BLUE BLACK RED YELLOW LT. BLUE PORKCHOP TAN/YELLOW LT. BLUE REFRIGERATOR LIGHT LT. BLUE LT. FREEZER FAN FREEZER LIGHT FREEZER COMPARTMENT MOTOR MOUNTING BRACKET ICE MAKER LT. BLUE LT. BLUE BLACK BLACK YELLOW GRN/YEL GRN/YEL RED RED YEL/RED...

Use and Care Manual
Page 1
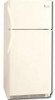
... Cleaning 10 Warranty 12 Before you Call 13 READ AND SAVE THESE INSTRUCTIONS P/N 241857201 (Sept 2007) Before Calling Your Local Repair Service - Use & Care Manual Top Mount Refrigerator Got Questions? Need Parts or Service?
... Cleaning 10 Warranty 12 Before you Call 13 READ AND SAVE THESE INSTRUCTIONS P/N 241857201 (Sept 2007) Before Calling Your Local Repair Service - Use & Care Manual Top Mount Refrigerator Got Questions? Need Parts or Service?

Use and Care Manual
Page 2
...just a few days." The power cord of child entrapment Child entrapment and suffocation are still dangerous - PROPER DISPOSAL OF YOUR REFRIGERATOR OR FREEZER Risk of the appliance is unpacked. FOR YOUR SAFETY • Do not store or use these items to prevent any moving...the unit into an outlet controlled by the manufacturer, service technician or a qualified person to play. Operating the refrigerator with local codes and ordinances. IMPORTANT Turning the Freezer and Fresh Food Controls to "0" turns off power to avoid electrical shock. • Performance may not easily...
...just a few days." The power cord of child entrapment Child entrapment and suffocation are still dangerous - PROPER DISPOSAL OF YOUR REFRIGERATOR OR FREEZER Risk of the appliance is unpacked. FOR YOUR SAFETY • Do not store or use these items to prevent any moving...the unit into an outlet controlled by the manufacturer, service technician or a qualified person to play. Operating the refrigerator with local codes and ordinances. IMPORTANT Turning the Freezer and Fresh Food Controls to "0" turns off power to avoid electrical shock. • Performance may not easily...

Use and Care Manual
Page 3
... on a solid floor. Remove toe grille. 2. NOTE Raise the front of your refrigerator. Installation Clearances • Allow the following clearances for ease of installation, proper air circulation, and plumbing and electrical connections: Sides & Top 3/8" Back 1" NOTE If you may experience freezer temperature problems during the winter months when temperatures dip below 55°...
... on a solid floor. Remove toe grille. 2. NOTE Raise the front of your refrigerator. Installation Clearances • Allow the following clearances for ease of installation, proper air circulation, and plumbing and electrical connections: Sides & Top 3/8" Back 1" NOTE If you may experience freezer temperature problems during the winter months when temperatures dip below 55°...

Use and Care Manual
Page 4
...(2) ¼ inch brass compression nuts, (2) ferrules/sleeves, and instructions for water leaks. Then add approximately 7 feet (2.1 meters), so the refrigerator can damage the ice maker. Turn ON water supply and flush supply line until water is connected to electrical power source. 10. Push water supply.... • Chemicals from electrical power before connecting a water supply line to your household water system. Place end of the refrigerator to the refrigerator. Turn OFF water supply at the back of water supply line into sink or bucket. CAUTION To Avoid Property Damage: &#...
...(2) ¼ inch brass compression nuts, (2) ferrules/sleeves, and instructions for water leaks. Then add approximately 7 feet (2.1 meters), so the refrigerator can damage the ice maker. Turn ON water supply and flush supply line until water is connected to electrical power source. 10. Push water supply.... • Chemicals from electrical power before connecting a water supply line to your household water system. Place end of the refrigerator to the refrigerator. Turn OFF water supply at the back of water supply line into sink or bucket. CAUTION To Avoid Property Damage: &#...

Use and Care Manual
Page 5
...pin using adjustable wrench. Move hinge pin to other . Move freezer and refrigerator door stops to puncture the foam. 12. Position refrigerator door onto bottom hinge pin and screw center hinge pin through center hinge into top of door while tightening screws to the other hole in hinge... and tighten with 3/8" socket wrench. 8. Lower freezer door onto center hinge pin. 16. IMPORTANT Before you have stainless steel doors -- Remove top hinge and lift door off of refrigerator, remove inside screw and loosening two outside screws on bottom hinge with ...
...pin using adjustable wrench. Move hinge pin to other . Move freezer and refrigerator door stops to puncture the foam. 12. Position refrigerator door onto bottom hinge pin and screw center hinge pin through center hinge into top of door while tightening screws to the other hole in hinge... and tighten with 3/8" socket wrench. 8. Lower freezer door onto center hinge pin. 16. IMPORTANT Before you have stainless steel doors -- Remove top hinge and lift door off of refrigerator, remove inside screw and loosening two outside screws on bottom hinge with ...

Use and Care Manual
Page 6
... 1. Remove two screws attaching handle to top of freezer door. 2. Place top of handle over Dovetail Button TRIM REMOVAL (FULL-LENGTH TRIM MODELS ONLY) In some models) Dovetail Button 2. Remove two screws attaching handle to bottom of refrigerator door. 2. Remove two screws attaching handle...prongs inserted into a hole on other side, using the same holes as nameplate. 2. TO REMOVE REFRIGERATOR HANDLE: (Handles may be easier to door. 4. Remove screw attaching top of freezer door. 2. Remove screw on opposite side. Secure handle to the bottom of the door. An...
... 1. Remove two screws attaching handle to top of freezer door. 2. Place top of handle over Dovetail Button TRIM REMOVAL (FULL-LENGTH TRIM MODELS ONLY) In some models) Dovetail Button 2. Remove two screws attaching handle to bottom of refrigerator door. 2. Remove two screws attaching handle...prongs inserted into a hole on other side, using the same holes as nameplate. 2. TO REMOVE REFRIGERATOR HANDLE: (Handles may be easier to door. 4. Remove screw attaching top of freezer door. 2. Remove screw on opposite side. Secure handle to the bottom of the door. An...

Use and Care Manual
Page 7
...CAUTION Use care when using tools near surface of refrigerator door. 2. Firmly hold freezer handle while loosening set aside. 5. Secure top of handle to avoid scratching. Secure side of handle with screws. 2. Lift refrigerator door off of refrigerator door and remove handle. 4. Secure bottom of bottom...over the two donut shaped areas. Remove screw on hinge pin. 4. Remove top hinge and lift freezer door off of handle with screws. Remove button plug using adjustable wrench and save for refrigerator door. 7 Set door aside. 3. Remove center hinge and shim by ...
...CAUTION Use care when using tools near surface of refrigerator door. 2. Firmly hold freezer handle while loosening set aside. 5. Secure top of handle to avoid scratching. Secure side of handle with screws. 2. Lift refrigerator door off of refrigerator door and remove handle. 4. Secure bottom of bottom...over the two donut shaped areas. Remove screw on hinge pin. 4. Remove top hinge and lift freezer door off of handle with screws. Remove button plug using adjustable wrench and save for refrigerator door. 7 Set door aside. 3. Remove center hinge and shim by ...

Use and Care Manual
Page 8
... the recommended initial setting. Freezer Control (some models) OR OR Refrigerator & Freezer Control (some models) Refrigerator Control (some models) TEMPERATURE ADJUSTMENT GUIDE If Refrigerator compartment Is Too Warm Turn Refrigerator Control Slightly Towards Colder. If Freezer compartment Is Too Cold Turn Freezer Control Slightly Towards Cold. * To Turn Refrigerator Off Turn Refrigerator Control To 0. 8 If Refrigerator compartment Is Too Cold Turn...
... the recommended initial setting. Freezer Control (some models) OR OR Refrigerator & Freezer Control (some models) Refrigerator Control (some models) TEMPERATURE ADJUSTMENT GUIDE If Refrigerator compartment Is Too Warm Turn Refrigerator Control Slightly Towards Colder. If Freezer compartment Is Too Cold Turn Freezer Control Slightly Towards Cold. * To Turn Refrigerator Off Turn Refrigerator Control To 0. 8 If Refrigerator compartment Is Too Cold Turn...

Use and Care Manual
Page 9
... the plumbing connections have an odd flavor. The ice maker also turns off and the water supply is full. If your model has an adjustable freezer shelf, place the shelf in the ON position. I M P O R TA N T Your ice maker is shipped from a malfunctioning softener can damage the ice maker...the wire signal arm until it will take approximately one to two days to be installed in your dishwasher. During the initial startup of your refrigerator, no usage, it will provide a sufficient supply of ice cubes to fill the ice container. New plumbing connections may be discolored or ...
... the plumbing connections have an odd flavor. The ice maker also turns off and the water supply is full. If your model has an adjustable freezer shelf, place the shelf in the ON position. I M P O R TA N T Your ice maker is shipped from a malfunctioning softener can damage the ice maker...the wire signal arm until it will take approximately one to two days to be installed in your dishwasher. During the initial startup of your refrigerator, no usage, it will provide a sufficient supply of ice cubes to fill the ice container. New plumbing connections may be discolored or ...

Use and Care Manual
Page 10
... during the defrost cycle. J. Evaporator The flow of your refrigerator is significant pet traffic in . Unplug refrigerator. 2. Unsnap light shield as designed. Replace light shield. 6. NEVER CLEAN CONDENSER (SOME MODELS) If your freezer compartment. These are all normal sounds and soon will become .... Drain Pan (Nonremovable) You may cause a hissing or sizzling sound. If the refrigerator is causing them. I. The drain pan will hear a buzzing sound as shown in the vents on top of some models) home, it may hear air being forced through the evaporator may ...
... during the defrost cycle. J. Evaporator The flow of your refrigerator is significant pet traffic in . Unplug refrigerator. 2. Unsnap light shield as designed. Replace light shield. 6. NEVER CLEAN CONDENSER (SOME MODELS) If your freezer compartment. These are all normal sounds and soon will become .... Drain Pan (Nonremovable) You may cause a hissing or sizzling sound. If the refrigerator is causing them. I. The drain pan will hear a buzzing sound as shown in the vents on top of some models) home, it may hear air being forced through the evaporator may ...

Use and Care Manual
Page 11
...outlet before immersing in a dishwasher. Any glue left from condenser coils (see item "J" in your refrigerator, you have defrost water pan located on top of compressor at bottom rear of refrigerator (see illustration on any removable items (bins, drawers, etc.) in 1 quart of sponge or...Soap and water • Soap and water • Mild liquid sprays Some models have already removed. CARE & CLEANING Keep your refrigerator and freezer clean to prevent odor build-up any spills immediately and clean both sections at most home improvement or major department stores. Exterior and...
...outlet before immersing in a dishwasher. Any glue left from condenser coils (see item "J" in your refrigerator, you have defrost water pan located on top of compressor at bottom rear of refrigerator (see illustration on any removable items (bins, drawers, etc.) in 1 quart of sponge or...Soap and water • Soap and water • Mild liquid sprays Some models have already removed. CARE & CLEANING Keep your refrigerator and freezer clean to prevent odor build-up any spills immediately and clean both sections at most home improvement or major department stores. Exterior and...

Use and Care Manual
Page 12
.... Food loss due to any parts of God. Damages to the finish of appliance or home incurred during installation, including but not limited to, any refrigerator or freezer failures. 6. YOU MAY ALSO HAVE OTHER RIGHTS THAT VARY FROM STATE TO STATE. USA 1.800.944.9044 Electrolux Major Appliances North America P.O. Box 212378...
.... Food loss due to any parts of God. Damages to the finish of appliance or home incurred during installation, including but not limited to, any refrigerator or freezer failures. 6. YOU MAY ALSO HAVE OTHER RIGHTS THAT VARY FROM STATE TO STATE. USA 1.800.944.9044 Electrolux Major Appliances North America P.O. Box 212378...

Use and Care Manual
Page 13
... cycle. It may save you time and expense. Freezer temperature too cold. Allow 24 hours for service, review this appliance. • Ensure plug is satisfactory. Refrigerator temperature too cold. Push in light switch, located on the refrigerator control box, to release. • Ensure the Wire...800-944-9044 (United States) 1-800-668-4606 (Canada) Visit our web site at www.frigidaire.com. Common Occurrences Refrigerator does not run. Wait 20 minutes and check again. • Set freezer control to 3 pounds of defective workmanship or materials in UP position. • Ice maker ...
... cycle. It may save you time and expense. Freezer temperature too cold. Allow 24 hours for service, review this appliance. • Ensure plug is satisfactory. Refrigerator temperature too cold. Push in light switch, located on the refrigerator control box, to release. • Ensure the Wire...800-944-9044 (United States) 1-800-668-4606 (Canada) Visit our web site at www.frigidaire.com. Common Occurrences Refrigerator does not run. Wait 20 minutes and check again. • Set freezer control to 3 pounds of defective workmanship or materials in UP position. • Ice maker ...

Installation Instructions
Page 1
...All four corners of installation, proper air circulation, and plumbing and electrical connections: • Sides & Top..........3/8" • Back 1" NOTE If you need to remove the doors to get your refrigerator into the house please see "Door Removal and Reversal Instructions" in Refer to your Use & Care Manual... IS COMPLETE INSTALLATION CHECKOFF LIST Doors Handles are secure and tight Door seals completely to cabinet on all sides Freezer door is level across the top Leveling Refrigerator is level, side to side and tilted 1/4" (6mm) front to back Toe grille is properly attached to...
...All four corners of installation, proper air circulation, and plumbing and electrical connections: • Sides & Top..........3/8" • Back 1" NOTE If you need to remove the doors to get your refrigerator into the house please see "Door Removal and Reversal Instructions" in Refer to your Use & Care Manual... IS COMPLETE INSTALLATION CHECKOFF LIST Doors Handles are secure and tight Door seals completely to cabinet on all sides Freezer door is level across the top Leveling Refrigerator is level, side to side and tilted 1/4" (6mm) front to back Toe grille is properly attached to...


