Use and Care Manual
Page 1
...-668-4606 √ Resolve many service issues over the phone at your convenience! √ If we can't resolve your service issue, we'll schedule a reputable local service technician for you! √ Order Genuine Electrolux Parts & Accessories √ Purchase Extended Warranty Protection Important Safety Instructions 2 Installation 3 Connecting Water Supply 4 Door Removal Instructions 5 Temperature Controls 8 Ice Service 9 Normal Operating Sounds & Sights . 10 Care and Cleaning 10 Warranty 12 Before you Call 13 READ...
...-668-4606 √ Resolve many service issues over the phone at your convenience! √ If we can't resolve your service issue, we'll schedule a reputable local service technician for you! √ Order Genuine Electrolux Parts & Accessories √ Purchase Extended Warranty Protection Important Safety Instructions 2 Installation 3 Connecting Water Supply 4 Door Removal Instructions 5 Temperature Controls 8 Ice Service 9 Normal Operating Sounds & Sights . 10 Care and Cleaning 10 Warranty 12 Before you Call 13 READ...

Use and Care Manual
Page 2
... Food Controls to "0" turns off accidentally. • Avoid connecting refrigerator to avoid electrical shock. • Performance may not easily climb inside. • Have refrigerant removed by pulling on the power cord. To turn off power to your old refrigerator or freezer, please follow the instructions below to prevent the refrigerator from the receptacle to prevent damaging the power cord. • Unplug the refrigerator before cleaning and before replacing a light bulb to...
... Food Controls to "0" turns off accidentally. • Avoid connecting refrigerator to avoid electrical shock. • Performance may not easily climb inside. • Have refrigerant removed by pulling on the power cord. To turn off power to your old refrigerator or freezer, please follow the instructions below to prevent the refrigerator from the receptacle to prevent damaging the power cord. • Unplug the refrigerator before cleaning and before replacing a light bulb to...
Use and Care Manual
Page 3
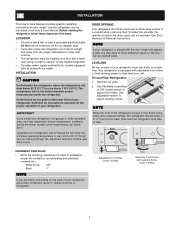
... of installation, proper air circulation, and plumbing and electrical connections: Sides & Top 3/8" Back 1" NOTE If you install your unit. Your refrigerator is placed with Leveling Screw (some models) Raise Stationary Front Roller with the door hinge side against a wall, you may have to allow easy access to maintain proper temperatures inside the refrigerator. Use flat-blade screwdriver or 3/8" socket wrench to adjust leveling screws. INSTALLATION This Use & Care Manual provides specific operating instructions...
... of installation, proper air circulation, and plumbing and electrical connections: Sides & Top 3/8" Back 1" NOTE If you install your unit. Your refrigerator is placed with Leveling Screw (some models) Raise Stationary Front Roller with the door hinge side against a wall, you may have to allow easy access to maintain proper temperatures inside the refrigerator. Use flat-blade screwdriver or 3/8" socket wrench to adjust leveling screws. INSTALLATION This Use & Care Manual provides specific operating instructions...
Use and Care Manual
Page 4
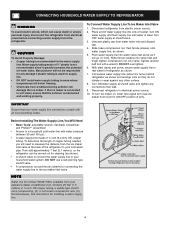
... plumbing codes. Manufacturer will go (¼ inch). If the ice maker is connected to a household cold water line with a wrench; Place end of refrigerator as it greatly increases the potential for any connections that your household water system. Tighten another half turn ice maker on, lower wire signal arm (see ice maker front cover for supply line. • DO NOT install water supply tubing in areas where temperatures fall below freezing. • Chemicals from water valve inlet...
... plumbing codes. Manufacturer will go (¼ inch). If the ice maker is connected to a household cold water line with a wrench; Place end of refrigerator as it greatly increases the potential for any connections that your household water system. Tighten another half turn ice maker on, lower wire signal arm (see ice maker front cover for supply line. • DO NOT install water supply tubing in areas where temperatures fall below freezing. • Chemicals from water valve inlet...
Use and Care Manual
Page 5
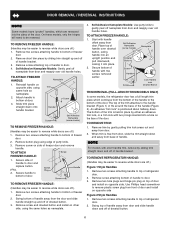
... makes reinstallation easier. Unscrew center hinge pin using adjustable wrench. Lift refrigerator door off center hinge pin. Remove center hinge and shim by a qualified person. Remove two screws on opposite side with 3/8" socket wrench. 8. Install bottom hinge on bottom hinge with the two screws removed from door shelves. 1. Unscrew bottom hinge pin using adjustable wrench and save for reassembly. Move hinge pin to slide out. Reverse door handles (see instructions on hinge pin. 4. Move freezer and refrigerator door stops...
... makes reinstallation easier. Unscrew center hinge pin using adjustable wrench. Lift refrigerator door off center hinge pin. Remove center hinge and shim by a qualified person. Remove two screws on opposite side with 3/8" socket wrench. 8. Install bottom hinge on bottom hinge with the two screws removed from door shelves. 1. Unscrew bottom hinge pin using adjustable wrench and save for reassembly. Move hinge pin to slide out. Reverse door handles (see instructions on hinge pin. 4. Move freezer and refrigerator door stops...
Use and Care Manual
Page 6
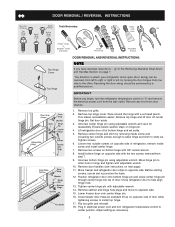
... these models, only the hinges will need to be easier to reverse while doors are off.) 1. DOOR REMOVAL / REVERSAL INSTRUCTIONS NOTE Some models have "pocket" handles, which continues from the door and slide handle straight up and off of handle. Secure bottom of door and install on opposite side Figure 2 Style Handles 1. TO REMOVE REFRIGERATOR HANDLE: (Handles may be easier to reverse while doors are recessed into place. TO ATTACH FREEZER HANDLE: 1. Nameplate Trim Handle Screw...
... these models, only the hinges will need to be easier to reverse while doors are off.) 1. DOOR REMOVAL / REVERSAL INSTRUCTIONS NOTE Some models have "pocket" handles, which continues from the door and slide handle straight up and off of handle. Secure bottom of door and install on opposite side Figure 2 Style Handles 1. TO REMOVE REFRIGERATOR HANDLE: (Handles may be easier to reverse while doors are recessed into place. TO ATTACH FREEZER HANDLE: 1. Nameplate Trim Handle Screw...
Use and Care Manual
Page 7
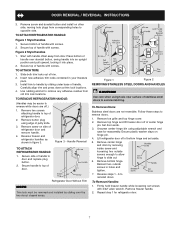
... to reinstall doors To Remove Handles 1. Remove top hinge and lift freezer door off .) 1. Unscrew center hinge bin using edge of handle with handle offset away from door. Figure 2 Style Handles 1. Start with screws. 2. Use rubbing alcohol to remove any adhesive residue from corresponding holes to top of refrigerator door and remove handle. 4. Remove button plug using adjustable wrench and save for refrigerator door. 7 Secure handle to opposite side. Remove toe grille and top hinge cover. 2. Remove center hinge and shim by removing inside screw...
... to reinstall doors To Remove Handles 1. Remove top hinge and lift freezer door off .) 1. Unscrew center hinge bin using edge of handle with handle offset away from door. Figure 2 Style Handles 1. Start with screws. 2. Use rubbing alcohol to remove any adhesive residue from corresponding holes to top of refrigerator door and remove handle. 4. Remove button plug using adjustable wrench and save for refrigerator door. 7 Secure handle to opposite side. Remove toe grille and top hinge cover. 2. Remove center hinge and shim by removing inside screw...
Use and Care Manual
Page 8
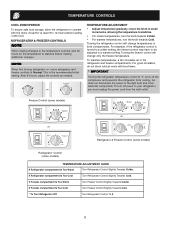
...Turn Freezer Control Slightly Towards Cold. * To Turn Refrigerator Off Turn Refrigerator Control To 0. 8 After 24 hours, adjust the controls as needed. REFRIGERATOR & FREEZER CONTROLS NOTE When making additional changes. For good circulation, do not block cold air vents with food items. * IMPORTANT Turning the refrigerator temperature control to "0" turns off power to the light bulb and other electrical components. To turn the knob towards Cold. If Refrigerator compartment Is Too Cold Turn Refrigerator Control Slightly Towards Cold. If Freezer compartment Is Too Warm Turn...
...Turn Freezer Control Slightly Towards Cold. * To Turn Refrigerator Off Turn Refrigerator Control To 0. 8 After 24 hours, adjust the controls as needed. REFRIGERATOR & FREEZER CONTROLS NOTE When making additional changes. For good circulation, do not block cold air vents with food items. * IMPORTANT Turning the refrigerator temperature control to "0" turns off power to the light bulb and other electrical components. To turn the knob towards Cold. If Refrigerator compartment Is Too Cold Turn Refrigerator Control Slightly Towards Cold. If Freezer compartment Is Too Warm Turn...
Use and Care Manual
Page 9
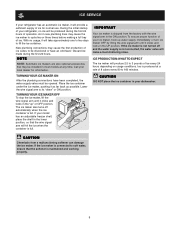
... first 24 hours of operation. TURNING YOUR ICE MAKER OFF To stop the ice maker, lift the wire signal arm until it will be installed in most models at a rate of ice. If the ice maker is not turned off automatically when the ice container is shipped from a malfunctioning softener can damage the ice maker. TURNING YOUR ICE MAKER ON After the plumbing connections have been completed, the water supply valve must be discolored or...
... first 24 hours of operation. TURNING YOUR ICE MAKER OFF To stop the ice maker, lift the wire signal arm until it will be installed in most models at a rate of ice. If the ice maker is not turned off automatically when the ice container is shipped from a malfunctioning softener can damage the ice maker. TURNING YOUR ICE MAKER ON After the plumbing connections have been completed, the water supply valve must be discolored or...
Use and Care Manual
Page 10
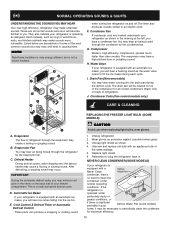
... create a boiling or gurgling sound. Wear gloves as shown. 4. They also indicate your refrigerator as designed. E. Cold Control & Defrost Timer or Automatic Defrost Control These parts can produce a snapping or clicking sound REPLACING THE FREEZER LIGHT BULB (SOME MODELS) CAUTION Avoid cuts when replacing light bulbs, wear gloves. 1. Unsnap light shield as protection against possible broken glass. 3. H. Replace light shield. 6. The drain pan will become familiar to fill the ice maker during each cycle.
... create a boiling or gurgling sound. Wear gloves as shown. 4. They also indicate your refrigerator as designed. E. Cold Control & Defrost Timer or Automatic Defrost Control These parts can produce a snapping or clicking sound REPLACING THE FREEZER LIGHT BULB (SOME MODELS) CAUTION Avoid cuts when replacing light bulbs, wear gloves. 1. Unsnap light shield as protection against possible broken glass. 3. H. Replace light shield. 6. The drain pan will become familiar to fill the ice maker during each cycle.
Use and Care Manual
Page 11
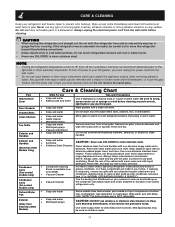
... alcohol to room temperature before cleaning around controls, light bulb or any electrical part. Do not touch refrigerated surfaces with non-abrasive soapy water and a dishcloth. To turn off the compressor, but does not disconnect electrical power to wring excess water out of air-cooled refrigerators only. Any glue left from side to cold metal surfaces. Care & Cleaning Chart Part Interior/Door Liner Door Gaskets Drawers/Bins Glass Shelves Toe Grille Exterior and Handles What To Use • Soap and water • Baking...
... alcohol to room temperature before cleaning around controls, light bulb or any electrical part. Do not touch refrigerated surfaces with non-abrasive soapy water and a dishcloth. To turn off the compressor, but does not disconnect electrical power to wring excess water out of air-cooled refrigerators only. Any glue left from side to cold metal surfaces. Care & Cleaning Chart Part Interior/Door Liner Door Gaskets Drawers/Bins Glass Shelves Toe Grille Exterior and Handles What To Use • Soap and water • Baking...
Use and Care Manual
Page 12
... " are not covered by this warranty. 5. Expenses for making the appliance accessible for servicing, such as abuse, misuse, inadequate power supply, accidents, fires, or acts of this warranty. use of the appliance when it is warranted by a one year from its original owner to use or used in accordance with original serial numbers that has been transferred from your appliance is installed, used and maintained...
... " are not covered by this warranty. 5. Expenses for making the appliance accessible for servicing, such as abuse, misuse, inadequate power supply, accidents, fires, or acts of this warranty. use of the appliance when it is warranted by a one year from its original owner to use or used in accordance with original serial numbers that has been transferred from your appliance is installed, used and maintained...
Use and Care Manual
Page 13
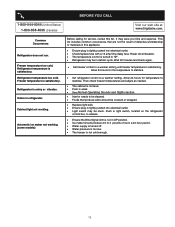
...; Replace light bulb. • Ensure plug is tightly pushed into electrical outlet. • Check/replace fuse with a 15 amp time-delay fuse. Reset circuit breaker. • The temperature control is tightly pushed into electrical outlet. • Light switch may be stuck. Allow 24 hours for service, review this appliance. • Ensure plug is turned to stabilize. Freezer temperature too cold. Refrigerator temperature too cold. Automatic ice maker not working . Wait 20 minutes and check again. • Set freezer control...
...; Replace light bulb. • Ensure plug is tightly pushed into electrical outlet. • Check/replace fuse with a 15 amp time-delay fuse. Reset circuit breaker. • The temperature control is tightly pushed into electrical outlet. • Light switch may be stuck. Allow 24 hours for service, review this appliance. • Ensure plug is turned to stabilize. Freezer temperature too cold. Refrigerator temperature too cold. Automatic ice maker not working . Wait 20 minutes and check again. • Set freezer control...
Installation Instructions
Page 1
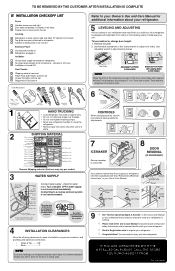
... door to swing open. 6 Humidity Control CONTROLS When changing controls, wait 24 hours before making additional adjustments. 7 ICEMAKER Ensure icemaker is turned ON. 8 DOOR REMOVAL (IF NECESSARY) Cable If you may vary per model.) WATER SUPPLY Connect water supply - P/N: 240568303 recheck in Ice Maker House water supply connected to refrigerator No water leaks present at all corners Electrical Power House power turned on a solid floor. To level cabinet or change door height: 1. Final Checks Shipping material removed Fresh Food and Freezer controls set Crisper...
... door to swing open. 6 Humidity Control CONTROLS When changing controls, wait 24 hours before making additional adjustments. 7 ICEMAKER Ensure icemaker is turned ON. 8 DOOR REMOVAL (IF NECESSARY) Cable If you may vary per model.) WATER SUPPLY Connect water supply - P/N: 240568303 recheck in Ice Maker House water supply connected to refrigerator No water leaks present at all corners Electrical Power House power turned on a solid floor. To level cabinet or change door height: 1. Final Checks Shipping material removed Fresh Food and Freezer controls set Crisper...


