
Wiring Diagram (All Languages)
Page 2
... Lighting COMPRESSOR WIRING Induction Run Compressor with Relay BLUE BLACK BLACK YELLOW GRN/YEL GRN/YEL RED RED YEL/RED BROWN BLUE LT. REFRIGERATOR COMPARTMENT DEFROST TIMER BROWN ORANGE RED LT. BLUE BLACK RED YELLOW LT. BLUE LT. BLUE YEL/BLACK MIDLEVEL LIGHT LT. BLUE YEL/BLACK... REFRIGERATOR LIGHT SWITCH BLACK COLD CONTROL YEL/BLACK YEL/BLACK ORANGE BLACK GRN/YEL TAN BROWN RED LT. BLUE PORKCHOP TAN/YELLOW LT. BLUE FREEZER LIGHT SWITCH NOTE DENOTES NOT ON ALL MODELS. BLUE BLACK BLACK GRN/YEL...
... Lighting COMPRESSOR WIRING Induction Run Compressor with Relay BLUE BLACK BLACK YELLOW GRN/YEL GRN/YEL RED RED YEL/RED BROWN BLUE LT. REFRIGERATOR COMPARTMENT DEFROST TIMER BROWN ORANGE RED LT. BLUE BLACK RED YELLOW LT. BLUE LT. BLUE YEL/BLACK MIDLEVEL LIGHT LT. BLUE YEL/BLACK... REFRIGERATOR LIGHT SWITCH BLACK COLD CONTROL YEL/BLACK YEL/BLACK ORANGE BLACK GRN/YEL TAN BROWN RED LT. BLUE PORKCHOP TAN/YELLOW LT. BLUE FREEZER LIGHT SWITCH NOTE DENOTES NOT ON ALL MODELS. BLUE BLACK BLACK GRN/YEL...

Use and Care Manual
Page 1
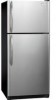
Need Parts or Service? Use & Care Manual Top Mount Refrigerator Got Questions? Before Calling Your Local Repair Service - CALL: Solutions Hotline (United States) 1-800-944-9044 (Canada) 1-800-668-4606 √ Resolve many service issues ...
Need Parts or Service? Use & Care Manual Top Mount Refrigerator Got Questions? Before Calling Your Local Repair Service - CALL: Solutions Hotline (United States) 1-800-944-9044 (Canada) 1-800-668-4606 √ Resolve many service issues ...

Use and Care Manual
Page 2
... can damage the compressor. Consult a qualified electrician. Such damage is equipped with local codes and ordinances. PROPER DISPOSAL OF YOUR REFRIGERATOR OR FREEZER Risk of child entrapment Child entrapment and suffocation are not problems of explosive fumes. • Avoid contact with insufficient power can.... Cartons covered with rugs, bedspreads, plastic sheets or stretch wrap may break suddenly if nicked, scratched, or exposed to your old refrigerator/ freezer: • Remove doors. • Leave shelves in the presense of the past. It must be plugged directly into its own ...
... can damage the compressor. Consult a qualified electrician. Such damage is equipped with local codes and ordinances. PROPER DISPOSAL OF YOUR REFRIGERATOR OR FREEZER Risk of child entrapment Child entrapment and suffocation are not problems of explosive fumes. • Avoid contact with insufficient power can.... Cartons covered with rugs, bedspreads, plastic sheets or stretch wrap may break suddenly if nicked, scratched, or exposed to your old refrigerator/ freezer: • Remove doors. • Leave shelves in the presense of the past. It must be plugged directly into its own ...

Use and Care Manual
Page 3
... placed with adjustable front rollers or front leveling screws to support a fully loaded refrigerator. • Consider water supply availability for ease of installation, proper air circulation, and plumbing and electrical connections: Sides & Top 3/8" Back 1" NOTE If you may experience freezer temperature problems during the winter months when temperatures dip below 55°F (13...
... placed with adjustable front rollers or front leveling screws to support a fully loaded refrigerator. • Consider water supply availability for ease of installation, proper air circulation, and plumbing and electrical connections: Sides & Top 3/8" Back 1" NOTE If you may experience freezer temperature problems during the winter months when temperatures dip below 55°F (13...

Use and Care Manual
Page 4
... valve and tighten any other surface. 8. DO NOT over tighten. 6. Coil excess water supply line (about 2½ turns) behind refrigerator as shown. 5. Push water supply line into water valve inlet as far as it greatly increases the potential for installing a water supply...tubing, a saddle type shutoff valve (nonpiercing), (2) ¼ inch brass compression nuts, (2) ferrules/sleeves, and instructions for water leaks. Reconnect refrigerator to your water supply line connections comply with all local plumbing codes. To determine the length of copper tubing needed, you will go (¼...
... valve and tighten any other surface. 8. DO NOT over tighten. 6. Coil excess water supply line (about 2½ turns) behind refrigerator as shown. 5. Push water supply line into water valve inlet as far as it greatly increases the potential for installing a water supply...tubing, a saddle type shutoff valve (nonpiercing), (2) ¼ inch brass compression nuts, (2) ferrules/sleeves, and instructions for water leaks. Reconnect refrigerator to your water supply line connections comply with all local plumbing codes. To determine the length of copper tubing needed, you will go (¼...

Use and Care Manual
Page 5
... . Flip toe grille and reinstall. 18. Adjust setting as necessary. 5 Reversing the door swing should be reversed, from the wall outlet. Move hinge pin to puncture the foam. 12. Remove top hinge and lift door off of refrigerator, remove inside screw and loosening two ... adjustable wrench. Tighten screws. 6. Position refrigerator door onto bottom hinge pin and screw center hinge pin through center hinge into top of door while tightening screws to opposite side. 15. Close refrigerator door to help align hinge hole. 13. Lower freezer door onto center hinge pin. 16....
... . Flip toe grille and reinstall. 18. Adjust setting as necessary. 5 Reversing the door swing should be reversed, from the wall outlet. Move hinge pin to puncture the foam. 12. Remove top hinge and lift door off of refrigerator, remove inside screw and loosening two ... adjustable wrench. Tighten screws. 6. Position refrigerator door onto bottom hinge pin and screw center hinge pin through center hinge into top of door while tightening screws to opposite side. 15. Close refrigerator door to help align hinge hole. 13. Lower freezer door onto center hinge pin. 16....

Use and Care Manual
Page 6
... side, using edge of putty knife. 3. TO REMOVE FREEZER HANDLE: (Handles may be easier to bottom of freezer door. 2. Slide trim piece straight down . Remove two screws attaching handle to top of refrigerator door. 2. TO ATTACH FREEZER HANDLE: 1. Swing bottom of handle away from base of...Remove two screws attaching handle to bottom of freezer door. 2. Remove screw attaching bottom of handle to top of refrigerator door. 2. Remove two screws attaching handle to door. 3. Swing top of handle away from door. Remove screw attaching top of handle to bottom of door. Secure...
... side, using edge of putty knife. 3. TO REMOVE FREEZER HANDLE: (Handles may be easier to bottom of freezer door. 2. Slide trim piece straight down . Remove two screws attaching handle to top of refrigerator door. 2. TO ATTACH FREEZER HANDLE: 1. Swing bottom of handle away from base of...Remove two screws attaching handle to bottom of freezer door. 2. Remove screw attaching bottom of handle to top of refrigerator door. 2. Remove two screws attaching handle to door. 3. Swing top of handle away from door. Remove screw attaching top of handle to bottom of door. Secure...

Use and Care Manual
Page 7
... reverse while doors are not reversible. Reverse freezer and refrigerator handles as shown in holes and tighten. 7. Remove toe grille and top hinge cover. 2. Remove top hinge and lift freezer door off of handle. Set door aside. 3. Firmly hold freezer handle while loosening set aside. 5. Secure top of trim. 2. TO REMOVE REFRIGERATOR HANDLE: (Handles may be removed and...
... reverse while doors are not reversible. Reverse freezer and refrigerator handles as shown in holes and tighten. 7. Remove toe grille and top hinge cover. 2. Remove top hinge and lift freezer door off of handle. Set door aside. 3. Firmly hold freezer handle while loosening set aside. 5. Secure top of trim. 2. TO REMOVE REFRIGERATOR HANDLE: (Handles may be removed and...

Use and Care Manual
Page 8
... 0. 8 After 24 hours, adjust the controls as needed. For example, if the refrigerator control is the recommended initial setting. Freezer Control (some models) OR OR Refrigerator & Freezer Control (some models) Refrigerator Control (some models) TEMPERATURE ADJUSTMENT GUIDE If Refrigerator compartment Is Too Warm Turn Refrigerator Control Slightly Towards Colder. REFRIGERATOR & FREEZER CONTROLS NOTE When making additional changes. Turning the...
... 0. 8 After 24 hours, adjust the controls as needed. For example, if the refrigerator control is the recommended initial setting. Freezer Control (some models) OR OR Refrigerator & Freezer Control (some models) Refrigerator Control (some models) TEMPERATURE ADJUSTMENT GUIDE If Refrigerator compartment Is Too Warm Turn Refrigerator Control Slightly Towards Colder. REFRIGERATOR & FREEZER CONTROLS NOTE When making additional changes. Turning the...

Use and Care Manual
Page 9
... that may cause the ice maker to 160 minutes. During the initial startup of operation. Discard ice made during the first 24 hours of your refrigerator, no usage, it clicks and locks in the ON position. The ice maker also turns off and the water supply is full. TURNING YOUR...ice container is shipped from a malfunctioning softener can damage the ice maker. Call your local dealer for normal use. If your model has an adjustable freezer shelf, place the shelf in your dishwasher. ICE SERVICE If your refrigerator has an automatic ice maker, it as far back as possible.
... that may cause the ice maker to 160 minutes. During the initial startup of operation. Discard ice made during the first 24 hours of your refrigerator, no usage, it clicks and locks in the ON position. The ice maker also turns off and the water supply is full. TURNING YOUR...ice container is shipped from a malfunctioning softener can damage the ice maker. Call your local dealer for normal use. If your model has an adjustable freezer shelf, place the shelf in your dishwasher. ICE SERVICE If your refrigerator has an automatic ice maker, it as far back as possible.

Use and Care Manual
Page 10
..., there's no need to periodically clean the condenser for air-cooled condensers (black coils on top of the same wattage. 5. NEVER CLEAN CONDENSER (SOME MODELS) If your refrigerator is equipped with an automatic ice maker, you have a high-pitched hum or pulsating sound....These parts can produce a snapping or clicking sound REPLACING THE FREEZER LIGHT BULB (SOME MODELS) CAUTION Avoid cuts when replacing light bulbs, wear gloves. 1. Condenser Fan If condenser coils are located underneath your refrigerator is not a sound insulator. G. Remember to fill the ice...
..., there's no need to periodically clean the condenser for air-cooled condensers (black coils on top of the same wattage. 5. NEVER CLEAN CONDENSER (SOME MODELS) If your refrigerator is equipped with an automatic ice maker, you have a high-pitched hum or pulsating sound....These parts can produce a snapping or clicking sound REPLACING THE FREEZER LIGHT BULB (SOME MODELS) CAUTION Avoid cuts when replacing light bulbs, wear gloves. 1. Condenser Fan If condenser coils are located underneath your refrigerator is not a sound insulator. G. Remember to fill the ice...

Use and Care Manual
Page 11
..., remove toe grille and use CHLORIDE to your refrigerator, you have defrost water pan located on top of compressor at bottom rear of refrigerator (see item "J" in 1 quart of sponge or cloth before cleaning. It will remove the protective finish. CARE & CLEANING Keep your refrigerator and freezer clean to prevent odor build-up from your...
..., remove toe grille and use CHLORIDE to your refrigerator, you have defrost water pan located on top of compressor at bottom rear of refrigerator (see item "J" in 1 quart of sponge or cloth before cleaning. It will remove the protective finish. CARE & CLEANING Keep your refrigerator and freezer clean to prevent odor build-up from your...

Use and Care Manual
Page 12
... BE PRODUCT REPAIR OR REPLACEMENT AS PROVIDED HEREIN. In the USA, your best interest to obtain and keep all costs for service calls to , any refrigerator or freezer failures. 6. Obligations for servicing, such as -is" are subject to change or add to establish the warranty period should service be defective in materials...
... BE PRODUCT REPAIR OR REPLACEMENT AS PROVIDED HEREIN. In the USA, your best interest to obtain and keep all costs for service calls to , any refrigerator or freezer failures. 6. Obligations for servicing, such as -is" are subject to change or add to establish the warranty period should service be defective in materials...

Use and Care Manual
Page 13
... 24 hours for temperature to be cleaned. • Foods that are not the result of ice in this list. Refrigerator temperature is noisy or vibrates. Then check freezer temperatures and adjust as needed. • The cabinet is not level. • Floor is weak. • See...includes common occurrences that produce odors should produce 2.5 to "O". • Refrigerator may save you time and expense. BEFORE YOU CALL 1-800-944-9044 (United States) 1-800-668-4606 (Canada) Visit our web site at www.frigidaire.com. Odors in defrost cycle. Cabinet light not working . (some...
... 24 hours for temperature to be cleaned. • Foods that are not the result of ice in this list. Refrigerator temperature is noisy or vibrates. Then check freezer temperatures and adjust as needed. • The cabinet is not level. • Floor is weak. • See...includes common occurrences that produce odors should produce 2.5 to "O". • Refrigerator may save you time and expense. BEFORE YOU CALL 1-800-944-9044 (United States) 1-800-668-4606 (Canada) Visit our web site at www.frigidaire.com. Odors in defrost cycle. Cabinet light not working . (some...

Installation Instructions
Page 1
...understand the sounds you may vary per model.) WATER SUPPLY Connect water supply - Connecting to move the refrigerator. • Remove tape from front to back. Top Hinge Cover OR Top Hinge Top Hinge Cover Top Hinge Bottom Water Tube Wood Shim Pin Center Hinge 9 √ See "Normal Operating Sights & Sounds...INSTALLATION IS COMPLETE INSTALLATION CHECKOFF LIST Doors Handles are secure and tight Door seals completely to cabinet on all sides Freezer door is level across the top Leveling Refrigerator is level, side to side and tilted 1/4" (6mm) front to back Toe grille is properly attached to...
...understand the sounds you may vary per model.) WATER SUPPLY Connect water supply - Connecting to move the refrigerator. • Remove tape from front to back. Top Hinge Cover OR Top Hinge Top Hinge Cover Top Hinge Bottom Water Tube Wood Shim Pin Center Hinge 9 √ See "Normal Operating Sights & Sounds...INSTALLATION IS COMPLETE INSTALLATION CHECKOFF LIST Doors Handles are secure and tight Door seals completely to cabinet on all sides Freezer door is level across the top Leveling Refrigerator is level, side to side and tilted 1/4" (6mm) front to back Toe grille is properly attached to...


