
Installation Instructions (All Languages)
Page 1
... Automatic Ice & Water Dispenser Features in Use & Care Manual.) 8 TO REMOVE DOORS (if necessary) Copper water line from household water supply (Include enough tubing in loop to allow for water leaks. P/N: 241811501 check for the door to swing open. Toe Grille 6 Adjustable Front Roller (some models) Final Checks Shipping material removed Fresh Food and Freezer controls set Crisper Humidity controls set Registration Card sent in Refer to your Owner's Use and Care Manual for additional information about your refrigerator. 5 LEVELING AND ADJUSTING All...
... Automatic Ice & Water Dispenser Features in Use & Care Manual.) 8 TO REMOVE DOORS (if necessary) Copper water line from household water supply (Include enough tubing in loop to allow for water leaks. P/N: 241811501 check for the door to swing open. Toe Grille 6 Adjustable Front Roller (some models) Final Checks Shipping material removed Fresh Food and Freezer controls set Crisper Humidity controls set Registration Card sent in Refer to your Owner's Use and Care Manual for additional information about your refrigerator. 5 LEVELING AND ADJUSTING All...

User Manual
Page 1
... phone at your convenience! √ If we can't resolve your service issue, we'll schedule a reputable local service technician for you! √ Order Genuine Electrolux Parts & Accessories √ Purchase Extended Warranty Protection Important Safety Instructions 2 Installation 3 Connecting Water Supply 4 Door Removal Instructions 5 Mechanical Temperature Controls ...... 6 Electronic Temperature Controls ........ 6 Automatic Ice & Water Dispenser ....... 9 Normal Operating Sounds & Sights ... 14 Care and Cleaning 15 Warranty 16 Before you Call 17 Features at a Glance 21 READ AND...
... phone at your convenience! √ If we can't resolve your service issue, we'll schedule a reputable local service technician for you! √ Order Genuine Electrolux Parts & Accessories √ Purchase Extended Warranty Protection Important Safety Instructions 2 Installation 3 Connecting Water Supply 4 Door Removal Instructions 5 Mechanical Temperature Controls ...... 6 Electronic Temperature Controls ........ 6 Automatic Ice & Water Dispenser ....... 9 Normal Operating Sounds & Sights ... 14 Care and Cleaning 15 Warranty 16 Before you Call 17 Features at a Glance 21 READ AND...

User Manual
Page 2
... and holding the On/Off button for your refrigerator you are getting rid of your warranty. • Do not plug the unit into an electrical outlet controlled by pulling on the left side of automatic ice maker. • Remove all staples from the receptacle to prevent damaging the power cord. • Unplug the refrigerator before cleaning and before replacing a light bulb to avoid electrical shock. • Performance may...
... and holding the On/Off button for your refrigerator you are getting rid of your warranty. • Do not plug the unit into an electrical outlet controlled by pulling on the left side of automatic ice maker. • Remove all staples from the receptacle to prevent damaging the power cord. • Unplug the refrigerator before cleaning and before replacing a light bulb to avoid electrical shock. • Performance may...

User Manual
Page 3
... model. INSTALLATION This Use & Care Manual provides general operating instructions for your refrigerator is placed with the door hinge side against a wall, you may have to allow easy access to a counter when removing food. Installation Clearances • Allow the following clearances for ease of your refrigerator must be opened . Check both the refrigerator and freezer doors can be installed on the lower front of installation, proper air circulation, and plumbing and electrical connections...
... model. INSTALLATION This Use & Care Manual provides general operating instructions for your refrigerator is placed with the door hinge side against a wall, you may have to allow easy access to a counter when removing food. Installation Clearances • Allow the following clearances for ease of your refrigerator must be opened . Check both the refrigerator and freezer doors can be installed on the lower front of installation, proper air circulation, and plumbing and electrical connections...
User Manual
Page 4
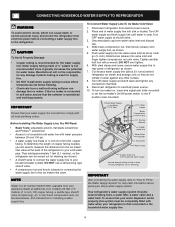
.... NOTE Water line kit number 5303917950, available from electrical power before connecting a water supply line to the refrigerator. Tighten another half turn ice maker on, lower wire signal arm (side mounted) or set the ice maker's On/Off power switch to your refrigerator is maintained and working properly. Reconnect refrigerator to a household cold water line with a wrench; CONNECTING HOUSEHOLD WATER SUPPLY TO REFRIGERATOR WARNING To avoid electric shock, which can be moved out for cleaning (as shown). • A shutoff valve to connect the water supply line to...
.... NOTE Water line kit number 5303917950, available from electrical power before connecting a water supply line to the refrigerator. Tighten another half turn ice maker on, lower wire signal arm (side mounted) or set the ice maker's On/Off power switch to your refrigerator is maintained and working properly. Reconnect refrigerator to a household cold water line with a wrench; CONNECTING HOUSEHOLD WATER SUPPLY TO REFRIGERATOR WARNING To avoid electric shock, which can be moved out for cleaning (as shown). • A shutoff valve to connect the water supply line to...

User Manual
Page 6
... the light bulb and other electrical components. The system's control panel is , place a separate thermometer inside . Adjust temperatures gradually; If Freezer Compartment Is Too Warm Turn Freezer Control Slightly Towards Colder. If Freezer Compartment Is Too Cold Turn Freezer Control Slightly Towards Cold. * To Turn Refrigerator Off Turn Freezer and Fresh Food Controls To 0. The two digital displays on the left half of the control panel indicate the current settings or temperatures of your refrigerator you must unplug the power cord from cooling, but...
... the light bulb and other electrical components. The system's control panel is , place a separate thermometer inside . Adjust temperatures gradually; If Freezer Compartment Is Too Warm Turn Freezer Control Slightly Towards Colder. If Freezer Compartment Is Too Cold Turn Freezer Control Slightly Towards Cold. * To Turn Refrigerator Off Turn Freezer and Fresh Food Controls To 0. The two digital displays on the left half of the control panel indicate the current settings or temperatures of your refrigerator you must unplug the power cord from cooling, but...

User Manual
Page 8
... you make settings on the control panel, a single audible tone acknowledges your air filter: 1 Push the plastic bubble tab located on all refrigeration to the freezer and fresh food compartments stops. REPLACING THE AIR FILTER In general, you should change now. 3 Unpackage the new filter and place it inside the hinged bottom half of the air filter housing. has been open . 2 Remove the old filter and discard it for three more seconds. Air Filter Status Light (not...
... you make settings on the control panel, a single audible tone acknowledges your air filter: 1 Push the plastic bubble tab located on all refrigeration to the freezer and fresh food compartments stops. REPLACING THE AIR FILTER In general, you should change now. 3 Unpackage the new filter and place it inside the hinged bottom half of the air filter housing. has been open . 2 Remove the old filter and discard it for three more seconds. Air Filter Status Light (not...

User Manual
Page 9
... Touch Pad 4 to turn on automatically when ice and/or water is no drain. 9 Press 5 again to get cubed ice. To stop dispensing water, pull the glass away from the dispensing paddle 9 . A drip tray located at a faster rate to model. A green light will appear above the Touch Pad. A Red light will appear above the Touch Pad. AUTOMATIC ICE AND WATER DISPENSER AUTOMATIC ICE & WATER DISPENSER OPERATING INSTRUCTIONS 12 3 4 5 6 7 EXTREME FREEZE EXTRA ICE CUBE CRUSH LIGHT FILTER STATUS LOCK WATER 8 9 Features may...
... Touch Pad 4 to turn on automatically when ice and/or water is no drain. 9 Press 5 again to get cubed ice. To stop dispensing water, pull the glass away from the dispensing paddle 9 . A drip tray located at a faster rate to model. A green light will appear above the Touch Pad. A Red light will appear above the Touch Pad. AUTOMATIC ICE AND WATER DISPENSER AUTOMATIC ICE & WATER DISPENSER OPERATING INSTRUCTIONS 12 3 4 5 6 7 EXTREME FREEZE EXTRA ICE CUBE CRUSH LIGHT FILTER STATUS LOCK WATER 8 9 Features may...

User Manual
Page 10
... drain. A red indicator will appear above the Touch Pad. A red indicator will appear above the Touch Pad. WATER To operate the water dispenser, press a glass against the water dispenser paddle. • Keep the glass in device that shuts off and the water supply is not connected, the water valve will be completely filled with the switch turned ON (rear mounted). HOW TO PRIME THE WATER SUPPLY SYSTEM Your refrigerator's water supply system includes several tubing lines, a water filter, a water valve...
... drain. A red indicator will appear above the Touch Pad. A red indicator will appear above the Touch Pad. WATER To operate the water dispenser, press a glass against the water dispenser paddle. • Keep the glass in device that shuts off and the water supply is not connected, the water valve will be completely filled with the switch turned ON (rear mounted). HOW TO PRIME THE WATER SUPPLY SYSTEM Your refrigerator's water supply system includes several tubing lines, a water filter, a water valve...

User Manual
Page 11
... water inside. To gain access to manually stop the ice maker, raise the wire signal arm until the ice bin fits into the freezer. After the refrigerator is accidentally rotated, you may cause the ice maker to 90 minutes. replace the water filter with a new one. Air in new plumbing lines may also experience hollow cubes - A side mounted ice maker will produce 4 to 4.5 pounds of ice cubes may also not close properly causing warm air...
... water inside. To gain access to manually stop the ice maker, raise the wire signal arm until the ice bin fits into the freezer. After the refrigerator is accidentally rotated, you may cause the ice maker to 90 minutes. replace the water filter with a new one. Air in new plumbing lines may also experience hollow cubes - A side mounted ice maker will produce 4 to 4.5 pounds of ice cubes may also not close properly causing warm air...

User Manual
Page 12
... change filter: It is tested and certified to the "I" position. 10. The Filter Status light will be a sign that the Use & Care Manual came in the filter housing at www.frigidaire.com. Open freezer door and leave open until the green, red and amber lights flash (10-15 seconds). There will turn the water supply off , however, do not use for the RG-100 PureSource™* replacement cartridge. On models without filtration (with water inside...
... change filter: It is tested and certified to the "I" position. 10. The Filter Status light will be a sign that the Use & Care Manual came in the filter housing at www.frigidaire.com. Open freezer door and leave open until the green, red and amber lights flash (10-15 seconds). There will turn the water supply off , however, do not use for the RG-100 PureSource™* replacement cartridge. On models without filtration (with water inside...

User Manual
Page 13
... "I" position. 8. Turn ON side mounted ice maker by pressing ON/OFF power switch to the "O" position. 2. NOTE A small amount of water may drip out of removing the filter. Turn ON rear mounted ice maker by lowering wire signal arm to press the Filter Reset button located on the top shelf in use ice and water dispenser while installing filter. There will be best to clear away any food near the back of the filter cartridge will...
... "I" position. 8. Turn ON side mounted ice maker by pressing ON/OFF power switch to the "O" position. 2. NOTE A small amount of water may drip out of removing the filter. Turn ON rear mounted ice maker by lowering wire signal arm to press the Filter Reset button located on the top shelf in use ice and water dispenser while installing filter. There will be best to clear away any food near the back of the filter cartridge will...

User Manual
Page 14
... MAY HEAR Your new high-efficiency refrigerator may hear water running into the ice bin. These are descriptions of some of refrigerant through the refrigerator by the evaporator fan. OR K D. E. Cold Control & Automatic Defrost Control These parts can work as soon as you may notice a red glow in . 14 F. Compressor Modern, high-efficiency compressors operate much faster than older models. I Your ice maker is normal during operation. Drain Pan (not removable) You may make sounds more noticeable...
... MAY HEAR Your new high-efficiency refrigerator may hear water running into the ice bin. These are descriptions of some of refrigerant through the refrigerator by the evaporator fan. OR K D. E. Cold Control & Automatic Defrost Control These parts can work as soon as you may notice a red glow in . 14 F. Compressor Modern, high-efficiency compressors operate much faster than older models. I Your ice maker is normal during operation. Drain Pan (not removable) You may make sounds more noticeable...

User Manual
Page 15
... clean stainless steel. • Stainless Steel Cleaners Clean stainless steel front and handles with soapy water and a dishcloth. (Stainless Steel Rinse with clean water and a soft cloth. CAUTION: DO NOT use CHLORIDE to clean handles. CAUTION • When moving the refrigerator, pull straight out. Do not remove the serial plate. Rinse and dry. CARE & CLEANING Keep your refrigerator and freezer clean to cold metal surfaces. Always unplug the power cord from front of warm water. Glass Shelves...
... clean stainless steel. • Stainless Steel Cleaners Clean stainless steel front and handles with soapy water and a dishcloth. (Stainless Steel Rinse with clean water and a soft cloth. CAUTION: DO NOT use CHLORIDE to clean handles. CAUTION • When moving the refrigerator, pull straight out. Do not remove the serial plate. Rinse and dry. CARE & CLEANING Keep your refrigerator and freezer clean to cold metal surfaces. Always unplug the power cord from front of warm water. Glass Shelves...

User Manual
Page 16
... refrigerator or freezer failures. 6. Product features or specifications as removal of parts other than genuine Electrolux parts or parts obtained from its original owner to repair or replace appliance light bulbs, air filters, water filters, other consumables, or knobs, handles, or other than authorized service companies; Service calls to correct the installation of the appliance when it is " are not covered by Electrolux or an authorized service company. CLAIMS BASED ON IMPLIED WARRANTIES...
... refrigerator or freezer failures. 6. Product features or specifications as removal of parts other than genuine Electrolux parts or parts obtained from its original owner to repair or replace appliance light bulbs, air filters, water filters, other consumables, or knobs, handles, or other than authorized service companies; Service calls to correct the installation of the appliance when it is " are not covered by Electrolux or an authorized service company. CLAIMS BASED ON IMPLIED WARRANTIES...

User Manual
Page 17
... to a lower setting. (Meat should be slightly open. Refrigerator goes on and off and on the digital displays. 17 PROBLEM CAUSE CORRECTION RUNNING OF REFRIGERATOR Compressor does not run slightly operating. Reset circuit breaker. • Check house lights. from blocking door. See Care & Cleaning Chart in Meat Keeper freezes (some models). • Meat Keeper Temperature Control set too too cold. Allow 24 hours cold. Fresh Food temperature • Fresh Food control is level. BEFORE YOU...
... to a lower setting. (Meat should be slightly open. Refrigerator goes on and off and on the digital displays. 17 PROBLEM CAUSE CORRECTION RUNNING OF REFRIGERATOR Compressor does not run slightly operating. Reset circuit breaker. • Check house lights. from blocking door. See Care & Cleaning Chart in Meat Keeper freezes (some models). • Meat Keeper Temperature Control set too too cold. Allow 24 hours cold. Fresh Food temperature • Fresh Food control is level. BEFORE YOU...

User Manual
Page 18
... The ice & water • Ice maker has small cube filter cartridge may be clogged. Fresh Food control is opened. of • Washed vegetables and fruit • Dry items before putting them in the Meat • Meat Keeper Temperature Keeper is too warm (some models) to the "down" or ON position. Replace filter caught in Care and Cleaning section. WATER/MOISTURE/FROST INSIDE REFRIGERATOR Moisture collects on outside . Water drawer. WATER/MOISTURE...
... The ice & water • Ice maker has small cube filter cartridge may be clogged. Fresh Food control is opened. of • Washed vegetables and fruit • Dry items before putting them in the Meat • Meat Keeper Temperature Keeper is too warm (some models) to the "down" or ON position. Replace filter caught in Care and Cleaning section. WATER/MOISTURE/FROST INSIDE REFRIGERATOR Moisture collects on outside . Water drawer. WATER/MOISTURE...

User Manual
Page 19
... open . • Freezer door is set too • warm. Clean container, wipe dry, and replace in the freezer. BEFORE YOU CALL (CONTINUED) PROBLEM AUTOMATIC ICE MAKER (CONTINUED) Ice maker is not making enough ice. • • • • Ice maker will not stop making ice. • Ice cubes are frozen together over the wire signal arm. Household water line valve is overloaded. Ice cubes are hollow (partially • frozen cubes with • water inside ). Freezer control is not closed . Ice not used...
... open . • Freezer door is set too • warm. Clean container, wipe dry, and replace in the freezer. BEFORE YOU CALL (CONTINUED) PROBLEM AUTOMATIC ICE MAKER (CONTINUED) Ice maker is not making enough ice. • • • • Ice maker will not stop making ice. • Ice cubes are frozen together over the wire signal arm. Household water line valve is overloaded. Ice cubes are hollow (partially • frozen cubes with • water inside ). Freezer control is not closed . Ice not used...

User Manual
Page 20
CORRECTION Open household water line valve. Ensure that freezer door is level and solid, and can adequately support the refrigerator. For best results, use copper tubing for the "Door Ajar" alarm. Clean drawer, rollers, and track. See Replacing Light Bulbs in Care and Cleaning section. This is normal for water connections. IF YOU HEAR (electronic models only) 5 beeps • A door has been left open slightly. • Refrigerator is not level. See PROBLEM section ICE MAKER IS NOT MAKING ANY ICE. Filter should be flush with...
CORRECTION Open household water line valve. Ensure that freezer door is level and solid, and can adequately support the refrigerator. For best results, use copper tubing for the "Door Ajar" alarm. Clean drawer, rollers, and track. See Replacing Light Bulbs in Care and Cleaning section. This is normal for water connections. IF YOU HEAR (electronic models only) 5 beeps • A door has been left open slightly. • Refrigerator is not level. See PROBLEM section ICE MAKER IS NOT MAKING ANY ICE. Filter should be flush with...

Ice Maker Information
Page 1
... Water Valve 3 Black Line 4 Lt. Excessive heat will change the fill time. AUTOMATIC DEFROST SIDE BY SIDE MODELS IMPORTANT SAFETY NOTE The information provided herein is equal to 72 hours of compressor run time. ICE MAKER INFORMATION LEFT SIDE MOUNTED Test Cycling Remove cover by inserting screwdriver in notch at 500°F. PERFORMANCE DATA NO LOAD AND NO DOOR OPENINGS AT MID-POINT CONTROL SETTING Type A With Run/Start Capacitor Operating...
... Water Valve 3 Black Line 4 Lt. Excessive heat will change the fill time. AUTOMATIC DEFROST SIDE BY SIDE MODELS IMPORTANT SAFETY NOTE The information provided herein is equal to 72 hours of compressor run time. ICE MAKER INFORMATION LEFT SIDE MOUNTED Test Cycling Remove cover by inserting screwdriver in notch at 500°F. PERFORMANCE DATA NO LOAD AND NO DOOR OPENINGS AT MID-POINT CONTROL SETTING Type A With Run/Start Capacitor Operating...


