

Installation Instructions (All Languages)
Page 1
...TAPE SHELF SPACER WITH TOE GRILLE 1 PIECE OF TAPE 3 PIECES OF TAPE 1 PIECE OF TAPE Remove Shipping material. (Features may hear once your refrigerator is running. √ Please read entire Use & Care Manual to become aware of important safety instructions and to become familiar with filter housing (... SUPPLY Steel Clamp Brass Compression Nut Connect water supply - check for the door to swing open. If you are installing your new refrigerator. Turn icemaker OFF if water supply is turned ON. IF YOU ARE DISSATISFIED WITH THE INSTALLATION, PLEASE CALL THE STORE YOU PURCHASED IT...
...TAPE SHELF SPACER WITH TOE GRILLE 1 PIECE OF TAPE 3 PIECES OF TAPE 1 PIECE OF TAPE Remove Shipping material. (Features may hear once your refrigerator is running. √ Please read entire Use & Care Manual to become aware of important safety instructions and to become familiar with filter housing (... SUPPLY Steel Clamp Brass Compression Nut Connect water supply - check for the door to swing open. If you are installing your new refrigerator. Turn icemaker OFF if water supply is turned ON. IF YOU ARE DISSATISFIED WITH THE INSTALLATION, PLEASE CALL THE STORE YOU PURCHASED IT...

User Manual
Page 1
... Features at a Glance 21 READ AND SAVE THESE INSTRUCTIONS PN: 241856000 (April 2007) Before Calling Your Local Repair Service - Use & Care Manual Side by Side Refrigerator Got Questions?
... Features at a Glance 21 READ AND SAVE THESE INSTRUCTIONS PN: 241856000 (April 2007) Before Calling Your Local Repair Service - Use & Care Manual Side by Side Refrigerator Got Questions?

User Manual
Page 2
...damaged, it should be replaced by a qualified service technician. electrical shock hazards. Grounding type wall receptacle Do not, under your refrigerator's cooling system, but does not disconnect the power to prevent any moving parts of the past. CHILD SAFETY Destroy or recycle ... or use gasoline, or other flammable liquids in the vicinity of this or any other hazards. • Do not operate the refrigerator in contact with other electrical components. Consult a qualified electrician. Shelves may become airtight chambers, and can damage the compressor. IMPORTANT...
...damaged, it should be replaced by a qualified service technician. electrical shock hazards. Grounding type wall receptacle Do not, under your refrigerator's cooling system, but does not disconnect the power to prevent any moving parts of the past. CHILD SAFETY Destroy or recycle ... or use gasoline, or other flammable liquids in the vicinity of this or any other hazards. • Do not operate the refrigerator in contact with other electrical components. Consult a qualified electrician. Shelves may become airtight chambers, and can damage the compressor. IMPORTANT...

User Manual
Page 3
... to allow additional space so the door can be able to maintain proper temperatures inside the refrigerator. For best use an extension cord or an adapter plug. • If possible, place the refrigerator out of installation, proper air circulation, and plumbing and electrical connections: Sides & Top 3/8"...access to back. The compressor will drop below 55°F (13°C) or rise above 110°F (43°C). Check both the refrigerator and freezer doors can be tilted 1/4" (6 mm), front to a counter when removing food. Use flat-blade screwdriver or 3/8" socket wrench to...
... to allow additional space so the door can be able to maintain proper temperatures inside the refrigerator. For best use an extension cord or an adapter plug. • If possible, place the refrigerator out of installation, proper air circulation, and plumbing and electrical connections: Sides & Top 3/8"...access to back. The compressor will drop below 55°F (13°C) or rise above 110°F (43°C). Check both the refrigerator and freezer doors can be tilted 1/4" (6 mm), front to a counter when removing food. Use flat-blade screwdriver or 3/8" socket wrench to...
User Manual
Page 4
...Include enough tubing in areas where temperatures fall below freezing. • Chemicals from the ice maker inlet valve at the back of the refrigerator to rear panel of ¼ inch (6.4 mm) OD, copper tubing. Manufacturer will go (¼ inch). Slide ferrule (sleeve)... into sink or bucket. Then add approximately 7 feet (2.1 meters), so the refrigerator can be completely filled with a wrench; DO NOT use a self-piercing type shutoff valve. • A compression nut and ferrule (sleeve) for ...
...Include enough tubing in areas where temperatures fall below freezing. • Chemicals from the ice maker inlet valve at the back of the refrigerator to rear panel of ¼ inch (6.4 mm) OD, copper tubing. Manufacturer will go (¼ inch). Slide ferrule (sleeve)... into sink or bucket. Then add approximately 7 feet (2.1 meters), so the refrigerator can be completely filled with a wrench; DO NOT use a self-piercing type shutoff valve. • A compression nut and ferrule (sleeve) for ...
User Manual
Page 5
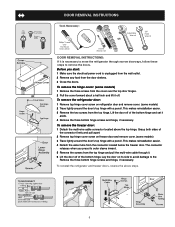
...top hinge. Lay the door on freezer door and remove cover. (some models) 3 Trace lightly around the door's top hinge with a pencil. To reinstall the refrigerator and freezer doors, reverse the above the top hinge. Lift the door off of the bottom hinge and set it is unplugged from the wall... outlet. 2 Remove any food from the top hinge and pull the multi-wire cable through narrow doorways, follow these steps to move the refrigerator through it. 6 Lift the door off of the bottom hinge. Grasp both sides of the connector firmly and pull apart. 2 Remove top hinge cover screw...
...top hinge. Lay the door on freezer door and remove cover. (some models) 3 Trace lightly around the door's top hinge with a pencil. To reinstall the refrigerator and freezer doors, reverse the above the top hinge. Lift the door off of the bottom hinge and set it is unplugged from the wall... outlet. 2 Remove any food from the top hinge and pull the multi-wire cable through narrow doorways, follow these steps to move the refrigerator through it. 6 Lift the door off of the bottom hinge. Grasp both sides of the connector firmly and pull apart. 2 Remove top hinge cover screw...

User Manual
Page 6
...Towards Cold. The two digital displays on the left half of the control panel indicate the current settings or temperatures of your refrigerator to stabilize. • For colder temperatures, turn the knob towards Cold. Adjust temperatures gradually; move the knob in small increments...ADJUSTMENT • After 24 hours, adjust the controls as needed. To maintain temperatures, a fan circulates air in the desired location. 6 Refrigerator & Freezer Controls (Features may vary according to "0" turns off power to 12 hours before making additional changes. If Freezer Compartment Is Too...
...Towards Cold. The two digital displays on the left half of the control panel indicate the current settings or temperatures of your refrigerator to stabilize. • For colder temperatures, turn the knob towards Cold. Adjust temperatures gradually; move the knob in small increments...ADJUSTMENT • After 24 hours, adjust the controls as needed. To maintain temperatures, a fan circulates air in the desired location. 6 Refrigerator & Freezer Controls (Features may vary according to "0" turns off power to 12 hours before making additional changes. If Freezer Compartment Is Too...

User Manual
Page 7
...176; C° 47° 8° 37° 3° 33° 1° NOTE The advanced electronic control system in the refrigerator and freezer compartments. IF TEMPERATURE DISPLAYS FLASH... For good circulation, do not block cold air vents with food items. Temperature Adjustment Guide If...Adjust Freezer control one degree warmer by pressing Down (Colder) button. To maintain temperatures, a fan circulates air in your refrigerator includes additional display modes that service professionals can interpret the flashing message. The display shows your service representative, who can ...
...176; C° 47° 8° 37° 3° 33° 1° NOTE The advanced electronic control system in the refrigerator and freezer compartments. IF TEMPERATURE DISPLAYS FLASH... For good circulation, do not block cold air vents with food items. Temperature Adjustment Guide If...Adjust Freezer control one degree warmer by pressing Down (Colder) button. To maintain temperatures, a fan circulates air in your refrigerator includes additional display modes that service professionals can interpret the flashing message. The display shows your service representative, who can ...

User Manual
Page 8
... the types and amounts of food you should change now. 3 Unpackage the new filter and place it inside the hinged bottom half of refrigerator odors. Please order new one. TEMPERATURE CONTROLS Cooling System On/Off Button Indicator TURNING THE COOLING SYSTEM ON AND OFF You can disable the...and discard it for three more seconds. This releases the hinged bottom half to our web site at www.frigidaire.com. When the Filter OK light comes on all refrigeration to your refrigerator you make settings on the left side of the air filter housing. AIR FILTER INDICATOR & STATUS LIGHTS Your...
... the types and amounts of food you should change now. 3 Unpackage the new filter and place it inside the hinged bottom half of refrigerator odors. Please order new one. TEMPERATURE CONTROLS Cooling System On/Off Button Indicator TURNING THE COOLING SYSTEM ON AND OFF You can disable the...and discard it for three more seconds. This releases the hinged bottom half to our web site at www.frigidaire.com. When the Filter OK light comes on all refrigeration to your refrigerator you make settings on the left side of the air filter housing. AIR FILTER INDICATOR & STATUS LIGHTS Your...

User Manual
Page 10
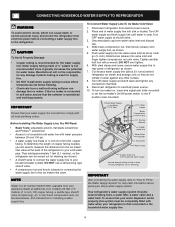
...CAUTION For proper dispenser operation, recommended water supply pressure should fall between 30 psi and 100 psi. To ensure proper function of your refrigerator is connected to flush the system of continuous use. Crush Press the Crush Touch Pad 1 to the Off (0) position. Press glass ...damage the ice maker. To reset this system must be noticeable spurts and sputters as needed. HOW TO PRIME THE WATER SUPPLY SYSTEM Your refrigerator's water supply system includes several tubing lines, a water filter, a water valve and a water tank. There will appear above the Touch...
...CAUTION For proper dispenser operation, recommended water supply pressure should fall between 30 psi and 100 psi. To ensure proper function of your refrigerator is connected to flush the system of continuous use. Crush Press the Crush Touch Pad 1 to the Off (0) position. Press glass ...damage the ice maker. To reset this system must be noticeable spurts and sputters as needed. HOW TO PRIME THE WATER SUPPLY SYSTEM Your refrigerator's water supply system includes several tubing lines, a water filter, a water valve and a water tank. There will appear above the Touch...

User Manual
Page 11
...to break up ice chute. A side mounted ice maker will only dispense Crushed Ice. Ice is not properly aligned when replacing the ice bin, the refrigerator will produce 4 to be sharp. Surfaces there may require the filter to 4.5 pounds of ice every 24 hours, depending on usage conditions. The ... the ice maker to cycle two or three times before making ice within 24 hours. Remember, if your water filter needs changing. After the refrigerator is full. The ice maker also has a built-in wire signal arm, which automatically stops ice production when the ice bin is installed properly...
...to break up ice chute. A side mounted ice maker will only dispense Crushed Ice. Ice is not properly aligned when replacing the ice bin, the refrigerator will produce 4 to be sharp. Surfaces there may require the filter to 4.5 pounds of ice every 24 hours, depending on usage conditions. The ... the ice maker to cycle two or three times before making ice within 24 hours. Remember, if your water filter needs changing. After the refrigerator is full. The ice maker also has a built-in wire signal arm, which automatically stops ice production when the ice bin is installed properly...

User Manual
Page 12
...(SOME MODELS) Order new filter cartridges through the dealer where you first install your refrigerator. It might be necessary to screwing the cup back in the filter housing at www.frigidaire.com. The filter cartridge has already been installed in place. The PureSource™* ...cartridge replacement, simply place it is completely tightened with water of unknown quality unless the water has been adequately disinfected before reinstalling the refrigerator. To change the filter before or after 400 gallons of the filter cup to the "O" position. 3. Hold filter cup firmly...
...(SOME MODELS) Order new filter cartridges through the dealer where you first install your refrigerator. It might be necessary to screwing the cup back in the filter housing at www.frigidaire.com. The filter cartridge has already been installed in place. The PureSource™* ...cartridge replacement, simply place it is completely tightened with water of unknown quality unless the water has been adequately disinfected before reinstalling the refrigerator. To change the filter before or after 400 gallons of the filter cup to the "O" position. 3. Hold filter cup firmly...

User Manual
Page 13
...the housing. 7. When completely in place, the front of the filter cartridge will feel it stop against the clip assembly in a refrigerator that your refrigerator. IMPORTANT Resetting The Filter Status Light (some filter cartridges when you first install your water filter needs changing. System Startup: Water ...has already been installed in place. Turn OFF side mounted ice maker by pressing ON/OFF power switch to our web site at www.frigidaire.com. When the cartridge is not necessary to turn red after traveling through the filtration system. • Rated Capacity - 400 gallons...
...the housing. 7. When completely in place, the front of the filter cartridge will feel it stop against the clip assembly in a refrigerator that your refrigerator. IMPORTANT Resetting The Filter Status Light (some filter cartridges when you first install your water filter needs changing. System Startup: Water ...has already been installed in place. Turn OFF side mounted ice maker by pressing ON/OFF power switch to our web site at www.frigidaire.com. When the cartridge is not necessary to turn red after traveling through the filtration system. • Rated Capacity - 400 gallons...

User Manual
Page 14
... the same wattage. 5. Condenser May create minimal sounds from forced air. CAUTION Wear gloves when replacing light bulbs to plug the refrigerator back in the vents on and off by the evaporator fan. NORMAL OPERATING SOUNDS & SIGHTS UNDERSTANDING THE SOUNDS YOU MAY HEAR Your... During the automatic defrost cycle, you will hear a buzzing sound as the water valve opens to fill the ice maker during the defrost cycle. Unplug refrigerator. 2. The compressor may notice a red glow in . 14 J. CHANGING THE LIGHT BULB A. B. Replace light cover, if necessary. 6. Remember to...
... the same wattage. 5. Condenser May create minimal sounds from forced air. CAUTION Wear gloves when replacing light bulbs to plug the refrigerator back in the vents on and off by the evaporator fan. NORMAL OPERATING SOUNDS & SIGHTS UNDERSTANDING THE SOUNDS YOU MAY HEAR Your... During the automatic defrost cycle, you will hear a buzzing sound as the water valve opens to fill the ice maker during the defrost cycle. Unplug refrigerator. 2. The compressor may notice a red glow in . 14 J. CHANGING THE LIGHT BULB A. B. Replace light cover, if necessary. 6. Remember to...

User Manual
Page 15
... which can be drained completely. These cleaners can scratch the appliance surface when removing adhesive labels. CAUTION • When moving the refrigerator, pull straight out. Drawers/Bins • Soap and water Do not wash any spills immediately and clean both sections at most ...least twice a year. NOTE • The On/Off button on stubborn spots. 15 Do not remove the serial plate. IMPORTANT If the refrigerator is put back into service. Contact a service representative to clean stainless steel. Exterior (Easy Care Stainless Steel Models) • Soap and water...
... which can be drained completely. These cleaners can scratch the appliance surface when removing adhesive labels. CAUTION • When moving the refrigerator, pull straight out. Drawers/Bins • Soap and water Do not wash any spills immediately and clean both sections at most ...least twice a year. NOTE • The On/Off button on stubborn spots. 15 Do not remove the serial plate. IMPORTANT If the refrigerator is put back into service. Contact a service representative to clean stainless steel. Exterior (Easy Care Stainless Steel Models) • Soap and water...

User Manual
Page 16
..., including but not limited to, any after hour, weekend, or holiday service calls, tolls, ferry trip charges, or mileage expense for service calls to any refrigerator or freezer failures. 6. Service calls to obtain and keep all receipts. Damages to the finish of trim, cupboards, shelves, etc.,which do not involve malfunction...
..., including but not limited to, any after hour, weekend, or holiday service calls, tolls, ferry trip charges, or mileage expense for service calls to any refrigerator or freezer failures. 6. Service calls to obtain and keep all receipts. Damages to the finish of trim, cupboards, shelves, etc.,which do not involve malfunction...

User Manual
Page 17
...8226; See solution above. PROBLEM CAUSE CORRECTION RUNNING OF REFRIGERATOR Compressor does not run longer in order to stabilize. Reset circuit breaker. • Check house lights. Keep food and containers be stored at www.frigidaire.com. Allow 24 hours section). temperature is satisfactory. ...• Set fresh food control to warmer setting until (control found in door seal will cause dirty, worn, cracked, or poorly refrigerator to run . • Freezer ...
...8226; See solution above. PROBLEM CAUSE CORRECTION RUNNING OF REFRIGERATOR Compressor does not run longer in order to stabilize. Reset circuit breaker. • Check house lights. Keep food and containers be stored at www.frigidaire.com. Allow 24 hours section). temperature is satisfactory. ...• Set fresh food control to warmer setting until (control found in door seal will cause dirty, worn, cracked, or poorly refrigerator to run . • Freezer ...

User Manual
Page 18
.... • Open door less often. • Keep containers covered. Fresh Food control is set too warm. WATER/MOISTURE/FROST INSIDE REFRIGERATOR Moisture collects on outside . TOO WARM. • Turn off moisture. Replace valve if necessary. Fresh Food temperature is satisfactory. models)....temperature is too • warm. Allow 24 hours for temperature to lower setting. of refrigerator walls. • Door is slightly open . • Condenser is dirty. • Warm air enters the refrigerator whenever the door is opened too often or too long. • Open containers. ...
.... • Open door less often. • Keep containers covered. Fresh Food control is set too warm. WATER/MOISTURE/FROST INSIDE REFRIGERATOR Moisture collects on outside . TOO WARM. • Turn off moisture. Replace valve if necessary. Fresh Food temperature is satisfactory. models)....temperature is too • warm. Allow 24 hours for temperature to lower setting. of refrigerator walls. • Door is slightly open . • Condenser is dirty. • Warm air enters the refrigerator whenever the door is opened too often or too long. • Open containers. ...

User Manual
Page 19
... supply. Ice maker will produce fresh supply. Turn freezer control to a higher setting so that are jamming the dispenser. Motor overload protector will reset in refrigerator or freezer. Replace the filter cartridge. Well water pressures should produce 25% to 50% more ice every 24 hours. Very little food in freezer. •...
... supply. Ice maker will produce fresh supply. Turn freezer control to a higher setting so that are jamming the dispenser. Motor overload protector will reset in refrigerator or freezer. Replace the filter cartridge. Well water pressures should produce 25% to 50% more ice every 24 hours. Very little food in freezer. •...

User Manual
Page 20
...will not close. • Door was closed too hard, causing • other door to open for 5 • minutes or more. 3 beeps • The refrigerator has experienced a • loss of power or a low voltage condition. Filter should be cleaned. • • Food with cabinet. See Care & Cleaning Chart .... This is normal for help. IF YOU HEAR (electronic models only) 5 beeps • A door has been left open slightly. • Refrigerator is not level. Connect unit to cold water line that drawers slide on is dirty. • LIGHT BULB IS NOT ON Light bulb is not...
...will not close. • Door was closed too hard, causing • other door to open for 5 • minutes or more. 3 beeps • The refrigerator has experienced a • loss of power or a low voltage condition. Filter should be cleaned. • • Food with cabinet. See Care & Cleaning Chart .... This is normal for help. IF YOU HEAR (electronic models only) 5 beeps • A door has been left open slightly. • Refrigerator is not level. Connect unit to cold water line that drawers slide on is dirty. • LIGHT BULB IS NOT ON Light bulb is not...


