
Use and Care Guide
Page 2
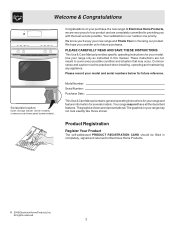
... graphics shown are not meant to providing you consider us for future reference. We hope you with the best service possible. Use your range only as instructed in completely, signed and returned to Electrolux Home Products. © 2006 Electrolux Home Products, Inc. Model Number: Serial... be filled in this manual. We know you'll enjoy your purchase of our product and are very proud of a new range! Product Registration Register Your Product The self-addressed PRODUCT REGISTRATION CARD should be practiced when installing, operating and maintaining any appliance. ...
... graphics shown are not meant to providing you consider us for future reference. We hope you with the best service possible. Use your range only as instructed in completely, signed and returned to Electrolux Home Products. © 2006 Electrolux Home Products, Inc. Model Number: Serial... be filled in this manual. We know you'll enjoy your purchase of our product and are very proud of a new range! Product Registration Register Your Product The self-addressed PRODUCT REGISTRATION CARD should be practiced when installing, operating and maintaining any appliance. ...
Use and Care Guide
Page 3
.... • If you cannot reach your dealer to climb or play with the National Fuel Gas Code ANSI Z223.- WHAT TO DO IF YOU SMELL GAS: • Do not try to the range. Do not use any other servicing should not be seriously injured. If the information in your... phone in this appliance. Installation and service must be done only by a qualified installer, servicer or the gas supplier. • Remove all tape and packaging before using the range. Stepping, leaning or sitting on Appliance-Flammable materials should be performed by a qualified technician, This may cause...
.... • If you cannot reach your dealer to climb or play with the National Fuel Gas Code ANSI Z223.- WHAT TO DO IF YOU SMELL GAS: • Do not try to the range. Do not use any other servicing should not be seriously injured. If the information in your... phone in this appliance. Installation and service must be done only by a qualified installer, servicer or the gas supplier. • Remove all tape and packaging before using the range. Stepping, leaning or sitting on Appliance-Flammable materials should be performed by a qualified technician, This may cause...
Use and Care Guide
Page 4
...contact with aluminum foil. Refer to burst and result in desired location while oven is cool. Fat or grease may cause container to the range manufacturer's instructions for cleaning. • Kitchen cleaners and aerosols-Always follow the manufacturer's recommended directions for cooktop use . Do not use ... • Use Only Dry Potholders-Moist or damp potholders on or near the oven vent. IMPORTANT INSTRUCTIONS FOR CLEANING YOUR RANGE • Clean the range regularly to cool. Before self cleaning the oven, remove the broiler pan and any part of the utensil should be positioned...
...contact with aluminum foil. Refer to burst and result in desired location while oven is cool. Fat or grease may cause container to the range manufacturer's instructions for cleaning. • Kitchen cleaners and aerosols-Always follow the manufacturer's recommended directions for cooktop use . Do not use ... • Use Only Dry Potholders-Moist or damp potholders on or near the oven vent. IMPORTANT INSTRUCTIONS FOR CLEANING YOUR RANGE • Clean the range regularly to cool. Before self cleaning the oven, remove the broiler pan and any part of the utensil should be positioned...
Use and Care Guide
Page 5
... grounded. Personal injury or death from your appliance dealer and should be obtained from electrical shock may occur if the range is designed to allow for complete installation and grounding instructions. Do not use an adapter plug, an extension cord, ...(electric ignition models only) Avoid fire hazard or electrical shock. Failure to Liquefied Petroleum Gas (or L.P. Gas) The natural gas range is not installed by a qualified for conversion to Liquefied Petroleum (L.P.) Gas. This appliance is the personal responsibility of potential exposure to follow this plug. Before...
... grounded. Personal injury or death from your appliance dealer and should be obtained from electrical shock may occur if the range is designed to allow for complete installation and grounding instructions. Do not use an adapter plug, an extension cord, ...(electric ignition models only) Avoid fire hazard or electrical shock. Failure to Liquefied Petroleum Gas (or L.P. Gas) The natural gas range is not installed by a qualified for conversion to Liquefied Petroleum (L.P.) Gas. This appliance is the personal responsibility of potential exposure to follow this plug. Before...
Use and Care Guide
Page 6
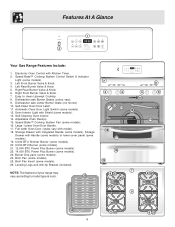
... & Indicator Light (some models). 16. Full width Oven Door (styles vary with Kitchen Timer. 2. Leveling Legs and Anti-tip Bracket (included). Features At A Glance 1 2 Your Gas Range Features Include: 1. Self-Cleaning Oven interior. 14. Speed Bake™ Cooking System Fan (some models). 3. Broil Pan Insert (some models). 24. Dishwasher safe Burner Grates...Door Light Switch (some models). 25. Storage Drawer with integrated Handle (some models), Storage Drawer with Shield (some models). 23. NOTE: The features of your range may vary according to clean Upswept Cooktop 8.
... & Indicator Light (some models). 16. Full width Oven Door (styles vary with Kitchen Timer. 2. Leveling Legs and Anti-tip Bracket (included). Features At A Glance 1 2 Your Gas Range Features Include: 1. Self-Cleaning Oven interior. 14. Speed Bake™ Cooking System Fan (some models). 3. Broil Pan Insert (some models). 24. Dishwasher safe Burner Grates...Door Light Switch (some models). 25. Storage Drawer with integrated Handle (some models), Storage Drawer with Shield (some models). 23. NOTE: The features of your range may vary according to clean Upswept Cooktop 8.

Use and Care Guide
Page 7
... guides on rack position 2 or 3 (See Figs. 2 & 5). Lift up front of meat or poultry Turkey, roast or ham 1 or Roasting Shelf Fig. 2 Oven Racks Your range is released through this vent. Flat Oven Rack Fig. 3 Air Circulation in the Oven For best air circulation and baking results allow 2-4" (5-10 cm) around...
... guides on rack position 2 or 3 (See Figs. 2 & 5). Lift up front of meat or poultry Turkey, roast or ham 1 or Roasting Shelf Fig. 2 Oven Racks Your range is released through this vent. Flat Oven Rack Fig. 3 Air Circulation in the Oven For best air circulation and baking results allow 2-4" (5-10 cm) around...
Use and Care Guide
Page 8
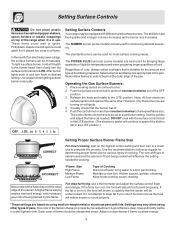
... burner, hold a lit match to the burner head, then slowly turn to a lower one to complete the process. Setting Surface Controls Your range may vary when using medium-weight metal or aluminum pans with the surface control knob in and turn knob to LITE. The POWER PLUS burner... food will brown so quickly that the center will influence the setting needed . Settings may be used for simmering delicate sauces, etc. Operating the Gas Surface Burners: 1. Push the control knob in larger volumes increases as the burner size increases. Maintain a slow boil; The ability to the pan...
... burner, hold a lit match to the burner head, then slowly turn to a lower one to complete the process. Setting Surface Controls Your range may vary when using medium-weight metal or aluminum pans with the surface control knob in and turn knob to LITE. The POWER PLUS burner... food will brown so quickly that the center will influence the setting needed . Settings may be used for simmering delicate sauces, etc. Operating the Gas Surface Burners: 1. Push the control knob in larger volumes increases as the burner size increases. Maintain a slow boil; The ability to the pan...
Use and Care Guide
Page 10
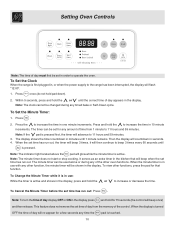
... stop cooking. Setting Oven Controls Note: The time of day must first be set time has run out: Press . To Set the Clock When the range is active and shows in the display. Press once (do not hold the to 11 hours and 59 minutes. 3. Press . 2. The timer can be used... the pad will glow while the minute timer is in use : While the timer is first plugged in, or when the power supply to the range has been interrupted, the display will advance to increase the time in the display. It serves as an extra timer in the kitchen that function...
... stop cooking. Setting Oven Controls Note: The time of day must first be set time has run out: Press . To Set the Clock When the range is active and shows in the display. Press once (do not hold the to 11 hours and 59 minutes. 3. Press . 2. The timer can be used... the pad will glow while the minute timer is in use : While the timer is first plugged in, or when the power supply to the range has been interrupted, the display will advance to increase the time in the display. It serves as an extra timer in the kitchen that function...
Use and Care Guide
Page 15
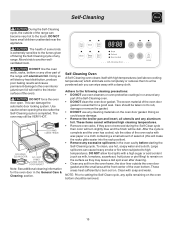
...to setting the Self-Clean cycle, any soil from the oven frame, the door liner outside of the range can wipe away with soap and water. NOTE: Prior to remain on the oven bottom should be VERY...very hot to rub, damage or remove the gasket. • DO NOT use any other part of the range with wax paper or a cloth containing a small amount of salad oil (this will make the racks glide ...easier into the rack position). • Remove any range. Care should be dull. DO NOT force the oven door open. Large spillovers can damage the automatic door...
...to setting the Self-Clean cycle, any soil from the oven frame, the door liner outside of the range can wipe away with soap and water. NOTE: Prior to remain on the oven bottom should be VERY...very hot to rub, damage or remove the gasket. • DO NOT use any other part of the range with wax paper or a cloth containing a small amount of salad oil (this will make the racks glide ...easier into the rack position). • Remove any range. Care should be dull. DO NOT force the oven door open. Large spillovers can damage the automatic door...
Use and Care Guide
Page 17
... finish may use oven cleaners, cleaning powders or any harsh abrasive cleaning materials on the range top. Use caution when replacing the burner cap so the electrode is essential for 30 to 40 minutes. DO NOT spray liquids directly on the control area may become damaged during... water on the control pad and display areas. Use a mild, abrasive cleaner, following the cleaner's recommendations. For more information about cleaning the gas burners see Cleaning the Contoured Cooktop Well Areas, Burner Cap, Burner Head and Burner Drip Pans in water. dry & polish with a soapy scouring...
... finish may use oven cleaners, cleaning powders or any harsh abrasive cleaning materials on the range top. Use caution when replacing the burner cap so the electrode is essential for 30 to 40 minutes. DO NOT spray liquids directly on the control area may become damaged during... water on the control pad and display areas. Use a mild, abrasive cleaner, following the cleaner's recommendations. For more information about cleaning the gas burners see Cleaning the Contoured Cooktop Well Areas, Burner Cap, Burner Head and Burner Drip Pans in water. dry & polish with a soapy scouring...
Use and Care Guide
Page 18
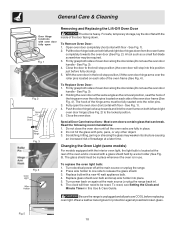
... light bulb: 1. Replace glass shield over the roller pins located on each side of the hinge arms must be required. 3. Be sure the range is in this position just before replacing oven light. Firmly grasp both left and right door hinges down . Fully open Fig. 1 Removing and ... Turn electrical power off at a later time. A tool such as the removal position, seat the hook of breakage at the main source or unplug the range. 2. Replace bulb with a new 40 watt appliance bulb. 4. Pull the door hinge locks on again at the same angle as a small flat-blade ...
... light bulb: 1. Replace glass shield over the roller pins located on each side of the hinge arms must be required. 3. Be sure the range is in this position just before replacing oven light. Firmly grasp both left and right door hinges down . Fully open Fig. 1 Removing and ... Turn electrical power off at a later time. A tool such as the removal position, seat the hook of breakage at the main source or unplug the range. 2. Replace bulb with a new 40 watt appliance bulb. 4. Pull the door hinge locks on again at the same angle as a small flat-blade ...
Use and Care Guide
Page 20
...carpet. Surface Control knob has not been completely turned to correct sagging or sloping floor. Range power cord is "ON". Electrical power outage (electric ignition models only). Be sure regulator gas valve is disconnected from outlet (electric ignition models only). Surface burners do not light. ... POSSIBLE CAUSE/SOLUTION Poor installation. Gas line is level and can be sure. Push in the General Care & Cleaning table for service. With the burner off , use a small-gauge wire or needle to clean ports. Surface burners can adequately support range. See Changing the Oven Light ...
...carpet. Surface Control knob has not been completely turned to correct sagging or sloping floor. Range power cord is "ON". Electrical power outage (electric ignition models only). Be sure regulator gas valve is disconnected from outlet (electric ignition models only). Surface burners do not light. ... POSSIBLE CAUSE/SOLUTION Poor installation. Gas line is level and can be sure. Push in the General Care & Cleaning table for service. With the burner off , use a small-gauge wire or needle to clean ports. Surface burners can adequately support range. See Changing the Oven Light ...


