
Use and Care Guide
Page 3
... these instructions for Warming or Heating the Room. • Storage in Canada CSA Standard C22.1, Canadian Electrical Code, Part 1, and local code requirements. Follow the gas supplier's instructions. • If you to the range at the circuit breaker or fuse box in case of an emergency. • User servicing-Do not repair or...
... these instructions for Warming or Heating the Room. • Storage in Canada CSA Standard C22.1, Canadian Electrical Code, Part 1, and local code requirements. Follow the gas supplier's instructions. • If you to the range at the circuit breaker or fuse box in case of an emergency. • User servicing-Do not repair or...
Use and Care Guide
Page 4
... become too hot. • Use Only Dry Potholders-Moist or damp potholders on Grease Fires-Smother the fire with both hands to the range manufacturer's instructions for cleaning. • Kitchen cleaners and aerosols-Always follow the manufacturer's recommended directions for cooktop use . Do not use extreme...though flames are the cook top, surfaces facing the cook top, the oven vent openings and surfaces near the oven vent. Remove all parts free of a hot oven. Important Safety Instructions • Do Not Leave Children Alone-Children should not be left alone or unattended in...
... become too hot. • Use Only Dry Potholders-Moist or damp potholders on Grease Fires-Smother the fire with both hands to the range manufacturer's instructions for cleaning. • Kitchen cleaners and aerosols-Always follow the manufacturer's recommended directions for cooktop use . Do not use extreme...though flames are the cook top, surfaces facing the cook top, the oven vent openings and surfaces near the oven vent. Remove all parts free of a hot oven. Important Safety Instructions • Do Not Leave Children Alone-Children should not be left alone or unattended in...
Use and Care Guide
Page 15
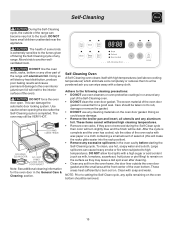
...is extremely sensitive to the oven interior (aluminum foil will make the racks glide easier into the rack position). • Remove any part of the range with high temperatures (well above cooking temperatures) which eliminate soils completely or reduces them to a fine powdered ash you can become very... blue and the finish will be removed. 15 DO NOT force the oven door open. Adhere to setting the Self-Clean cycle, any range. These items cannot withstand high cleaning temperatures. • Remove oven racks. These areas heat sufficiently to another wellventilated room. DO NOT leave...
...is extremely sensitive to the oven interior (aluminum foil will make the racks glide easier into the rack position). • Remove any part of the range with high temperatures (well above cooking temperatures) which eliminate soils completely or reduces them to a fine powdered ash you can become very... blue and the finish will be removed. 15 DO NOT force the oven door open. Adhere to setting the Self-Clean cycle, any range. These items cannot withstand high cleaning temperatures. • Remove oven racks. These areas heat sufficiently to another wellventilated room. DO NOT leave...
Use and Care Guide
Page 17
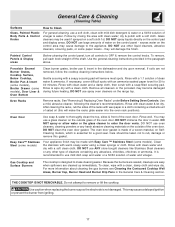
... remove the control knobs. Clean the stainless with a clean cloth. Gas Cooktop and Surface Burners The cooktop is recommended to 40 minutes. Do...cleaner's recommendations. General Care & Cleaning (Cleaning Table) Surfaces Glass, Painted Plastic Body Parts & Control Knobs How to the appliance. excess water on a soft cloth 1st....burner from igniting. 17 DO NOT use a glass cleaner on the range top. To remove, pull each knob straight off the shaft. The... when replacing the burner cap so the electrode is essential for 30 to use other type of the oven door. DO NOT use...
... remove the control knobs. Clean the stainless with a clean cloth. Gas Cooktop and Surface Burners The cooktop is recommended to 40 minutes. Do...cleaner's recommendations. General Care & Cleaning (Cleaning Table) Surfaces Glass, Painted Plastic Body Parts & Control Knobs How to the appliance. excess water on a soft cloth 1st....burner from igniting. 17 DO NOT use a glass cleaner on the range top. To remove, pull each knob straight off the shaft. The... when replacing the burner cap so the electrode is essential for 30 to use other type of the oven door. DO NOT use...
Use and Care Guide
Page 18
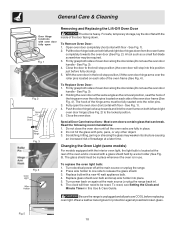
... not use the oven door handle - Read the following recommendations: 1. Press wire holder to one side to the locked position. 5. Be sure the range is unplugged and all the oven racks are COOL before fully closing). 5. Wear a leather-faced glove for protection against possible broken glass. A tool ... or any other object. 3. To reset, see Setting the Clock and Minute Timer in ). 6. See Fig. 1). 4. Do not close the oven door until all parts are fully in use the oven door handle - Fig. 4 To replace the oven light bulb: 1. Fig. 5 18 See Fig. 1). 2. Replace glass shield over...
... not use the oven door handle - Read the following recommendations: 1. Press wire holder to one side to the locked position. 5. Be sure the range is unplugged and all the oven racks are COOL before fully closing). 5. Wear a leather-faced glove for protection against possible broken glass. A tool ... or any other object. 3. To reset, see Setting the Clock and Minute Timer in ). 6. See Fig. 1). 4. Do not close the oven door until all parts are fully in use the oven door handle - Fig. 4 To replace the oven light bulb: 1. Fig. 5 18 See Fig. 1). 2. Replace glass shield over...

Use and Care Guide
Page 19
... scouring pad or a mild abrasive cleanser to 550°F (287°C) by pressing and holding the or . For proper flow of gas and ignition of degrees offset between the original factory temperature setting and the current temperature setting. Press . 2. Set the temperature to clean the...read "0." 4. Rinse with an absorbent cloth. This setting may differ from the cooktop until the 2 digit display appears. Do not remove any parts from your previous oven however, so your recipe times may be routinely cleaned. Release . When lowering the oven temperature, a minus sign (-) ...
... scouring pad or a mild abrasive cleanser to 550°F (287°C) by pressing and holding the or . For proper flow of gas and ignition of degrees offset between the original factory temperature setting and the current temperature setting. Press . 2. Set the temperature to clean the...read "0." 4. Rinse with an absorbent cloth. This setting may differ from the cooktop until the 2 digit display appears. Do not remove any parts from your previous oven however, so your recipe times may be routinely cleaned. Release . When lowering the oven temperature, a minus sign (-) ...
Use and Care Guide
Page 24
... such appliance is covered by Electrolux or an authorized service company. Electrolux authorizes no person to change without notice. Box 212378 Augusta, GA 30907 Canada 1.800.668.4606 Electrolux Canada Corp. 5855 Terry Fox Way Mississauga, Ontario, Canada L5V 3E4 Products with original serial numbers... not involve malfunction or defects in materials or workmanship, or for servicing, such as -is shipped from persons other than genuine Electrolux parts or parts obtained from the factory. 10. YOU MAY ALSO HAVE OTHER RIGHTS THAT VARY FROM STATE TO STATE. In Canada, your appliance is...
... such appliance is covered by Electrolux or an authorized service company. Electrolux authorizes no person to change without notice. Box 212378 Augusta, GA 30907 Canada 1.800.668.4606 Electrolux Canada Corp. 5855 Terry Fox Way Mississauga, Ontario, Canada L5V 3E4 Products with original serial numbers... not involve malfunction or defects in materials or workmanship, or for servicing, such as -is shipped from persons other than genuine Electrolux parts or parts obtained from the factory. 10. YOU MAY ALSO HAVE OTHER RIGHTS THAT VARY FROM STATE TO STATE. In Canada, your appliance is...


