Use and Care Manual
Page 2
... choosing our product. If a 2-prong wall receptacle is the only available outlet, it replaced with a properly grounded 3-prong wall receptacle installed by a qualified technician. Gas) This natural gas range is the personal responsibility of the consumer to cover every possible condition and situation that is our number one priority. Use your model. Failure to...
... choosing our product. If a 2-prong wall receptacle is the only available outlet, it replaced with a properly grounded 3-prong wall receptacle installed by a qualified technician. Gas) This natural gas range is the personal responsibility of the consumer to cover every possible condition and situation that is our number one priority. Use your model. Failure to...
Use and Care Manual
Page 3
... personal injury and damage to situations that may be seriously injured. Do not store or use . Follow the gas supplier's instructions. • If you to the range. • Never modify or alter the construction of the appliance unless specifically recommended in the manuals. This manual...Not Leave Children Alone-Children should not be done only by a qualified installer, servicer or the gas supplier. • Remove all instructions given. During and after unpacking the range. This symbol will help alert you cannot reach your dealer to cause burns. Installation and service ...
... personal injury and damage to situations that may be seriously injured. Do not store or use . Follow the gas supplier's instructions. • If you to the range. • Never modify or alter the construction of the appliance unless specifically recommended in the manuals. This manual...Not Leave Children Alone-Children should not be done only by a qualified installer, servicer or the gas supplier. • Remove all instructions given. During and after unpacking the range. This symbol will help alert you cannot reach your dealer to cause burns. Installation and service ...
Use and Care Manual
Page 4
... from cleaners and aerosols may cause severe burns. Exposed fat and grease could catch fire. IMPORTANT INSTRUCTIONS FOR CLEANING YOUR RANGE • Clean the range regularly to operate again. Do not allow dripping fat to rub, damage or move the gasket. Stand to such substances... use of these areas until they have had sufficient time to the full LITE position when igniting top burners. Refer to the range manufacturer's instructions for cleaning. • Kitchen cleaners and aerosols-Always follow the manufacturer's recommended directions for cooktop service without its...
... from cleaners and aerosols may cause severe burns. Exposed fat and grease could catch fire. IMPORTANT INSTRUCTIONS FOR CLEANING YOUR RANGE • Clean the range regularly to operate again. Do not allow dripping fat to rub, damage or move the gasket. Stand to such substances... use of these areas until they have had sufficient time to the full LITE position when igniting top burners. Refer to the range manufacturer's instructions for cleaning. • Kitchen cleaners and aerosols-Always follow the manufacturer's recommended directions for cooktop service without its...
Use and Care Manual
Page 5
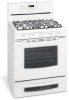
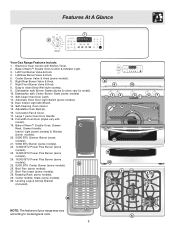
...11. Dishwasher safe Center Burner Grate (some models). 29. Leveling Legs & Anti-tip Bracket (included). 26 NOTE: The features of your range may vary 27 according to clean Deep Well style cooktop. 9. Large 1 piece Oven Door Handle. 18. Bake-n-Warm™ Double Oven,... Burner Valve & Knob (some models). 26. Self-Clean Oven Door Latch. 12. Broil Pan (some models). 13. Features At A Glance 1 2 Your Gas Range Features Include: 1. Right Front Burner Valve & Knob. 8. Self-Cleaning Oven interior. 15. Bake-n-Warm™ Double Oven Control & Indicator Light. 3. Left ...
...11. Dishwasher safe Center Burner Grate (some models). 29. Leveling Legs & Anti-tip Bracket (included). 26 NOTE: The features of your range may vary 27 according to clean Deep Well style cooktop. 9. Large 1 piece Oven Door Handle. 18. Bake-n-Warm™ Double Oven,... Burner Valve & Knob (some models). 26. Self-Clean Oven Door Latch. 12. Broil Pan (some models). 13. Features At A Glance 1 2 Your Gas Range Features Include: 1. Right Front Burner Valve & Knob. 8. Self-Cleaning Oven interior. 15. Bake-n-Warm™ Double Oven Control & Indicator Light. 3. Left ...
Use and Care Manual
Page 6
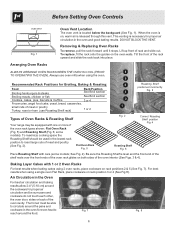
... of meat or poultry Turkey, roast or ham (use Roasting Shelf rack) 1 or 2 4 3 2 1 Roasting Shelf positioned incorrectly Fig. 3 Types of Oven Racks & Roasting Shelf Your range may be used in the lowest rack position to roast large cuts of the oven cavity. When the oven is on the oven walls.
... of meat or poultry Turkey, roast or ham (use Roasting Shelf rack) 1 or 2 4 3 2 1 Roasting Shelf positioned incorrectly Fig. 3 Types of Oven Racks & Roasting Shelf Your range may be used in the lowest rack position to roast large cuts of the oven cavity. When the oven is on the oven walls.

Use and Care Manual
Page 7
...match to the burner head, then slowly turn counterclockwise to desired setting. Use caution when lighting surface burners manually. Setting Surface Controls Your range may vary when using the center burner with the griddle, REMOVE the center burner grate from the cooktop and replace with lids. The ...The Power Plus burner or burners (some models) is too cool, the food will absorb the fat and be steady and sharp. Operating the Gas Surface Burners: 1. DO NOT cook with different sized surface burners. Maintain a slow boil; Note: Before using other types of food being prepared....
...match to the burner head, then slowly turn counterclockwise to desired setting. Use caution when lighting surface burners manually. Setting Surface Controls Your range may vary when using the center burner with the griddle, REMOVE the center burner grate from the cooktop and replace with lids. The ...The Power Plus burner or burners (some models) is too cool, the food will absorb the fat and be steady and sharp. Operating the Gas Surface Burners: 1. DO NOT cook with different sized surface burners. Maintain a slow boil; Note: Before using other types of food being prepared....
Use and Care Manual
Page 9
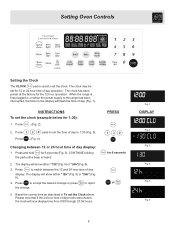
When the range is first plugged in, or when the power supply to set the clock. Press . (Fig. 2). 2. Press to accept the desired change or press the change. ... CLOCK pad is heard. 2. Changing between the 12 and 24 hour time of day operation. CONTINUE holding the pad until a beep is used to the range has been interrupted, the timer in To set the time of day display: 1. to 1:30 (Fig. 3). . (Fig. 4).
When the range is first plugged in, or when the power supply to set the clock. Press . (Fig. 2). 2. Press to accept the desired change or press the change. ... CLOCK pad is heard. 2. Changing between the 12 and 24 hour time of day operation. CONTINUE holding the pad until a beep is used to the range has been interrupted, the timer in To set the time of day display: 1. to 1:30 (Fig. 3). . (Fig. 4).
Use and Care Manual
Page 12
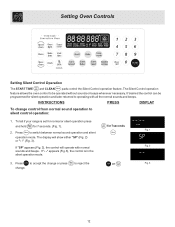
... TIME and CLEAN pads control the Silent Control operation feature. The display will operate with all the normal sounds and beeps. To tell if your range is in the silent operation mode. 3. The Silent Control operation feature allows the oven control to switch between normal sound operation and silent operation mode...
... TIME and CLEAN pads control the Silent Control operation feature. The display will operate with all the normal sounds and beeps. To tell if your range is in the silent operation mode. 3. The Silent Control operation feature allows the oven control to switch between normal sound operation and silent operation mode...
Use and Care Manual
Page 25
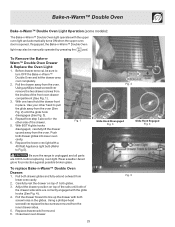
With one hand hold the drawer front in the glides. Repeat from step 3 above for protection against possible broken glass. Fig. 1 Be sure the range is opened. Adjust the drawer position on top of the drawer side slots are COOL before replacing oven light. Use your other side of the ...
With one hand hold the drawer front in the glides. Repeat from step 3 above for protection against possible broken glass. Fig. 1 Be sure the range is opened. Adjust the drawer position on top of the drawer side slots are COOL before replacing oven light. Use your other side of the ...
Use and Care Manual
Page 26
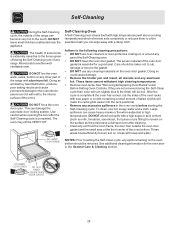
...gasket. Use caution when opening the door after cleaning. • Clean any soil from the oven frame, the door liner outside of the range can cause heavy smoke or fire when subjected to another wellventilated room. The oven may leave a dull spot even after the Self-Cleaning cycle...any cleaning materials on the oven door gasket. Doing so could cause damage. • Remove the broiler pan and insert, all utensils and any range. After the cycle is completed. See additional cleaning information for a good seal. Self-Cleaning During the Self-Cleaning cycle, the outside the oven ...
...gasket. Use caution when opening the door after cleaning. • Clean any soil from the oven frame, the door liner outside of the range can cause heavy smoke or fire when subjected to another wellventilated room. The oven may leave a dull spot even after the Self-Cleaning cycle...any cleaning materials on the oven door gasket. Doing so could cause damage. • Remove the broiler pan and insert, all utensils and any range. After the cycle is completed. See additional cleaning information for a good seal. Self-Cleaning During the Self-Cleaning cycle, the outside the oven ...
Use and Care Manual
Page 27
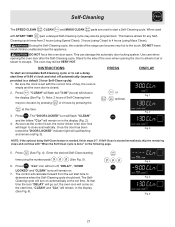
... door is set, the motor driven oven door lock will calculate forward from 2 hours (using Speed Clean), 3 hours (using Clean) to the side of the range can damage the automatic door locking system. "CLn" icon will turn on . 7. The control will begin to the touch. The Self- This can become very...
... door is set, the motor driven oven door lock will calculate forward from 2 hours (using Speed Clean), 3 hours (using Clean) to the side of the range can damage the automatic door locking system. "CLn" icon will turn on . 7. The control will begin to the touch. The Self- This can become very...
Use and Care Manual
Page 30
...Care™ Stainless Steel (some models). Rinse well. Your range finish is recommended to use large amounts of water on the control area may use other types of vinegar & water. For more information about cleaning the gas burners see Cleaning the Contoured Cooktop Well Areas, Burner Cap,...mild dish detergent & water or a 50/50 solution of cleaners containing any other liquid cleaners, abrasive cleaners, scouring pads, or some models) Gas Cooktop and Surface Burners Use soap & water to thoroughly clean the top, sides & front of water and vinegar. The oven door gasket is...
...Care™ Stainless Steel (some models). Rinse well. Your range finish is recommended to use large amounts of water on the control area may use other types of vinegar & water. For more information about cleaning the gas burners see Cleaning the Contoured Cooktop Well Areas, Burner Cap,...mild dish detergent & water or a 50/50 solution of cleaners containing any other liquid cleaners, abrasive cleaners, scouring pads, or some models) Gas Cooktop and Surface Burners Use soap & water to thoroughly clean the top, sides & front of water and vinegar. The oven door gasket is...
Use and Care Manual
Page 32
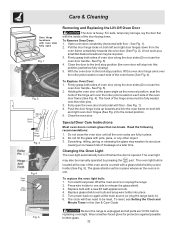
... break. Press wire holder to one side to be reset. To reset, see Setting the Clock and Minute Timer in use. Fig. 5 Be sure the range is in this position just before replacing oven light. Close the door to the locked position. 5. To Replace Oven Door: 1. See Fig. 1). 4. Read ... of the door facing down from the oven frame completely towards and into the oven frame on again at the main source or unplug the range. 2. Scratching, hitting, jarring or stressing the glass may also be in ). 6. See Fig. 3). 4. See Fig. 1). 2. Pull the door hinge locks on each side ...
... break. Press wire holder to one side to be reset. To reset, see Setting the Clock and Minute Timer in use. Fig. 5 Be sure the range is in this position just before replacing oven light. Close the door to the locked position. 5. To Replace Oven Door: 1. See Fig. 1). 4. Read ... of the door facing down from the oven frame completely towards and into the oven frame on again at the main source or unplug the range. 2. Scratching, hitting, jarring or stressing the glass may also be in ). 6. See Fig. 3). 4. See Fig. 1). 2. Pull the door hinge locks on each side ...

Use and Care Manual
Page 33
...the broil rack to LITE. Regular cleaning is started. Self-Cleaning cycle does not work (some models). Excessive spillovers in center of range until burner ignites & then turn control knob to desired flame size. (2) Burner ports are clogged. Place oven rack in oven....results. Follow Broil instructions under Self-Cleaning. (2) SelfCleaning cycle was interrupted. Push in this will happen for service. (5) Be sure gas supply is disconnected from outlet (electric ignition models only). Dry the burners thoroughly following list. See Setting Oven Controls in this appliance...
...the broil rack to LITE. Regular cleaning is started. Self-Cleaning cycle does not work (some models). Excessive spillovers in center of range until burner ignites & then turn control knob to desired flame size. (2) Burner ports are clogged. Place oven rack in oven....results. Follow Broil instructions under Self-Cleaning. (2) SelfCleaning cycle was interrupted. Push in this will happen for service. (5) Be sure gas supply is disconnected from outlet (electric ignition models only). Dry the burners thoroughly following list. See Setting Oven Controls in this appliance...


