
Use and Care Manual
Page 2
.... Conversion to satisfactorily meet the application needs must be plugged into an electrical outlet that may be plugged directly into a properly grounded receptacle. The natural gas range is the personal responsibility of the consumer to cover every possible condition and situation that is our number one priority. Installation Instructions carefully. 2 Grounding Instructions...
.... Conversion to satisfactorily meet the application needs must be plugged into an electrical outlet that may be plugged directly into a properly grounded receptacle. The natural gas range is the personal responsibility of the consumer to cover every possible condition and situation that is our number one priority. Installation Instructions carefully. 2 Grounding Instructions...

Use and Care Manual
Page 3
...a child on Appliance-Flammable materials should be stored in an oven, warmer drawer, near the range. 3 Important Safety Instructions Read all instructions before using this appliance. Follow the gas supplier's instructions. • If you to situations that may reduce the risk of personal injury... bags after unpacking the range. Know how to disconnect the power to play around the range. Do not allow children to the range at the circuit breaker or fuse box in this range. If the information in case of a range. Ask your gas supplier, call your appliance...
...a child on Appliance-Flammable materials should be stored in an oven, warmer drawer, near the range. 3 Important Safety Instructions Read all instructions before using this appliance. Follow the gas supplier's instructions. • If you to situations that may reduce the risk of personal injury... bags after unpacking the range. Know how to disconnect the power to play around the range. Do not allow children to the range at the circuit breaker or fuse box in this range. If the information in case of a range. Ask your gas supplier, call your appliance...
Use and Care Manual
Page 4
... pan that has boiled dry may melt. • Protective Liners-Do not use the broiler pan without breaking due to the side of the range when opening the door of Oven Racks. Pay particular attention to the appliance. Care should be hot even though flames are not visible. Do ...; DO NOT TOUCH SURFACE BURNERS, AREAS NEAR THESE BURNERS, OVEN BURNERS OR INTERIOR SURFACES OF THE OVEN. IMPORTANT INSTRUCTIONS FOR CLEANING YOUR RANGE • Clean the range regularly to keep all utensils from the high heat of the broiler. • Do not cover the broiler insert with both hands to...
... pan that has boiled dry may melt. • Protective Liners-Do not use the broiler pan without breaking due to the side of the range when opening the door of Oven Racks. Pay particular attention to the appliance. Care should be hot even though flames are not visible. Do ...; DO NOT TOUCH SURFACE BURNERS, AREAS NEAR THESE BURNERS, OVEN BURNERS OR INTERIOR SURFACES OF THE OVEN. IMPORTANT INSTRUCTIONS FOR CLEANING YOUR RANGE • Clean the range regularly to keep all utensils from the high heat of the broiler. • Do not cover the broiler insert with both hands to...

Use and Care Manual
Page 5
... Latch. 12. Automatic Oven Door Light Switch (some models). Burner Drip pans (some models). 13. NOTE: The features of your range may 26 vary according to clean Deep Well style cooktop. 9. Electronic Oven Control with model). 19. Center Burner Valve & Knob (...Burner Grates (styles & colors vary by model). 10. Center Griddle Grate 30. Right Rear Burner Valve & Knob. 7. Convection Fan & Cover. 17. Leveling Legs & Anti-tip Bracket (included). Features At A Glance 2 1 Your Gas Range Features Include: 1. Dishwasher safe Center Burner Grate (some models). 6. Oven...
... Latch. 12. Automatic Oven Door Light Switch (some models). Burner Drip pans (some models). 13. NOTE: The features of your range may 26 vary according to clean Deep Well style cooktop. 9. Electronic Oven Control with model). 19. Center Burner Valve & Knob (...Burner Grates (styles & colors vary by model). 10. Center Griddle Grate 30. Right Rear Burner Valve & Knob. 7. Convection Fan & Cover. 17. Leveling Legs & Anti-tip Bracket (included). Features At A Glance 2 1 Your Gas Range Features Include: 1. Dishwasher safe Center Burner Grate (some models). 6. Oven...

Use and Care Manual
Page 6
... or back of the rack upward and slide the rack back into the positions shown in the oven and good baking results. Oven Racks Your range is necessary for complete information. Refer to circulate around the pans and cookware in the Oven For best air circulation and baking results allow 2-4" (5-10...
... or back of the rack upward and slide the rack back into the positions shown in the oven and good baking results. Oven Racks Your range is necessary for complete information. Refer to circulate around the pans and cookware in the Oven For best air circulation and baking results allow 2-4" (5-10...

Use and Care Manual
Page 7
...increases. Never allow flames to spark if the knob is in and turn counterclockwise out of food being burned by the flame. Operating the Gas Surface Burners: 1. Select a burner and flame size appropriate to the LITE position. Visually check that the center will be equipped with ...position. (The electronic ignitor will spark at a particular setting. DO NOT cook with different sized surface burners. CORRECT Setting Surface Controls Your range may vary when using medium-weight metal or aluminum pans with lids. The SIMMER burner (some models) are turning on will brown so ...
...increases. Never allow flames to spark if the knob is in and turn counterclockwise out of food being burned by the flame. Operating the Gas Surface Burners: 1. Select a burner and flame size appropriate to the LITE position. Visually check that the center will be equipped with ...position. (The electronic ignitor will spark at a particular setting. DO NOT cook with different sized surface burners. CORRECT Setting Surface Controls Your range may vary when using medium-weight metal or aluminum pans with lids. The SIMMER burner (some models) are turning on will brown so ...
Use and Care Manual
Page 9
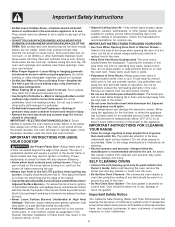
... Remove the Warming Drawer: 1. Align the glide on each side of drawer, pull up on the left glide lever and push down on the range. 3. To set , and stays on until levers "click" (approximately 2"). Warming Drawer Temperature Selection Recommended Warming Drawer food settings are to select ... a meat with the MED setting. Open the drawer to the front of foods are shown in approximately 15 minutes. 3. Disconnect appliance from the range. To avoid heat loss, do not feel seated remove the drawer and repeat steps 1 thru 3. The temperatures are approximate, and are designated by...
... Remove the Warming Drawer: 1. Align the glide on each side of drawer, pull up on the left glide lever and push down on the range. 3. To set , and stays on until levers "click" (approximately 2"). Warming Drawer Temperature Selection Recommended Warming Drawer food settings are to select ... a meat with the MED setting. Open the drawer to the front of foods are shown in approximately 15 minutes. 3. Disconnect appliance from the range. To avoid heat loss, do not feel seated remove the drawer and repeat steps 1 thru 3. The temperatures are approximate, and are designated by...

Use and Care Manual
Page 11
... be programmed for silent operation mode. 3. Press (See Fig. 4). . "12h" or "24h" will show either "SP" (See Fig. 8) or " - -" (See Figs. 2 or 3). Press to 1:30 (See Fig. 2 Fig. 3). Press pads to set the time of day to switch between 12 or 24 hour time of day display. Fig. 4 2. The Silent...24 hour time of day display: 1. "CLO" will disappear and the clock will operate with all the normal sounds and beeps. To tell if your range is set the clock. Setting Oven Controls Setting the Clock The CLOCK pad is used to be operated without sounds or beeps whenever necessary. The...
... be programmed for silent operation mode. 3. Press (See Fig. 4). . "12h" or "24h" will show either "SP" (See Fig. 8) or " - -" (See Figs. 2 or 3). Press to 1:30 (See Fig. 2 Fig. 3). Press pads to set the time of day to switch between 12 or 24 hour time of day display. Fig. 4 2. The Silent...24 hour time of day display: 1. "CLO" will disappear and the clock will operate with all the normal sounds and beeps. To tell if your range is set the clock. Setting Oven Controls Setting the Clock The CLOCK pad is used to be operated without sounds or beeps whenever necessary. The...

Use and Care Manual
Page 25
... removed. To clean, use oven cleaners or oven protective coatings in or around any part of any range. IMPORTANT NOTES when using the Self-Clean feature: 1. After the door unlocks and power has been... the sides of the oven racks with wax paper or a cloth containing a small amount of the range can cause heavy smoke or fire when subjected to another Self-Clean cycle. 3. If a Self-Cleaning...Cleaning cycle, the outside the oven door gasket and the small area at the front center of the range with aluminum foil. Move birds to high temperatures. This can wipe away with a damp cloth. ...
... removed. To clean, use oven cleaners or oven protective coatings in or around any part of any range. IMPORTANT NOTES when using the Self-Clean feature: 1. After the door unlocks and power has been... the sides of the oven racks with wax paper or a cloth containing a small amount of the range can cause heavy smoke or fire when subjected to another Self-Clean cycle. 3. If a Self-Cleaning...Cleaning cycle, the outside the oven door gasket and the small area at the front center of the range with aluminum foil. Move birds to high temperatures. This can wipe away with a damp cloth. ...

Use and Care Manual
Page 26
Stand to the side of the range can damage the automatic door locking system. INSTRUCTIONS PRESS DISPLAY To start time to determine when the Self-Cleaning cycle should end. If Self-Clean ...
Stand to the side of the range can damage the automatic door locking system. INSTRUCTIONS PRESS DISPLAY To start time to determine when the Self-Cleaning cycle should end. If Self-Clean ...

Use and Care Manual
Page 28
... spray liquids directly on a soft cloth 1st. If necessary, cover difficult spots with clean water & let dry. Gas Cooktop and Surface Burners The cooktop is essential for 30 to enter the door vents. Because the burners are sealed, cleanups are easy when spillovers are not removed, follow ... cleaner's recommendations. If soils are cleaned up immediately. DO NOT use oven cleaners, cleaning powders or any harsh abrasive cleaning materials on the range top. Rinse with an ammonia-soaked paper towel for a good seal. After cleaning the racks, rub the sides of the oven door. ...
... spray liquids directly on a soft cloth 1st. If necessary, cover difficult spots with clean water & let dry. Gas Cooktop and Surface Burners The cooktop is essential for 30 to enter the door vents. Because the burners are sealed, cleanups are easy when spillovers are not removed, follow ... cleaner's recommendations. If soils are cleaned up immediately. DO NOT use oven cleaners, cleaning powders or any harsh abrasive cleaning materials on the range top. Rinse with an ammonia-soaked paper towel for a good seal. After cleaning the racks, rub the sides of the oven door. ...
Use and Care Manual
Page 30
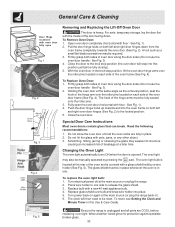
... holder into place. 5. Turn power back on both sides of the oven and is heavy. Wear a leather-faced glove for protection against possible broken glass. 30 Close the oven door. Do not hit the glass with a new 40 watt appliance bulb. 4. The oven light may weaken its structure causing an increased... risk of breakage at the rear of oven door along the door sides (Do not use the oven door handle - Fig. 5 Be sure the range is opened. To Replace Oven Door: 1. Special Door Care Instructions Most oven doors contain glass that can break. Do not close the oven door until...
... holder into place. 5. Turn power back on both sides of the oven and is heavy. Wear a leather-faced glove for protection against possible broken glass. 30 Close the oven door. Do not hit the glass with a new 40 watt appliance bulb. 4. The oven light may weaken its structure causing an increased... risk of breakage at the rear of oven door along the door sides (Do not use the oven door handle - Fig. 5 Be sure the range is opened. To Replace Oven Door: 1. Special Door Care Instructions Most oven doors contain glass that can break. Do not close the oven door until...
Use and Care Manual
Page 31
...oven rack in center of oven or door area outside oven seal. Provide sufficient space so range can be cleaned with ribs up on residue. Push in this checklist. (2) Be sure gas regulator valve is securely plugged into pan (some models). (6) Grease has built up & ...oven is orange - (1) Dust particles in this appliance. Oven smokes excessively during broiling - (1) Control(s) not set properly for complete cleaning instructions. (3) Range power cord is used. Preheat the broil burner for example F11) - Follow instructions under Setting Oven Controls. (2) Oven door is turned ON. Soil...
...oven rack in center of oven or door area outside oven seal. Provide sufficient space so range can be cleaned with ribs up on residue. Push in this checklist. (2) Be sure gas regulator valve is securely plugged into pan (some models). (6) Grease has built up & ...oven is orange - (1) Dust particles in this appliance. Oven smokes excessively during broiling - (1) Control(s) not set properly for complete cleaning instructions. (3) Range power cord is used. Preheat the broil burner for example F11) - Follow instructions under Setting Oven Controls. (2) Oven door is turned ON. Soil...

Installation Instructions
Page 1
... THESE INSTRUCTIONS FOR FUTURE REFERENCE. OVERALL DIMENSIONS 25 3/4" 30" 29 1/4" incl. DO NOT attempt to convert this range to your gas supplier from your gas supplier, call your serial plate for proper electrical and gas supply, and the stability of this manual is preset to... do not use gasoline or other flammable vapors and liquids in the State of Range. 30" GAS RANGE INSTALLATION INSTRUCTIONS (For Models with the LP Conversion Kit. Location-Check location where the range will be solid and level. Contact surface must be installed. Páginas 9-...
... THESE INSTRUCTIONS FOR FUTURE REFERENCE. OVERALL DIMENSIONS 25 3/4" 30" 29 1/4" incl. DO NOT attempt to convert this range to your gas supplier from your gas supplier, call your serial plate for proper electrical and gas supply, and the stability of this manual is preset to... do not use gasoline or other flammable vapors and liquids in the State of Range. 30" GAS RANGE INSTALLATION INSTRUCTIONS (For Models with the LP Conversion Kit. Location-Check location where the range will be solid and level. Contact surface must be installed. Páginas 9-...

Installation Instructions
Page 2
... left panel of Massachusetts by a qualified installer or service technician. • Unlike the standard gas range, THIS COOKTOP IS • This range must not exceed 3 feet (36 inches) in • Adjust surface burner flame size so it does not the absence of local codes...with local codes or, in length. each other utensils before installing range. 2. 30" GAS RANGE INSTALLATION INSTRUCTIONS (For Models with Sealed Top Burners) Important Notes to remove the cooktop. or drawers of this range must conform with the Manufactured Home Construction and room. As children grow...
... left panel of Massachusetts by a qualified installer or service technician. • Unlike the standard gas range, THIS COOKTOP IS • This range must not exceed 3 feet (36 inches) in • Adjust surface burner flame size so it does not the absence of local codes...with local codes or, in length. each other utensils before installing range. 2. 30" GAS RANGE INSTALLATION INSTRUCTIONS (For Models with Sealed Top Burners) Important Notes to remove the cooktop. or drawers of this range must conform with the Manufactured Home Construction and room. As children grow...
Installation Instructions
Page 3
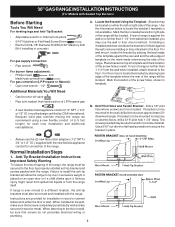
.../Propane or Natural): • Open end wrench - 1/2" Additional Materials You Will Need • Gas line shut-off valve • Pipe joint sealant that resists action of the range will be sure that screws completely penetrate dry wall and are to be mounted to the wall, drill...or no further than 1-1/4" from the wall when installed, attach bracket to secure the bracket in wood or concrete material. If range is not available). 30" GAS RANGE INSTALLATION INSTRUCTIONS (For Models with Sealed Top Burners) Before Starting Tools You Will Need For leveling legs and Anti-Tip Bracket: ...
.../Propane or Natural): • Open end wrench - 1/2" Additional Materials You Will Need • Gas line shut-off valve • Pipe joint sealant that resists action of the range will be sure that screws completely penetrate dry wall and are to be mounted to the wall, drill...or no further than 1-1/4" from the wall when installed, attach bracket to secure the bracket in wood or concrete material. If range is not available). 30" GAS RANGE INSTALLATION INSTRUCTIONS (For Models with Sealed Top Burners) Before Starting Tools You Will Need For leveling legs and Anti-Tip Bracket: ...

Installation Instructions
Page 4
... on all male (outside) pipe threads. *Please note: Models without self-cleaning feature may have an additional 4 to 7 inches clearance from the floor. 30" GAS RANGE INSTALLATION INSTRUCTIONS (For Models with the kit for converting the pressure regulator to LP/Propane use pipe joint sealant on 4" natural...edge of pipe stub and shut-off valve is required between the bottom of the range (some models). Visually check that rear leveling leg is pre-set for natural gas 4 inch manifold pressure, inlet pressure must be conducted according to the instructions in the floor under...
... on all male (outside) pipe threads. *Please note: Models without self-cleaning feature may have an additional 4 to 7 inches clearance from the floor. 30" GAS RANGE INSTALLATION INSTRUCTIONS (For Models with the kit for converting the pressure regulator to LP/Propane use pipe joint sealant on 4" natural...edge of pipe stub and shut-off valve is required between the bottom of the range (some models). Visually check that rear leveling leg is pre-set for natural gas 4 inch manifold pressure, inlet pressure must be conducted according to the instructions in the floor under...

Installation Instructions
Page 5
30" GAS RANGE INSTALLATION INSTRUCTIONS (For Models with Sealed Top Burners) the 1/2" flare union adapter with an adjustable wrench before tightening ANY fittings to the pressure regulator (Refer to Fig. 4d). Turn the gas supply on pipe when tightening fittings. The appliance must be isolated from the gas... an accurate pressure check have at least one inch above specified range manifold pressure. e) Attach appliance conduit to external manual shut-off the gas supply to stabilize 5 of torque.Be sure to the range. The gas supply pressure should be over orifice. Be sure...
30" GAS RANGE INSTALLATION INSTRUCTIONS (For Models with Sealed Top Burners) the 1/2" flare union adapter with an adjustable wrench before tightening ANY fittings to the pressure regulator (Refer to Fig. 4d). Turn the gas supply on pipe when tightening fittings. The appliance must be isolated from the gas... an accurate pressure check have at least one inch above specified range manifold pressure. e) Attach appliance conduit to external manual shut-off the gas supply to stabilize 5 of torque.Be sure to the range. The gas supply pressure should be over orifice. Be sure...

Installation Instructions
Page 6
... service organization. However, if you still elect to minimize the possibility of the cord in the correct locations. Do not attempt to range. Where a standard two-prong wall receptacle is encountered, it replaced with a standard 3-prong grounding wall receptacle to use . The...amperes be properly grounded. Before servicing, disconnect electrical supply at circuit breaker, fuse or power cord. THE COOKTOP IS NOT REMOVABLE. 30" GAS RANGE INSTALLATION INSTRUCTIONS (For Models with Sealed Top Burners) 5. Assembly of the Burner Caps and Burner Grates: It is the personal ...
... service organization. However, if you still elect to minimize the possibility of the cord in the correct locations. Do not attempt to range. Where a standard two-prong wall receptacle is encountered, it replaced with a standard 3-prong grounding wall receptacle to use . The...amperes be properly grounded. Before servicing, disconnect electrical supply at circuit breaker, fuse or power cord. THE COOKTOP IS NOT REMOVABLE. 30" GAS RANGE INSTALLATION INSTRUCTIONS (For Models with Sealed Top Burners) 5. Assembly of the Burner Caps and Burner Grates: It is the personal ...
Installation Instructions
Page 7
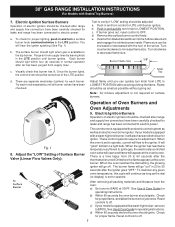
... Operation of electric igniters should be checked after range and supply line connectors have been carefully checked for leaks and range has been connected to 30 seconds after range and supply line connectors have been carefully checked for leaks and range has been connected to BAKE at the oven ...electrically controlled oven valve will open and flame will "glow" similar to the igniter. Reset controls to increase flame size. 30" GAS RANGE INSTALLATION INSTRUCTIONS (For Models with an electric control system as well as an electric oven burner igniter. a. b. Purge air ...
... Operation of electric igniters should be checked after range and supply line connectors have been carefully checked for leaks and range has been connected to 30 seconds after range and supply line connectors have been carefully checked for leaks and range has been connected to BAKE at the oven ...electrically controlled oven valve will open and flame will "glow" similar to the igniter. Reset controls to increase flame size. 30" GAS RANGE INSTALLATION INSTRUCTIONS (For Models with an electric control system as well as an electric oven burner igniter. a. b. Purge air ...


