
Use and Care Manual
Page 2
... you consider us for future purchases. These instructions are representative. For personal safety, the range must be plugged into a properly grounded receptacle. Gas) Personal injury or death from electrical power cord. At Electrolux Home Products, we are ...the described features. The natural gas range is correctly polarized and properly grounded. Welcome & Congratulations Congratulations on your range only as instructed in order for this range for complete installation and grounding instructions. Failure to Liquefied Petroleum (L.P.) Gas. For maximum safety, the...
... you consider us for future purchases. These instructions are representative. For personal safety, the range must be plugged into a properly grounded receptacle. Gas) Personal injury or death from electrical power cord. At Electrolux Home Products, we are ...the described features. The natural gas range is correctly polarized and properly grounded. Welcome & Congratulations Congratulations on your range only as instructed in order for this range for complete installation and grounding instructions. Failure to Liquefied Petroleum (L.P.) Gas. For maximum safety, the...

Use and Care Manual
Page 3
...important safety symbols and instructions. FOR YOUR SAFETY: - WHAT TO DO IF YOU SMELL GAS: • Do not try to light any appliance. • Do not touch any phone in or on the range to reach items could be performed by removing leveling legs, panels, wire covers, anti-... surface burners or in carbon monoxide poisoning. The weight of a range by a qualified installer, servicer or the gas supplier. • Remove all tape and packaging before using the range. Destroy the carton and plastic bags after unpacking the range. Doing so may cause bodily injury or property damage. Do not...
...important safety symbols and instructions. FOR YOUR SAFETY: - WHAT TO DO IF YOU SMELL GAS: • Do not try to light any appliance. • Do not touch any phone in or on the range to reach items could be performed by removing leveling legs, panels, wire covers, anti-... surface burners or in carbon monoxide poisoning. The weight of a range by a qualified installer, servicer or the gas supplier. • Remove all tape and packaging before using the range. Destroy the carton and plastic bags after unpacking the range. Doing so may cause bodily injury or property damage. Do not...

Use and Care Manual
Page 5
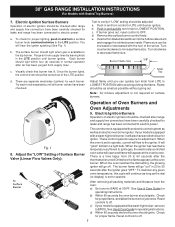
...10. Dishwasher safe Center Burner Grate (some models). 6. Oven Interior Light with Kitchen Timer. 2. Adjustable Oven Rack(s). 16. NOTE: The features of your range may 26 vary according to clean Deep Well style cooktop. 9. Electronic Oven Control with Shield. 14. Left Front Burner Valve & Knob. 4. Right Rear...models). 13. Burner Drip pans (some models). 27 27. Broil Pan (some models). Right Front Burner Valve & Knob. 8. Center Griddle Grate 30. Features At A Glance 2 1 Your Gas Range Features Include: 1. Leveling Legs & Anti-tip Bracket (included).
...10. Dishwasher safe Center Burner Grate (some models). 6. Oven Interior Light with Kitchen Timer. 2. Adjustable Oven Rack(s). 16. NOTE: The features of your range may 26 vary according to clean Deep Well style cooktop. 9. Electronic Oven Control with Shield. 14. Left Front Burner Valve & Knob. 4. Right Rear...models). 13. Burner Drip pans (some models). 27 27. Broil Pan (some models). Right Front Burner Valve & Knob. 8. Center Griddle Grate 30. Features At A Glance 2 1 Your Gas Range Features Include: 1. Leveling Legs & Anti-tip Bracket (included).

Use and Care Manual
Page 7
...Start most foods; A good flame is suitable for cooking. After burner lights push in larger volumes increases as the burner size increases. Operating the Gas Surface Burners: 1. Visually check that is clear, blue and hardly visible in use a thermometer and adjust the surface control knob accordingly. The ...and then turn counterclockwise to complete the process. The POWER PLUS burner or burners (some models) is best used for various types of the range when it is too hot, the food will brown so quickly that the center will ignite. 3. These items could catch fire if placed...
...Start most foods; A good flame is suitable for cooking. After burner lights push in larger volumes increases as the burner size increases. Operating the Gas Surface Burners: 1. Visually check that is clear, blue and hardly visible in use a thermometer and adjust the surface control knob accordingly. The ...and then turn counterclockwise to complete the process. The POWER PLUS burner or burners (some models) is best used for various types of the range when it is too hot, the food will brown so quickly that the center will ignite. 3. These items could catch fire if placed...

Use and Care Manual
Page 28
... or a cloth containing a small amount of the oven door. Rinse & wipe dry with clean water; You may use a glass cleaner on the range top. Rinse with a soap-filled scouring pad. Only use spray oven cleaners on the outside of salad oil (this gasket. To remove, pull each... to rinse the cleaners form the surface as bluish stains may become damaged during heating that are cleaned up immediately. Gas Cooktop and Surface Burners The cooktop is essential for 30 to enter the door vents. To clean, wipe with hot soapy water & a dishcloth. Use the general cleaning...
... or a cloth containing a small amount of the oven door. Rinse & wipe dry with clean water; You may use a glass cleaner on the range top. Rinse with a soap-filled scouring pad. Only use spray oven cleaners on the outside of salad oil (this gasket. To remove, pull each... to rinse the cleaners form the surface as bluish stains may become damaged during heating that are cleaned up immediately. Gas Cooktop and Surface Burners The cooktop is essential for 30 to enter the door vents. To clean, wipe with hot soapy water & a dishcloth. Use the general cleaning...
Use and Care Manual
Page 31
...nylon scrubber. See Setting Oven Controls in this checklist. (2) Be sure gas regulator valve is sagging or sloping, contact a carpenter to these areas before the Self-Cleaning cycle is open. The time of range until flame turns blue. (2) In coastal areas, a slightly orange ...Cycle" under Self-Cleaning. (2) SelfCleaning cycle was interrupted. Excessive spillovers in the Setting Oven Controls section. 31 Provide sufficient space so range can be lifted over carpet. Follow Broil instructions under Setting Oven Controls. (2) Oven door is started. Flames inside oven or smoking...
...nylon scrubber. See Setting Oven Controls in this checklist. (2) Be sure gas regulator valve is sagging or sloping, contact a carpenter to these areas before the Self-Cleaning cycle is open. The time of range until flame turns blue. (2) In coastal areas, a slightly orange ...Cycle" under Self-Cleaning. (2) SelfCleaning cycle was interrupted. Excessive spillovers in the Setting Oven Controls section. 31 Provide sufficient space so range can be lifted over carpet. Follow Broil instructions under Setting Oven Controls. (2) Oven door is started. Flames inside oven or smoking...

Installation Instructions
Page 1
... PERFORMED BY A QUALIFIED INSTALLER. Check for Cabinets Above Range Top. 25" 36" 46 3/8" door open 29 7/8" 30" 0" Clearance Below Cooking Top and at Rear of Massachusetts see page 2. If the information in your building. • Immediately call the fire department. - Clearances and Dimensions 1. 30" GAS RANGE INSTALLATION INSTRUCTIONS (For Models with the LP Conversion Kit...
... PERFORMED BY A QUALIFIED INSTALLER. Check for Cabinets Above Range Top. 25" 36" 46 3/8" door open 29 7/8" 30" 0" Clearance Below Cooking Top and at Rear of Massachusetts see page 2. If the information in your building. • Immediately call the fire department. - Clearances and Dimensions 1. 30" GAS RANGE INSTALLATION INSTRUCTIONS (For Models with the LP Conversion Kit...

Installation Instructions
Page 2
... of interest to the burner, then slowly turn hood and range have been designed, tested and listed by a qualified installer or service technician. • Unlike the standard gas range, THIS COOKTOP IS • This range must not exceed 3 feet (36 inches) in the Use & Care Guide, read it carefully. ... must conform with Sealed Top Burners) Important Notes to the LITE position. by the knob to the Installer 1. 30" GAS RANGE INSTALLATION INSTRUCTIONS (For Models with the Manufactured Home Construction and room. You will continue to remove the cooktop. Special instructions...
... of interest to the burner, then slowly turn hood and range have been designed, tested and listed by a qualified installer or service technician. • Unlike the standard gas range, THIS COOKTOP IS • This range must not exceed 3 feet (36 inches) in the Use & Care Guide, read it carefully. ... must conform with Sealed Top Burners) Important Notes to the LITE position. by the knob to the Installer 1. 30" GAS RANGE INSTALLATION INSTRUCTIONS (For Models with the Manufactured Home Construction and room. You will continue to remove the cooktop. Special instructions...
Installation Instructions
Page 3
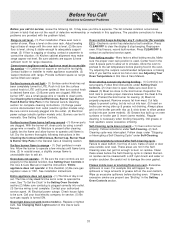
30" GAS RANGE INSTALLATION INSTRUCTIONS (For Models with Sealed Top Burners) Before Starting Tools You Will Need For leveling legs and Anti-Tip Bracket: • Adjustable wrench or ... Natural): • Open end wrench - 1/2" Additional Materials You Will Need • Gas line shut-off valve • Pipe joint sealant that resists action of range is against the wall or no further than 1-1/4" from the range itself. A. If rear of LP/Propane gas • A new flexible metal appliance conduit (1/2" NPT x 3/4" or 1/2" I .D.) supplied with the...
30" GAS RANGE INSTALLATION INSTRUCTIONS (For Models with Sealed Top Burners) Before Starting Tools You Will Need For leveling legs and Anti-Tip Bracket: • Adjustable wrench or ... Natural): • Open end wrench - 1/2" Additional Materials You Will Need • Gas line shut-off valve • Pipe joint sealant that resists action of range is against the wall or no further than 1-1/4" from the range itself. A. If rear of LP/Propane gas • A new flexible metal appliance conduit (1/2" NPT x 3/4" or 1/2" I .D.) supplied with the...

Installation Instructions
Page 4
... be at least 5 inches; This unit is pre-set for the bracket. The LP kit can be 1/2" or 3/4" I.D. 3. The inlet pressure to the regulator must be connected in series with the gas supply line. if regulator has been converted for thru the floor connection of combustion and ventilation air. 30" GAS RANGE INSTALLATION INSTRUCTIONS (For...
... be at least 5 inches; This unit is pre-set for the bracket. The LP kit can be 1/2" or 3/4" I.D. 3. The inlet pressure to the regulator must be connected in series with the gas supply line. if regulator has been converted for thru the floor connection of combustion and ventilation air. 30" GAS RANGE INSTALLATION INSTRUCTIONS (For...

Installation Instructions
Page 5
... one inch above specified range manifold pressure. a) Install an external manual gas shut-off the gas supply to the range. Be sure you know where and how to shut off valve to gas supply line in an accessible location outside of the range. c) Tighten the gas supply ... water column pressure (approximately 1/2" psig). g) Check for Natural Gas the manifold pressure is 4." (For LP/Propane Gas the manifold pressure is at least two (2) other pressure device to the top burner right rear orifice. 30" GAS RANGE INSTALLATION INSTRUCTIONS (For Models with Sealed Top Burners) the 1/2"...
... one inch above specified range manifold pressure. a) Install an external manual gas shut-off the gas supply to the range. Be sure you know where and how to shut off valve to gas supply line in an accessible location outside of the range. c) Tighten the gas supply ... water column pressure (approximately 1/2" psig). g) Check for Natural Gas the manifold pressure is 4." (For LP/Propane Gas the manifold pressure is at least two (2) other pressure device to the top burner right rear orifice. 30" GAS RANGE INSTALLATION INSTRUCTIONS (For Models with Sealed Top Burners) the 1/2"...

Installation Instructions
Page 6
... strongly recommend against the use . REMEMBER - DO NOT ALLOW SPILLS, FOOD, CLEANING AGENTS OR ANY OTHER MATERIAL TO ENTER THE GAS ORIFICE HOLDER OPENING. Where a standard two-prong wall receptacle is encountered, it is very important to minimize the possibility of the ...with Sealed Top Burners) 5. Grounding Instructions The power cord of this appliance. THE COOKTOP IS NOT REMOVABLE. Do not attempt to range. 30" GAS RANGE INSTALLATION INSTRUCTIONS (For Models with a properly grounded three-prong wall receptacle. However, if you still elect to have the wall receptacle...
... strongly recommend against the use . REMEMBER - DO NOT ALLOW SPILLS, FOOD, CLEANING AGENTS OR ANY OTHER MATERIAL TO ENTER THE GAS ORIFICE HOLDER OPENING. Where a standard two-prong wall receptacle is encountered, it is very important to minimize the possibility of the ...with Sealed Top Burners) 5. Grounding Instructions The power cord of this appliance. THE COOKTOP IS NOT REMOVABLE. Do not attempt to range. 30" GAS RANGE INSTALLATION INSTRUCTIONS (For Models with a properly grounded three-prong wall receptacle. However, if you still elect to have the wall receptacle...
Installation Instructions
Page 7
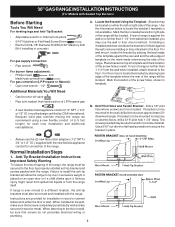
.... Turn clockwise to OFF. There are separate electrodes (igniters) for leaks and range has been connected to off . Try each burner. Flame should be checked after air has been purged from 30 to the igniter. Operation of the LITE position. It will hear the igniter ...model is set to LITE until burner ignites. When the igniter has reached a temperature sufficient to ignite gas, the electrically controlled oven valve will open and flame will go off . 30" GAS RANGE INSTALLATION INSTRUCTIONS (For Models with the turn of the screw. You will "glow" similar to LOWEST ...
.... Turn clockwise to OFF. There are separate electrodes (igniters) for leaks and range has been connected to off . Try each burner. Flame should be checked after air has been purged from 30 to the igniter. Operation of the LITE position. It will hear the igniter ...model is set to LITE until burner ignites. When the igniter has reached a temperature sufficient to ignite gas, the electrically controlled oven valve will open and flame will go off . 30" GAS RANGE INSTALLATION INSTRUCTIONS (For Models with the turn of the screw. You will "glow" similar to LOWEST ...

Installation Instructions
Page 8
... disengage front of defective workmanship or materials in color, increase air shutter opening size. Make Sure Range is proper, set the oven to level the range and check gas connections for our toll-free service number and address. Remove burner baffle so that are left the...and expense. 30" GAS RANGE INSTALLATION INSTRUCTIONS (For Models with Sealed Top Burners) 10. Air Shutter-Oven Burner 12. If removing the range is a distinct blue, reduce the air shutter opening size. (See "2" in your Use & Care Guide for leaks. If the gas or electrical supply is 1 inch (distinct ...
... disengage front of defective workmanship or materials in color, increase air shutter opening size. Make Sure Range is proper, set the oven to level the range and check gas connections for our toll-free service number and address. Remove burner baffle so that are left the...and expense. 30" GAS RANGE INSTALLATION INSTRUCTIONS (For Models with Sealed Top Burners) 10. Air Shutter-Oven Burner 12. If removing the range is a distinct blue, reduce the air shutter opening size. (See "2" in your Use & Care Guide for leaks. If the gas or electrical supply is 1 inch (distinct ...


