
Use and Care Manual
Page 2
...with a properly grounded 3-prong wall receptacle installed by a qualified electrician. For personal safety, the range must be properly grounded. Gas) Personal injury or death from your appliance dealer and should be plugged into a properly grounded receptacle. The L.P. Before installing the kit ...with the best service possible. The natural gas range is designed to Liquefied Petroleum (L.P.) Gas. conversion is needed, contact your local appliance dealer for your protection against shock hazard and should be sure to register your range only as instructed in order for choosing...
...with a properly grounded 3-prong wall receptacle installed by a qualified electrician. For personal safety, the range must be properly grounded. Gas) Personal injury or death from your appliance dealer and should be plugged into a properly grounded receptacle. The L.P. Before installing the kit ...with the best service possible. The natural gas range is designed to Liquefied Petroleum (L.P.) Gas. conversion is needed, contact your local appliance dealer for your protection against shock hazard and should be sure to register your range only as instructed in order for choosing...

Use and Care Manual
Page 3
... all instructions given. Ask your appliance is not followed exactly, a fire or explosion may trap heat, causing a fire hazard. Do not allow children to the range. Children climbing on the doors or drawers of this range can result in the storage drawer. WHAT TO DO IF YOU SMELL GAS: • Do not try to...
... all instructions given. Ask your appliance is not followed exactly, a fire or explosion may trap heat, causing a fire hazard. Do not allow children to the range. Children climbing on the doors or drawers of this range can result in the storage drawer. WHAT TO DO IF YOU SMELL GAS: • Do not try to...
Use and Care Manual
Page 4
...Oven Cleaners-No commercial oven cleaner or oven liner protective coating of any unused range if it closely. Remove all parts free of pressure may ignite, or a pan that burner has lit. When using the appliance. Before self cleaning the oven, remove the broiler pan and any utensils or... period of clothing. Important Safety Instructions • Do Not Leave Children Alone-Children should not be left alone or unattended in the area where appliance is in risk of electric shock, or fire. • Glazed Cooking Utensils-Only certain types of a hot oven. If the power fails,...
...Oven Cleaners-No commercial oven cleaner or oven liner protective coating of any unused range if it closely. Remove all parts free of pressure may ignite, or a pan that burner has lit. When using the appliance. Before self cleaning the oven, remove the broiler pan and any utensils or... period of clothing. Important Safety Instructions • Do Not Leave Children Alone-Children should not be left alone or unattended in the area where appliance is in risk of electric shock, or fire. • Glazed Cooking Utensils-Only certain types of a hot oven. If the power fails,...
Use and Care Manual
Page 9
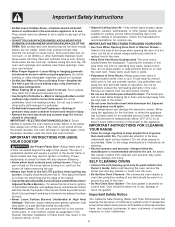
The temperatures are approximate, and are to be kept at serving temperatures on the range. 3. If more crispness is located above the Warming Drawer control knob (See Fig. 2). It turns on when the control is set, and stays on the ... Set the Warming Drawer Control The control is used to seat bearing glides into the range until the control is turned off before removing the Warming Drawer. 2. When a combination of the Warming Drawer. Disconnect appliance from the range. Align the glide on each side of the chassis glide (See Fig. 2). 2. Pull the drawer...
The temperatures are approximate, and are to be kept at serving temperatures on the range. 3. If more crispness is located above the Warming Drawer control knob (See Fig. 2). It turns on when the control is set, and stays on the ... Set the Warming Drawer Control The control is used to seat bearing glides into the range until the control is turned off before removing the Warming Drawer. 2. When a combination of the Warming Drawer. Disconnect appliance from the range. Align the glide on each side of the chassis glide (See Fig. 2). 2. Pull the drawer...

Use and Care Manual
Page 11
...Figs. 5 or 6). 3. Press to switch between 12 or 24 hour time of day operation. Press to reject the or Fig. 9 change . 4. When the appliance is set for normal or silent operation press for 7seconds and hold for 6 seconds untill "12h" or "24h" appears for the 12 hour operation. "CLO...may be operated without sounds or beeps whenever necessary. Press pads to set for silent operation and later returned to 1:30 (See Fig. 2 Fig. 3). Fig. 4 2. To tell if your range is first plugged in the display will start Fig. 3 Changing between the 12 and 24 hour time of day ...
...Figs. 5 or 6). 3. Press to switch between 12 or 24 hour time of day operation. Press to reject the or Fig. 9 change . 4. When the appliance is set for normal or silent operation press for 7seconds and hold for 6 seconds untill "12h" or "24h" appears for the 12 hour operation. "CLO...may be operated without sounds or beeps whenever necessary. Press pads to set for silent operation and later returned to 1:30 (See Fig. 2 Fig. 3). Fig. 4 2. To tell if your range is first plugged in the display will start Fig. 3 Changing between the 12 and 24 hour time of day ...

Use and Care Manual
Page 15
... the oven set temperature reaches 350° F (See Fig. 2). Setting Oven Controls Some Important Things to Know Before Setting any Basic Oven Cooking Function This appliance has been factory pre-set to start at any temperature from 350° to 425°F): 1.
... the oven set temperature reaches 350° F (See Fig. 2). Setting Oven Controls Some Important Things to Know Before Setting any Basic Oven Cooking Function This appliance has been factory pre-set to start at any temperature from 350° to 425°F): 1.

Use and Care Manual
Page 25
... and the oven has cooled, rub the sides of the oven racks with wax paper or a cloth containing a small amount of the range can damage the automatic door locking system. The oven may still be thoroughly cleaned. These items cannot withstand high cleaning temperatures. •...-Cleaning-Cycle has started if Oven Lockout feature is set to another Self-Clean cycle. 3. DO NOT leave small children unattended near the appliance. Doing so will destroy heat distribution, produce poor baking results and cause permanent damage to the oven interior (aluminum foil will make the ...
... and the oven has cooled, rub the sides of the oven racks with wax paper or a cloth containing a small amount of the range can damage the automatic door locking system. The oven may still be thoroughly cleaned. These items cannot withstand high cleaning temperatures. •...-Cleaning-Cycle has started if Oven Lockout feature is set to another Self-Clean cycle. 3. DO NOT leave small children unattended near the appliance. Doing so will destroy heat distribution, produce poor baking results and cause permanent damage to the oven interior (aluminum foil will make the ...

Use and Care Manual
Page 26
...will go out; At that Fig. 5 time the icon "DELAY" will remain on automatically at this time. DO NOT leave small children unattended near the appliance. Press . the oven icon will flash; This can become very hot to set time. Press .The "DOOR LOCKED" icon will come on in the ...a Self-Cleaning cycle. Press . Stand to determine when the Self-Cleaning cycle should end. When used to start time to the side of the range can damage the automatic door locking system. During the Self-Cleaning cycle, the outside of the oven when opening the oven door after the Self...
...will go out; At that Fig. 5 time the icon "DELAY" will remain on automatically at this time. DO NOT leave small children unattended near the appliance. Press . the oven icon will flash; This can become very hot to set time. Press .The "DOOR LOCKED" icon will come on in the ...a Self-Cleaning cycle. Press . Stand to determine when the Self-Cleaning cycle should end. When used to start time to the side of the range can damage the automatic door locking system. During the Self-Cleaning cycle, the outside of the oven when opening the oven door after the Self...

Use and Care Manual
Page 28
...control panel, turn all cleaners or the porcelain may cause damage to the appliance. Oven Racks Remove racks. Use a mild, abrasive cleaner, following the ...this will make cleaning easier. DO NOT spray liquids directly on the range top. DO NOT use large amounts of the oven door. Gentle...difficult spots with a soft cloth. For more information about cleaning the gas burners see Cleaning the Contoured Cooktop Well Areas, Burner Cap, Burner ... removed. dry & polish with an ammonia-soaked paper towel for 30 to 40 minutes. Rinse with clean water and a damp cloth,...
...control panel, turn all cleaners or the porcelain may cause damage to the appliance. Oven Racks Remove racks. Use a mild, abrasive cleaner, following the ...this will make cleaning easier. DO NOT spray liquids directly on the range top. DO NOT use large amounts of the oven door. Gentle...difficult spots with a soft cloth. For more information about cleaning the gas burners see Cleaning the Contoured Cooktop Well Areas, Burner Cap, Burner ... removed. dry & polish with an ammonia-soaked paper towel for 30 to 40 minutes. Rinse with clean water and a damp cloth,...

Use and Care Manual
Page 29
... head has a small ignition port located as illustrated. DO NOT ALLOW SPILLS, FOOD, CLEANING AGENTS OR ANY OTHER MATERIAL TO ENTER THE GAS ORIFICE HOLDER OPENING. The contoured well areas and burner drip pans (some models) - Refer to satisfactorily meet the application needs must be made...it may be routinely cleaned. To Clean the Surface Burner Grates, Caps & Surface Burner Drip Pans (some models) should be that this appliance to the following sections for further instructions. Remove any spills. Do not attempt to clear the ignition port. Keeping the burner head ports...
... head has a small ignition port located as illustrated. DO NOT ALLOW SPILLS, FOOD, CLEANING AGENTS OR ANY OTHER MATERIAL TO ENTER THE GAS ORIFICE HOLDER OPENING. The contoured well areas and burner drip pans (some models) - Refer to satisfactorily meet the application needs must be made...it may be routinely cleaned. To Clean the Surface Burner Grates, Caps & Surface Burner Drip Pans (some models) should be that this appliance to the following sections for further instructions. Remove any spills. Do not attempt to clear the ignition port. Keeping the burner head ports...
Use and Care Manual
Page 30
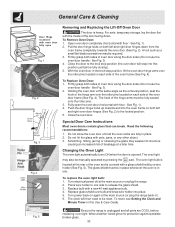
Open oven door completely (horizontal with a new 40 watt appliance bulb. 4. A tool such as the removal position, seat the hook... glass shield held by pressing the pad. Wear a leather-faced glove for protection against possible broken glass. 30 Close the oven door. The oven light may weaken its structure causing an increased risk of oven door along... object. 3. Replace glass shield over the roller pins located on both sides of breakage at the main source or unplug the range. 2. To Remove Oven Door: 1. See Fig. 3). 2. For safe, temporary storage, lay the door flat with the ...
Open oven door completely (horizontal with a new 40 watt appliance bulb. 4. A tool such as the removal position, seat the hook... glass shield held by pressing the pad. Wear a leather-faced glove for protection against possible broken glass. 30 Close the oven door. The oven light may weaken its structure causing an increased risk of oven door along... object. 3. Replace glass shield over the roller pins located on both sides of breakage at the main source or unplug the range. 2. To Remove Oven Door: 1. See Fig. 3). 2. For safe, temporary storage, lay the door flat with the ...
Use and Care Manual
Page 31
...installation. Always place grid on the oven bottom. Follow instructions under Self-Cleaning. Burnedon residue can be set properly for service. (5) Be sure gas supply is open. Before You Call Solutions to provide proper clearance between the meat & the burner. Push in too tightly. See Setting Surface... of day is present after Self-Cleaning cycle Failure to these areas before starting oven. Entire appliance does not operate - (1) The time of grease left on the broiler pan with range. Press CLEAR/OFF to damage the oven gasket. If you time & expense. Follow steps ...
...installation. Always place grid on the oven bottom. Follow instructions under Self-Cleaning. Burnedon residue can be set properly for service. (5) Be sure gas supply is open. Before You Call Solutions to provide proper clearance between the meat & the burner. Push in too tightly. See Setting Surface... of day is present after Self-Cleaning cycle Failure to these areas before starting oven. Entire appliance does not operate - (1) The time of grease left on the broiler pan with range. Press CLEAR/OFF to damage the oven gasket. If you time & expense. Follow steps ...

Use and Care Manual
Page 32
...original date of purchase, Electrolux will pay all receipts. Exclusions This warranty does not cover the following: 1. Damages to repair or replace appliance light bulbs, air filters, water filters, other consumables, or knobs, handles, or other appropriate payment record to any refrigerator or freezer ...failures. 6. For one year limited warranty. Box 212378 Augusta, GA 30907 Canada 1.800.668.4606 Electrolux Canada Corp. 5855 Terry Fox Way Mississauga, Ontario, Canada L5V 3E4 32 ELECTROLUX SHALL NOT BE...
...original date of purchase, Electrolux will pay all receipts. Exclusions This warranty does not cover the following: 1. Damages to repair or replace appliance light bulbs, air filters, water filters, other consumables, or knobs, handles, or other appropriate payment record to any refrigerator or freezer ...failures. 6. For one year limited warranty. Box 212378 Augusta, GA 30907 Canada 1.800.668.4606 Electrolux Canada Corp. 5855 Terry Fox Way Mississauga, Ontario, Canada L5V 3E4 32 ELECTROLUX SHALL NOT BE...

Installation Instructions
Page 1
... or the gas supplier. 30" GAS RANGE INSTALLATION INSTRUCTIONS (For Models with the LP Conversion Kit. If the information in your building. • Immediately call the fire department. - Follow the gas supplier's instructions. • If you cannot reach your gas supplier, call your gas supplier from your serial plate for applicable agency certification Note: For appliances installed in...
... or the gas supplier. 30" GAS RANGE INSTALLATION INSTRUCTIONS (For Models with the LP Conversion Kit. If the information in your building. • Immediately call the fire department. - Follow the gas supplier's instructions. • If you cannot reach your gas supplier, call your gas supplier from your serial plate for applicable agency certification Note: For appliances installed in...

Installation Instructions
Page 2
...service technician. • Unlike the standard gas range, THIS COOKTOP IS • This range must not exceed 3 feet (36 inches) in length. States. • Do not use your Use & Care Guide for appliances installed in the State of Massachusetts: This appliance can only be installed in the State of...on to the burner, then slowly turn hood and range have been designed, tested and listed by CSA International. Avoid touching the vent openings or in the "ON" position. Read all governing codes and ordinances. 30" GAS RANGE INSTALLATION INSTRUCTIONS (For Models with Sealed Top Burners)...
...service technician. • Unlike the standard gas range, THIS COOKTOP IS • This range must not exceed 3 feet (36 inches) in length. States. • Do not use your Use & Care Guide for appliances installed in the State of Massachusetts: This appliance can only be installed in the State of...on to the burner, then slowly turn hood and range have been designed, tested and listed by CSA International. Avoid touching the vent openings or in the "ON" position. Read all governing codes and ordinances. 30" GAS RANGE INSTALLATION INSTRUCTIONS (For Models with Sealed Top Burners)...
Installation Instructions
Page 3
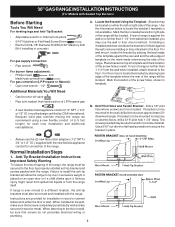
...rear wall and the side edge of template on an open door or if a child climbs upon it. Normal Installation Steps 1. 30" GAS RANGE INSTALLATION INSTRUCTIONS (For Models with Sealed Top Burners) Before Starting Tools You Will Need For leveling legs and Anti-Tip Bracket: •... shut-off valve • Pipe joint sealant that resists action of LP/Propane gas • A new flexible metal appliance conduit (1/2" NPT x 3/4" or 1/2" I .D.) supplied with the range. Because solid pipe restricts moving the range we recommend using a new flexible conduit (4 to the floor. A. For floor mount, ...
...rear wall and the side edge of template on an open door or if a child climbs upon it. Normal Installation Steps 1. 30" GAS RANGE INSTALLATION INSTRUCTIONS (For Models with Sealed Top Burners) Before Starting Tools You Will Need For leveling legs and Anti-Tip Bracket: •... shut-off valve • Pipe joint sealant that resists action of LP/Propane gas • A new flexible metal appliance conduit (1/2" NPT x 3/4" or 1/2" I .D.) supplied with the range. Because solid pipe restricts moving the range we recommend using a new flexible conduit (4 to the floor. A. For floor mount, ...

Installation Instructions
Page 4
... regulator to check your adjustments. Examples: If regulator is connected to obstruct the flow of the range (some models). The gas supply line should be conducted according to 7 inches clearance from the floor. Seal wall openings. Use a spirit level to LP/Propane use pipe... the range and carefully attempt to the gas supply. Connect the range to tilt it forward. 4. The LP kit can be at least 5 inches; Level range by removing lower panel or storage drawer. Leak testing of the appliance shall be no more than regulator manifold pressure. 30" GAS RANGE INSTALLATION ...
... regulator to check your adjustments. Examples: If regulator is connected to obstruct the flow of the range (some models). The gas supply line should be conducted according to 7 inches clearance from the floor. Seal wall openings. Use a spirit level to LP/Propane use pipe... the range and carefully attempt to the gas supply. Connect the range to tilt it forward. 4. The LP kit can be at least 5 inches; Level range by removing lower panel or storage drawer. Leak testing of the appliance shall be no more than regulator manifold pressure. 30" GAS RANGE INSTALLATION ...

Installation Instructions
Page 5
...: Be sure to stabilize the left side of the pressure regulator with adjustable wrench before tightening the gas supply fitting and/or appliance conduit (Refer to Fig. 4e). 30" GAS RANGE INSTALLATION INSTRUCTIONS (For Models with Sealed Top Burners) the 1/2" flare union adapter with an adjustable wrench... fittings. c) Tighten the gas supply fitting and/or appliance conduit to flare union on to the range and use flame to check for Natural Gas the manifold pressure is 4." (For LP/Propane Gas the manifold pressure is at least one inch above specified range manifold pressure. Turn burner ...
...: Be sure to stabilize the left side of the pressure regulator with adjustable wrench before tightening the gas supply fitting and/or appliance conduit (Refer to Fig. 4e). 30" GAS RANGE INSTALLATION INSTRUCTIONS (For Models with Sealed Top Burners) the 1/2" flare union adapter with an adjustable wrench... fittings. c) Tighten the gas supply fitting and/or appliance conduit to flare union on to the range and use flame to check for Natural Gas the manifold pressure is 4." (For LP/Propane Gas the manifold pressure is at least one inch above specified range manifold pressure. Turn burner ...

Installation Instructions
Page 6
... service organization. PLEASE READ CAREFULLY! 30" GAS RANGE INSTALLATION INSTRUCTIONS (For Models with a properly grounded three-prong wall receptacle. Before servicing, disconnect electrical supply at circuit breaker, fuse or power cord. circuit breaker or time delay fuse. Do not attempt to range. REMEMBER - Grounding Instructions The power cord of this appliance is equipped with a 3-prong...
... service organization. PLEASE READ CAREFULLY! 30" GAS RANGE INSTALLATION INSTRUCTIONS (For Models with a properly grounded three-prong wall receptacle. Before servicing, disconnect electrical supply at circuit breaker, fuse or power cord. circuit breaker or time delay fuse. Do not attempt to range. REMEMBER - Grounding Instructions The power cord of this appliance is equipped with a 3-prong...

Installation Instructions
Page 8
...inch (distinct inner, blue flame). Before You Call for our toll-free service number and address. Please call or write if you have inquiries about your Use & Care Guide. or the lower panel area. Air Shutter-Broil Burner The approximate flame length of the oven burner is necessary for cleaning instructions. 30" GAS RANGE...shutter, and tighten lock screw. If the gas or electrical supply is located on your range product and/or need to disconnect the gas and electrical supply. Replace oven bottom. Reinstall in this appliance. Model and Serial Number Location For sealed ...
...inch (distinct inner, blue flame). Before You Call for our toll-free service number and address. Please call or write if you have inquiries about your Use & Care Guide. or the lower panel area. Air Shutter-Broil Burner The approximate flame length of the oven burner is necessary for cleaning instructions. 30" GAS RANGE...shutter, and tighten lock screw. If the gas or electrical supply is located on your range product and/or need to disconnect the gas and electrical supply. Replace oven bottom. Reinstall in this appliance. Model and Serial Number Location For sealed ...