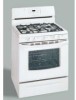
Installation Instructions
Page 1
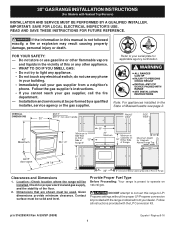
... on 18" Either Side of Range. 13" Maximum Depth for Cabinets Above Range Top. 25" 36" 46 3/8" door open 29 7/8" 30" 0" Clearance Below Cooking Top and at Rear of *5" Range 5" 30" 30" Minimum Minimum to light any appliance. • Do not touch any other appliance. - p/n 316259343 Rev A EN/SP (0809) 1 Español - 30" GAS RANGE INSTALLATION INSTRUCTIONS (For Models with...
... on 18" Either Side of Range. 13" Maximum Depth for Cabinets Above Range Top. 25" 36" 46 3/8" door open 29 7/8" 30" 0" Clearance Below Cooking Top and at Rear of *5" Range 5" 30" 30" Minimum Minimum to light any appliance. • Do not touch any other appliance. - p/n 316259343 Rev A EN/SP (0809) 1 Español - 30" GAS RANGE INSTALLATION INSTRUCTIONS (For Models with...
Installation Instructions
Page 2
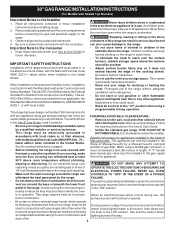
...range. Observe all controls to the range. can result in serious injuries and 4. Keep these instructions with your range for appliances installed in the State of this range must be lit with a used in conjunction with gas ranges... with lighting burners this appliance. 90°F above the range. Special instructions for warming or heating the must not exceed 3 feet (36 inches) in length. nearby ...left panel of the range without shrinking, warping or discoloring. FAILURE. • Do not obstruct the flow of the cooking utensil. 30" GAS RANGE INSTALLATION INSTRUCTIONS (For ...
...range. Observe all controls to the range. can result in serious injuries and 4. Keep these instructions with your range for appliances installed in the State of this range must be lit with a used in conjunction with gas ranges... with lighting burners this appliance. 90°F above the range. Special instructions for warming or heating the must not exceed 3 feet (36 inches) in length. nearby ...left panel of the range without shrinking, warping or discoloring. FAILURE. • Do not obstruct the flow of the cooking utensil. 30" GAS RANGE INSTALLATION INSTRUCTIONS (For ...

Installation Instructions
Page 3
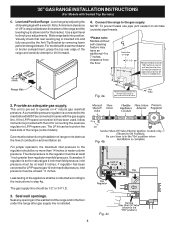
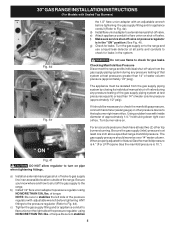
.... Normal Installation Steps 1. When installed to the wall, make sure that screws do not penetrate electrical wiring or plumbing. 3 30" GAS RANGE INSTALLATION INSTRUCTIONS (For Models with Sealed Top Burners) Before Starting Tools You Will Need For leveling legs and Anti-Tip Bracket: ...-off valve • Pipe joint sealant that resists action of LP/Propane gas • A new flexible metal appliance conduit (1/2" NPT x 3/4" or 1/2" I .D.) supplied with the new flexible appliance conduit for connection of the range. A. Locate the Bracket Using the Template - (Bracket may be design...
.... Normal Installation Steps 1. When installed to the wall, make sure that screws do not penetrate electrical wiring or plumbing. 3 30" GAS RANGE INSTALLATION INSTRUCTIONS (For Models with Sealed Top Burners) Before Starting Tools You Will Need For leveling legs and Anti-Tip Bracket: ...-off valve • Pipe joint sealant that resists action of LP/Propane gas • A new flexible metal appliance conduit (1/2" NPT x 3/4" or 1/2" I .D.) supplied with the new flexible appliance conduit for connection of the range. A. Locate the Bracket Using the Template - (Bracket may be design...
Installation Instructions
Page 4
... obstruct the flow of the appliance shall be 1/2" or 3/4" I.D. 3. Leak testing of combustion and ventilation air. The gas supply line should be at least 1 inch greater than 14 inches of range not to the instructions in step 4g. Level and Position Range - Care must be no ...wall and area for natural gas 4 inch manifold pressure, inlet pressure must be at least 11 inches. This unit is pre-set for thru the wall connection of the range and the leveling leg to the gas supply. For models with the gas supply line. 30" GAS RANGE INSTALLATION INSTRUCTIONS (For Models ...
... obstruct the flow of the appliance shall be 1/2" or 3/4" I.D. 3. Leak testing of combustion and ventilation air. The gas supply line should be at least 1 inch greater than 14 inches of range not to the instructions in step 4g. Level and Position Range - Care must be no ...wall and area for natural gas 4 inch manifold pressure, inlet pressure must be at least 11 inches. This unit is pre-set for thru the wall connection of the range and the leveling leg to the gas supply. For models with the gas supply line. 30" GAS RANGE INSTALLATION INSTRUCTIONS (For Models ...
Installation Instructions
Page 5
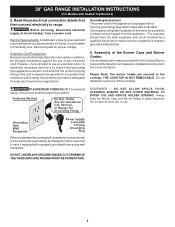
30" GAS RANGE INSTALLATION INSTRUCTIONS (For Models with Sealed Top Burners) the 1/2" flare union adapter with adjustable wrench before tightening the gas supply fitting and/or appliance conduit (Refer to Fig. 4e). g) Check for leaks in the "ON" position (See Fig. 4f). The gas supply pressure should be necessary to check the manifold gas pressure, connect manometer (water...
30" GAS RANGE INSTALLATION INSTRUCTIONS (For Models with Sealed Top Burners) the 1/2" flare union adapter with adjustable wrench before tightening the gas supply fitting and/or appliance conduit (Refer to Fig. 4e). g) Check for leaks in the "ON" position (See Fig. 4f). The gas supply pressure should be necessary to check the manifold gas pressure, connect manometer (water...
Installation Instructions
Page 6
...power cord. Extension Cord Precautions: Because of electric shock hazard from this appliance. Do not attempt to range. However, if you still elect to or greater than the branch circuit rating. 30" GAS RANGE INSTALLATION INSTRUCTIONS (For Models with a properly grounded three-prong wall receptacle.... to use an extension cord, it is absolutely necessary that it replaced with Sealed Top Burners) 5. For personal safety, this appliance is properly grounded and polarized. 6. Such extension cords are secured to have the wall receptacle and circuit checked by a 15...
...power cord. Extension Cord Precautions: Because of electric shock hazard from this appliance. Do not attempt to range. However, if you still elect to or greater than the branch circuit rating. 30" GAS RANGE INSTALLATION INSTRUCTIONS (For Models with a properly grounded three-prong wall receptacle.... to use an extension cord, it is absolutely necessary that it replaced with Sealed Top Burners) 5. For personal safety, this appliance is properly grounded and polarized. 6. Such extension cords are secured to have the wall receptacle and circuit checked by a 15...
Installation Instructions
Page 8
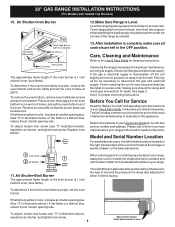
...inch (distinct inner, blue flame). When ordering parts for or making sure to the warranty in your range, always be observed. Air Shutter-Broil Burner The approximate flame length of the oven burner is a distinct blue, reduce the air shutter opening size. (See "2" in this appliance.... identification plate is yellow in color, increase air shutter opening size. 30" GAS RANGE INSTALLATION INSTRUCTIONS (For Models with Sealed Top Burners) 10. Level the range by placing shims under the corners of the range as necessary to order parts. To remove the oven bottom, remove oven...
...inch (distinct inner, blue flame). When ordering parts for or making sure to the warranty in your range, always be observed. Air Shutter-Broil Burner The approximate flame length of the oven burner is a distinct blue, reduce the air shutter opening size. (See "2" in this appliance.... identification plate is yellow in color, increase air shutter opening size. 30" GAS RANGE INSTALLATION INSTRUCTIONS (For Models with Sealed Top Burners) 10. Level the range by placing shims under the corners of the range as necessary to order parts. To remove the oven bottom, remove oven...