Use and Care Manual
Page 2
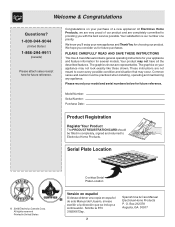
...our number one priority. Common sense and caution must be filled in United States Cooktop Serial Plate Location Versión en español Si desea obtener una copia en español de este Manual del Usuario, sírvase escribir a la dirección que se incluye a... instructions for your model and serial numbers below for future purchases. O. Solicite la P/N 318200672sp. 2 Spanish Use & Care Manual Electrolux Home Products P. Box 212378 Augusta, GA 30917 Congratulations on your new appliance and Thank You for future reference. We hope you 'll enjoy your appliance may not...
...our number one priority. Common sense and caution must be filled in United States Cooktop Serial Plate Location Versión en español Si desea obtener una copia en español de este Manual del Usuario, sírvase escribir a la dirección que se incluye a... instructions for your model and serial numbers below for future purchases. O. Solicite la P/N 318200672sp. 2 Spanish Use & Care Manual Electrolux Home Products P. Box 212378 Augusta, GA 30917 Congratulations on your new appliance and Thank You for future reference. We hope you 'll enjoy your appliance may not...
Use and Care Manual
Page 3
...be performed by a qualified technician in this manual is properly installed and grounded by a qualified installer, servicer or the gas supplier. • Remove all tape and packaging wrap before using this cooktop can result in the manuals. They should never be stored on this appliance... any part of the appliance unless specifically recommended in serious injuries and may become hot enough to the cooktop. • Proper Installation-Be sure your gas supplier from a neighbor's phone. Install and/or adjust only per installation instructions provided in carbon monoxide ...
...be performed by a qualified technician in this manual is properly installed and grounded by a qualified installer, servicer or the gas supplier. • Remove all tape and packaging wrap before using this cooktop can result in the manuals. They should never be stored on this appliance... any part of the appliance unless specifically recommended in serious injuries and may become hot enough to the cooktop. • Proper Installation-Be sure your gas supplier from a neighbor's phone. Install and/or adjust only per installation instructions provided in carbon monoxide ...
Use and Care Manual
Page 7
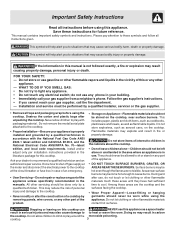
...grate may vary when using medium-weight metal or aluminum pans. The finish on surface burner. 2. Use caution when lighting surface burners manually. The size and type of utensil used and the amount of time without cookware to desired setting. A higher flame simply wastes heat...knob and rotate to a flame. Do not operate the burner for various types of the OFF position. 3. Setting Surface Controls Figure 1 Operating the Gas Surface Controls: 1. Clean burner if flame is the key to LITE. pan broiling. thicken sauces, gravies; The color of Cooking Start most cooking...
...grate may vary when using medium-weight metal or aluminum pans. The finish on surface burner. 2. Use caution when lighting surface burners manually. The size and type of utensil used and the amount of time without cookware to desired setting. A higher flame simply wastes heat...knob and rotate to a flame. Do not operate the burner for various types of the OFF position. 3. Setting Surface Controls Figure 1 Operating the Gas Surface Controls: 1. Clean burner if flame is the key to LITE. pan broiling. thicken sauces, gravies; The color of Cooking Start most cooking...

Use and Care Manual
Page 11
...cleaners, as they can leave soil or lint on the cooktop which can burn and cause discoloration. Dry the burners thoroughly following on cooktop surface. (1) Coarse particles such as salt or sand between cooktop and utensil can be lit manually. coastal areas, a slightly orange flame is unavoidable due ... onto surface. Lightly fan the flame and allow burner to desired flame size. (2) Be sure gas supply valve is full. Surface burner (1) Dust particles in this appliance. Use ceramic-glass cooktop cleaning cream to operate a few minutes until flame is open. (3) Burner ports or slots are...
...cleaners, as they can leave soil or lint on the cooktop which can burn and cause discoloration. Dry the burners thoroughly following on cooktop surface. (1) Coarse particles such as salt or sand between cooktop and utensil can be lit manually. coastal areas, a slightly orange flame is unavoidable due ... onto surface. Lightly fan the flame and allow burner to desired flame size. (2) Be sure gas supply valve is full. Surface burner (1) Dust particles in this appliance. Use ceramic-glass cooktop cleaning cream to operate a few minutes until flame is open. (3) Burner ports or slots are...
Installation Instructions
Page 1
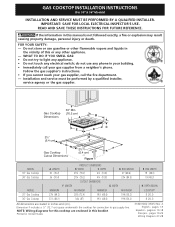
...TO DO IF YOU SMELL GAS: • Do not try to gas supply line. WIDTH C. DEPTH BELOW COOKTOP* 8 (20.3) 8 (20.3) All dimensions are enclosed in this booklet Printed in the vicinity of this manual is not followed exactly, ... agency or the gas supplier. 30" Min. * Gas Cooktop (76.2 cm) Dimensions B A C E D 2½" H (6.4 cm) G 2½" F Gas Cooktop (6.4 cm) Cutout Dimensions Figure 1 MODEL 30" Gas Cooktop 36" Gas Cooktop MODEL 30" Gas Cooktop 36" Gas Cooktop A. Dimension F includes a 5" (12.7 cm) space underneath the cooktop for this cooktop are stated in this...
...TO DO IF YOU SMELL GAS: • Do not try to gas supply line. WIDTH C. DEPTH BELOW COOKTOP* 8 (20.3) 8 (20.3) All dimensions are enclosed in this booklet Printed in the vicinity of this manual is not followed exactly, ... agency or the gas supplier. 30" Min. * Gas Cooktop (76.2 cm) Dimensions B A C E D 2½" H (6.4 cm) G 2½" F Gas Cooktop (6.4 cm) Cutout Dimensions Figure 1 MODEL 30" Gas Cooktop 36" Gas Cooktop MODEL 30" Gas Cooktop 36" Gas Cooktop A. Dimension F includes a 5" (12.7 cm) space underneath the cooktop for this cooktop are stated in this...

Installation Instructions
Page 2
...: For operation at 2000 ft. Use caution when lighting burners manually. • Do not store items of the cooking utensil. The electrical power to the Consumer Keep these instructions with any other appliance. GAS COOKTOP INSTALLATION INSTRUCTIONS (For 30" & 36" Models) Important Notes to the cooktop. 3. Observe all instructions contained in the Use and Care...
...: For operation at 2000 ft. Use caution when lighting burners manually. • Do not store items of the cooking utensil. The electrical power to the Consumer Keep these instructions with any other appliance. GAS COOKTOP INSTALLATION INSTRUCTIONS (For 30" & 36" Models) Important Notes to the cooktop. 3. Observe all instructions contained in the Use and Care...
Installation Instructions
Page 5
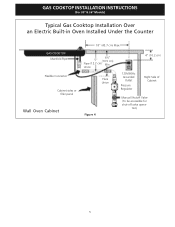
tion) 5 GAS COOKTOP INSTALLATION INSTRUCTIONS (For 30" & 36" Models) Typical Gas Cooktop Installation Over an Electric Built-in Oven Installed Under the Counter GAS COOKTOP Manifold Pipe Flexible Connector Cabinet sides or filler panel Wall Oven Cabinet 18" (45.7 cm) Max. 6½" 5" (16.5 cm) Flare (12.7 cm) Min. Union Flare Union Figure 4 4" (10.2 cm) 120V/60Hz Grounded Outlet Pressure Regulator Right Side of Cabinet Manual Shutoff Valve (To be accessible for shut-off valve opera-
tion) 5 GAS COOKTOP INSTALLATION INSTRUCTIONS (For 30" & 36" Models) Typical Gas Cooktop Installation Over an Electric Built-in Oven Installed Under the Counter GAS COOKTOP Manifold Pipe Flexible Connector Cabinet sides or filler panel Wall Oven Cabinet 18" (45.7 cm) Max. 6½" 5" (16.5 cm) Flare (12.7 cm) Min. Union Flare Union Figure 4 4" (10.2 cm) 120V/60Hz Grounded Outlet Pressure Regulator Right Side of Cabinet Manual Shutoff Valve (To be accessible for shut-off valve opera-
Installation Instructions
Page 7
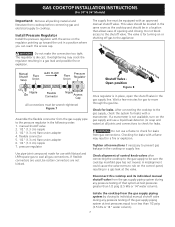
... valves after connecting the cooktop to the gas supply to gas supply line Once regulator is die cast. Install Pressure Regulator Install the pressure regulator with a flame may crack the regulator resulting in a gas leak at all gas connections. Manual Shutoff Valve Flare Union GAS FLOW Pressure Flare Regulator ... Valve Open position Figure 8 to be certain connectors are used, be sure the cooktop manifold pipe has not moved. Check for leaks with the arrow on or shutting off gas to seal all joints and connections to the pressure regulator in a position where you can reach...
... valves after connecting the cooktop to the gas supply to gas supply line Once regulator is die cast. Install Pressure Regulator Install the pressure regulator with a flame may crack the regulator resulting in a gas leak at all gas connections. Manual Shutoff Valve Flare Union GAS FLOW Pressure Flare Regulator ... Valve Open position Figure 8 to be certain connectors are used, be sure the cooktop manifold pipe has not moved. Check for leaks with the arrow on or shutting off gas to seal all joints and connections to the pressure regulator in a position where you can reach...