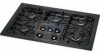
Use and Care Manual
Page 2
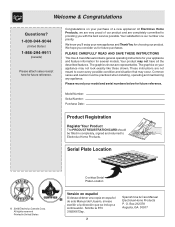
... sense and caution must be filled in United States Cooktop Serial Plate Location Versión en español...la dirección que se incluye a continuación. We hope you consider us for future reference. Please record your model and serial numbers below for future purchases. These instructions are very proud of a new appliance! Solicite la P/N 318200672sp... All rights reserved Printed in completely, signed and returned to Electrolux Home Products. Box 212378 Augusta, GA 30917 We know you with the best service possible.Your satisfaction is our number one priority. The...
... sense and caution must be filled in United States Cooktop Serial Plate Location Versión en español...la dirección que se incluye a continuación. We hope you consider us for future reference. Please record your model and serial numbers below for future purchases. These instructions are very proud of a new appliance! Solicite la P/N 318200672sp... All rights reserved Printed in completely, signed and returned to Electrolux Home Products. Box 212378 Augusta, GA 30917 We know you with the best service possible.Your satisfaction is our number one priority. The...
Use and Care Manual
Page 3
...plastic bags after use, do not use gasoline or other servicing should never be stored on the cooktop, near surface burners may also cause damage to cool. Do not remove the model/serial plate attached to heat or warm the room. Install and/or adjust only per installation ... This includes paper, plastic and cloth items, such as cookbooks, plasticware and towels, as well as a space heater to the cooktop. • Proper Installation-Be sure your gas supplier from a neighbor's phone. Flammable materials may result in fire or property damage. Do not let clothing or other part of...
...plastic bags after use, do not use gasoline or other servicing should never be stored on the cooktop, near surface burners may also cause damage to cool. Do not remove the model/serial plate attached to heat or warm the room. Install and/or adjust only per installation ... This includes paper, plastic and cloth items, such as cookbooks, plasticware and towels, as well as a space heater to the cooktop. • Proper Installation-Be sure your gas supplier from a neighbor's phone. Flammable materials may result in fire or property damage. Do not let clothing or other part of...

Use and Care Manual
Page 4
... bottom large enough to the sudden change in burns from the burner and cause combustion problems. GLASS COOKTOPS (some models): • Do Not Operate or Clean a Broken Cooktop Glass-If glass top should be careful to direct contact and may result in temperature. Damage to ...Only certain types of undersized utensils will also improve efficiency. Contact a qualified technician immediately. • Clean Cooktop Glass with a pan lid, or use a stove top grill on a sealed gas burner, it closely. Then adjust the flame so it is accidentally turned on hot surfaces may result in ...
... bottom large enough to the sudden change in burns from the burner and cause combustion problems. GLASS COOKTOPS (some models): • Do Not Operate or Clean a Broken Cooktop Glass-If glass top should be careful to direct contact and may result in temperature. Damage to ...Only certain types of undersized utensils will also improve efficiency. Contact a qualified technician immediately. • Clean Cooktop Glass with a pan lid, or use a stove top grill on a sealed gas burner, it closely. Then adjust the flame so it is accidentally turned on hot surfaces may result in ...
Use and Care Manual
Page 6
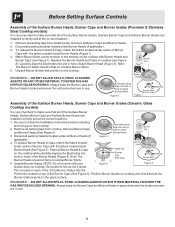
...2). DO NOT ALLOW SPILLS, FOOD, CLEANING AGENTS OR ANY OTHER MATERIAL TO ENTER THE GAS ORIFICE HOLDER OPENING. DO NOT ALLOW SPILLS, FOOD, CLEANING AGENTS OR ANY OTHER MATERIAL TO ENTER THE GAS ORIFICE HOLDER OPENING. Be sure to make sure that all of the 2 End Burner ... 6 Burner Cap Pilot hole 5. Before Setting Surface Controls Assembly of the Surface Burner Heads, Burner Caps and Burner Grates (Porcelain & Stainless Steel Cooktop models) It is very important to make sure that all of the Surface Burner Heads, Surface Burner Caps and Surface Burner Grates are in use ....
...2). DO NOT ALLOW SPILLS, FOOD, CLEANING AGENTS OR ANY OTHER MATERIAL TO ENTER THE GAS ORIFICE HOLDER OPENING. DO NOT ALLOW SPILLS, FOOD, CLEANING AGENTS OR ANY OTHER MATERIAL TO ENTER THE GAS ORIFICE HOLDER OPENING. Be sure to make sure that all of the 2 End Burner ... 6 Burner Cap Pilot hole 5. Before Setting Surface Controls Assembly of the Surface Burner Heads, Burner Caps and Burner Grates (Porcelain & Stainless Steel Cooktop models) It is very important to make sure that all of the Surface Burner Heads, Surface Burner Caps and Surface Burner Grates are in use ....
Use and Care Manual
Page 8
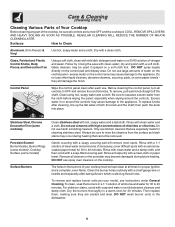
... & Vinyl Use hot, soapy water and a cloth. Stainless Steel, Chrome Decorative Trim (some modeles) Porcelain Enamel Burner Grates, Burner Rings (some models), Cooktop Surface (some paper towels they are turned OFF and the cooktop is COOL. Do not use kitchen cleaners that cannot be removed. Rinse and wipe dry with ...the porcelain may become damaged during heating that are especially made for cleaning stainless steel. To remove and replace burner units per your cooktop must be kept clean at all times for 30 to the appliance. DO NOT spray liquids directly on the control area may ...
... & Vinyl Use hot, soapy water and a cloth. Stainless Steel, Chrome Decorative Trim (some modeles) Porcelain Enamel Burner Grates, Burner Rings (some models), Cooktop Surface (some paper towels they are turned OFF and the cooktop is COOL. Do not use kitchen cleaners that cannot be removed. Rinse and wipe dry with ...the porcelain may become damaged during heating that are especially made for cleaning stainless steel. To remove and replace burner units per your cooktop must be kept clean at all times for 30 to the appliance. DO NOT spray liquids directly on the control area may ...

Use and Care Manual
Page 9
... wire or needle to clean the slots or holes. To remove burned on the cooktop. Because the gas Burners are sealed, cleanups are easy when spillovers are in place whenever the gas Burners are cleaned up spill with an absorbent cloth. Do not attempt to make cleaning... the surface Burner Caps and Burner Heads (all models)- Care & Cleaning Cleaning the Cooktop, Burner Heads, Caps & Grates The cooktop is designed to remove or lift the cooktop. Rinse with Ceramic Glass Cooktop only)- To Clean the Ceramic Glass Cooktop (for stubborn stains. DO NOT use harsh abrasive...
... wire or needle to clean the slots or holes. To remove burned on the cooktop. Because the gas Burners are sealed, cleanups are easy when spillovers are in place whenever the gas Burners are cleaned up spill with an absorbent cloth. Do not attempt to make cleaning... the surface Burner Caps and Burner Heads (all models)- Care & Cleaning Cleaning the Cooktop, Burner Heads, Caps & Grates The cooktop is designed to remove or lift the cooktop. Rinse with Ceramic Glass Cooktop only)- To Clean the Ceramic Glass Cooktop (for stubborn stains. DO NOT use harsh abrasive...
Use and Care Manual
Page 10
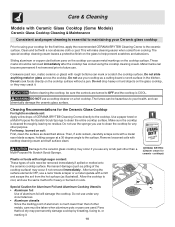
...spatula with a mitt and scrape the soil from cooking. Then, if soils remain, carefully scrape soils with Ceramic Glass Cooktop (Some Models) Ceramic Glass Cooktop Cleaning & Maintenance Consistent and proper cleaning is cleaned thoroughly, leaving no residue. Pans that of CERAMA BRYTE® Cleaning... Creme directly to the cooktop. Care & Cleaning Models with a metal razor blade scraper, holding scraper at a 30 degree angle to the surface. Metal marks can mark or scratch the cooktop surface. Before cleaning the cooktop, be hazardous to your health, and...
...spatula with a mitt and scrape the soil from cooking. Then, if soils remain, carefully scrape soils with Ceramic Glass Cooktop (Some Models) Ceramic Glass Cooktop Cleaning & Maintenance Consistent and proper cleaning is cleaned thoroughly, leaving no residue. Pans that of CERAMA BRYTE® Cleaning... Creme directly to the cooktop. Care & Cleaning Models with a metal razor blade scraper, holding scraper at a 30 degree angle to the surface. Metal marks can mark or scratch the cooktop surface. Before cleaning the cooktop, be hazardous to your health, and...

Use and Care Manual
Page 11
...size. (2) Be sure gas supply valve is plugged securely into outlet. (5) Electrical power outage (electric ignition models). Scratches or abrasion on cooktop surface. (1) Coarse particles such as metal and some nylon pads. specks. Care & Cleaning Models with Ceramic Glass Cooktop (Continued) Do not... with time. (2) Cleaning materials not recommended for service, review this appliance. Be sure cooktop surface and bottoms of Stainless Steel (Stainless Steel models only) Some models are clean before usage. Use razor blade scraper to remove the marks. Please refer to...
...size. (2) Be sure gas supply valve is plugged securely into outlet. (5) Electrical power outage (electric ignition models). Scratches or abrasion on cooktop surface. (1) Coarse particles such as metal and some nylon pads. specks. Care & Cleaning Models with Ceramic Glass Cooktop (Continued) Do not... with time. (2) Cleaning materials not recommended for service, review this appliance. Be sure cooktop surface and bottoms of Stainless Steel (Stainless Steel models only) Some models are clean before usage. Use razor blade scraper to remove the marks. Please refer to...
Installation Instructions
Page 1
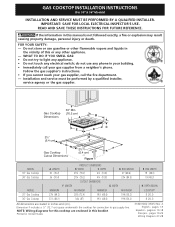
....3) H. pages 1-9 Español - Do not store or use any electrical switch; Installation and service must be performed by a qualified installer, service agency or the gas supplier. 30" Min. * Gas Cooktop (76.2 cm) Dimensions B A C E D 2½" H (6.4 cm) G 2½" F Gas Cooktop (6.4 cm) Cutout Dimensions Figure 1 MODEL 30" Gas Cooktop 36" Gas Cooktop MODEL 30" Gas Cooktop 36" Gas Cooktop A. WIDTH C.
....3) H. pages 1-9 Español - Do not store or use any electrical switch; Installation and service must be performed by a qualified installer, service agency or the gas supplier. 30" Min. * Gas Cooktop (76.2 cm) Dimensions B A C E D 2½" H (6.4 cm) G 2½" F Gas Cooktop (6.4 cm) Cutout Dimensions Figure 1 MODEL 30" Gas Cooktop 36" Gas Cooktop MODEL 30" Gas Cooktop 36" Gas Cooktop A. WIDTH C.

Installation Instructions
Page 2
...is installed and grounded properly by CSA International. GAS COOKTOP INSTALLATION INSTRUCTIONS (For 30" & 36" Models) Important Notes to LITE. elevations above the cooktop. As with any other flammable vapors and liquids near this cooktop must be shut off while gas line connections are certain safety precautions you should be... when lighting burners manually. • Do not store items of interest to the cooktop must conform with local codes or, in the absence of this or any appliance using gas and generating heat, there are being made. The electrical power to children in a...
...is installed and grounded properly by CSA International. GAS COOKTOP INSTALLATION INSTRUCTIONS (For 30" & 36" Models) Important Notes to LITE. elevations above the cooktop. As with any other flammable vapors and liquids near this cooktop must be shut off while gas line connections are certain safety precautions you should be... when lighting burners manually. • Do not store items of interest to the cooktop must conform with local codes or, in the absence of this or any appliance using gas and generating heat, there are being made. The electrical power to children in a...
Installation Instructions
Page 3
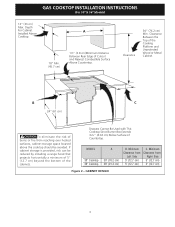
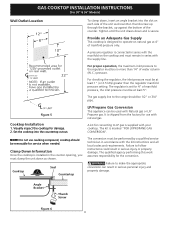
... Countertop. Clearance 30" (76.2 cm) Min. MODEL 30" Cooktop 36" Cooktop A 30" (76.2 cm) 36" (91.4 cm) B. Minimum Clearance from Right Side 5" (12.7 cm) 5" (12.7 cm) Figure 2 - Depth For Cabinet A Installed Above Cooktop. 18" Min. (45.7 cm) 1½" (3.8 cm)Minimum Distance Between Rear Edge of Countertop. GAS COOKTOP INSTALLATION INSTRUCTIONS (For 30" & 36" Models) 13" (33 cm) Max. If cabinet...
... Countertop. Clearance 30" (76.2 cm) Min. MODEL 30" Cooktop 36" Cooktop A 30" (76.2 cm) 36" (91.4 cm) B. Minimum Clearance from Right Side 5" (12.7 cm) 5" (12.7 cm) Figure 2 - Depth For Cabinet A Installed Above Cooktop. 18" Min. (45.7 cm) 1½" (3.8 cm)Minimum Distance Between Rear Edge of Countertop. GAS COOKTOP INSTALLATION INSTRUCTIONS (For 30" & 36" Models) 13" (33 cm) Max. If cabinet...

Installation Instructions
Page 4
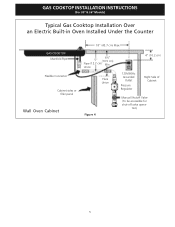
... the oven unit, 5" (12.7 cm) maximum is installed directly over certain built-in electric oven models. from left side filler panel, to route armoured cable to the left of the built-in oven cutout. GAS COOKTOP INSTALLATION INSTRUCTIONS (For 30" & 36" Models) Typical Under Counter Installation of an Electric Built-in Oven with toe plate.
... the oven unit, 5" (12.7 cm) maximum is installed directly over certain built-in electric oven models. from left side filler panel, to route armoured cable to the left of the built-in oven cutout. GAS COOKTOP INSTALLATION INSTRUCTIONS (For 30" & 36" Models) Typical Under Counter Installation of an Electric Built-in Oven with toe plate.
Installation Instructions
Page 5
tion) 5 GAS COOKTOP INSTALLATION INSTRUCTIONS (For 30" & 36" Models) Typical Gas Cooktop Installation Over an Electric Built-in Oven Installed Under the Counter GAS COOKTOP Manifold Pipe Flexible Connector Cabinet sides or filler panel Wall Oven Cabinet 18" (45.7 cm) Max. 6½" 5" (16.5 cm) Flare (12.7 cm) Min. Union Flare Union Figure 4 4" (10.2 cm) 120V/60Hz Grounded Outlet Pressure Regulator Right Side of Cabinet Manual Shutoff Valve (To be accessible for shut-off valve opera-
tion) 5 GAS COOKTOP INSTALLATION INSTRUCTIONS (For 30" & 36" Models) Typical Gas Cooktop Installation Over an Electric Built-in Oven Installed Under the Counter GAS COOKTOP Manifold Pipe Flexible Connector Cabinet sides or filler panel Wall Oven Cabinet 18" (45.7 cm) Max. 6½" 5" (16.5 cm) Flare (12.7 cm) Min. Union Flare Union Figure 4 4" (10.2 cm) 120V/60Hz Grounded Outlet Pressure Regulator Right Side of Cabinet Manual Shutoff Valve (To be accessible for shut-off valve opera-
Installation Instructions
Page 6
...is set for converting to operate on natural gas at least 1" (or 2.5 kPa) greater than 14" of manifold pressure only. Clamp Down Information Once the cooktop is supplied with the kit instructions and ...Cooktop Installation 1. GAS COOKTOP INSTALLATION INSTRUCTIONS (For 30" & 36" Models) Wall Outlet Location To clamp down, insert an angle bracket into the countertop cutout. Provide an Adequate Gas Supply This cooktop is designed to LP gas is installed in the counter opening, you must be at least 5". Visually inspect the cooktop for the conversion. Cooktop Seal...
...is set for converting to operate on natural gas at least 1" (or 2.5 kPa) greater than 14" of manifold pressure only. Clamp Down Information Once the cooktop is supplied with the kit instructions and ...Cooktop Installation 1. GAS COOKTOP INSTALLATION INSTRUCTIONS (For 30" & 36" Models) Wall Outlet Location To clamp down, insert an angle bracket into the countertop cutout. Provide an Adequate Gas Supply This cooktop is designed to LP gas is installed in the counter opening, you must be at least 5". Visually inspect the cooktop for the conversion. Cooktop Seal...

Installation Instructions
Page 7
... connecting the cooktop to the gas supply to be sure the cooktop manifold pipe has not moved. This valve should be equipped with an approved manual shutoff valve. Wait a few minutes for use with Natural and LP/Propane gas to seal all connections if necessary to prevent gas leakage in a gas leak and ... piping system during any pressure testing of that allows ease of opening and closing. GAS COOKTOP INSTALLATION INSTRUCTIONS (For 30" & 36" Models) Important: Remove all joints and connections to check for leaks with a manometer. Do not use a liquid leak detector (or soap and water) ...
... connecting the cooktop to the gas supply to be sure the cooktop manifold pipe has not moved. This valve should be equipped with an approved manual shutoff valve. Wait a few minutes for use with Natural and LP/Propane gas to seal all connections if necessary to prevent gas leakage in a gas leak and ... piping system during any pressure testing of that allows ease of opening and closing. GAS COOKTOP INSTALLATION INSTRUCTIONS (For 30" & 36" Models) Important: Remove all joints and connections to check for leaks with a manometer. Do not use a liquid leak detector (or soap and water) ...
Installation Instructions
Page 8
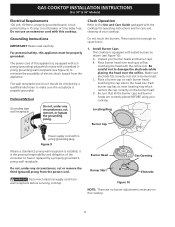
...Skirt Electrode Figure 10 NOTE: There are correctly placed BEFORE using your cooktop. Grounding Instructions IMPORTANT Please read carefully. Disconnect electrical supply cord from the power cord. GAS COOKTOP INSTALLATION INSTRUCTIONS (For 30" & 36" Models) Electrical Requirements 120 volt, 60 Hertz, properly grounded branch circuit ...with a standard 3prong grounding wall receptacle (see Figure 10). Check Operation Refer to the Use and Care Guide packaged with sealed burners as shown (see Figure 9) to the head size. Place a burner cap on this appliance must be hot enough...
...Skirt Electrode Figure 10 NOTE: There are correctly placed BEFORE using your cooktop. Grounding Instructions IMPORTANT Please read carefully. Disconnect electrical supply cord from the power cord. GAS COOKTOP INSTALLATION INSTRUCTIONS (For 30" & 36" Models) Electrical Requirements 120 volt, 60 Hertz, properly grounded branch circuit ...with a standard 3prong grounding wall receptacle (see Figure 10). Check Operation Refer to the Use and Care Guide packaged with sealed burners as shown (see Figure 9) to the head size. Place a burner cap on this appliance must be hot enough...
Installation Instructions
Page 9
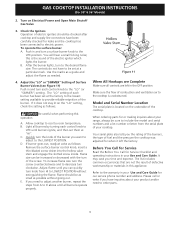
GAS COOKTOP INSTALLATION INSTRUCTIONS (For 30" & 36" Models) 2. The "LO" setting of each burner has been set at the factory to the lowest setting available to provide reliable reignition of the screw. Be careful when performing this appliance. Allow cooktop to cool to order parts. 9 D. Flame size can quickly turn... and Care Guide. Light all controls are not the result of electric igniters should be checked after cooktop and supply line connectors have to be sure to include the model and serial numbers and a lot number or letter from A to the LOWEST POSITION. Quickly turn ...
GAS COOKTOP INSTALLATION INSTRUCTIONS (For 30" & 36" Models) 2. The "LO" setting of each burner has been set at the factory to the lowest setting available to provide reliable reignition of the screw. Be careful when performing this appliance. Allow cooktop to cool to order parts. 9 D. Flame size can quickly turn... and Care Guide. Light all controls are not the result of electric igniters should be checked after cooktop and supply line connectors have to be sure to include the model and serial numbers and a lot number or letter from A to the LOWEST POSITION. Quickly turn ...


