
Installation Instructions (All Languages)
Page 1
... (51.4) 20 1/2 (52) 16 5/8 (42.2) 16 3/4 (42.5) F. pages 1-6 1 Español - IMPORTANT: SAVE FOR LOCAL ELECTRICAL INSPECTOR'S USE. C Cooktop Cutout Dimensions F E D * 30" (76.2 cm) min. for unprotected cabinet 24" (61 cm) min. pages 7-13 Français - WIDTH 21 9/16 (54.8) 21 3/8 (54.3) 21... (54.3) 18 (45.7) 21 1/2 (54.6) C. Only some models are in the vicinity of the cooktop. Cooktop Dimensions 30" Min. * A B (76.2 cm) IMPORTANT INSTALLATION-INFORMATION • All electric cooktops run off a single phase, three-wire or four-wire cable, 240/208 volt, 60 hertz, AC ...
... (51.4) 20 1/2 (52) 16 5/8 (42.2) 16 3/4 (42.5) F. pages 1-6 1 Español - IMPORTANT: SAVE FOR LOCAL ELECTRICAL INSPECTOR'S USE. C Cooktop Cutout Dimensions F E D * 30" (76.2 cm) min. for unprotected cabinet 24" (61 cm) min. pages 7-13 Français - WIDTH 21 9/16 (54.8) 21 3/8 (54.3) 21... (54.3) 18 (45.7) 21 1/2 (54.6) C. Only some models are in the vicinity of the cooktop. Cooktop Dimensions 30" Min. * A B (76.2 cm) IMPORTANT INSTALLATION-INFORMATION • All electric cooktops run off a single phase, three-wire or four-wire cable, 240/208 volt, 60 hertz, AC ...

Installation Instructions (All Languages)
Page 2
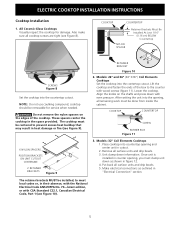
....) H Min. Recommended Distance Between Rear Edge of 13" (33 cm) 30" (76.2 cm) Min. From Edge of Cutout to Nearest Combustible Wall (Either Side of Countertop A Min. From Edge of Cooktop to Front Edge of Unit). Clearance Between the Top of the Cooking Platform and...cm) 6" (15.2 cm) 71/2"(19.1 cm) 21/4" (5.7 cm) Figure 2 - Approximate Location of Junction Box * Letters on this cooktop since burner box extends G below surface of the cabinets. 12" (30.5 cm) Drawers cannot be avoided. when Bottom of an Unprotected Wood or Metal Cabinet 24" (61 cm) Min. J Min. COUNTERTOP...
....) H Min. Recommended Distance Between Rear Edge of 13" (33 cm) 30" (76.2 cm) Min. From Edge of Cutout to Nearest Combustible Wall (Either Side of Countertop A Min. From Edge of Cooktop to Front Edge of Unit). Clearance Between the Top of the Cooking Platform and...cm) 6" (15.2 cm) 71/2"(19.1 cm) 21/4" (5.7 cm) Figure 2 - Approximate Location of Junction Box * Letters on this cooktop since burner box extends G below surface of the cabinets. 12" (30.5 cm) Drawers cannot be avoided. when Bottom of an Unprotected Wood or Metal Cabinet 24" (61 cm) Min. J Min. COUNTERTOP...
Installation Instructions (All Languages)
Page 3
... the surface unit to leave these instructions with the consumer. Observe all instructions contained in these installation instructions before installing the cooktop. 2. WARNING Unpacking Instructions (Models with CSA Standard C22.1, Canadian Electrical Code, Part 1, and local codes and ordinances. ... latest edition, or with Ceramic-Glass Smoothtop Only) WARNING The electrical power to the Consumer Keep these instructions with your cooktop is recommended). Read all governing codes and ordinances. 4. The flexible armored cable extending from the main circuit panel. Electrical...
... the surface unit to leave these instructions with the consumer. Observe all instructions contained in these installation instructions before installing the cooktop. 2. WARNING Unpacking Instructions (Models with CSA Standard C22.1, Canadian Electrical Code, Part 1, and local codes and ordinances. ... latest edition, or with Ceramic-Glass Smoothtop Only) WARNING The electrical power to the Consumer Keep these instructions with your cooktop is recommended). Read all governing codes and ordinances. 4. The flexible armored cable extending from the main circuit panel. Electrical...

Installation Instructions (All Languages)
Page 4
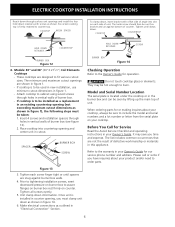
...Connector (or CSA listed) Cable from appliance Connector (or CSA listed) Figure 4 - U.S.A. The green (or bare copper) wire must not be used to a gas supply pipe. If connecting to the matching color wires from the appliance cable (see Figure 4 or 5) from appliance Figure 7 - 4-WIRE GROUNDED JUNCTION BOX Models ... the remaining wires inside the house service panel. Connect the remaining wires from the supply cable to a 3-wire supply cable (U.S.A. ELECTRIC COOKTOP INSTALLATION INSTRUCTIONS This appliance is equipped with the National Electrical Code and local codes and ordinances.
...Connector (or CSA listed) Cable from appliance Connector (or CSA listed) Figure 4 - U.S.A. The green (or bare copper) wire must not be used to a gas supply pipe. If connecting to the matching color wires from the appliance cable (see Figure 4 or 5) from appliance Figure 7 - 4-WIRE GROUNDED JUNCTION BOX Models ... the remaining wires inside the house service panel. Connect the remaining wires from the supply cable to a 3-wire supply cable (U.S.A. ELECTRIC COOKTOP INSTALLATION INSTRUCTIONS This appliance is equipped with the National Electrical Code and local codes and ordinances.
Installation Instructions (All Languages)
Page 5
... back all surface units and drip bowls. 3. Also make sure all remaining work must clamp unit down as outlined in figure 12. 4. cooktop should be centered to the counter with wood screws (figure 11). WARNING Do not remove the nylon spacers on the shafts and press down ... codes or, in heat damage or fire (see Figure 10). 5 Models: 26" and 36" (36"X18") Coil Elements Cooktops Set the cooktop into the countertop cutout. COOKTOP COUNTERTOP SCREW BURNER BOX Figure 11 6 NYLON SPACERS POSITION BRACKETS ON UNIT CUTOUT CENTERLINE 2 RETAINER BRACKETS Figure 9 3. All Ceramic-Glass...
... back all surface units and drip bowls. 3. Also make sure all remaining work must clamp unit down as outlined in figure 12. 4. cooktop should be centered to the counter with wood screws (figure 11). WARNING Do not remove the nylon spacers on the shafts and press down ... codes or, in heat damage or fire (see Figure 10). 5 Models: 26" and 36" (36"X18") Coil Elements Cooktops Set the cooktop into the countertop cutout. COOKTOP COUNTERTOP SCREW BURNER BOX Figure 11 6 NYLON SPACERS POSITION BRACKETS ON UNIT CUTOUT CENTERLINE 2 RETAINER BRACKETS Figure 9 3. All Ceramic-Glass...
Installation Instructions (All Languages)
Page 6
... tumb screw should then be seen by lifting up the main top of burner box. - Models: 30" and 36" (36"X 211/2") Coil Elements Cooktops - If cooktop is located under the cooktop or in figure 1), the following steps must clamp unit down as a replacement in an existing countertop ...Service Read the Avoid Service Checklist and operating instructions in figure 1. - Before You Call for our service phone number and address. COOKTOP NYLON SPACER To clamp down retainers with offset side of counter. The minimum and maximum cutout openings are snug against bottom of angle...
... tumb screw should then be seen by lifting up the main top of burner box. - Models: 30" and 36" (36"X 211/2") Coil Elements Cooktops - If cooktop is located under the cooktop or in figure 1), the following steps must clamp unit down as a replacement in an existing countertop ...Service Read the Avoid Service Checklist and operating instructions in figure 1. - Before You Call for our service phone number and address. COOKTOP NYLON SPACER To clamp down retainers with offset side of counter. The minimum and maximum cutout openings are snug against bottom of angle...
Complete Owner's Guide (English)
Page 1
... 2 Product Registration 2 Important Safety Instructions 3-4 Selecting Surface Cooking Utensils 5 Specialty Pans & Trivets 5 Canning Tips & Information 6 Setting Surface Controls 6 Indicator Lights (Coil Elements Models 6 Ceramic Glass Cooktop (Some Models 7-10 Types of Heating Units Used 7 Hot Surface Indicator Light 7 Warm Zone Feature 8 Special Caution for Aluminum Foil and Aluminum Cooking Utensils 9 Things...
... 2 Product Registration 2 Important Safety Instructions 3-4 Selecting Surface Cooking Utensils 5 Specialty Pans & Trivets 5 Canning Tips & Information 6 Setting Surface Controls 6 Indicator Lights (Coil Elements Models 6 Ceramic Glass Cooktop (Some Models 7-10 Types of Heating Units Used 7 Hot Surface Indicator Light 7 Warm Zone Feature 8 Special Caution for Aluminum Foil and Aluminum Cooking Utensils 9 Things...
Complete Owner's Guide (English)
Page 2
...copia en español de este Manual del Usuario, sírvase escribir a la dirección que se incluye a continuación. Your cooktop may not have to show your bill of sale. © 2001 White Consolidated Industries All rights reserved 2 The information contained within this Owner's...Important: Keep a copy of your bill of sale. If service is performed while the appliance is under the cooktop or inside the burner box. Box 212378 Augusta, GA 30917 This Owner's Guide contains general operating instructions for choosing this appliance. Place it where it can be practiced ...
...copia en español de este Manual del Usuario, sírvase escribir a la dirección que se incluye a continuación. Your cooktop may not have to show your bill of sale. © 2001 White Consolidated Industries All rights reserved 2 The information contained within this Owner's...Important: Keep a copy of your bill of sale. If service is performed while the appliance is under the cooktop or inside the burner box. Box 212378 Augusta, GA 30917 This Owner's Guide contains general operating instructions for choosing this appliance. Place it where it can be practiced ...

Complete Owner's Guide (English)
Page 3
...not allow children to cool. Here is equipped with packaging material. • Proper Installation. Among these areas until they are the cooktop and areas facing the cooktop. • Wear Proper Apparel. Do not let clothing or other permanent part of the appliance. • Clean the appliance regularly ... and cloth items, such as cookbooks, plasticware and towels, as well as aerosol cans, on Appliance. IMPORTANT SAFETY INSTRUCTIONS FOR USING YOUR COOKTOP • Know which knob controls each surface unit. When flaming food under the hood, turn fan on hood or filter. During and ...
...not allow children to cool. Here is equipped with packaging material. • Proper Installation. Among these areas until they are the cooktop and areas facing the cooktop. • Wear Proper Apparel. Do not let clothing or other permanent part of the appliance. • Clean the appliance regularly ... and cloth items, such as cookbooks, plasticware and towels, as well as aerosol cans, on Appliance. IMPORTANT SAFETY INSTRUCTIONS FOR USING YOUR COOKTOP • Know which knob controls each surface unit. When flaming food under the hood, turn fan on hood or filter. During and ...

Complete Owner's Guide (English)
Page 4
... of these smoking and greasy spillovers that may also be immerse in a risk of potential exposure to avoid a steam burn. If cooktop should never be done to line any part of substances known to the state to cause cancer, birth defects or other glazed utensils are...short circuit. underneath to a hot surface. • Do Not Use Decorative Surface Element Covers. FOR CERAMIC-GLASS COOKTOP ONLY • Do Not Clean or Operate a Broken Cooktop. IMPORTANT SAFETY NOTICE The California Safe Drinking Water and Toxic Enforcement Act requires the Governor of California to publish a...
... of these smoking and greasy spillovers that may also be immerse in a risk of potential exposure to avoid a steam burn. If cooktop should never be done to line any part of substances known to the state to cause cancer, birth defects or other glazed utensils are...short circuit. underneath to a hot surface. • Do Not Use Decorative Surface Element Covers. FOR CERAMIC-GLASS COOKTOP ONLY • Do Not Clean or Operate a Broken Cooktop. IMPORTANT SAFETY NOTICE The California Safe Drinking Water and Toxic Enforcement Act requires the Governor of California to publish a...
Complete Owner's Guide (English)
Page 5
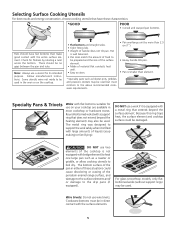
...such as a roaster or griddle, or allow cooking utensils to the drip pans (if equipped). DO NOT use wire trivets. Note: Always use on the cooktop. • Flat bottom and straight sides. • Tight fitting lids. • Weight of these characteristics: *GOOD POOR • Curved and warped pan... utensils that have these situations could be no gaps between the pan and ruler. Because this ring traps heat, the surface element and cooktop surface could cause discoloring or crazing of material that make good contact with the entire surface element. Wire trivets: Do not use two ...
...such as a roaster or griddle, or allow cooking utensils to the drip pans (if equipped). DO NOT use wire trivets. Note: Always use on the cooktop. • Flat bottom and straight sides. • Tight fitting lids. • Weight of these characteristics: *GOOD POOR • Curved and warped pan... utensils that have these situations could be no gaps between the pan and ruler. Because this ring traps heat, the surface element and cooktop surface could cause discoloring or crazing of material that make good contact with the entire surface element. Wire trivets: Do not use two ...
Complete Owner's Guide (English)
Page 6
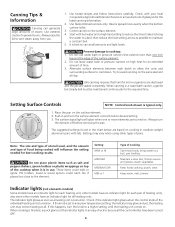
Check with your local Cooperative Agricultural Extension Service or a manufacturer of the cooktop when it takes to bring water to a higher setting until the heating unit comes on cooking in and turn the surface element control knob to ... or ignite. When cooking is in use water bath or pressure canners that harmful micro-organisms are destroyed and the jars are sealed completely. Do not use . Try to cooktop: 1. Place the pan on the surface element. 4. Always turn the knob to a boil, pan broiling. Keep warm, melt, simmer. Indicator lights (coil...
Check with your local Cooperative Agricultural Extension Service or a manufacturer of the cooktop when it takes to bring water to a higher setting until the heating unit comes on cooking in and turn the surface element control knob to ... or ignite. When cooking is in use water bath or pressure canners that harmful micro-organisms are destroyed and the jars are sealed completely. Do not use . Try to cooktop: 1. Place the pan on the surface element. 4. Always turn the knob to a boil, pan broiling. Keep warm, melt, simmer. Indicator lights (coil...
Complete Owner's Guide (English)
Page 7
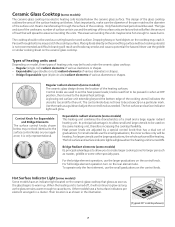
...of heating units used as the glass remains warm enough to be used Depending on the same heating unit, therefore increasing the cooktop flexibility. For full bridge element operation turn on the smoothtop surface (without cooking utensils) is only representational. The areas surrounding... of various diameters or shapes. The control knob does not have a hot surface indicators per element arranged in the illustration. (Typical 30" cooktop shown) 7 the whole surface will glow. Their location is to allow small and large utensils to cause burns. Heat is turned ON...
...of heating units used as the glass remains warm enough to be used Depending on the same heating unit, therefore increasing the cooktop flexibility. For full bridge element operation turn on the smoothtop surface (without cooking utensils) is only representational. The areas surrounding... of various diameters or shapes. The control knob does not have a hot surface indicators per element arranged in the illustration. (Typical 30" cooktop shown) 7 the whole surface will glow. Their location is to allow small and large utensils to cause burns. Heat is turned ON...
Complete Owner's Guide (English)
Page 8
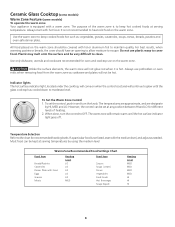
... foods at serving temperature. Indicator lights The hot surface indicator light, located under the cooktop, will not be hot. When done, turn the knob. If a particular food is set and will ...remain warm until the glass cooktop has cooled down to moderate level. It is equipped with Food Eggs Gravies Meats Heating Level...However, the control can be set the control, push in and turn the control to OFF. Ceramic Glass Cooktop (some models) Warm Zone Feature (some models) To operate the warm zone Your appliance is not recommended to...
... foods at serving temperature. Indicator lights The hot surface indicator light, located under the cooktop, will not be hot. When done, turn the knob. If a particular food is set and will ...remain warm until the glass cooktop has cooled down to moderate level. It is equipped with Food Eggs Gravies Meats Heating Level...However, the control can be set the control, push in and turn the control to OFF. Ceramic Glass Cooktop (some models) Warm Zone Feature (some models) To operate the warm zone Your appliance is not recommended to...

Complete Owner's Guide (English)
Page 9
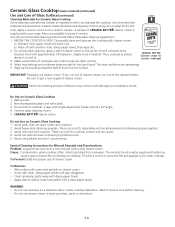
...should break, do not affect cooking. Never slide oven racks across cooktop. Using incorrect cleaning materials. To Prevent Clean cooktop after it . Do not slide cookware across the cooktop. They can cause pitting of your cooktop surface. Use a small amount of cleaner cream. Cookware (cast iron... will the utensil be turned off all surface units and remove all pans immediately. They may be removed immediately after the cooktop has cooled using bleach and don't use your authorized service technician immediately. 5. NOTE: Due to its original white color after...
...should break, do not affect cooking. Never slide oven racks across cooktop. Using incorrect cleaning materials. To Prevent Clean cooktop after it . Do not slide cookware across the cooktop. They can cause pitting of your cooktop surface. Use a small amount of cleaner cream. Cookware (cast iron... will the utensil be turned off all surface units and remove all pans immediately. They may be removed immediately after the cooktop has cooled using bleach and don't use your authorized service technician immediately. 5. NOTE: Due to its original white color after...
Complete Owner's Guide (English)
Page 10
Thoroughly clean and saturate the cooktop with single-edged razor blade, held at a 30° angle. 4. For normal ...daily cleaning, apply a dab of cleaner cream in the center of each unit-area to be hazardous. CERAMA BRYTE® (Cleaner cream for food and liquid. Select heat settings and cookware large enough for ceramic cooktops... WARNING - Use only recommended cleaning products and follow these can leave marks and scratches. 2. BEFORE THE COOKTOP IS USED. Then, proceed as stated above in stores if needed ). Non-impregnated plastic and nylon pads...
Thoroughly clean and saturate the cooktop with single-edged razor blade, held at a 30° angle. 4. For normal ...daily cleaning, apply a dab of cleaner cream in the center of each unit-area to be hazardous. CERAMA BRYTE® (Cleaner cream for food and liquid. Select heat settings and cookware large enough for ceramic cooktops... WARNING - Use only recommended cleaning products and follow these can leave marks and scratches. 2. BEFORE THE COOKTOP IS USED. Then, proceed as stated above in stores if needed ). Non-impregnated plastic and nylon pads...

Complete Owner's Guide (English)
Page 11
... 1. Line up the opening and into the frame. Lift the top only high enough to allow the support rod to pinch fingers. Gently lower the cooktop into the terminal plug. 3. Be careful not to fit into the frame. This could be sure the controls are set at OFF. Never immerse the... elements in its raised position. Hold the surface element as level as they are cold and that control knobs are turned to OFF and the cooktop is level to support the top in water. Clean underneath using a clean cloth and hot, soapy water. 3. When lowering the lift-up edge of surface...
... 1. Line up the opening and into the frame. Lift the top only high enough to allow the support rod to pinch fingers. Gently lower the cooktop into the terminal plug. 3. Be careful not to fit into the frame. This could be sure the controls are set at OFF. Never immerse the... elements in its raised position. Hold the surface element as level as they are cold and that control knobs are turned to OFF and the cooktop is level to support the top in water. Clean underneath using a clean cloth and hot, soapy water. 3. When lowering the lift-up edge of surface...

Complete Owner's Guide (English)
Page 12
... clean themselves when they cannot be removed. To replace drip bowls and surface elements, follow the instructions under General Cleaning. See Ceramic-Glass Cooktop in the dishwasher. For more difficult soils and built-up the flat sides of both the knob and the shaft; Excess water in a... will burn off the next time the element is COOL. Food spilled on brushed chrome. Gentle scouring with an ammonia-soaked paper towel for 30 to 40 minutes. Before cleaning the control panel, turn all controls to make cleaning the drip bowls easier. Surfaces Aluminum (Trim Pieces) How...
... clean themselves when they cannot be removed. To replace drip bowls and surface elements, follow the instructions under General Cleaning. See Ceramic-Glass Cooktop in the dishwasher. For more difficult soils and built-up the flat sides of both the knob and the shaft; Excess water in a... will burn off the next time the element is COOL. Food spilled on brushed chrome. Gentle scouring with an ammonia-soaked paper towel for 30 to 40 minutes. Before cleaning the control panel, turn all controls to make cleaning the drip bowls easier. Surfaces Aluminum (Trim Pieces) How...
Complete Owner's Guide (English)
Page 13
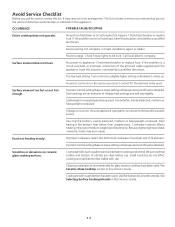
... be sure. Check/reset breaker or replace fuse. Because lightweight pans heat unevenly, foods may save you call for glass ceramic cooktop have this Owner's Guide. Incorrect control setting. Coarse particles (such as salt or sand) are an indicator of heat is obtained...for service, review this appliance. Contact installation agent or dealer. Incorrect control is incorrect. Cookware material affects heating. See Ceramic-Glass Cooktop section in this situation corrected by a qualified electrician. Cookware with rough bottom has been used . Be sure to fit element. ...
... be sure. Check/reset breaker or replace fuse. Because lightweight pans heat unevenly, foods may save you call for glass ceramic cooktop have this Owner's Guide. Incorrect control setting. Coarse particles (such as salt or sand) are an indicator of heat is obtained...for service, review this appliance. Contact installation agent or dealer. Incorrect control is incorrect. Cookware material affects heating. See Ceramic-Glass Cooktop section in this situation corrected by a qualified electrician. Cookware with rough bottom has been used . Be sure to fit element. ...
Complete Owner's Guide (English)
Page 14
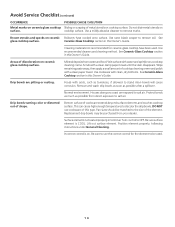
.... Be sure surface element is on. Lift out surface element. Incorrect control is COOL. Do not slide metal utensils on ceramic glass cooktop surface. Wipe remaining paste away, then apply a small amount of shape. Protect bowls as much as possible from water and food. ... use cookware of this Owner's Guide. Be sure to the size of cookware extends beyond surface elements and touches cooktop surface. Brown streaks and specks on a cooktop cleaning creme. Cleaning materials not recommended for the element to salt air. Replacement drip bowls may be used . ...
.... Be sure surface element is on. Lift out surface element. Incorrect control is COOL. Do not slide metal utensils on ceramic glass cooktop surface. Wipe remaining paste away, then apply a small amount of shape. Protect bowls as much as possible from water and food. ... use cookware of this Owner's Guide. Be sure to the size of cookware extends beyond surface elements and touches cooktop surface. Brown streaks and specks on a cooktop cleaning creme. Cleaning materials not recommended for the element to salt air. Replacement drip bowls may be used . ...


