
Complete Owner's Guide (English)
Page 2
... of injury, and tell you what can be caused by inappropriate waste handling of others . LAUNDRY CENTER SAFETY Your safety and the safety of this laundry center. Follow the gas supplier's instructions. • If you purchased the product. Prevent Fire •Do not wash or dry ...items that may not have every Note: The instructions appearing in the Use and Care Guide, Operating Instructions, Installation Instructions and on or near the dryer. Your laundry center may Owner's Guide. By ensuring this Owner's Guide are not followed. We have...
... of injury, and tell you what can be caused by inappropriate waste handling of others . LAUNDRY CENTER SAFETY Your safety and the safety of this laundry center. Follow the gas supplier's instructions. • If you purchased the product. Prevent Fire •Do not wash or dry ...items that may not have every Note: The instructions appearing in the Use and Care Guide, Operating Instructions, Installation Instructions and on or near the dryer. Your laundry center may Owner's Guide. By ensuring this Owner's Guide are not followed. We have...
Complete Owner's Guide (English)
Page 3
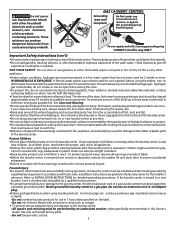
.... •To prevent fire, do not smoke or use an open flame during operation, the laundry center must be plugged into , on or near children. Installation instructions are packed in serious injury or death. -Do not combine laundry products for use fabric softeners or products to fabrics can cause serious injury or death. These...
.... •To prevent fire, do not smoke or use an open flame during operation, the laundry center must be plugged into , on or near children. Installation instructions are packed in serious injury or death. -Do not combine laundry products for use fabric softeners or products to fabrics can cause serious injury or death. These...
Complete Owner's Guide (English)
Page 4
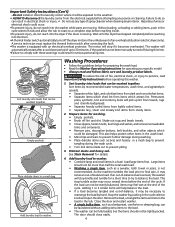
... use any service or cleaning. Sort items by pushing in a mesh bag. Pretreat stains and heavy soil. Add laundry load to the weather. • ALWAYS disconnect the laundry center from the electrical supply before reaching inside out to the load. • The washer can not be washed together... before reaching into loads that can be damaged. This stop before attempting any type of the cycle. Important Safety Instructions (Con't) -Do not install or store the laundry center where it will be exposed to washer. • Combine large and small items in a load. The washer...
... use any service or cleaning. Sort items by pushing in a mesh bag. Pretreat stains and heavy soil. Add laundry load to the weather. • ALWAYS disconnect the laundry center from the electrical supply before reaching inside out to the load. • The washer can not be washed together... before reaching into loads that can be damaged. This stop before attempting any type of the cycle. Important Safety Instructions (Con't) -Do not install or store the laundry center where it will be exposed to washer. • Combine large and small items in a load. The washer...
Complete Owner's Guide (English)
Page 6
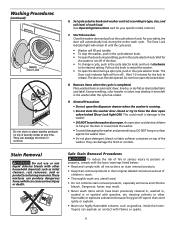
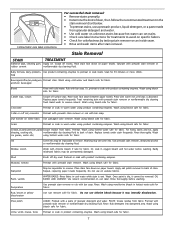
...Stain Removal Procedures To reduce the risk of the door. • To change a cycle, push in their original labeled containers and out of laundry center at any utensil used. • Do not combine stain removal products, especially ammonia and chlorine bleach. For your specific model controls.) 7. The ... wash cycle. These mixtures can produce dangerous fumes which have been previously cleaned in, washed in, soaked in or spotted with all instructions on stain removal products. • Keep stain removal products in the cycle selector knob and turn off vapors that could result in ...
...Stain Removal Procedures To reduce the risk of the door. • To change a cycle, push in their original labeled containers and out of laundry center at any utensil used. • Do not combine stain removal products, especially ammonia and chlorine bleach. For your specific model controls.) 7. The ... wash cycle. These mixtures can produce dangerous fumes which have been previously cleaned in, washed in, soaked in or spotted with all instructions on stain removal products. • Keep stain removal products in the cycle selector knob and turn off vapors that could result in ...
Complete Owner's Guide (English)
Page 7
... fluid to pretreat or soak stains. Replace towels under stain frequently. Ink Some inks may set stains. • Check care label instructions for treatments to avoid on specific fabrics. • Check for fabric. Use prewash stain remover, denatured alcohol or nonflammable dry cleaning ...stain remover. Do not use chlorine bleach because it cannot be permanently damaged. Pretreat with bar soap. Follow fabric care label instructions. Rub with prewash stain remover or nonflammable dry cleaning fluid. Wash using product containing enzymes. Chocolate Pretreat or soak in ...
... fluid to pretreat or soak stains. Replace towels under stain frequently. Ink Some inks may set stains. • Check care label instructions for treatments to avoid on specific fabrics. • Check for fabric. Use prewash stain remover, denatured alcohol or nonflammable dry cleaning ...stain remover. Do not use chlorine bleach because it cannot be permanently damaged. Pretreat with bar soap. Follow fabric care label instructions. Rub with prewash stain remover or nonflammable dry cleaning fluid. Wash using product containing enzymes. Chocolate Pretreat or soak in ...
Complete Owner's Guide (English)
Page 9
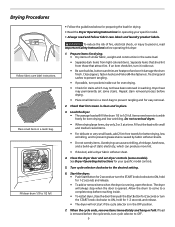
... • The dryer will not start if the cycle selector is opened. Drying Procedures Follow fabric care label instructions. Fill dryer drum 1/3 to ON, hold for operating your specific model controls. 5. Tie strings and sashes... • Follow the guidelines below for preparing the load for drying. • Read the Dryer Operating Instructions for 1-2 seconds and release. • To add or remove items when the dryer is removed before reaching... to persons, read and follow fabric care labels and laundry product labels. Repeat stain removal process before operating this dryer. 1.
... • The dryer will not start if the cycle selector is opened. Drying Procedures Follow fabric care label instructions. Fill dryer drum 1/3 to ON, hold for operating your specific model controls. 5. Tie strings and sashes... • Follow the guidelines below for preparing the load for drying. • Read the Dryer Operating Instructions for 1-2 seconds and release. • To add or remove items when the dryer is removed before reaching... to persons, read and follow fabric care labels and laundry product labels. Repeat stain removal process before operating this dryer. 1.
Complete Owner's Guide (English)
Page 11
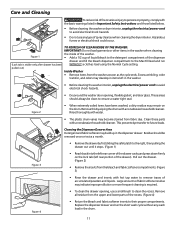
... fire or serious injury to persons or property, comply with a nonabrasive household cleanser. Excess wrinkling, color transfer, and odors may build up in Important Safety Instructions and those listed below. • Before cleaning the washer or dryer interior, unplug the electrical power cord to avoid electrical shock hazards. • Do not...
... fire or serious injury to persons or property, comply with a nonabrasive household cleanser. Excess wrinkling, color transfer, and odors may build up in Important Safety Instructions and those listed below. • Before cleaning the washer or dryer interior, unplug the electrical power cord to avoid electrical shock hazards. • Do not...
Complete Owner's Guide (English)
Page 13
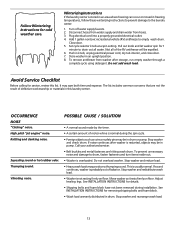
... continues, washer is stored in an area where freezing can occur or moved in freezing temperatures, follow these winterizing instructions to prevent damage to the laundry center: 1. Stop washer and redistribute wash load. • Washer is restarted, objects may produce a thumping sound. ... through a complete cycle using detergent. To prevent unnecessary noise and damage to empty wash drum. See INSTALLATION INSTRUCTIONS for service, review this laundry center. Squealing sound or hot rubber odor. Set cycle selector knob at a spin setting. Pull out knob and...
... continues, washer is stored in an area where freezing can occur or moved in freezing temperatures, follow these winterizing instructions to prevent damage to the laundry center: 1. Stop washer and redistribute wash load. • Washer is restarted, objects may produce a thumping sound. ... through a complete cycle using detergent. To prevent unnecessary noise and damage to empty wash drum. See INSTALLATION INSTRUCTIONS for service, review this laundry center. Squealing sound or hot rubber odor. Set cycle selector knob at a spin setting. Pull out knob and...
Complete Owner's Guide (English)
Page 14
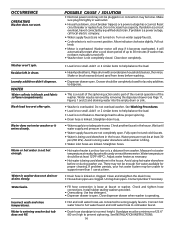
... • Drain hose is being used elsewhere in or connection may not be loose. Install rubber sealing washers provided. • Oversudsing. Laundry additives didn't dispense. Warm or hot water is overheated. Avoid using hot water elsewhere before washing. • Dispenser drawer open hot and... cold faucets. • Water is kinked or clogged. See Washing Procedures. • Load is too small. See INSTALLATION INSTRUCTIONS. 14 Turn on . Connect hot water hose to hot water faucet and cold water hose to support more than 1 use . Standpipe ...
... • Drain hose is being used elsewhere in or connection may not be loose. Install rubber sealing washers provided. • Oversudsing. Laundry additives didn't dispense. Warm or hot water is overheated. Avoid using hot water elsewhere before washing. • Dispenser drawer open hot and... cold faucets. • Water is kinked or clogged. See Washing Procedures. • Load is too small. See INSTALLATION INSTRUCTIONS. 14 Turn on . Connect hot water hose to hot water faucet and cold water hose to support more than 1 use . Standpipe ...
Complete Owner's Guide (English)
Page 15
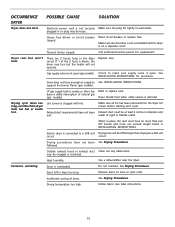
... a dehumidifier near the dryer. Dryer is open (gas models). Insufficient sorting of rigid or flexible metal. Follow fabric care label instructions. 15 Call authorized service person for procedure. Make sure all lint has been removed from the dryer lint screen before starting each cycle.... Do not overload. Reset circuit breaker or replace fuse. There are 2 house fuses in dryer too long. Check to See INSTALLATION INSTRUCTIONS. support the burner flame (gas models). High humidity. Electrical power cord is not open . House fuse blown or circuit breaker tripped....
... a dehumidifier near the dryer. Dryer is open (gas models). Insufficient sorting of rigid or flexible metal. Follow fabric care label instructions. 15 Call authorized service person for procedure. Make sure all lint has been removed from the dryer lint screen before starting each cycle.... Do not overload. Reset circuit breaker or replace fuse. There are 2 house fuses in dryer too long. Check to See INSTALLATION INSTRUCTIONS. support the burner flame (gas models). High humidity. Electrical power cord is not open . House fuse blown or circuit breaker tripped....

Complete Owner's Guide (English)
Page 16
Service calls to correct the installation of your appliance or to instruct you how to use your receipt, delivery slip, or some other than authorized service companies; Surcharges including, but not limited to any obligations under ...Corp. 5855 Terry Fox Way Mississauga, Ontario, Canada L5V 3E4 Products used and maintained in accordance with the provided instructions. This warranty only applies in the USA and Canada. Products with the provided instructions. 8. For one year limited warranty. Product that prove to repair or replace appliance light bulbs, air filters, water...
Service calls to correct the installation of your appliance or to instruct you how to use your receipt, delivery slip, or some other than authorized service companies; Surcharges including, but not limited to any obligations under ...Corp. 5855 Terry Fox Way Mississauga, Ontario, Canada L5V 3E4 Products used and maintained in accordance with the provided instructions. This warranty only applies in the USA and Canada. Products with the provided instructions. 8. For one year limited warranty. Product that prove to repair or replace appliance light bulbs, air filters, water...
Installation Instructions (All Languages)
Page 2
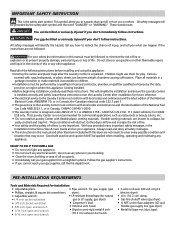
... & Care Guide and on your gas supplier from a neighbor's phone. Cartons covered with flexible plastic venting materials. Always read these instructions near the Laundry Center after the Laundry Center is installed correctly and safely. PRE-INSTALLATION REQUIREMENTS Tools and Materials Required for Installation: • Adjustable pliers. • Pipe wrench for natural • 1/4 inch socket w/...
... & Care Guide and on your gas supplier from a neighbor's phone. Cartons covered with flexible plastic venting materials. Always read these instructions near the Laundry Center after the Laundry Center is installed correctly and safely. PRE-INSTALLATION REQUIREMENTS Tools and Materials Required for Installation: • Adjustable pliers. • Pipe wrench for natural • 1/4 inch socket w/...
Installation Instructions (All Languages)
Page 4
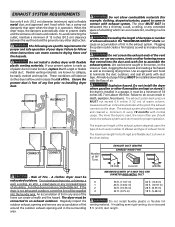
... rigid and flexible duct is shown in the chart below. Failure to follow these instructions can result in the surrounding area. These conditions will obstruct clothes dryer airflow and ... CM) DIAMETER RIGID METAL DUCT 0 56 ft. (17.07 m) 42 ft. (12.8 m) 1 46 ft. (14.02 m) 36 ft. (10.97 m) 2 34 ft. (10.36 m) 28 ft. (8.53 m) 3 32 ft. (9.75 m) 18 ft. (5.48 m) Do not install flexible plastic...CORRECT Number of any area of a building. A clothes dryer must be exhausted into the laundry area. Ensure the present duct is installed in contact with an inclined manometer at the ...
... rigid and flexible duct is shown in the chart below. Failure to follow these instructions can result in the surrounding area. These conditions will obstruct clothes dryer airflow and ... CM) DIAMETER RIGID METAL DUCT 0 56 ft. (17.07 m) 42 ft. (12.8 m) 1 46 ft. (14.02 m) 36 ft. (10.97 m) 2 34 ft. (10.36 m) 28 ft. (8.53 m) 3 32 ft. (9.75 m) 18 ft. (5.48 m) Do not install flexible plastic...CORRECT Number of any area of a building. A clothes dryer must be exhausted into the laundry area. Ensure the present duct is installed in contact with an inclined manometer at the ...
Installation Instructions (All Languages)
Page 8
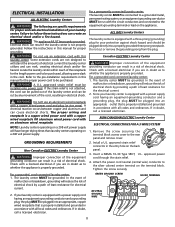
... conductor can be purchased. NON-CANADIAN ELECTRIC Laundry Center ELECTRICAL CONNECTIONS FOR A 3 WIRE SYSTEM 1. The laundry center MUST be installed onto power cord. ELECTRICAL INSTALLATION ALL ELECTRIC Laundry Centers WARNING The following are specific requirements for proper and safe electrical installation of least resistance for the electrical current. 2. Follow the instructions in the cord. Some extension cords...
... conductor can be purchased. NON-CANADIAN ELECTRIC Laundry Center ELECTRICAL CONNECTIONS FOR A 3 WIRE SYSTEM 1. The laundry center MUST be installed onto power cord. ELECTRICAL INSTALLATION ALL ELECTRIC Laundry Centers WARNING The following are specific requirements for proper and safe electrical installation of least resistance for the electrical current. 2. Follow the instructions in the cord. Some extension cords...
Installation Instructions (All Languages)
Page 10
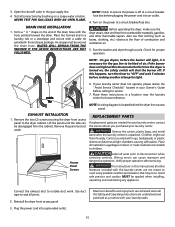
... to light. NOTE: On gas dryers, before calling for your laundry center, contact the source where you purchased your laundry tasks. 10 Run the washer and dryer though a cycle. Children might use them for proper operation. Test all the Safety and Operating instructions are needed for service. 7. WATER WILL SIPHON FROM THE WASHER IF...
... to light. NOTE: On gas dryers, before calling for your laundry center, contact the source where you purchased your laundry tasks. 10 Run the washer and dryer though a cycle. Children might use them for proper operation. Test all the Safety and Operating instructions are needed for service. 7. WATER WILL SIPHON FROM THE WASHER IF...
Operating Instructions (Operating Instructions)
Page 1
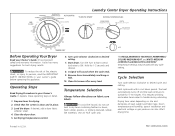
...Guide. Prepare items for 5-10 minutes. Check that lint screen is clean and in your owner's guide before operating this appliance. Laundry Center Dryer Operating Instructions PRESS SAVER AUTOMATIC PRESS SAVER Before Operating Your Dryer Read your Owner's Guide. Use Air Fluff cycle only. The heat automatically turns ... and hang or fold. 10. P/N 134396400A (0403) To avoid fire hazard, do not use heat to persons, read the IMPORTANT SAFETY INSTRUCTIONS in place. 3. To reduce the risk of fire, electric shock, or injury to dry items containing feathers or down period.
...Guide. Prepare items for 5-10 minutes. Check that lint screen is clean and in your owner's guide before operating this appliance. Laundry Center Dryer Operating Instructions PRESS SAVER AUTOMATIC PRESS SAVER Before Operating Your Dryer Read your Owner's Guide. Use Air Fluff cycle only. The heat automatically turns ... and hang or fold. 10. P/N 134396400A (0403) To avoid fire hazard, do not use heat to persons, read the IMPORTANT SAFETY INSTRUCTIONS in place. 3. To reduce the risk of fire, electric shock, or injury to dry items containing feathers or down period.
Operating Instructions (Operating Instructions)
Page 5
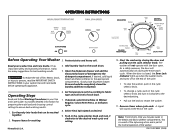
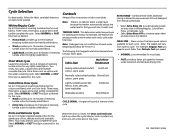
.... 2. Prepare items for best washing results. 5. Push in the cycle selector knob and turn it clockwise to persons, read the IMPORTANT SAFETY INSTRUCTIONS in the cycle selector knob and turn it clockwise to the desired setting. • Pull out the knob to restart the washer. 11. ... wash load and choosing control settings to time you may see water in U. It has 4. detergent compartment. It provides detailed information for laundry additives to fabric type and soil level of the washer. Remove items when cycle ends. It also has many suggestions for washing. 6. ...
.... 2. Prepare items for best washing results. 5. Push in the cycle selector knob and turn it clockwise to persons, read the IMPORTANT SAFETY INSTRUCTIONS in the cycle selector knob and turn it clockwise to the desired setting. • Pull out the knob to restart the washer. 11. ... wash load and choosing control settings to time you may see water in U. It has 4. detergent compartment. It provides detailed information for laundry additives to fabric type and soil level of the washer. Remove items when cycle ends. It also has many suggestions for washing. 6. ...
Operating Instructions (Operating Instructions)
Page 6
... example, Regular Fast spin speed is much faster than Delicate Fast spin speed. • NORMAL is no -iron finish. Cycle Selection For best results, follow instructions on items to the type and size of reversing tumble action for lightly soiled fabrics.
... example, Regular Fast spin speed is much faster than Delicate Fast spin speed. • NORMAL is no -iron finish. Cycle Selection For best results, follow instructions on items to the type and size of reversing tumble action for lightly soiled fabrics.
Wiring Diagram (All Languages)
Page 1
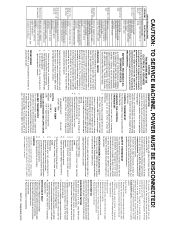
...this high radiant heat and opens its mounting bracket. 5. Disconnect electrical current and remove ventilation panel. Replace motor. Disconnect Laundry Center from electrical supply. 2. Remove front panel and air duct assembly. 3. CAUTION: DRYER TROUBLESHOOTING PROBLEM WHAT TO LOOK FOR... heated air to permit cycling of duct work. (See Installation Instructions) TO SERVICE MACHINE, POWER MUST BE DISCONNECTED! The purpose of the heater housing. Heater Assembly Testing: 1. Disconnect Laundry Center from electrical supply. 2. Remove leads to reinstall. The total sequence...
...this high radiant heat and opens its mounting bracket. 5. Disconnect electrical current and remove ventilation panel. Replace motor. Disconnect Laundry Center from electrical supply. 2. Remove front panel and air duct assembly. 3. CAUTION: DRYER TROUBLESHOOTING PROBLEM WHAT TO LOOK FOR... heated air to permit cycling of duct work. (See Installation Instructions) TO SERVICE MACHINE, POWER MUST BE DISCONNECTED! The purpose of the heater housing. Heater Assembly Testing: 1. Disconnect Laundry Center from electrical supply. 2. Remove leads to reinstall. The total sequence...


