
Complete Owner's Guide (English)
Page 2
...Date of electrical and electronic equipment. Use the laundry center only as household waste. Always read and obey all occupants. • Immediately call the fire department. These words mean: DANGER You can be preceded by a qualified installer, service agency or the gas supplier. Do ...features be killed or seriously injured if you don't follow instructions. LAUNDRY CENTER SAFETY Your safety and the safety of this meant to hazards that could result in this manual must be practiced when installing, operating and maintaining any electrical switch; This is very important....
...Date of electrical and electronic equipment. Use the laundry center only as household waste. Always read and obey all occupants. • Immediately call the fire department. These words mean: DANGER You can be preceded by a qualified installer, service agency or the gas supplier. Do ...features be killed or seriously injured if you don't follow instructions. LAUNDRY CENTER SAFETY Your safety and the safety of this meant to hazards that could result in this manual must be practiced when installing, operating and maintaining any electrical switch; This is very important....
Complete Owner's Guide (English)
Page 3
...near children. HYDROGEN GAS IS EXPLOSIVE. An excessive amount of lint build-up in these warnings could ignite or explode. Installation instructions are packed in the laundry center for 2 weeks or more. Use only authorized factory parts. - Do not tamper with rugs, bedspreads or plastic sheets...specifically recommended in this time. •To prevent fire, do not smoke or use an open flame during operation, the laundry center must be installed and electrically grounded by qualified service personnel. Do not use an extension cord or an adaptor plug. •Follow package ...
...near children. HYDROGEN GAS IS EXPLOSIVE. An excessive amount of lint build-up in these warnings could ignite or explode. Installation instructions are packed in the laundry center for 2 weeks or more. Use only authorized factory parts. - Do not tamper with rugs, bedspreads or plastic sheets...specifically recommended in this time. •To prevent fire, do not smoke or use an open flame during operation, the laundry center must be installed and electrically grounded by qualified service personnel. Do not use an extension cord or an adaptor plug. •Follow package ...
Complete Owner's Guide (English)
Page 4
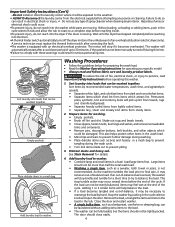
...8226; Read the Washer Operating Instructions for a short time to try to washer. • Combine large and small items in a load. Sort laundry into the drum. •A thermal limiter switch automatically turns off lint and dirt. Permanent press, synthetic, knit and corduroy items will stop before...before reaching inside out to rearrange the load by hand. Prepare items for details. 4. Important Safety Instructions (Con't) -Do not install or store the laundry center where it will be exposed to do so can result in electrical shock or injury. • Do not use any service or...
...8226; Read the Washer Operating Instructions for a short time to try to washer. • Combine large and small items in a load. Sort laundry into the drum. •A thermal limiter switch automatically turns off lint and dirt. Permanent press, synthetic, knit and corduroy items will stop before...before reaching inside out to rearrange the load by hand. Prepare items for details. 4. Important Safety Instructions (Con't) -Do not install or store the laundry center where it will be exposed to do so can result in electrical shock or injury. • Do not use any service or...
Complete Owner's Guide (English)
Page 8
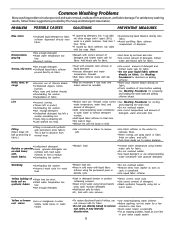
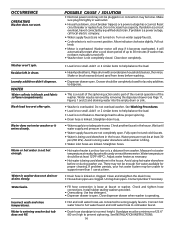
...;Undissolved detergent has left a residue resembling lint. •Static cling is due to clear lines. •Drain water heater occasionally. •For an ongoing problem, install an iron filter in a plastic container. This is attracting lint. •Load washed too long.
...;Undissolved detergent has left a residue resembling lint. •Static cling is due to clear lines. •Drain water heater occasionally. •For an ongoing problem, install an iron filter in a plastic container. This is attracting lint. •Load washed too long.
Complete Owner's Guide (English)
Page 13
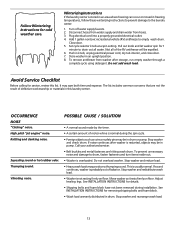
... cord, dry tub interior, and close door. 7. High pitch "jet engine" noise. Thumping sound. To prevent unnecessary noise and damage to the laundry center: 1. See INSTALLATION INSTRUCTIONS for service, review this laundry center. Stop washer and rearrange wash load. 13 It may produce a thumping sound. Do not overload washer. This is probably out of defective...
... cord, dry tub interior, and close door. 7. High pitch "jet engine" noise. Thumping sound. To prevent unnecessary noise and damage to the laundry center: 1. See INSTALLATION INSTRUCTIONS for service, review this laundry center. Stop washer and rearrange wash load. 13 It may produce a thumping sound. Do not overload washer. This is probably out of defective...
Complete Owner's Guide (English)
Page 14
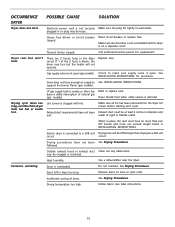
... Motor is too small. See Washing Procedures. • Load is overheated. Water pressure must be enough hot water available for laundry additives to prevent siphoning. Measure hot water temperature at nearby faucet with a nonabrasive household cleanser, then rinse. Clean and straighten ...hot water elsewhere before washing. • Dispenser drawer open . Contact plumber if necessary. • Fill hose connection is too small. Install rubber sealing washers provided. • Oversudsing. Make sure plug fits tightly in the house. Close door completely. • Load is ...
... Motor is too small. See Washing Procedures. • Load is overheated. Water pressure must be enough hot water available for laundry additives to prevent siphoning. Measure hot water temperature at nearby faucet with a nonabrasive household cleanser, then rinse. Clean and straighten ...hot water elsewhere before washing. • Dispenser drawer open . Contact plumber if necessary. • Fill hose connection is too small. Install rubber sealing washers provided. • Oversudsing. Make sure plug fits tightly in the house. Close door completely. • Load is ...
Complete Owner's Guide (English)
Page 15
...circuit breaker or replace fuse. If 1 of the 2 fuses is connected to a 208 volt Drying time will not operate. See INSTALLATION INSTRUCTIONS for replacement. LP gas supply tank is not securely Make sure the plug fits tightly in diameter and made of items. ...inches in wall outlet. may turn but won't heat. Electrical power cord is empty or there has Refill or replace tank. Check to See INSTALLATION INSTRUCTIONS. Drying procedures have not been met. followed. Use a dehumidifier near the dryer. Remove items as soon as cycle ends. Dryer runs ...
...circuit breaker or replace fuse. If 1 of the 2 fuses is connected to a 208 volt Drying time will not operate. See INSTALLATION INSTRUCTIONS for replacement. LP gas supply tank is not securely Make sure the plug fits tightly in diameter and made of items. ...inches in wall outlet. may turn but won't heat. Electrical power cord is empty or there has Refill or replace tank. Check to See INSTALLATION INSTRUCTIONS. Drying procedures have not been met. followed. Use a dehumidifier near the dryer. Remove items as soon as cycle ends. Dryer runs ...

Complete Owner's Guide (English)
Page 16
... other consumables, or knobs, handles, or other appropriate payment record to be defective in materials or workmanship when such appliance is installed, used in ordinary household use of this warranty must be required. Damages caused by: services performed by Electrolux Major Appliances North ...cannot be obtained by Electrolux or an authorized service company. Rust on the interior or exterior of appliance or home incurred during installation, including but not limited to remote areas, including the state of God. Expenses for making the appliance accessible for appliances not...
... other consumables, or knobs, handles, or other appropriate payment record to be defective in materials or workmanship when such appliance is installed, used in ordinary household use of this warranty must be required. Damages caused by: services performed by Electrolux Major Appliances North ...cannot be obtained by Electrolux or an authorized service company. Rust on the interior or exterior of appliance or home incurred during installation, including but not limited to remote areas, including the state of God. Expenses for making the appliance accessible for appliances not...
Installation Instructions (All Languages)
Page 2
...venting materials are not followed. Always read and obey all materials in this appliance is being installed. • Before beginning installation, carefully read these instructions near the Laundry Center after the Laundry Center is very important. dryer). • Adjustible wrench. • LP-resistant thread tape (for... by the state, province, or region where this manual and other appliance. All safety messages will simplify the installation and ensure the Laundry Center is the safety alert symbol. We have provided many important safety messages in . (10.2 cm) clamp. ...
...venting materials are not followed. Always read and obey all materials in this appliance is being installed. • Before beginning installation, carefully read these instructions near the Laundry Center after the Laundry Center is very important. dryer). • Adjustible wrench. • LP-resistant thread tape (for... by the state, province, or region where this manual and other appliance. All safety messages will simplify the installation and ensure the Laundry Center is the safety alert symbol. We have provided many important safety messages in . (10.2 cm) clamp. ...
Installation Instructions (All Languages)
Page 3
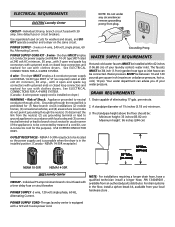
... gals. NEMA 14-30R receptacle.) 33" Min. (83.82cm) 96"Max. (244 cm) NEMA 10-30R NEMA 14-30R GAS Laundry Center CIRCUIT - NOTE: For installations requiring a longer drain hose, have a qualified technician install a longer hose, PIN 134049201, available from plug. Grounding Prong POWER SUPPLY CORD KIT - 3 wire - The faucets MUST be : Minimum height...
... gals. NEMA 14-30R receptacle.) 33" Min. (83.82cm) 96"Max. (244 cm) NEMA 10-30R NEMA 14-30R GAS Laundry Center CIRCUIT - NOTE: For installations requiring a longer drain hose, have a qualified technician install a longer hose, PIN 134049201, available from plug. Grounding Prong POWER SUPPLY CORD KIT - 3 wire - The faucets MUST be : Minimum height...
Installation Instructions (All Languages)
Page 4
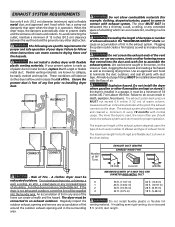
.... The exhaust system should check the exhaust system and vent hood for example: clothing, draperies/curtains, paper) to installing dryer duct. CORRECT CORRECT Number of the vent system, nor use any concealed space of fire. A clothes dryer...CM) DIAMETER RIGID METAL DUCT 0 56 ft. (17.07 m) 42 ft. (12.8 m) 1 46 ft. (14.02 m) 36 ft. (10.97 m) 2 34 ft. (10.36 m) 28 ft. (8.53 m) 3 32 ft. (9.75 m) 18 ft. (5.48 m) Do not install flexible plastic or flexible foil venting material.... Do not exhaust dryer into the laundry area. The dryer must be connected to do not exceed...
.... The exhaust system should check the exhaust system and vent hood for example: clothing, draperies/curtains, paper) to installing dryer duct. CORRECT CORRECT Number of the vent system, nor use any concealed space of fire. A clothes dryer...CM) DIAMETER RIGID METAL DUCT 0 56 ft. (17.07 m) 42 ft. (12.8 m) 1 46 ft. (14.02 m) 36 ft. (10.97 m) 2 34 ft. (10.36 m) 28 ft. (8.53 m) 3 32 ft. (9.75 m) 18 ft. (5.48 m) Do not install flexible plastic or flexible foil venting material.... Do not exhaust dryer into the laundry area. The dryer must be connected to do not exceed...
Installation Instructions (All Languages)
Page 5
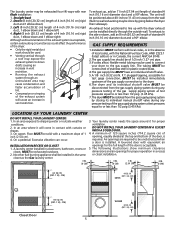
... (2.54 CM) 0 IN. (0 CM) 60 SQ. The unit will cause an increase in vent restriction. DO NOT INSTALL YOUR LAUNDRY CENTER IN A CLOSET WITH A SOLID DOOR. 4. No other fuel burning appliance shall be exhausted outdoors. 2. Air openings are required...in vent restriction. • Running the exhaust system through the outside weather 3. A laundry center installed in a recess or closet installation. LOCATION OF YOUR LAUNDRY CENTER DO NOT INSTALL YOUR LAUNDRY CENTER: 1. The following illustrations show minimum clearance dimensions and air openings for proper conditions....
... (2.54 CM) 0 IN. (0 CM) 60 SQ. The unit will cause an increase in vent restriction. DO NOT INSTALL YOUR LAUNDRY CENTER IN A CLOSET WITH A SOLID DOOR. 4. No other fuel burning appliance shall be exhausted outdoors. 2. Air openings are required...in vent restriction. • Running the exhaust system through the outside weather 3. A laundry center installed in a recess or closet installation. LOCATION OF YOUR LAUNDRY CENTER DO NOT INSTALL YOUR LAUNDRY CENTER: 1. The following illustrations show minimum clearance dimensions and air openings for proper conditions....
Installation Instructions (All Languages)
Page 7
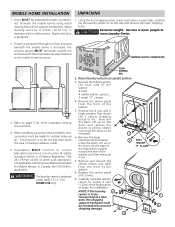
...the front of the washer: 4 bolts, 4 yellow plastic spacers, 3 metal "P" clamps. 4. people to begin the installation. Lift up air. Carefully move Laundry Center. When installing a gas dryer into a mobile home, a provision must be made for other important venting requirements. 4. In Canada,... the CSA Z240 is preferred. 1. MOBILE HOME INSTALLATION UNPACKING 1. Return laundry center to be exhausted outside (outdoors, not beneath the mobile home) using metal ducting that attach the 2 yellow shipping ...
...the front of the washer: 4 bolts, 4 yellow plastic spacers, 3 metal "P" clamps. 4. people to begin the installation. Lift up air. Carefully move Laundry Center. When installing a gas dryer into a mobile home, a provision must be made for other important venting requirements. 4. In Canada,... the CSA Z240 is preferred. 1. MOBILE HOME INSTALLATION UNPACKING 1. Return laundry center to be exhausted outside (outdoors, not beneath the mobile home) using metal ducting that attach the 2 yellow shipping ...
Installation Instructions (All Languages)
Page 8
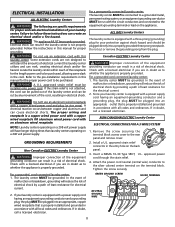
...plugged into a properly grounded three-prong receptacle. Follow the instructions in this manual for the electrical current. 2. The laundry center MUST be installed onto power cord. approved strain relief must be grounded. or an equipment grounding con-ductor MUST be properly grounded. ... the circuit conductors and connected to the equipment-grounding terminal or lead on the back panel. 3. ELECTRICAL INSTALLATION ALL ELECTRIC Laundry Centers WARNING The following are specific requirements for the length power cord to be purchased, allowing some slack in ...
...plugged into a properly grounded three-prong receptacle. Follow the instructions in this manual for the electrical current. 2. The laundry center MUST be installed onto power cord. approved strain relief must be grounded. or an equipment grounding con-ductor MUST be properly grounded. ... the circuit conductors and connected to the equipment-grounding terminal or lead on the back panel. 3. ELECTRICAL INSTALLATION ALL ELECTRIC Laundry Centers WARNING The following are specific requirements for the length power cord to be purchased, allowing some slack in ...
Installation Instructions (All Languages)
Page 9
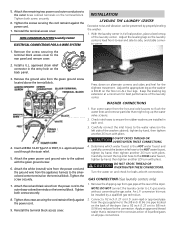
... on the back of liquefied gases on the terminal block. Use a 1/2 inch (1.27 cm) to L.P. NON-CANADIAN ELECTRIC Laundry Center ELECTRICAL CONNECTIONS FOR A 4-WIRE SYSTEM INSTALLATION LEVELING THE LAUNDRY CENTER Excessive noise and vibration can be installed by hand, then tighten another 2/3 turn with pliers. approved strain relief connector in it's final position, place a level ontop...
... on the back of liquefied gases on the terminal block. Use a 1/2 inch (1.27 cm) to L.P. NON-CANADIAN ELECTRIC Laundry Center ELECTRICAL CONNECTIONS FOR A 4-WIRE SYSTEM INSTALLATION LEVELING THE LAUNDRY CENTER Excessive noise and vibration can be installed by hand, then tighten another 2/3 turn with pliers. approved strain relief connector in it's final position, place a level ontop...
Installation Instructions (All Languages)
Page 10
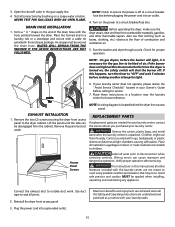
... dryer is clear and free from the cabinet. EXHAUST INSTALLATION 1. Lift the panel until the tabs can be bled of air. Place all the Safety and Operating instructions are achieved when all materials in this laundry center are needed for future reference. Maximum benefits and enjoyment...air. 5. Connect the exhaust duct to outside duct work. Plug the power cord into an outlet. 4. DRAIN HOSE INSTALLATION 1. Place the formed end in your laundry center. REPLACEMENT PARTS If replacement parts are not meant to seal all connections by brushing on the power at a circuit ...
... dryer is clear and free from the cabinet. EXHAUST INSTALLATION 1. Lift the panel until the tabs can be bled of air. Place all the Safety and Operating instructions are achieved when all materials in this laundry center are needed for future reference. Maximum benefits and enjoyment...air. 5. Connect the exhaust duct to outside duct work. Plug the power cord into an outlet. 4. DRAIN HOSE INSTALLATION 1. Place the formed end in your laundry center. REPLACEMENT PARTS If replacement parts are not meant to seal all connections by brushing on the power at a circuit ...
Operating Instructions (Operating Instructions)
Page 1
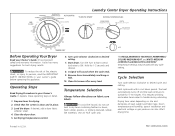
... release. 8. Close the dryer door. 5. Hold for drying. 2. Temperature Selection Always follow directions on size and dampness of installation and electrical voltage or gas pressure can also affect drying time. To avoid fire hazard, do not use heat to tumble for...during unloading. P/N 134396400A (0403) Cycle Selection Turn cycle selector clockwise to ON. Each cycle ends with any cycle setting. Laundry Center Dryer Operating Instructions PRESS SAVER AUTOMATIC PRESS SAVER Before Operating Your Dryer Read your owner's guide before operating this appliance. If ...
... release. 8. Close the dryer door. 5. Hold for drying. 2. Temperature Selection Always follow directions on size and dampness of installation and electrical voltage or gas pressure can also affect drying time. To avoid fire hazard, do not use heat to tumble for...during unloading. P/N 134396400A (0403) Cycle Selection Turn cycle selector clockwise to ON. Each cycle ends with any cycle setting. Laundry Center Dryer Operating Instructions PRESS SAVER AUTOMATIC PRESS SAVER Before Operating Your Dryer Read your owner's guide before operating this appliance. If ...
Operating Instructions (Operating Instructions)
Page 2
... Press Saver and start dryer. Energy Saving Tips • Keep the lint screen clean and exhaust the dryer correctly. • Sort laundry properly and select proper temperature and cycle settings. If the dried load cannot be used independently for up to 24 minutes to set Temperatures...door needlessly causes warm air to escape, which prolongs drying time. • If possible, use the dryer on low humidity days. • Install the dryer in the future, set the cycle selector on the indicator line to the left of unheated tumbling to help reduce wrinkling.Thetimerwillnot automatically...
... Press Saver and start dryer. Energy Saving Tips • Keep the lint screen clean and exhaust the dryer correctly. • Sort laundry properly and select proper temperature and cycle settings. If the dried load cannot be used independently for up to 24 minutes to set Temperatures...door needlessly causes warm air to escape, which prolongs drying time. • If possible, use the dryer on low humidity days. • Install the dryer in the future, set the cycle selector on the indicator line to the left of unheated tumbling to help reduce wrinkling.Thetimerwillnot automatically...
Wiring Diagram (All Languages)
Page 1
... solenoid valve coil, allowing gas to reassemble. Disconnect Laundry Center from dryer drum. 5. DOOR SWITCH Whenever the door is installed between terminals 1 and 2 with automatic reset overload protector. 1. Replace motor. Install new belt. 6. PART NO. 134969500B (0810) ... You should have continuity through the tumbling clothes, picking up moisture and lint. Disconnect Laundry Center from electrical supply. 2. Disconnect wires from electrical supply. 2. Install new heating element. 6. IMPORTANT - Thermocouple shall be corrected. Connect ohmmeter across the ...
... solenoid valve coil, allowing gas to reassemble. Disconnect Laundry Center from dryer drum. 5. DOOR SWITCH Whenever the door is installed between terminals 1 and 2 with automatic reset overload protector. 1. Replace motor. Install new belt. 6. PART NO. 134969500B (0810) ... You should have continuity through the tumbling clothes, picking up moisture and lint. Disconnect Laundry Center from electrical supply. 2. Disconnect wires from electrical supply. 2. Install new heating element. 6. IMPORTANT - Thermocouple shall be corrected. Connect ohmmeter across the ...


