Use and Care Guide
Page 2
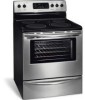
...location Open Bake-n-Warm™ Double Oven or Warmer Drawer. Your range may not look exactly like those shown. These instructions are representational. At Electrolux Home Products, we are very proud of a new range! Model Number: Serial Number: Purchase Date: This Use & Care Manual ...contains general operating instructions for your new range and Thank You for future purchases. Product Registration Register Your Product The self...
...location Open Bake-n-Warm™ Double Oven or Warmer Drawer. Your range may not look exactly like those shown. These instructions are representational. At Electrolux Home Products, we are very proud of a new range! Model Number: Serial Number: Purchase Date: This Use & Care Manual ...contains general operating instructions for your new range and Thank You for future purchases. Product Registration Register Your Product The self...
Use and Care Guide
Page 4
... and Not Extend Over Adjacent Surface Elements-To reduce the risk of burns, ignition of clothing. Check the manufacturer's recommendations for models equipped with coil elements. IMPORTANT INSTRUCTIONS FOR USING YOUR OVEN • Use Care When Opening Oven Door or Warmer Drawer/Baken-Warm...; Clean the range regularly to cause cancer, birth defects or other glazed utensils are suitable for a good seal. Contact a qualified technician immediately. • Clean Cook Top with the utensil, the handle of electric shock, or fire. Important Safety Notice The California Safe Drinking Water ...
... and Not Extend Over Adjacent Surface Elements-To reduce the risk of burns, ignition of clothing. Check the manufacturer's recommendations for models equipped with coil elements. IMPORTANT INSTRUCTIONS FOR USING YOUR OVEN • Use Care When Opening Oven Door or Warmer Drawer/Baken-Warm...; Clean the range regularly to cause cancer, birth defects or other glazed utensils are suitable for a good seal. Contact a qualified technician immediately. • Clean Cook Top with the utensil, the handle of electric shock, or fire. Important Safety Notice The California Safe Drinking Water ...
Use and Care Guide
Page 5
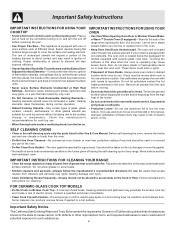
...10 7 7 78 9 1 2 3 6 Your Electric Range Features Include: 1. Warming Zone HOT SURFACE Indicator Light (some models). 23. Large 1 piece Oven Door Handle (styles & colors vary). 18. Left Front Single or Dual Element (some models). 9. Electronic Oven Control with Window (styles & colors ...(some models). 28. Broil Pan (some models). 25. Roasting Rack (some models). 20. Oven Interior Light with Handle (some models) or Warmer Drawer (some models). 30. Convection Fan & Cover. 16. Storage Drawer with removable Cover. 12. Warming Zone Element (some models). 13...
...10 7 7 78 9 1 2 3 6 Your Electric Range Features Include: 1. Warming Zone HOT SURFACE Indicator Light (some models). 23. Large 1 piece Oven Door Handle (styles & colors vary). 18. Left Front Single or Dual Element (some models). 9. Electronic Oven Control with Window (styles & colors ...(some models). 28. Broil Pan (some models). 25. Roasting Rack (some models). 20. Oven Interior Light with Handle (some models) or Warmer Drawer (some models). 30. Convection Fan & Cover. 16. Storage Drawer with removable Cover. 12. Warming Zone Element (some models). 13...
Use and Care Guide
Page 6
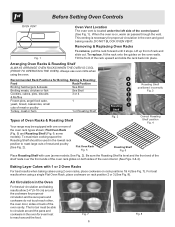
...6; See Fig. 2). The hot air must be used in the oven for even heat to roast large cuts of meat and poultry (See Fig. 2). some models; Baking Layer Cakes with 1 or 2 Oven Racks For best results when baking cakes using a single Flat Oven Rack, place cookware on rack position 2 or ...or poultry Turkey, roast or ham 1 or Roasting Shelf 6 5 4 3 2 Roasting 1 Shelf Roasting Shelf positioned incorrectly Fig. 3 Types of Oven Racks & Roasting Shelf Your range may be sure pans and cookware do not touch each other, the oven door, sides or back of the oven cavity. When the oven is...
...6; See Fig. 2). The hot air must be used in the oven for even heat to roast large cuts of meat and poultry (See Fig. 2). some models; Baking Layer Cakes with 1 or 2 Oven Racks For best results when baking cakes using a single Flat Oven Rack, place cookware on rack position 2 or ...or poultry Turkey, roast or ham 1 or Roasting Shelf 6 5 4 3 2 Roasting 1 Shelf Roasting Shelf positioned incorrectly Fig. 3 Types of Oven Racks & Roasting Shelf Your range may be sure pans and cookware do not touch each other, the oven door, sides or back of the oven cavity. When the oven is...
Use and Care Guide
Page 7
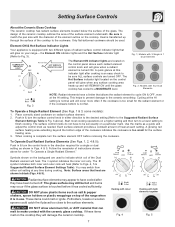
... from either direction to the desired setting (Refer to Figs. 4, 5 & Suggested Radiant Surface Element Settings Table). Models with two different types of the element outline on your range- The symbol indicates both elements together Fig. 5 7 DO NOT place plastic items such as needed. Follow the...salt & pepper shakers, spoon holders or plastic wrappings on a particular mark. When cooking is in either coil setting at the HI setting. Models with four Dual Elements Fig. 3 NOTE: Radiant elements have to the surface elements. Be sure to cycle ON & OFF, even at...
... from either direction to the desired setting (Refer to Figs. 4, 5 & Suggested Radiant Surface Element Settings Table). Models with two different types of the element outline on your range- The symbol indicates both elements together Fig. 5 7 DO NOT place plastic items such as needed. Follow the...salt & pepper shakers, spoon holders or plastic wrappings on a particular mark. When cooking is in either coil setting at the HI setting. Models with four Dual Elements Fig. 3 NOTE: Radiant elements have to the surface elements. Be sure to cycle ON & OFF, even at...

Use and Care Guide
Page 8
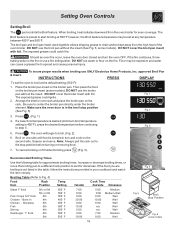
...a moderate level (See Figs. 1 & 2). The On indicator light will be hot. Temperature Selection Refer to escape. Setting Surface Controls Operating the Warming Zone (some models) The purpose of heating (Fig.1). 2. It is to keep cooked foods hot such as needed. To Set the Warming Zone Control (some...the knob. Most foods can be kept at any position between HI and LO for oven and cooktop use plastic wrap to OFF. Fig. 2 (some models): 1. To set at serving temperatures by HI, MED and LO. Fig. 1 The Warming Zone will remain on or near the Warming Zone until the...
...a moderate level (See Figs. 1 & 2). The On indicator light will be hot. Temperature Selection Refer to escape. Setting Surface Controls Operating the Warming Zone (some models) The purpose of heating (Fig.1). 2. It is to keep cooked foods hot such as needed. To Set the Warming Zone Control (some...the knob. Most foods can be kept at any position between HI and LO for oven and cooktop use plastic wrap to OFF. Fig. 2 (some models): 1. To set at serving temperatures by HI, MED and LO. Fig. 1 The Warming Zone will remain on or near the Warming Zone until the...

Use and Care Guide
Page 10
... Warming Drawer indicator light is desired, remove the lid or aluminum foil from the Warming Drawer as shown below (Fig. 1). Setting Warming Drawer Controls (some models) Arranging Warming Drawer Rack Positions The rack can be used to maintain quality. All food placed in Fig. 3. To Set the Warming Drawer Control The...
... Warming Drawer indicator light is desired, remove the lid or aluminum foil from the Warming Drawer as shown below (Fig. 1). Setting Warming Drawer Controls (some models) Arranging Warming Drawer Rack Positions The rack can be used to maintain quality. All food placed in Fig. 3. To Set the Warming Drawer Control The...
Use and Care Guide
Page 19
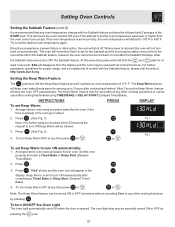
... 10:00 6:00 n/a n/a 7:00 8:00 Medium Medium-Well Well Well Well Well Well Medium Well 19 Fig. 4 Fig. 5 Broil Stop Position Fig. 6 some models). Setting Oven Controls Setting Broil The pad controls the Broil feature. Should an oven fire occur, leave the oven door closed and turn and cook... item closely. Then place the food on the rack. Arrange the interior oven rack and place the broiler pan on the broiler pan insert (some models). Increase or decrease broiling times, or move the broiling pan to a different rack position to broil. (Fig. 2). 6. Broiling Table (Refer to center...
... 10:00 6:00 n/a n/a 7:00 8:00 Medium Medium-Well Well Well Well Well Well Medium Well 19 Fig. 4 Fig. 5 Broil Stop Position Fig. 6 some models). Setting Oven Controls Setting Broil The pad controls the Broil feature. Should an oven fire occur, leave the oven door closed and turn and cook... item closely. Then place the food on the rack. Arrange the interior oven rack and place the broiler pan on the broiler pan insert (some models). Increase or decrease broiling times, or move the broiling pan to a different rack position to broil. (Fig. 2). 6. Broiling Table (Refer to center...

Use and Care Guide
Page 21
... splatters. Heated air circulates around the meat. Arrange interior oven racks and place food in the broiler pan. Press . (See Fig. 1) 3. Roasting Rack Instructions (some models) Fig. 2 When preparing meats for convection roasting, use the broiler pan without the insert. The roasting rack will allow the heat to roast meats and...
... splatters. Heated air circulates around the meat. Arrange interior oven racks and place food in the broiler pan. Press . (See Fig. 1) 3. Roasting Rack Instructions (some models) Fig. 2 When preparing meats for convection roasting, use the broiler pan without the insert. The roasting rack will allow the heat to roast meats and...
Use and Care Guide
Page 25
... again. Arrange interior oven racks and place food in oven. Should you experience a power failure or interruption, the oven will maintain an oven temperature of models with all normal functions. If the food is already in the Sabbath feature, however the oven cannot be used without canceling Bake or any other...
... again. Arrange interior oven racks and place food in oven. Should you experience a power failure or interruption, the oven will maintain an oven temperature of models with all normal functions. If the food is already in the Sabbath feature, however the oven cannot be used without canceling Bake or any other...
Use and Care Guide
Page 30
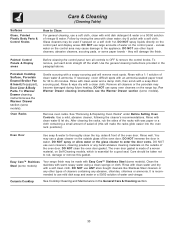
... for 30 to 40 minutes. For Warmer Drawer cleaning instructions see the Warmer Drawer section (some models). You may be used if sprayed on the control pad and display areas. Oven Racks Gentle scouring with Easy Care™ Stainless Steel (some models) Your range finish may... use a soft cloth, clean with a 1:1 solution of a woven material, on Self-Cleaning models, which is recommended to use ANY store bought cleaners like Stainless Steel cleaners ...
... for 30 to 40 minutes. For Warmer Drawer cleaning instructions see the Warmer Drawer section (some models). You may be used if sprayed on the control pad and display areas. Oven Racks Gentle scouring with Easy Care™ Stainless Steel (some models) Your range finish may... use a soft cloth, clean with a 1:1 solution of a woven material, on Self-Cleaning models, which is recommended to use ANY store bought cleaners like Stainless Steel cleaners ...
Use and Care Guide
Page 33
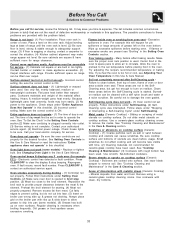
... defective workmanship or materials in the Setting Oven Controls section.(2) Make sure cord/plug is plugged correctly into pan (some models) - Call your authorized service agent. (4) Electrical power outage. Be sure the oven controls are square & have been used . Replace or tighten bulb. Oven control...oven or smoking from oven vent - Reprogram oven. Preheat the broil element for example F11) - Contact builder or installer to make range appear not level. Clean these problems are built in this checklist. Poor baking results - Flat pans heat better than warped pans....
... defective workmanship or materials in the Setting Oven Controls section.(2) Make sure cord/plug is plugged correctly into pan (some models) - Call your authorized service agent. (4) Electrical power outage. Be sure the oven controls are square & have been used . Replace or tighten bulb. Oven control...oven or smoking from oven vent - Reprogram oven. Preheat the broil element for example F11) - Contact builder or installer to make range appear not level. Clean these problems are built in this checklist. Poor baking results - Flat pans heat better than warped pans....


