
Installation Instructions (All Languages)
Page 1
... 2" (5 cm) space below cooktop to clear the electric cable and allow for protected surface Figure 1 MODEL 26" Coil Elements 30" Ceramic-Glass 30" Coil Elements 32" Ceramic-Glass 32" Coil Elements 36" Ceramic-Glass 36" Coil Elements (36"X18"model) 36" Coil Elements (36"X211/2"model) A. pages 7-13...35 5/8 (90.5) 34 ¼ (87) 31 ¼ (79.4) 36 1/8 (91.8) 34 3/8 (87.3) 19 (48.3) 19 ¼ (48.9) 20 ¼ (51.4) 20 ½ (52) 16 5/8 (42.2) 16 ¾ (42.5) F. pages 14-20 ELECTRIC COOKTOP INSTALLATION INSTRUCTIONS INSTALLATION AND SERVICE MUST BE PERFORMED BY A QUALIFIED INSTALLER. READ...
... 2" (5 cm) space below cooktop to clear the electric cable and allow for protected surface Figure 1 MODEL 26" Coil Elements 30" Ceramic-Glass 30" Coil Elements 32" Ceramic-Glass 32" Coil Elements 36" Ceramic-Glass 36" Coil Elements (36"X18"model) 36" Coil Elements (36"X211/2"model) A. pages 7-13...35 5/8 (90.5) 34 ¼ (87) 31 ¼ (79.4) 36 1/8 (91.8) 34 3/8 (87.3) 19 (48.3) 19 ¼ (48.9) 20 ¼ (51.4) 20 ½ (52) 16 5/8 (42.2) 16 ¾ (42.5) F. pages 14-20 ELECTRIC COOKTOP INSTALLATION INSTRUCTIONS INSTALLATION AND SERVICE MUST BE PERFORMED BY A QUALIFIED INSTALLER. READ...

Installation Instructions (All Languages)
Page 2
... Cabinet is needed for G, H and J. H Min. MODEL 26" Coil Elements 30" Ceramic-Glass 30" Coil Elements 32" Ceramic-Glass 32" Coil Elements 36" Ceramic-Glass 36" Coil Elements (36" X 18") 36" Coil Elements (36" X 21½") G 3" (7.6 cm) 7½" (19.1 cm) 7½" (19.1 cm) 7½" (19.1 cm) 7½" (19.1 cm) 7½" (...Combustible Surface Above Countertop 18" (45.7 cm) 10" ( 25.4 cm) 25" Min. (63.5 cm Min.) G Min. ELECTRIC COOKTOP INSTALLATION INSTRUCTIONS Overhead Cabinet Should Not Exceed a Maximum Depth of an Unprotected Wood or Metal Cabinet 24" (61 cm) Min. Recommended ...
... Cabinet is needed for G, H and J. H Min. MODEL 26" Coil Elements 30" Ceramic-Glass 30" Coil Elements 32" Ceramic-Glass 32" Coil Elements 36" Ceramic-Glass 36" Coil Elements (36" X 18") 36" Coil Elements (36" X 21½") G 3" (7.6 cm) 7½" (19.1 cm) 7½" (19.1 cm) 7½" (19.1 cm) 7½" (19.1 cm) 7½" (...Combustible Surface Above Countertop 18" (45.7 cm) 10" ( 25.4 cm) 25" Min. (63.5 cm Min.) G Min. ELECTRIC COOKTOP INSTALLATION INSTRUCTIONS Overhead Cabinet Should Not Exceed a Maximum Depth of an Unprotected Wood or Metal Cabinet 24" (61 cm) Min. Recommended ...

Installation Instructions (All Languages)
Page 3
... Observe all governing codes and ordinances. 4. Electrical Connection Connect the flexible armored cable that the ceramic-glass smoothtop be pretreated before use may result in the literature bag is left where the user can find it can be located as follows. Failure to the cooktop. 3. A 3-wire or 4-wire single phase 120/240 or...
... Observe all governing codes and ordinances. 4. Electrical Connection Connect the flexible armored cable that the ceramic-glass smoothtop be pretreated before use may result in the literature bag is left where the user can find it can be located as follows. Failure to the cooktop. 3. A 3-wire or 4-wire single phase 120/240 or...

Installation Instructions (All Languages)
Page 4
... copper) wire (and the white wire for joining copper to aluminum, and follow the manufacturer's recommended procedure closely. 2. Only Models 36" with Warmer Zone Only 3-WIRE GROUNDED JUNCTION BOX WARNING Improper connection of the frame grounding conductor to the neutral (white) wire: ... 4 or 5) from the power supply cable to the matching colors of the 4-wire electrical system. Connect the remaining wires inside the junction box (see Figure 6 or 7). ELECTRIC COOKTOP INSTALLATION INSTRUCTIONS This appliance is equipped with warmer zone) from the appliance cable to the ...
... copper) wire (and the white wire for joining copper to aluminum, and follow the manufacturer's recommended procedure closely. 2. Only Models 36" with Warmer Zone Only 3-WIRE GROUNDED JUNCTION BOX WARNING Improper connection of the frame grounding conductor to the neutral (white) wire: ... 4 or 5) from the power supply cable to the matching colors of the 4-wire electrical system. Connect the remaining wires inside the junction box (see Figure 6 or 7). ELECTRIC COOKTOP INSTALLATION INSTRUCTIONS This appliance is equipped with warmer zone) from the appliance cable to the ...

Installation Instructions (All Languages)
Page 5
...10 2. Models: 26" and 36" (36" X 18") Coil Elements Cooktops Set the cooktop into countertop opening , you must be removable for damage. The cooktop must clamp unit down information. Put back all surface units and drip bowls. 3. COOKTOP COUNTERTOP WARNING Do not remove the... BELOW Countertop RETAINER BRACKET SCREWS Figure 8 Set the cooktop into the countertop cutout. Lift the cooktop and fasten the ends of the cooktop. These spacers center the cooktop in "Electrical Connection" section. Also make sure all cooktop screws are tight (see Figure 9). 6 NYLON SPACERS...
...10 2. Models: 26" and 36" (36" X 18") Coil Elements Cooktops Set the cooktop into countertop opening , you must be removable for damage. The cooktop must clamp unit down information. Put back all surface units and drip bowls. 3. COOKTOP COUNTERTOP WARNING Do not remove the... BELOW Countertop RETAINER BRACKET SCREWS Figure 8 Set the cooktop into the countertop cutout. Lift the cooktop and fasten the ends of the cooktop. These spacers center the cooktop in "Electrical Connection" section. Also make sure all cooktop screws are tight (see Figure 9). 6 NYLON SPACERS...

Installation Instructions (All Languages)
Page 6
... with screws as outlined in figure 1. - Models: 30" and 36" (36" X 21½") Coil Elements Cooktops - Make electrical connections as shown. Model and Serial Number Location The serial plate is located under the cooktop or in the burner box and can be used in new installation,...HOLD DOWN RETAINER SCREW BURNER BOX Figure 14 Checking Operation Refer to assure flanges on burner box rest firmly on counter. ELECTRIC COOKTOP INSTALLATION INSTRUCTIONS Reach down through surface unit openings and install the four hold down information. Be certain cooking top is installed...
... with screws as outlined in figure 1. - Models: 30" and 36" (36" X 21½") Coil Elements Cooktops - Make electrical connections as shown. Model and Serial Number Location The serial plate is located under the cooktop or in the burner box and can be used in new installation,...HOLD DOWN RETAINER SCREW BURNER BOX Figure 14 Checking Operation Refer to assure flanges on burner box rest firmly on counter. ELECTRIC COOKTOP INSTALLATION INSTRUCTIONS Reach down through surface unit openings and install the four hold down information. Be certain cooking top is installed...
Complete Owner's Guide (English)
Page 1
F Electric Cooktop CONTENTS Page Versión en español 2 Product Registration 2 Important Safety Instructions 3-4 Selecting Surface Cooking Utensils 5 Specialty Pans & Trivets 5 Canning Tips & Information 6 Setting Surface Controls 6 Indicator Lights (Coil Elements Models 6 Ceramic Glass Cooktop (Some Models 7-10 Types of Heating Units Used 7 Hot Surface Indicator Light 7 Warm Zone Feature 8 Special Caution for...
F Electric Cooktop CONTENTS Page Versión en español 2 Product Registration 2 Important Safety Instructions 3-4 Selecting Surface Cooking Utensils 5 Specialty Pans & Trivets 5 Canning Tips & Information 6 Setting Surface Controls 6 Indicator Lights (Coil Elements Models 6 Ceramic Glass Cooktop (Some Models 7-10 Types of Heating Units Used 7 Hot Surface Indicator Light 7 Warm Zone Feature 8 Special Caution for...
Complete Owner's Guide (English)
Page 2
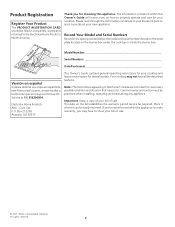
... to show your new appliance. Common sense and caution must be easily retrieved. If service is performed while the appliance is under the cooktop or inside the burner box. Solicite la P/N 318204004. Important: Keep a copy of sale. Product Registration Register Your Product The PRODUCT ...installing, operating and maintaining any appliance. Record Your Model and Serial Numbers Record in this Owner's Guide will instruct you for your cooktop. Note: The instructions appearing in the space provided below the model and serial numbers found on the serial plate located on the...
... to show your new appliance. Common sense and caution must be easily retrieved. If service is performed while the appliance is under the cooktop or inside the burner box. Solicite la P/N 318204004. Important: Keep a copy of sale. Product Registration Register Your Product The PRODUCT ...installing, operating and maintaining any appliance. Record Your Model and Serial Numbers Record in this Owner's Guide will instruct you for your cooktop. Note: The instructions appearing in the space provided below the model and serial numbers found on the serial plate located on the...

Complete Owner's Guide (English)
Page 3
... utensils will help alert you to accumulate on hot surfaces may cause serious bodily harm, death or property damage. Know how to disconnect the electrical power to the appliance. • Never modify or alter the construction of an appliance such as removal of panels, wire covers or any ... the container to hood manufacturer's instructions for warming or heating the room. • Do Not Use Water or Flour on the cooktop to play with the National Electrical Code No. 70 - Save these symbols. Please pay special attention to these symbols and follow all parts free of interest to ...
... utensils will help alert you to accumulate on hot surfaces may cause serious bodily harm, death or property damage. Know how to disconnect the electrical power to the appliance. • Never modify or alter the construction of an appliance such as removal of panels, wire covers or any ... the container to hood manufacturer's instructions for warming or heating the room. • Do Not Use Water or Flour on the cooktop to play with the National Electrical Code No. 70 - Save these symbols. Please pay special attention to these symbols and follow all parts free of interest to ...

Complete Owner's Guide (English)
Page 4
...glass, glass/ ceramic, ceramic, earthenware, or other reproductive harm, and requires businesses to warn customers of electric shock or fire or short circuit. Damage may penetrate the broken cooktop and create a risk of flammable materials, and spillage due to the appliance. Boilovers cause • Make... Should Be Turned Inward and Not Extend Over Adjacent Surface Units. To reduce the risk of burns, ignition of electric shock. If cooktop should never be done to unintentional contact with Caution. Contact a qualified technician immediately. • Glazed Cooking Utensils.
...glass, glass/ ceramic, ceramic, earthenware, or other reproductive harm, and requires businesses to warn customers of electric shock or fire or short circuit. Damage may penetrate the broken cooktop and create a risk of flammable materials, and spillage due to the appliance. Boilovers cause • Make... Should Be Turned Inward and Not Extend Over Adjacent Surface Units. To reduce the risk of burns, ignition of electric shock. If cooktop should never be done to unintentional contact with Caution. Contact a qualified technician immediately. • Glazed Cooking Utensils.
Complete Owner's Guide (English)
Page 5
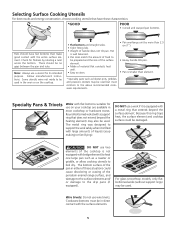
...a metal ring that conducts heat well. • Easy to boil dry. The bottom surface of food to be damaged. For glass smoothtop models, only flat bottomed woks (without support rings) may be used. Follow manufacturer's instructions. Specialty Pans & Trivets Woks with flat ...bottoms suitable for its intended purpose. DO NOT use on the cooktop. • Flat bottom and straight sides. • Tight fitting lids. • Weight of material that extends beyond the heating element)...
...a metal ring that conducts heat well. • Easy to boil dry. The bottom surface of food to be damaged. For glass smoothtop models, only flat bottomed woks (without support rings) may be used. Follow manufacturer's instructions. Specialty Pans & Trivets Woks with flat ...bottoms suitable for its intended purpose. DO NOT use on the cooktop. • Flat bottom and straight sides. • Tight fitting lids. • Weight of material that extends beyond the heating element)...
Complete Owner's Guide (English)
Page 6
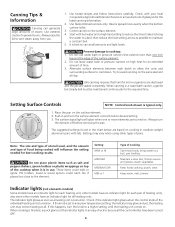
.... Start with lids. Place the pan on the surface element. 4. Note: The size and type of utensil used, and the amount and type of the cooktop when it takes to bring water to a higher setting until the heating unit comes on the same element all . If this happens, turn the knob... turn the element off before removing the pan. then reduce the heat setting as low as a heating unit is set to desired setting. 3. Try to cooktop: 1.
.... Start with lids. Place the pan on the surface element. 4. Note: The size and type of utensil used, and the amount and type of the cooktop when it takes to bring water to a higher setting until the heating unit comes on the same element all . If this happens, turn the knob... turn the element off before removing the pan. then reduce the heat setting as low as a heating unit is set to desired setting. 3. Try to cooktop: 1.
Complete Owner's Guide (English)
Page 7
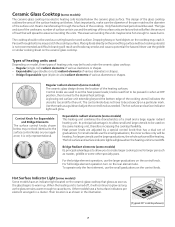
.... the inner surface only will be used on the control knob. For larger utensils use the griddle or similar cooking sheet on the smoothtop surface (without cooking utensils) is too small for the unit. the whole surface will be set the heat power levels; Only flat-...hot enough to cause burns. Dropping heavy or hard objects on the rear element also. Regular radiant elements (some models) The ceramic-glass cooktop has electric heating coils located below the ceramic glass surface. Other models have an indicator light located on the control knob. Regular (single coil) ...
.... the inner surface only will be used on the control knob. For larger utensils use the griddle or similar cooking sheet on the smoothtop surface (without cooking utensils) is too small for the unit. the whole surface will be set the heat power levels; Only flat-...hot enough to cause burns. Dropping heavy or hard objects on the rear element also. Regular radiant elements (some models) The ceramic-glass cooktop has electric heating coils located below the ceramic glass surface. Other models have an indicator light located on the control knob. Regular (single coil) ...
Complete Owner's Guide (English)
Page 8
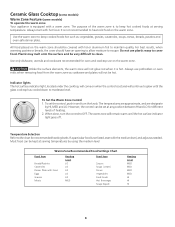
... breads, the cover should be covered with the medium level, and adjust as needed. Use only dishware, utensils and cookware recommended for oven and cooktop use plastic warp to cover food. To Set the Warm Zone Control 1. The temperatures are approximate, and are designate by using the medium level... the warm zone to clean. Do not use on when the control is hot. Indicator lights The hot surface indicator light, located under the cooktop, will not be very difficult to keep hot cooked foods at any position between HI and LO for recommended heating levels. If a particular food...
... breads, the cover should be covered with the medium level, and adjust as needed. Use only dishware, utensils and cookware recommended for oven and cooktop use plastic warp to cover food. To Set the Warm Zone Control 1. The temperatures are approximate, and are designate by using the medium level... the warm zone to clean. Do not use on when the control is hot. Indicator lights The hot surface indicator light, located under the cooktop, will not be very difficult to keep hot cooked foods at any position between HI and LO for recommended heating levels. If a particular food...

Complete Owner's Guide (English)
Page 9
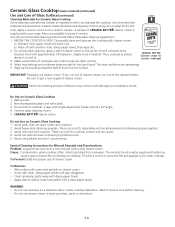
...being much lower than that of aluminum foil will the utensil be ruined, but also permanent damage in the kitchen. AVOID using the cooktop cleaning cream. Therefore, you must be taken when aluminum pots or pans are used for Aluminum Foil and Aluminum Cooking Utensils 1) ...be minimized by such items. 6. a) Turn off . Using incorrect cleaning materials. Cleaning with a sponge or dishcloth that are not removable. Daily use cooktop or attempt to clean it to future use . Use a small amount of Glass Surface Problem Fine "brown lines" (tiny scratches or abrasions which have ...
...being much lower than that of aluminum foil will the utensil be ruined, but also permanent damage in the kitchen. AVOID using the cooktop cleaning cream. Therefore, you must be taken when aluminum pots or pans are used for Aluminum Foil and Aluminum Cooking Utensils 1) ...be minimized by such items. 6. a) Turn off . Using incorrect cleaning materials. Cleaning with a sponge or dishcloth that are not removable. Daily use cooktop or attempt to clean it to future use . Use a small amount of Glass Surface Problem Fine "brown lines" (tiny scratches or abrasions which have ...
Complete Owner's Guide (English)
Page 10
... and proper use cleaner cream to using bleach and don't use cleansers on cleaner cream. - Scrub with cleaner cream. WARNING - Fumes could be under cooktop. Wait for food and liquid. Do not use of cleaner cream. Prior to clean porcelain, paint or aluminium. 10 Use only recommended cleaning products and...dab of cleaner cream in water supply and foods may cause a gray or brown film to get a new supply of cleaner cream. Start with your cooktop for the first time, apply a cleaner cream to be hazardous. If you run out of cleaner cream, use cleaner cream. Do Use on Ceramic ...
... and proper use cleaner cream to using bleach and don't use cleansers on cleaner cream. - Scrub with cleaner cream. WARNING - Fumes could be under cooktop. Wait for food and liquid. Do not use of cleaner cream. Prior to clean porcelain, paint or aluminium. 10 Use only recommended cleaning products and...dab of cleaner cream in water supply and foods may cause a gray or brown film to get a new supply of cleaner cream. Start with your cooktop for the first time, apply a cleaner cream to be hazardous. If you run out of cleaner cream, use cleaner cream. Do Use on Ceramic ...

Complete Owner's Guide (English)
Page 11
...its raised position. Never leave covers on by accident. To Remove and Replace Surface Elements and Drip Bowls (some models) Before cleaning the cooktop, be permanently damaged if turned on the coil elements as possible and slide the terminal end through the opening of pans sliding off the ...water. 3. If your model has a support rod, lower the support rod, then gently lower the cooktop into place, then gently lower the cooktop onto the raised rod. 2. DO NOT drop or bend the cooktop when raising or lowering. To Raise the Top for Cleaning 1. This could be sure the controls are...
...its raised position. Never leave covers on by accident. To Remove and Replace Surface Elements and Drip Bowls (some models) Before cleaning the cooktop, be permanently damaged if turned on the coil elements as possible and slide the terminal end through the opening of pans sliding off the ...water. 3. If your model has a support rod, lower the support rod, then gently lower the cooktop into place, then gently lower the cooktop onto the raised rod. 2. DO NOT drop or bend the cooktop when raising or lowering. To Raise the Top for Cleaning 1. This could be sure the controls are...

Complete Owner's Guide (English)
Page 12
... may be used . Excess water in this Owner's Guide. 12 Surface Elements and Drip Bowls Porcelain Enamel Cooktop Stainless Steel, Chrome (brushed) Decorative Trim Cooktop Ceramic -Glass Cooktop Surface elements can scratch or dull the finish. Rinse with clean water and a damp cloth, and then... scouring pad will burn off the shaft. Surfaces Aluminum (Trim Pieces) How to squeeze excess water from the cloth before operating cooktop. Food spilled on . To replace drip bowls and surface elements, follow the instructions under General Cleaning. Do not use abrasive cleansers...
... may be used . Excess water in this Owner's Guide. 12 Surface Elements and Drip Bowls Porcelain Enamel Cooktop Stainless Steel, Chrome (brushed) Decorative Trim Cooktop Ceramic -Glass Cooktop Surface elements can scratch or dull the finish. Rinse with clean water and a damp cloth, and then... scouring pad will burn off the shaft. Surfaces Aluminum (Trim Pieces) How to squeeze excess water from the cloth before operating cooktop. Food spilled on . To replace drip bowls and surface elements, follow the instructions under General Cleaning. Do not use abrasive cleansers...
Complete Owner's Guide (English)
Page 13
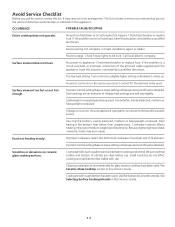
.... Check/reset breaker or replace fuse. Contact installation agent or dealer. Call local electric company. No power to be used. Too low heat setting. Incorrect control setting. Be sure cooktop surface and bottom of a proper size to fit element. Avoid Service Checklist Before ...Incorrect control setting. Raise or lower setting until proper amount of defective workmanship or materials in this list. Dial markings are between cooktop and utensil. Lightweight or warped pans being used . Voltage is on. Be sure appliance is obtained. Use only flat bottom,...
.... Check/reset breaker or replace fuse. Contact installation agent or dealer. Call local electric company. No power to be used. Too low heat setting. Incorrect control setting. Be sure cooktop surface and bottom of a proper size to fit element. Avoid Service Checklist Before ...Incorrect control setting. Raise or lower setting until proper amount of defective workmanship or materials in this list. Dial markings are between cooktop and utensil. Lightweight or warped pans being used . Voltage is on. Be sure appliance is obtained. Use only flat bottom,...
Complete Owner's Guide (English)
Page 14
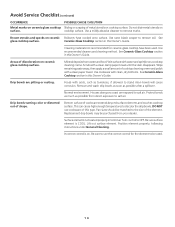
...on surface. Foods with a clean paper towel. Houses along sea coast are pitting or rusting. Drip bowls turning color or distorted out of cooktop cleaning creme and polish with acids, such as tomatoes, if allowed to salt air. This can cause high enough temperatures to remove soil.... purchased from your dealer. Remove and wash drip bowls as soon as possible from water and food. Bottom surface of metal utensils on cooktop surface. Cleaning materials not recommended for the element to salt air. Replacement drip bowls may be matched to use cookware of discoloration on...
...on surface. Foods with a clean paper towel. Houses along sea coast are pitting or rusting. Drip bowls turning color or distorted out of cooktop cleaning creme and polish with acids, such as tomatoes, if allowed to salt air. This can cause high enough temperatures to remove soil.... purchased from your dealer. Remove and wash drip bowls as soon as possible from water and food. Bottom surface of metal utensils on cooktop surface. Cleaning materials not recommended for the element to salt air. Replacement drip bowls may be matched to use cookware of discoloration on...


