
Installation Instructions (All Languages)
Page 1
for protected surface Figure 1 MODEL 26" Coil Elements 30" Ceramic-Glass 30" Coil Elements 32" Ceramic-Glass 32" Coil Elements 36" Ceramic-Glass 36" Coil Elements (36"X18"model) 36" Coil Elements (36"X211/2"model) A. for unprotected cabinet 24" (61 cm) min. WIDTH MIN. MAX. Only some models are in Canada. * Allow 2" (5 cm) space below cooktop to clear the electric cable and allow for installation of the junction box on the wall at the back of this or any...
for protected surface Figure 1 MODEL 26" Coil Elements 30" Ceramic-Glass 30" Coil Elements 32" Ceramic-Glass 32" Coil Elements 36" Ceramic-Glass 36" Coil Elements (36"X18"model) 36" Coil Elements (36"X211/2"model) A. for unprotected cabinet 24" (61 cm) min. WIDTH MIN. MAX. Only some models are in Canada. * Allow 2" (5 cm) space below cooktop to clear the electric cable and allow for installation of the junction box on the wall at the back of this or any...

Installation Instructions (All Languages)
Page 2
ELECTRIC COOKTOP INSTALLATION INSTRUCTIONS Overhead Cabinet Should Not Exceed a Maximum Depth of Countertop J Min. From Edge of Cutout to use drawer underneath cooktop. Approximate Location of Cutout and Nearest Combustible Surface Above Countertop 18" (45.7 cm) 10" ( 25.4 cm) 25" Min. (63.5 cm Min.) G Min. COUNTERTOP CUTOUT OPENING 2 Recommended Distance Between Rear Edge of Junction Box 12" (30.5 cm) It is provided, risk can be avoided. If...
ELECTRIC COOKTOP INSTALLATION INSTRUCTIONS Overhead Cabinet Should Not Exceed a Maximum Depth of Countertop J Min. From Edge of Cutout to use drawer underneath cooktop. Approximate Location of Cutout and Nearest Combustible Surface Above Countertop 18" (45.7 cm) 10" ( 25.4 cm) 25" Min. (63.5 cm Min.) G Min. COUNTERTOP CUTOUT OPENING 2 Recommended Distance Between Rear Edge of Junction Box 12" (30.5 cm) It is provided, risk can be avoided. If...

Installation Instructions (All Languages)
Page 3
....1, Canadian Electrical Code, Part 1, in Canada. DO NOT connect the wire to the Consumer Keep these instructions with the National Electrical Code ANSI/NFPA No. 70- Electrical Connection Connect the flexible armored cable that the ceramic-glass smoothtop be connected to the cooktop. 3. Electrical ground is installed and grounded properly by a qualified installer or service technician. • These cooktops must not exceed the circuit rating of the appliance in accordance with your cooktop is required on...
....1, Canadian Electrical Code, Part 1, in Canada. DO NOT connect the wire to the Consumer Keep these instructions with the National Electrical Code ANSI/NFPA No. 70- Electrical Connection Connect the flexible armored cable that the ceramic-glass smoothtop be connected to the cooktop. 3. Electrical ground is installed and grounded properly by a qualified installer or service technician. • These cooktops must not exceed the circuit rating of the appliance in accordance with your cooktop is required on...

Installation Instructions (All Languages)
Page 4
... white wire for joining copper to aluminum house wiring, use only special connectors which are approved for joining copper and aluminum wires in a short circuit or fire. U.S.A. ELECTRIC COOKTOP INSTALLATION INSTRUCTIONS This appliance is equipped with a frame connected green (or bare copper) ground wire. 1. If connection is made to aluminum, and follow the manufacturer's recommended procedure closely. 2. Only Models 36" with Warmer Zone Only 3-WIRE GROUNDED JUNCTION BOX WARNING Improper connection...
... white wire for joining copper to aluminum house wiring, use only special connectors which are approved for joining copper and aluminum wires in a short circuit or fire. U.S.A. ELECTRIC COOKTOP INSTALLATION INSTRUCTIONS This appliance is equipped with a frame connected green (or bare copper) ground wire. 1. If connection is made to aluminum, and follow the manufacturer's recommended procedure closely. 2. Only Models 36" with Warmer Zone Only 3-WIRE GROUNDED JUNCTION BOX WARNING Improper connection...

Installation Instructions (All Languages)
Page 5
... all surface units and drip bowls. 3. The retainer brackets MUST be removable for damage. ELECTRIC COOKTOP INSTALLATION INSTRUCTIONS Cooktop Installation 1. Models: 26" and 36" (36" X 18") Coil Elements Cooktops Set the cooktop into the countertop cutout. Models: 32" Coil Elements Cooktops 1. Once unit is installed in counter opening and center unit in the space provided. Also make sure all cooktop screws are tight (see Figure 9). 6 NYLON SPACERS POSITION BRACKETS ON UNIT CUTOUT CENTER LINE 2 RETAINER BRACKETS Figure 9 SCREW BURNER BOX...
... all surface units and drip bowls. 3. The retainer brackets MUST be removable for damage. ELECTRIC COOKTOP INSTALLATION INSTRUCTIONS Cooktop Installation 1. Models: 26" and 36" (36" X 18") Coil Elements Cooktops Set the cooktop into the countertop cutout. Models: 32" Coil Elements Cooktops 1. Once unit is installed in counter opening and center unit in the space provided. Also make sure all cooktop screws are tight (see Figure 9). 6 NYLON SPACERS POSITION BRACKETS ON UNIT CUTOUT CENTER LINE 2 RETAINER BRACKETS Figure 9 SCREW BURNER BOX...

Installation Instructions (All Languages)
Page 6
... to the warranty in your Owner's Guide. Models: 30" and 36" (36" X 21½") Coil Elements Cooktops - Prior to tightening installation screws, exert downward pressure on burner box to include the model and serial numbers and a lot number or letter from the serial plate on your cooktop. Unit clamp down retainers with offset side of angle into countertop opening and center unit in vertical walls of unit. Make electrical connections as a replacement in...
... to the warranty in your Owner's Guide. Models: 30" and 36" (36" X 21½") Coil Elements Cooktops - Prior to tightening installation screws, exert downward pressure on burner box to include the model and serial numbers and a lot number or letter from the serial plate on your cooktop. Unit clamp down retainers with offset side of angle into countertop opening and center unit in vertical walls of unit. Make electrical connections as a replacement in...
Complete Owner's Guide (English)
Page 1
...2 Product Registration 2 Important Safety Instructions 3-4 Selecting Surface Cooking Utensils 5 Specialty Pans & Trivets 5 Canning Tips & Information 6 Setting Surface Controls 6 Indicator Lights (Coil Elements Models 6 Ceramic Glass Cooktop (Some Models 7-10 Types of Heating Units Used 7 Hot Surface Indicator Light 7 Warm Zone Feature 8 Special Caution for Aluminum Foil and Aluminum Cooking Utensils 9 Things to Remember 9 Use and Care of Glass Surface 9-10 General Cleaning 11-12 Avoid Service Checklist 13-14 Notes 15 Warranty 16 318200612 (0511) Rev. F
...2 Product Registration 2 Important Safety Instructions 3-4 Selecting Surface Cooking Utensils 5 Specialty Pans & Trivets 5 Canning Tips & Information 6 Setting Surface Controls 6 Indicator Lights (Coil Elements Models 6 Ceramic Glass Cooktop (Some Models 7-10 Types of Heating Units Used 7 Hot Surface Indicator Light 7 Warm Zone Feature 8 Special Caution for Aluminum Foil and Aluminum Cooking Utensils 9 Things to Remember 9 Use and Care of Glass Surface 9-10 General Cleaning 11-12 Avoid Service Checklist 13-14 Notes 15 Warranty 16 318200612 (0511) Rev. F
Complete Owner's Guide (English)
Page 2
... care for your cooktop and feature information for your cooktop. Solicite la P/N 318204004. The date on how to learn more about your bill of sale. Record Your Model and Serial Numbers Record in the space provided below the model and serial numbers found on the serial plate located on the burner box under warranty, you on the bill establishes the warranty period service be required. Note: The instructions...
... care for your cooktop and feature information for your cooktop. Solicite la P/N 318204004. The date on how to learn more about your bill of sale. Record Your Model and Serial Numbers Record in the space provided below the model and serial numbers found on the serial plate located on the burner box under warranty, you on the bill establishes the warranty period service be required. Note: The instructions...

Complete Owner's Guide (English)
Page 3
... the literature package for warming or heating the room. • Do Not Use Water or Flour on any other servicing should be stored near the appliance. Install only per installation instructions provided in Canada, and local code requirements. Know how to disconnect the electrical power to the appliance at the circuit breaker or fuse box in injury. All other permanent part of undersized utensils will also...
... the literature package for warming or heating the room. • Do Not Use Water or Flour on any other servicing should be stored near the appliance. Install only per installation instructions provided in Canada, and local code requirements. Know how to disconnect the electrical power to the appliance at the circuit breaker or fuse box in injury. All other permanent part of undersized utensils will also...

Complete Owner's Guide (English)
Page 4
... not use . • Clean Cooktop with the utensil. Only certain types of the appliance. IMPORTANT SAFETY INSTRUCTIONS (continued) • Utensil Handles Should Be Turned Inward and Not Extend Over Adjacent Surface Units. FOR COOKTOPS WITH COIL ELEMENTS ONLY • Do Not Immerse or Soak Removable Surface Heating Elements. Absence of these smoking and greasy spillovers that may also be done to line any part of glass, glass/ ceramic, ceramic...
... not use . • Clean Cooktop with the utensil. Only certain types of the appliance. IMPORTANT SAFETY INSTRUCTIONS (continued) • Utensil Handles Should Be Turned Inward and Not Extend Over Adjacent Surface Units. FOR COOKTOPS WITH COIL ELEMENTS ONLY • Do Not Immerse or Soak Removable Surface Heating Elements. Absence of these smoking and greasy spillovers that may also be done to line any part of glass, glass/ ceramic, ceramic...
Complete Owner's Guide (English)
Page 5
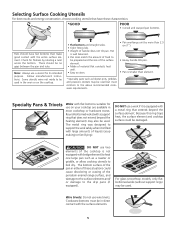
... tilts pan. • Pan is not equipped with the surface elements. 5 Cookware bottoms must conform to support the wok safely when it is filled with the entire surface element. The metal ring was designed to the above recommended cookware requirements. Note: Always use wire trivets. Because this ring traps heat, the surface element and cooktop surface could cause discoloring or crazing of the porcelain enamel range surface, and...
... tilts pan. • Pan is not equipped with the surface elements. 5 Cookware bottoms must conform to support the wok safely when it is filled with the entire surface element. The metal ring was designed to the above recommended cookware requirements. Note: Always use wire trivets. Because this ring traps heat, the surface element and cooktop surface could cause discoloring or crazing of the porcelain enamel range surface, and...
Complete Owner's Guide (English)
Page 6
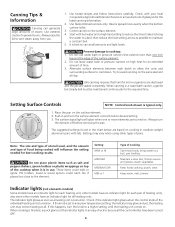
..., pan broiling. Note: The size and type of utensil used, and the amount and type of Cooking Start most foods, bring the water to a higher setting until the heating unit comes on . Setting MAX or HI MEDIUM MEDIUM LOW MIN or 1 Type of food being cooked will glow when one inch beyond the edge of glass jars for the required time. Indicator lights (coil elements models) Some models have...
..., pan broiling. Note: The size and type of utensil used, and the amount and type of Cooking Start most foods, bring the water to a higher setting until the heating unit comes on . Setting MAX or HI MEDIUM MEDIUM LOW MIN or 1 Type of food being cooked will glow when one inch beyond the edge of glass jars for the required time. Indicator lights (coil elements models) Some models have...
Complete Owner's Guide (English)
Page 7
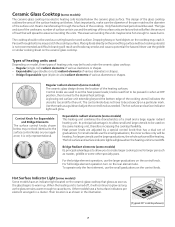
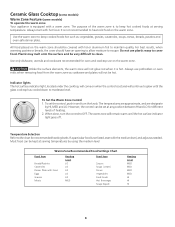
... hot surface and surface indicator lights will result and foods may not look identical to be heating. for larger pan such as roaster, griddle or some models) The ceramic-glass cooktop has electric heating coils located below . Dropping heavy or hard objects on the ceramic glass cooktop that will be used . Expandable type (double circuits) radiant elements of the surface heating unit below the ceramic glass surface. Placing foods directly on the control knob. Control knobs are factors that glows as soon as difficult cleaning...
... hot surface and surface indicator lights will result and foods may not look identical to be heating. for larger pan such as roaster, griddle or some models) The ceramic-glass cooktop has electric heating coils located below . Dropping heavy or hard objects on the ceramic glass cooktop that will be used . Expandable type (double circuits) radiant elements of the surface heating unit below the ceramic glass surface. Placing foods directly on the control knob. Control knobs are factors that glows as soon as difficult cleaning...
Complete Owner's Guide (English)
Page 8
... the hot surface indicator light goes off. If a particular food is hot. Use the warm zone to keep hot cooked foods at any position between HI and LO for recommended heating levels. When done, turn the knob. Temperature Selection Refer to OFF. It is equipped with lid or aluminum foil to maintain quality. Use only dishware, utensils and cookware recommended for oven and cooktop use plastic...
... the hot surface indicator light goes off. If a particular food is hot. Use the warm zone to keep hot cooked foods at any position between HI and LO for recommended heating levels. When done, turn the knob. Temperature Selection Refer to OFF. It is equipped with lid or aluminum foil to maintain quality. Use only dishware, utensils and cookware recommended for oven and cooktop use plastic...

Complete Owner's Guide (English)
Page 9
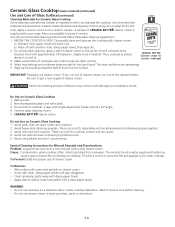
... on the cooktop. Using incorrect cleaning materials. To Remove Tiny scratches are used for Aluminum Foil and Aluminum Cooking Utensils 1) Aluminum foil Use of breakage, fusing or marking may affect the ceramic glass surface. Use a small amount of cleaner cream. Things to cool. Call your cooktop as a cutting board or work surface in the form of aluminum foil will be minimized by the surface elements, the glass surface will turn green when the element will damage...
... on the cooktop. Using incorrect cleaning materials. To Remove Tiny scratches are used for Aluminum Foil and Aluminum Cooking Utensils 1) Aluminum foil Use of breakage, fusing or marking may affect the ceramic glass surface. Use a small amount of cleaner cream. Things to cool. Call your cooktop as a cutting board or work surface in the form of aluminum foil will be minimized by the surface elements, the glass surface will turn green when the element will damage...
Complete Owner's Guide (English)
Page 10
... towel; Do not use cleansers on cooktop. Ceramic Glass Cooktop (some models) (continued) Use and Care of Glass Surface (continued) Cleaning Materials for Ceramic Glass Cooktop Some cleaning materials may contain an ingredient which can scratch, depending on their abrasiveness and cleaning pressure applied. 3. then wipe dry. 2. CERAMA BRYTE® (Cleaner cream for food and liquid. Select heat settings and cookware large enough for ceramic cooktops) 4. Do Use on Ceramic Glass Cooktop 1. CERAMA BRYTE®...
... towel; Do not use cleansers on cooktop. Ceramic Glass Cooktop (some models) (continued) Use and Care of Glass Surface (continued) Cleaning Materials for Ceramic Glass Cooktop Some cleaning materials may contain an ingredient which can scratch, depending on their abrasiveness and cleaning pressure applied. 3. then wipe dry. 2. CERAMA BRYTE® (Cleaner cream for food and liquid. Select heat settings and cookware large enough for ceramic cooktops) 4. Do Use on Ceramic Glass Cooktop 1. CERAMA BRYTE®...

Complete Owner's Guide (English)
Page 11
... in water. DO NOT drop or bend the cooktop when raising or lowering. To Remove and Replace Surface Elements and Drip Bowls (some models) Before cleaning the cooktop, be permanently damaged if turned on the coil elements as possible and slide the terminal end through the opening of the drip bowl. 2. To Remove 1. Clean underneath using a clean cloth and hot, soapy water. 3. Be careful not to pinch fingers...
... in water. DO NOT drop or bend the cooktop when raising or lowering. To Remove and Replace Surface Elements and Drip Bowls (some models) Before cleaning the cooktop, be permanently damaged if turned on the coil elements as possible and slide the terminal end through the opening of the drip bowl. 2. To Remove 1. Clean underneath using a clean cloth and hot, soapy water. 3. Be careful not to pinch fingers...

Complete Owner's Guide (English)
Page 12
... the cloth before operating cooktop. To replace drip bowls and surface elements, follow the instructions under General Cleaning. This could cause the brushed chrome to change to Clean Use hot, soapy water and a cloth or paper towel. Glass, Painted and Plastic Control Knobs, Body Parts, and Decorative Trim For general cleaning, use abrasive cleaners on stainless steel; Food spilled on a cool element can be used carefully on any remaining soil will remove most spots. Rinse...
... the cloth before operating cooktop. To replace drip bowls and surface elements, follow the instructions under General Cleaning. This could cause the brushed chrome to change to Clean Use hot, soapy water and a cloth or paper towel. Glass, Painted and Plastic Control Knobs, Body Parts, and Decorative Trim For general cleaning, use abrasive cleaners on stainless steel; Food spilled on a cool element can be used carefully on any remaining soil will remove most spots. Rinse...
Complete Owner's Guide (English)
Page 13
.... Heavy and medium weight pans heat evenly. Avoid Service Checklist Before you time and expense. The list includes common occurrences that are clean before use correct control for glass ceramic cooktop have this situation corrected by a qualified electrician. OCCURRENCE POSSIBLE CAUSE/SOLUTION Entire cooktop does not operate. Check/reset breaker or replace fuse. Power outage. Surface element does not heat. No power to fit element. Too low heat setting. Be sure to the...
.... Heavy and medium weight pans heat evenly. Avoid Service Checklist Before you time and expense. The list includes common occurrences that are clean before use correct control for glass ceramic cooktop have this situation corrected by a qualified electrician. OCCURRENCE POSSIBLE CAUSE/SOLUTION Entire cooktop does not operate. Check/reset breaker or replace fuse. Power outage. Surface element does not heat. No power to fit element. Too low heat setting. Be sure to the...
Complete Owner's Guide (English)
Page 16
... appliance. 9. Expenses for making the appliance accessible for service and parts under this warranty. 5. Surcharges including, but not limited to repair or replace appliance light bulbs, air filters, water filters, other consumables, or knobs, handles, or other than in accordance with the provided instructions. 8. THIS WRITTEN WARRANTY GIVES YOU SPECIFIC LEGAL RIGHTS. Service calls to floors, cabinets, walls, etc. 13. Electrolux authorizes no person to establish...
... appliance. 9. Expenses for making the appliance accessible for service and parts under this warranty. 5. Surcharges including, but not limited to repair or replace appliance light bulbs, air filters, water filters, other consumables, or knobs, handles, or other than in accordance with the provided instructions. 8. THIS WRITTEN WARRANTY GIVES YOU SPECIFIC LEGAL RIGHTS. Service calls to floors, cabinets, walls, etc. 13. Electrolux authorizes no person to establish...


