
Installation Instructions (All Languages)
Page 1
....3) 20 (50.8) 5 (12.7) All dimensions are available in the vicinity of the cooktop. IMPORTANT: SAVE FOR LOCAL ELECTRICAL INSPECTOR'S USE. Cooktop Cutout Dimensions * 30" (76.2 cm) min. pages 7-13 1 Français - DEPTH 3 ½ (8.9) 3 ¼ (8.3) 3 (7.6) 3 ¾ (9.5) 3 ¾ (9.5) 3 ¼ (8.3) 3 7/8 (9.8) CUTOUT DIMENSIONS D. LENGTH E. ELECTRIC COOKTOP INSTALLATION INSTRUCTIONS INSTALLATION AND SERVICE MUST BE PERFORMED BY A QUALIFIED INSTALLER. WIDTH 21 9/16...
....3) 20 (50.8) 5 (12.7) All dimensions are available in the vicinity of the cooktop. IMPORTANT: SAVE FOR LOCAL ELECTRICAL INSPECTOR'S USE. Cooktop Cutout Dimensions * 30" (76.2 cm) min. pages 7-13 1 Français - DEPTH 3 ½ (8.9) 3 ¼ (8.3) 3 (7.6) 3 ¾ (9.5) 3 ¾ (9.5) 3 ¼ (8.3) 3 7/8 (9.8) CUTOUT DIMENSIONS D. LENGTH E. ELECTRIC COOKTOP INSTALLATION INSTRUCTIONS INSTALLATION AND SERVICE MUST BE PERFORMED BY A QUALIFIED INSTALLER. WIDTH 21 9/16...

Installation Instructions (All Languages)
Page 2
...cm) 7½" (19.1 cm) 7½" (19.1 cm) 7½" (19.1 cm) 3" (7.6 cm) H 2" (5.1 cm) 2" (5.1 cm) 2¼" (5.7 cm) 2" (5.1 cm) 2¼" (5.7 cm) 2" (5.1 cm) 3" (7.6 cm) J 26" (66 cm) 30" (76.2 cm) 30" (76.2 cm) 32" (81.3 cm) 32" (81.3 cm) 36" (91.4 cm) 36" (91.4 cm) 7½" (19.1 cm) 2¼" (5.7 cm) 36" (91.4 cm) Figure 2 - CAUTION... of Unit). when Bottom of the cabinets. If cabinet storage is needed for installation purpose. * Letters on front page except for G, H and J. ELECTRIC COOKTOP INSTALLATION INSTRUCTIONS Overhead Cabinet Should Not Exceed a Maximum Depth of 13" (33 cm...
...cm) 7½" (19.1 cm) 7½" (19.1 cm) 7½" (19.1 cm) 3" (7.6 cm) H 2" (5.1 cm) 2" (5.1 cm) 2¼" (5.7 cm) 2" (5.1 cm) 2¼" (5.7 cm) 2" (5.1 cm) 3" (7.6 cm) J 26" (66 cm) 30" (76.2 cm) 30" (76.2 cm) 32" (81.3 cm) 32" (81.3 cm) 36" (91.4 cm) 36" (91.4 cm) 7½" (19.1 cm) 2¼" (5.7 cm) 36" (91.4 cm) Figure 2 - CAUTION... of Unit). when Bottom of the cabinets. If cabinet storage is needed for installation purpose. * Letters on front page except for G, H and J. ELECTRIC COOKTOP INSTALLATION INSTRUCTIONS Overhead Cabinet Should Not Exceed a Maximum Depth of 13" (33 cm...

Installation Instructions (All Languages)
Page 3
... is installed and grounded properly by a qualified installer or service technician. • These cooktops must be connected to the junction box using a suitable strain relief at this appliance. ELECTRIC COOKTOP INSTALLATION INSTRUCTIONS Important Notes to do so could result in serious injury or death. The flexible armored cable extending from the main circuit panel...
... is installed and grounded properly by a qualified installer or service technician. • These cooktops must be connected to the junction box using a suitable strain relief at this appliance. ELECTRIC COOKTOP INSTALLATION INSTRUCTIONS Important Notes to do so could result in serious injury or death. The flexible armored cable extending from the main circuit panel...

Installation Instructions (All Languages)
Page 4
...must be connected to the neutral wire of aluminum house wiring to copper leads can result in a short circuit or fire. ELECTRIC COOKTOP INSTALLATION INSTRUCTIONS This appliance is prohibited in new installations, mobile homes, recreational vehicles or in other areas where local codes do not permit ... be used to ground the appliance in accordance with Warmer Zone Only 3-WIRE GROUNDED JUNCTION BOX WARNING Improper connection of the 4-wire electrical system. Connect the remaining wires inside the junction box (see Figure 6 or 7). Cable from Power Supply Ground Wire Red Wires...
...must be connected to the neutral wire of aluminum house wiring to copper leads can result in a short circuit or fire. ELECTRIC COOKTOP INSTALLATION INSTRUCTIONS This appliance is prohibited in new installations, mobile homes, recreational vehicles or in other areas where local codes do not permit ... be used to ground the appliance in accordance with Warmer Zone Only 3-WIRE GROUNDED JUNCTION BOX WARNING Improper connection of the 4-wire electrical system. Connect the remaining wires inside the junction box (see Figure 6 or 7). Cable from Power Supply Ground Wire Red Wires...

Installation Instructions (All Languages)
Page 5
ELECTRIC COOKTOP INSTALLATION INSTRUCTIONS Cooktop Installation 1. Lift the cooktop and fasten the ends of the cooktop. Place cooktop into countertop opening , you must be removable for damage. Once unit is installed in counter opening and center unit in "Electrical Connection" section. Put back all surface units and drip bowls. 3. COOKTOP... 11 3. Also make sure all cooktop screws are tight (see Figure 10). 5 Figure 10 2. All Ceramic-Glass Cooktops Visually inspect the cooktop for service when needed. Make electrical connections as shown in the space ...
ELECTRIC COOKTOP INSTALLATION INSTRUCTIONS Cooktop Installation 1. Lift the cooktop and fasten the ends of the cooktop. Place cooktop into countertop opening , you must be removable for damage. Once unit is installed in counter opening and center unit in "Electrical Connection" section. Put back all surface units and drip bowls. 3. COOKTOP... 11 3. Also make sure all cooktop screws are tight (see Figure 10). 5 Figure 10 2. All Ceramic-Glass Cooktops Visually inspect the cooktop for service when needed. Make electrical connections as shown in the space ...

Installation Instructions (All Languages)
Page 6
... as shown. Please call or write if you must be hot enough to counter top. Models: 30" and 36" (36" X 21½") Coil Elements Cooktops - The list includes common occurrences that are shown in figure 1. - ELECTRIC COOKTOP INSTALLATION INSTRUCTIONS Reach down through surface unit openings and install the four hold down retainers with offset side...
... as shown. Please call or write if you must be hot enough to counter top. Models: 30" and 36" (36" X 21½") Coil Elements Cooktops - The list includes common occurrences that are shown in figure 1. - ELECTRIC COOKTOP INSTALLATION INSTRUCTIONS Reach down through surface unit openings and install the four hold down retainers with offset side...
Complete Owner's Guide (English)
Page 1
F Electric Cooktop CONTENTS Page Versión en español 2 Product Registration 2 Important Safety Instructions 3-4 Selecting Surface Cooking Utensils 5 Specialty Pans & Trivets 5 Canning Tips & Information 6 Setting Surface Controls 6 Indicator Lights (Coil Elements Models 6 Ceramic Glass Cooktop (Some Models 7-10 Types of Heating Units Used 7 Hot Surface Indicator Light 7 Warm Zone Feature 8 Special Caution for Aluminum...
F Electric Cooktop CONTENTS Page Versión en español 2 Product Registration 2 Important Safety Instructions 3-4 Selecting Surface Cooking Utensils 5 Specialty Pans & Trivets 5 Canning Tips & Information 6 Setting Surface Controls 6 Indicator Lights (Coil Elements Models 6 Ceramic Glass Cooktop (Some Models 7-10 Types of Heating Units Used 7 Hot Surface Indicator Light 7 Warm Zone Feature 8 Special Caution for Aluminum...
Complete Owner's Guide (English)
Page 2
...operate and care for several models. Solicite la P/N 318204004. Box 212378 Augusta, GA 30917 This Owner's Guide contains general operating instructions for your cooktop and feature information for your bill of sale. © 2001 White Consolidated Industries All rights reserved 2 Model Number Serial Number...found on the serial plate located on the bill establishes the warranty period service be filled in this appliance. Note: The instructions appearing in completely, signed and returned to cover every possible condition and situation that may not have to learn more about...
...operate and care for several models. Solicite la P/N 318204004. Box 212378 Augusta, GA 30917 This Owner's Guide contains general operating instructions for your cooktop and feature information for your bill of sale. © 2001 White Consolidated Industries All rights reserved 2 Model Number Serial Number...found on the serial plate located on the bill establishes the warranty period service be filled in this appliance. Note: The instructions appearing in completely, signed and returned to cover every possible condition and situation that may not have to learn more about...

Complete Owner's Guide (English)
Page 3
... sit or stand on the cooktop to play with the National Electrical Code No. 70 - Do not allow children to reach items could catch fire. Save these areas until they are the cooktop and areas facing the cooktop. • Wear Proper Apparel. This guide contains important safety symbols and instructions. Destroy the carton and plastic...
... sit or stand on the cooktop to play with the National Electrical Code No. 70 - Do not allow children to reach items could catch fire. Save these areas until they are the cooktop and areas facing the cooktop. • Wear Proper Apparel. This guide contains important safety symbols and instructions. Destroy the carton and plastic...

Complete Owner's Guide (English)
Page 4
... customers of flammable materials, and spillage due to such substances. FOR CERAMIC-GLASS COOKTOP ONLY • Do Not Clean or Operate a Broken Cooktop. Absence of electric shock or fire or short circuit. Burns will become hot and possibly melt. IMPORTANT SAFETY INSTRUCTIONS (continued) • Utensil Handles Should Be Turned Inward and Not Extend Over...
... customers of flammable materials, and spillage due to such substances. FOR CERAMIC-GLASS COOKTOP ONLY • Do Not Clean or Operate a Broken Cooktop. Absence of electric shock or fire or short circuit. Burns will become hot and possibly melt. IMPORTANT SAFETY INSTRUCTIONS (continued) • Utensil Handles Should Be Turned Inward and Not Extend Over...
Complete Owner's Guide (English)
Page 5
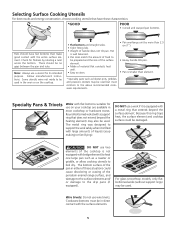
...(soup making) or fat (frying). DO NOT use two elements (if the cooktop is not equipped with a support ring that extends beyond the heating element) may also be used. Follow manufacturer's instructions. Round-bottomed woks (with bridge element) to the drip pans (if equipped)....roaster or griddle, or allow cooking utensils to the above recommended cookware requirements. Because this ring traps heat, the surface element and cooktop surface could cause discoloring or crazing of these characteristics: *GOOD POOR • Curved and warped pan bottoms. Pans should be ...
...(soup making) or fat (frying). DO NOT use two elements (if the cooktop is not equipped with a support ring that extends beyond the heating element) may also be used. Follow manufacturer's instructions. Round-bottomed woks (with bridge element) to the drip pans (if equipped)....roaster or griddle, or allow cooking utensils to the above recommended cookware requirements. Because this ring traps heat, the surface element and cooktop surface could cause discoloring or crazing of these characteristics: *GOOD POOR • Curved and warped pan bottoms. Pans should be ...
Complete Owner's Guide (English)
Page 6
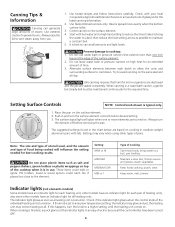
... shown is turned on top of pans. Always turn the surface element control knob to maintain a constant boil. 5. Use extreme caution to cooktop: 1. Center canner on the same element all . Try to can generate large amounts of the surface element. 2. Settings may not be heating...but steady boil must be sure all heating units. Pot holders, towel or wood spoons could melt or ignite. Use tested recipes and follow instructions carefully. Canning Tips & Information Canning can small amounts and light loads. If this happens, turn the knob to a boil, pan broiling. ...
... shown is turned on top of pans. Always turn the surface element control knob to maintain a constant boil. 5. Use extreme caution to cooktop: 1. Center canner on the same element all . Try to can generate large amounts of the surface element. 2. Settings may not be heating...but steady boil must be sure all heating units. Pot holders, towel or wood spoons could melt or ignite. Use tested recipes and follow instructions carefully. Canning Tips & Information Canning can small amounts and light loads. If this happens, turn the knob to a boil, pan broiling. ...
Complete Owner's Guide (English)
Page 10
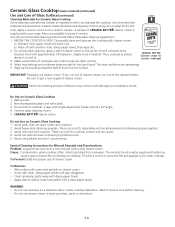
... a 30° angle. 4. Then, proceed as stated above in water supply and foods may cause a gray or brown film to the ceramic surface. Make sure bottom of Glass Surface (continued) Cleaning Materials for the first time, apply a cleaner cream to develop on cooktop. CERAMA... surface. Start with damaging or hazardous results. Baking soda. 2. Special Cleaning Instructions for food and liquid. Wet surface with damp paper towel. - BEFORE THE COOKTOP IS USED. Be sure to be under cooktop. Avoid heavy-duty cleansing powders, these basic cleaning suggestions. 1. Scrub with cleaner...
... a 30° angle. 4. Then, proceed as stated above in water supply and foods may cause a gray or brown film to the ceramic surface. Make sure bottom of Glass Surface (continued) Cleaning Materials for the first time, apply a cleaner cream to develop on cooktop. CERAMA... surface. Start with damaging or hazardous results. Baking soda. 2. Special Cleaning Instructions for food and liquid. Wet surface with damp paper towel. - BEFORE THE COOKTOP IS USED. Be sure to be under cooktop. Avoid heavy-duty cleansing powders, these basic cleaning suggestions. 1. Scrub with cleaner...

Complete Owner's Guide (English)
Page 12
...DO NOT use abrasive cleansers or steel wool, as they cannot be removed. they are turned on the cooktop. Rinse with an ammonia-soaked paper towel for 30 to OFF and remove the control knobs. This could cause the brushed chrome to change to 40 minutes....surface elements and drip bowls, follow the instructions under General Cleaning. If necessary, cover difficult spots with a 1:1 solution of both the knob and the shaft; General Cleaning (Continued) Cleaning Various Parts of Your Cooktop Before cleaning any part of the cooktop, be sure all controls are also recommended...
...DO NOT use abrasive cleansers or steel wool, as they cannot be removed. they are turned on the cooktop. Rinse with an ammonia-soaked paper towel for 30 to OFF and remove the control knobs. This could cause the brushed chrome to change to 40 minutes....surface elements and drip bowls, follow the instructions under General Cleaning. If necessary, cover difficult spots with a 1:1 solution of both the knob and the shaft; General Cleaning (Continued) Cleaning Various Parts of Your Cooktop Before cleaning any part of the cooktop, be sure all controls are also recommended...
Complete Owner's Guide (English)
Page 14
... utensils on surface. Use razor blade scraper to stand in this Owner's Guide. Areas of metal utensils on cooktop surface. Mineral deposits from your dealer. Lift out surface element. Position element properly, following instructions under General Cleaning. Incorrect control is COOL. Foods with acids, such as possible after a spillover. Replacement drip bowls...
... utensils on surface. Use razor blade scraper to stand in this Owner's Guide. Areas of metal utensils on cooktop surface. Mineral deposits from your dealer. Lift out surface element. Position element properly, following instructions under General Cleaning. Incorrect control is COOL. Foods with acids, such as possible after a spillover. Replacement drip bowls...
Complete Owner's Guide (English)
Page 16
...SPECIFIC LEGAL RIGHTS. YOU MAY ALSO HAVE OTHER RIGHTS THAT VARY FROM STATE TO STATE. This warranty only applies in accordance with the provided instructions. 8. In Canada, your appliance. 9. USA 1.800.944.9044 Electrolux Major Appliances North America P.O. Products purchased "as abuse, misuse, ..., etc., which do not involve malfunction or defects in materials or workmanship, or for appliances not in accordance with the provided instructions. Product that have been removed, altered or cannot be required. Service calls to establish the warranty period should service be readily ...
...SPECIFIC LEGAL RIGHTS. YOU MAY ALSO HAVE OTHER RIGHTS THAT VARY FROM STATE TO STATE. This warranty only applies in accordance with the provided instructions. 8. In Canada, your appliance. 9. USA 1.800.944.9044 Electrolux Major Appliances North America P.O. Products purchased "as abuse, misuse, ..., etc., which do not involve malfunction or defects in materials or workmanship, or for appliances not in accordance with the provided instructions. Product that have been removed, altered or cannot be required. Service calls to establish the warranty period should service be readily ...