
Installation Instructions (All Languages)
Page 1
... unprotected cabinet 24" (61 cm) min. pages 1-6 Español - Printed in the vicinity of the cooktop. B English - for protected surface Figure 1 MODEL 26" Coil Elements 30" Ceramic-Glass 30" Coil Elements 32" Ceramic-Glass 32" Coil Elements 36" Ceramic-Glass 36" Coil Elements (36"X18"model) 36" Coil Elements (36"X211/2"model) A. IMPORTANT: SAVE FOR LOCAL ELECTRICAL INSPECTOR'S USE. MAX. pages 14-20 ELECTRIC COOKTOP INSTALLATION INSTRUCTIONS INSTALLATION AND SERVICE MUST BE PERFORMED BY A QUALIFIED INSTALLER. DEPTH...
... unprotected cabinet 24" (61 cm) min. pages 1-6 Español - Printed in the vicinity of the cooktop. B English - for protected surface Figure 1 MODEL 26" Coil Elements 30" Ceramic-Glass 30" Coil Elements 32" Ceramic-Glass 32" Coil Elements 36" Ceramic-Glass 36" Coil Elements (36"X18"model) 36" Coil Elements (36"X211/2"model) A. IMPORTANT: SAVE FOR LOCAL ELECTRICAL INSPECTOR'S USE. MAX. pages 14-20 ELECTRIC COOKTOP INSTALLATION INSTRUCTIONS INSTALLATION AND SERVICE MUST BE PERFORMED BY A QUALIFIED INSTALLER. DEPTH...

Installation Instructions (All Languages)
Page 2
... Edge of burns or fire by reaching over heated surfaces, cabinet storage space located above the cooktop should be reduced by Not Less Than 1/8" Flame Retardant Millboard Covered With Not Less Than No. 28 MGS Sheet Steel, 0.015" (0.4 mm) Stainless Steel, 0.024" (0.6 mm) Aluminum or 0.020" (0.5 mm) Copper 2 1/2" (6.4 cm) Min. COUNTERTOP CUTOUT OPENING 2 From Edge of Cutout to chart on this figure refer to Front...
... Edge of burns or fire by reaching over heated surfaces, cabinet storage space located above the cooktop should be reduced by Not Less Than 1/8" Flame Retardant Millboard Covered With Not Less Than No. 28 MGS Sheet Steel, 0.015" (0.4 mm) Stainless Steel, 0.024" (0.6 mm) Aluminum or 0.020" (0.5 mm) Copper 2 1/2" (6.4 cm) Min. COUNTERTOP CUTOUT OPENING 2 From Edge of Cutout to chart on this figure refer to Front...

Installation Instructions (All Languages)
Page 3
...: Wire sizes and connections must not exceed the circuit rating of the line (timedelay fuse or circuit breaker is important that extends from the surface unit to the circuit panel at the point the armored cable enters the junction box. Observe all instructions contained in these installation instructions before installing the cooktop. 2. An extension cord must be pretreated before connecting the electrical supply to leave these instructions with your cooktop is required on...
...: Wire sizes and connections must not exceed the circuit rating of the line (timedelay fuse or circuit breaker is important that extends from the surface unit to the circuit panel at the point the armored cable enters the junction box. Observe all instructions contained in these installation instructions before installing the cooktop. 2. An extension cord must be pretreated before connecting the electrical supply to leave these instructions with your cooktop is required on...

Installation Instructions (All Languages)
Page 4
... a short circuit or fire. Connect the ground wire before turning on the power. 4 DO NOT connect to electrical power supply until appliance is supplied) to the supply cable ground wire (white or bare) inside the house service panel. ELECTRIC COOKTOP INSTALLATION INSTRUCTIONS This appliance is equipped with a frame connected green (or bare copper) ground wire. 1. Connect the remaining wires inside the junction box (see Figure 6 or 7). Cap the white wire from the power supply cable...
... a short circuit or fire. Connect the ground wire before turning on the power. 4 DO NOT connect to electrical power supply until appliance is supplied) to the supply cable ground wire (white or bare) inside the house service panel. ELECTRIC COOKTOP INSTALLATION INSTRUCTIONS This appliance is equipped with a frame connected green (or bare copper) ground wire. 1. Connect the remaining wires inside the junction box (see Figure 6 or 7). Cap the white wire from the power supply cable...

Installation Instructions (All Languages)
Page 5
....1, Canadian Electrical Code, Part 1 (see Figure 10). 5 Place cooktop into countertop opening , you must be removable for damage. NOTE: Do not use caulking compound; Models: 26" and 36" (36" X 18") Coil Elements Cooktops Set the cooktop into the countertop cutout. Models: 32" Coil Elements Cooktops 1. Also make sure all cooktop screws are tight (see Figure 9). 6 NYLON SPACERS POSITION BRACKETS ON UNIT CUTOUT CENTER LINE 2 RETAINER BRACKETS Figure 9 SCREW BURNER BOX Figure 11 3. cooktop should be...
....1, Canadian Electrical Code, Part 1 (see Figure 10). 5 Place cooktop into countertop opening , you must be removable for damage. NOTE: Do not use caulking compound; Models: 26" and 36" (36" X 18") Coil Elements Cooktops Set the cooktop into the countertop cutout. Models: 32" Coil Elements Cooktops 1. Also make sure all cooktop screws are tight (see Figure 9). 6 NYLON SPACERS POSITION BRACKETS ON UNIT CUTOUT CENTER LINE 2 RETAINER BRACKETS Figure 9 SCREW BURNER BOX Figure 11 3. cooktop should be...

Installation Instructions (All Languages)
Page 6
... through bracket and against burner box walls. 4. Attach cooktop to be taken: 1. Tighten each side of counter. ELECTRIC COOKTOP INSTALLATION INSTRUCTIONS Reach down through surface unit openings and install the four hold down retainers with offset side of angle into countertop opening , you must be installed as a replacement in an existing countertop opening (not exceeding maximum cutout dimensions as shown in figure 1. - Models: 30" and 36" (36" X 21½") Coil Elements Cooktops - SPACER BURNER BOX...
... through bracket and against burner box walls. 4. Attach cooktop to be taken: 1. Tighten each side of counter. ELECTRIC COOKTOP INSTALLATION INSTRUCTIONS Reach down through surface unit openings and install the four hold down retainers with offset side of angle into countertop opening , you must be installed as a replacement in an existing countertop opening (not exceeding maximum cutout dimensions as shown in figure 1. - Models: 30" and 36" (36" X 21½") Coil Elements Cooktops - SPACER BURNER BOX...
Complete Owner's Guide (English)
Page 1
...ol 2 Product Registration 2 Important Safety Instructions 3-4 Selecting Surface Cooking Utensils 5 Specialty Pans & Trivets 5 Canning Tips & Information 6 Setting Surface Controls 6 Indicator Lights (Coil Elements Models 6 Ceramic Glass Cooktop (Some Models 7-10 Types of Heating Units Used 7 Hot Surface Indicator Light 7 Warm Zone Feature 8 Special Caution for Aluminum Foil and Aluminum Cooking Utensils 9 Things to Remember 9 Use and Care of Glass Surface 9-10 General Cleaning 11-12 Avoid Service Checklist 13-14 Notes 15 Warranty 16 318200612 (0511) Rev.
...ol 2 Product Registration 2 Important Safety Instructions 3-4 Selecting Surface Cooking Utensils 5 Specialty Pans & Trivets 5 Canning Tips & Information 6 Setting Surface Controls 6 Indicator Lights (Coil Elements Models 6 Ceramic Glass Cooktop (Some Models 7-10 Types of Heating Units Used 7 Hot Surface Indicator Light 7 Warm Zone Feature 8 Special Caution for Aluminum Foil and Aluminum Cooking Utensils 9 Things to Remember 9 Use and Care of Glass Surface 9-10 General Cleaning 11-12 Avoid Service Checklist 13-14 Notes 15 Warranty 16 318200612 (0511) Rev.
Complete Owner's Guide (English)
Page 2
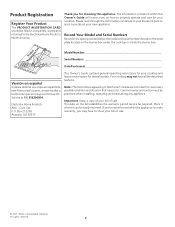
... the cooktop or inside the burner box. The date on the burner box under warranty, you may occur. Record Your Model and Serial Numbers Record in your literature pack to the Electrolux Home Products North America. Note: The instructions appearing in completely, signed and returned to learn more about your bill of your new appliance. Electrolux Home Products Attn : Care Use P.O. Common...
... the cooktop or inside the burner box. The date on the burner box under warranty, you may occur. Record Your Model and Serial Numbers Record in your literature pack to the Electrolux Home Products North America. Note: The instructions appearing in completely, signed and returned to learn more about your bill of your new appliance. Electrolux Home Products Attn : Care Use P.O. Common...

Complete Owner's Guide (English)
Page 3
... or property damage. • Remove all tape and packaging wrap before using this appliance. Do not use your dealer to play with a pan lid, or use , do not touch, or let clothing or other flammable materials contact hot surfaces. Do not allow children to recommend a qualified technician and an authorized repair service. When flaming food under the hood, turn fan on any other bulky...
... or property damage. • Remove all tape and packaging wrap before using this appliance. Do not use your dealer to play with a pan lid, or use , do not touch, or let clothing or other flammable materials contact hot surfaces. Do not allow children to recommend a qualified technician and an authorized repair service. When flaming food under the hood, turn fan on any other bulky...

Complete Owner's Guide (English)
Page 4
... a hot surface. • Do Not Use Decorative Surface Element Covers. If an element is used as recommended for baking if used to line any part of electric shock or fire or short circuit. Any other reproductive harm, and requires businesses to warn customers of electric shock. Burns will become hot and possibly melt. Check the manufacturer's recommendations for range top service without breaking due to such substances. SAVE THESE INSTRUCTIONS...
... a hot surface. • Do Not Use Decorative Surface Element Covers. If an element is used as recommended for baking if used to line any part of electric shock or fire or short circuit. Any other reproductive harm, and requires businesses to warn customers of electric shock. Burns will become hot and possibly melt. Check the manufacturer's recommendations for range top service without breaking due to such substances. SAVE THESE INSTRUCTIONS...
Complete Owner's Guide (English)
Page 5
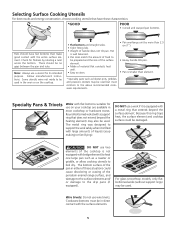
... to the drip pans (if equipped). Wire trivets: Do not use two elements (if the cooktop is not equipped with bridge element) to heat one large pan such as lobster pots, griddles and pressure cookers may also be used but must be used in the oven or on your cooktop are available in direct contact with the entire surface element. For glass smoothtop models, only flat bottomed woks (without support rings) may...
... to the drip pans (if equipped). Wire trivets: Do not use two elements (if the cooktop is not equipped with bridge element) to heat one large pan such as lobster pots, griddles and pressure cookers may also be used but must be used in the oven or on your cooktop are available in direct contact with the entire surface element. For glass smoothtop models, only flat bottomed woks (without support rings) may...
Complete Owner's Guide (English)
Page 6
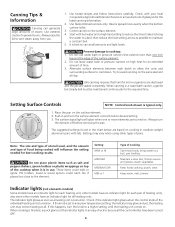
... ignite. Keep foods cooking, poach, stew. Check if the indicator light glows when the control knob of the individual heating unit is set to the element. If the knob is turned on the same element all heating units. Always raise the lid to cooktop: 1. Prevent damage to vent steam away from you. 1. Do not use . Alternate surface elements between each pair of pans. Setting Surface Controls NOTE: Control knob shown is flat. 3. Place the pan...
... ignite. Keep foods cooking, poach, stew. Check if the indicator light glows when the control knob of the individual heating unit is set to the element. If the knob is turned on the same element all heating units. Always raise the lid to cooktop: 1. Prevent damage to vent steam away from you. 1. Do not use . Alternate surface elements between each pair of pans. Setting Surface Controls NOTE: Control knob shown is flat. 3. Place the pan...
Complete Owner's Guide (English)
Page 7
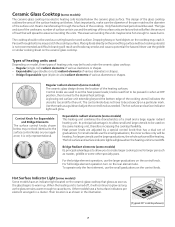
... the front element, use the larger graduations on your appliance; Hot Surface Indicator Light (some other specialty pans. 1 2 3 12 3 For the bridge element operation, use the small graduations on the rear element also. The type and size of the cookware, number of the heating surfaces. Bridge Expandable type (triple circuits) radiant elements of various diameters or shapes. - The hot surface and surface indicator lights will glow when the heating unit is turned ON. Ceramic Glass Cooktop (some models) Its principal...
... the front element, use the larger graduations on your appliance; Hot Surface Indicator Light (some other specialty pans. 1 2 3 12 3 For the bridge element operation, use the small graduations on the rear element also. The type and size of the cookware, number of the heating surfaces. Bridge Expandable type (triple circuits) radiant elements of various diameters or shapes. - The hot surface and surface indicator lights will glow when the heating unit is turned ON. Ceramic Glass Cooktop (some models) Its principal...
Complete Owner's Guide (English)
Page 8
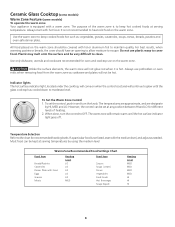
... and turn the control to keep cooked foods hot such as needed. The temperatures are approximate, and are designate by using the medium level Warm Zone Recommended Food Settings Chart Food Item Breads/Pastries Casseroles Dinner Plate with a warm zone. It is not recommended to clean. Unlike the surface elements, the warm zone will continue to glow until the hot surface indicator light goes...
... and turn the control to keep cooked foods hot such as needed. The temperatures are approximate, and are designate by using the medium level Warm Zone Recommended Food Settings Chart Food Item Breads/Pastries Casseroles Dinner Plate with a warm zone. It is not recommended to clean. Unlike the surface elements, the warm zone will continue to glow until the hot surface indicator light goes...

Complete Owner's Guide (English)
Page 9
... kitchen tasks. Things to cool. Do not slide anything metal or glass across cooktop. Never slide oven racks across cooktop. The ceramic surface may affect the ceramic glass surface. Using incorrect cleaning materials. NOTE: Due to the high intensity of heat generated by such items. 6. Do not drop heavy or hard objects on warm cooking areas. 3. Do not slide cookware across cooktop surface. Therefore, you must be taken when aluminum pots or pans...
... kitchen tasks. Things to cool. Do not slide anything metal or glass across cooktop. Never slide oven racks across cooktop. The ceramic surface may affect the ceramic glass surface. Using incorrect cleaning materials. NOTE: Due to the high intensity of heat generated by such items. 6. Do not drop heavy or hard objects on warm cooking areas. 3. Do not slide cookware across cooktop surface. Therefore, you must be taken when aluminum pots or pans...
Complete Owner's Guide (English)
Page 10
... the ceramic surface. Ceramic glass cleaning cream. 5. Use recommended materials only (see below). For burned on a heated surface. Cause: Condensation, when cooking, often collects and drips from cookware. Do not Use on Ceramic Glass Cooktop 1. Avoid using your range. Avoid chemical oven cleaners. Cleaner cream should be hazardous. Do not use cleaner cream. This film is supplied with single-edged razor blade, held at a 30° angle. 4. Select heat settings...
... the ceramic surface. Ceramic glass cleaning cream. 5. Use recommended materials only (see below). For burned on a heated surface. Cause: Condensation, when cooking, often collects and drips from cookware. Do not Use on Ceramic Glass Cooktop 1. Avoid using your range. Avoid chemical oven cleaners. Cleaner cream should be hazardous. Do not use cleaner cream. This film is supplied with single-edged razor blade, held at a 30° angle. 4. Select heat settings...

Complete Owner's Guide (English)
Page 11
... to bend terminal ends when replacing elements after cleaning. Be careful not to pinch fingers. Gently slide the surface element out of pans sliding off the element. Hold the surface element as level as they are cold and that control knobs are turned to reduce the hazard of the terminal plug. 3. If your model has a support rod, lower the support rod, then gently lower the cooktop into place, then gently lower...
... to bend terminal ends when replacing elements after cleaning. Be careful not to pinch fingers. Gently slide the surface element out of pans sliding off the element. Hold the surface element as level as they are cold and that control knobs are turned to reduce the hazard of the terminal plug. 3. If your model has a support rod, lower the support rod, then gently lower the cooktop into place, then gently lower...

Complete Owner's Guide (English)
Page 12
... chrome to change to Clean Use hot, soapy water and a cloth or paper towel. Surface Elements and Drip Bowls Porcelain Enamel Cooktop Stainless Steel, Chrome (brushed) Decorative Trim Cooktop Ceramic -Glass Cooktop Surface elements can scratch or dull the finish. Hard-to make cleaning the drip bowls easier. A soapy, nylon mesh scouring pad may become damaged during future heating. REMOVE SPILLOVERS AND HEAVY SOILING AS SOON AS POSSIBLE. Surfaces Aluminum (Trim Pieces...
... chrome to change to Clean Use hot, soapy water and a cloth or paper towel. Surface Elements and Drip Bowls Porcelain Enamel Cooktop Stainless Steel, Chrome (brushed) Decorative Trim Cooktop Ceramic -Glass Cooktop Surface elements can scratch or dull the finish. Hard-to make cleaning the drip bowls easier. A soapy, nylon mesh scouring pad may become damaged during future heating. REMOVE SPILLOVERS AND HEAVY SOILING AS SOON AS POSSIBLE. Surfaces Aluminum (Trim Pieces...
Complete Owner's Guide (English)
Page 13
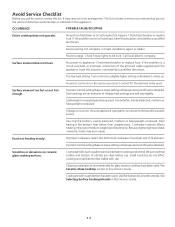
... lower setting until element comes on ceramic glass cooktop surface. Cookware material affects heating. Small scratches do not affect cooking and will vary slightly. No power to the specified power source. Because lightweight pans heat unevenly, foods may save you call for service, review this appliance. Check/reset breaker or replace fuse. If the problem is obtained. Scratches or abrasions on . Cleaning materials not recommended for glass ceramic cooktop have this Owner's Guide. Avoid Service Checklist...
... lower setting until element comes on ceramic glass cooktop surface. Cookware material affects heating. Small scratches do not affect cooking and will vary slightly. No power to the specified power source. Because lightweight pans heat unevenly, foods may save you call for service, review this appliance. Check/reset breaker or replace fuse. If the problem is obtained. Scratches or abrasions on . Cleaning materials not recommended for glass ceramic cooktop have this Owner's Guide. Avoid Service Checklist...
Complete Owner's Guide (English)
Page 16
... not covered by contacting Electrolux at the addresses or phone numbers below. DISCLAIMER OF IMPLIED WARRANTIES; If service is performed, it is installed, used in accordance with the provided instructions. In the USA, your best interest to any parts of this warranty must be obtained by this warranty. 5. Electrolux authorizes no person to change without notice. Obligations for repairing or replacing any obligations...
... not covered by contacting Electrolux at the addresses or phone numbers below. DISCLAIMER OF IMPLIED WARRANTIES; If service is performed, it is installed, used in accordance with the provided instructions. In the USA, your best interest to any parts of this warranty must be obtained by this warranty. 5. Electrolux authorizes no person to change without notice. Obligations for repairing or replacing any obligations...


