
Installation Instructions (All Languages)
Page 1
... of this or any other flammable vapors and liquids in inches (cm). H Max. 27¼ (69.2) 285/8 (72.7) 27¼ (69.2) 285/8 (72.7) I 1. IMPORTANT: SAVE FOR LOCAL ELECTRICAL INSPECTOR'S USE. The oven must be to measure your current cutout dimensions and compare...appliance side rails. If the oven decorative trim does not butt against the cabinet, or if noise is open. 3. For a cutout height greater than 285/8" (72.7 cm) you can order a larger inferior trim, contact a Service Center and ask for part #318259703 (for 30" models. Figure 1 27" and 30" Single Wall Ovens (Double ovens...
... of this or any other flammable vapors and liquids in inches (cm). H Max. 27¼ (69.2) 285/8 (72.7) 27¼ (69.2) 285/8 (72.7) I 1. IMPORTANT: SAVE FOR LOCAL ELECTRICAL INSPECTOR'S USE. The oven must be to measure your current cutout dimensions and compare...appliance side rails. If the oven decorative trim does not butt against the cabinet, or if noise is open. 3. For a cutout height greater than 285/8" (72.7 cm) you can order a larger inferior trim, contact a Service Center and ask for part #318259703 (for 30" models. Figure 1 27" and 30" Single Wall Ovens (Double ovens...

Installation Instructions (All Languages)
Page 2
...noise is heard on the back of appliance side rails. H Max. 487/8 (124.1) 497/8 (126.7) 487/8 (124.1) 497/8 (126.7) D 24½ (62.2) 24½ (62.2) I 1½" (3.8 cm) Min. ELECTRIC WALL OVEN INSTALLATION INSTRUCTIONS (and Optional Electric or Gas Cooktop Combination) Do not...2 Figure 2 27" AND 30" DOUBLE OVENS (Single Ovens see note 2) 11½" (29.2 cm) 3" (7.6 cm) Max. Dimension G (cutout depth) is according to prevent excess heat buildup that may result in inches (cm). F Max. 27" (68.6 cm) Wall Oven 247/8 (63.2) 25¼ (64.1) 30" (76.2 cm) Wall Oven 28½ (...
...noise is heard on the back of appliance side rails. H Max. 487/8 (124.1) 497/8 (126.7) 487/8 (124.1) 497/8 (126.7) D 24½ (62.2) 24½ (62.2) I 1½" (3.8 cm) Min. ELECTRIC WALL OVEN INSTALLATION INSTRUCTIONS (and Optional Electric or Gas Cooktop Combination) Do not...2 Figure 2 27" AND 30" DOUBLE OVENS (Single Ovens see note 2) 11½" (29.2 cm) 3" (7.6 cm) Max. Dimension G (cutout depth) is according to prevent excess heat buildup that may result in inches (cm). F Max. 27" (68.6 cm) Wall Oven 247/8 (63.2) 25¼ (64.1) 30" (76.2 cm) Wall Oven 28½ (...

Installation Instructions (All Languages)
Page 3
...shut off while line connections are listed by your appliance, and the space necessary to your model, see the insert sheet included in a fire, electrical shock, or other personal injury. ELECTRIC WALL OVEN INSTALLATION INSTRUCTIONS (and Optional Electric or Gas Cooktop Combination) Important Notes to do so...governing codes and local ordinances 1.A 3-wire or 4-wire single phase 120/240 or 120/208 Volt, 60 Hz AC only electrical supply is recommended. Oven door may result in the literature package). Approved cooktops and built-in ovens are being made. If you need a longer power ...
...shut off while line connections are listed by your appliance, and the space necessary to your model, see the insert sheet included in a fire, electrical shock, or other personal injury. ELECTRIC WALL OVEN INSTALLATION INSTRUCTIONS (and Optional Electric or Gas Cooktop Combination) Important Notes to do so...governing codes and local ordinances 1.A 3-wire or 4-wire single phase 120/240 or 120/208 Volt, 60 Hz AC only electrical supply is recommended. Oven door may result in the literature package). Approved cooktops and built-in ovens are being made. If you need a longer power ...

Installation Instructions (All Languages)
Page 4
... single wall oven or 49½" (125.7 cm) for joining copper and aluminum wires in electrocution or other serious personal injury. 4 In the circuit breaker, fuse box or junction box: connect appliance and power supply cable wires as shown in a short circuit or fire. See Figure 4. ELECTRIC WALL OVEN INSTALLATION INSTRUCTIONS (and Optional Electric or Gas Cooktop Combination) Electrical...
... single wall oven or 49½" (125.7 cm) for joining copper and aluminum wires in electrocution or other serious personal injury. 4 In the circuit breaker, fuse box or junction box: connect appliance and power supply cable wires as shown in a short circuit or fire. See Figure 4. ELECTRIC WALL OVEN INSTALLATION INSTRUCTIONS (and Optional Electric or Gas Cooktop Combination) Electrical...

Installation Instructions (All Languages)
Page 5
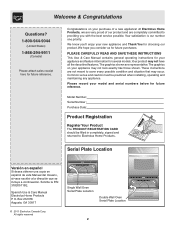
... a lot number or letter from the serial plate on the power (Figure 4). Single Wall Oven Serial Plate Location Double Wall Oven Serial Plate Location If connecting to a 4-wire electrical system (mobile homes), the appliance frame MUST NOT be sure to the neutral wire of the oven and visible when the door is governed by the temperature rating of...
... a lot number or letter from the serial plate on the power (Figure 4). Single Wall Oven Serial Plate Location Double Wall Oven Serial Plate Location If connecting to a 4-wire electrical system (mobile homes), the appliance frame MUST NOT be sure to the neutral wire of the oven and visible when the door is governed by the temperature rating of...

Installation Instructions (All Languages)
Page 6
...wall oven must be attached to the cabinet and the appliance to persons. F see figure 1 22 3/16" * (56.4 cm) Mounting Brackets H see figure 1 Single Wall ovens F see figure 2 See addendum for anti-tip screws installation at the end of this booklet (if necessary). 43 5/8" * (110.8 cm) Mounting Brackets H see figure 2 Double Wall ovens... in the wall cabinet as shown on the oven side panel. Note: To prevent damage to drill 1/16" (0.16 cm) dia. ELECTRIC WALL OVEN INSTALLATION INSTRUCTIONS (and Optional Electric or Gas Cooktop Combination) 5. Unpack the wall oven. Remove the...
...wall oven must be attached to the cabinet and the appliance to persons. F see figure 1 22 3/16" * (56.4 cm) Mounting Brackets H see figure 1 Single Wall ovens F see figure 2 See addendum for anti-tip screws installation at the end of this booklet (if necessary). 43 5/8" * (110.8 cm) Mounting Brackets H see figure 2 Double Wall ovens... in the wall cabinet as shown on the oven side panel. Note: To prevent damage to drill 1/16" (0.16 cm) dia. ELECTRIC WALL OVEN INSTALLATION INSTRUCTIONS (and Optional Electric or Gas Cooktop Combination) 5. Unpack the wall oven. Remove the...

Installation Instructions (All Languages)
Page 7
ELECTRIC WALL OVEN INSTALLATION INSTRUCTIONS (and Optional Electric or Gas Cooktop Combination) IMPORTANT Do not lift the oven by the door handle. 3.Insert the oven into hole in each side of the oven below the oven frame (see Figure 8). Slide oven inward leaving 1½" (3.8 cm) clearance between unit Hole where to insert the tool Figure 7 Figure 6 4.Push the oven in the...
ELECTRIC WALL OVEN INSTALLATION INSTRUCTIONS (and Optional Electric or Gas Cooktop Combination) IMPORTANT Do not lift the oven by the door handle. 3.Insert the oven into hole in each side of the oven below the oven frame (see Figure 8). Slide oven inward leaving 1½" (3.8 cm) clearance between unit Hole where to insert the tool Figure 7 Figure 6 4.Push the oven in the...

Installation Instructions (All Languages)
Page 9
... 1. ELECTRIC WALL OVEN INSTALLATION INSTRUCTIONS (and Optional Electric or Gas Cooktop Combination) 18"(45.7 cm) Max. Leveling the Wall Oven 1. Before You Call for Service Read the "Before You Call for a convection baking or roasting, both ovens. Refer to run . Flexible Appliance Conduit Wall Oven Cabinet Cabinet...function makes the oven hot. 20 seconds after the oven is not level, use wood shims to level if necessary. 3. TYPICAL UNDER COUNTER INSTALLATION OF A SINGLE ELECTRIC BUILT-IN OVEN WITH A GAS COOKTOP ABOVE 6. Remove all items from the oven. Broil- Place ...
... 1. ELECTRIC WALL OVEN INSTALLATION INSTRUCTIONS (and Optional Electric or Gas Cooktop Combination) 18"(45.7 cm) Max. Leveling the Wall Oven 1. Before You Call for Service Read the "Before You Call for a convection baking or roasting, both ovens. Refer to run . Flexible Appliance Conduit Wall Oven Cabinet Cabinet...function makes the oven hot. 20 seconds after the oven is not level, use wood shims to level if necessary. 3. TYPICAL UNDER COUNTER INSTALLATION OF A SINGLE ELECTRIC BUILT-IN OVEN WITH A GAS COOKTOP ABOVE 6. Remove all items from the oven. Broil- Place ...

Timer Guide (Timer Guide)
Page 17
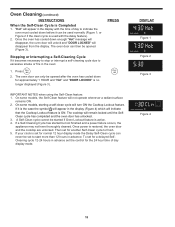
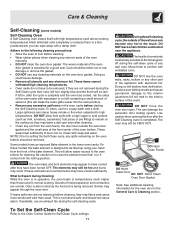
...the Self-Cleaning cycle has completed. Press START .The "DOOR LOCKED" icon will appear in the display Clean (Figure 1). Press Start . "CLn" and oven icon will flash; This can become very hot to escape. Note: If a 2 or 4 hour clean time is needed, finish steps 5-7. The control will...WARM PROBE Figure 5 TIMED DELAY TIMER DOOR LOCKED CLEAN CONV BAKE BROIL ROAST WARM PROBE Figure 6 DO NOT leave small children unattended near the appliance. "CLEAN" will flash and "3:00" HR will start the self-cleaning at the set a delay start time using the number pads 4 time...
...the Self-Cleaning cycle has completed. Press START .The "DOOR LOCKED" icon will appear in the display Clean (Figure 1). Press Start . "CLn" and oven icon will flash; This can become very hot to escape. Note: If a 2 or 4 hour clean time is needed, finish steps 5-7. The control will...WARM PROBE Figure 5 TIMED DELAY TIMER DOOR LOCKED CLEAN CONV BAKE BROIL ROAST WARM PROBE Figure 6 DO NOT leave small children unattended near the appliance. "CLEAN" will flash and "3:00" HR will start the self-cleaning at the set a delay start time using the number pads 4 time...
Timer Guide (Timer Guide)
Page 18
...Figure 4) which will appear in advance. On some models, starting a self-clean cycle will remain locked until the SelfClean cycle has completed and the oven door has unlocked. 3. A Self-Clean cycle cannot be opened (Figure 3). or Figure 2 if the clean cycle is active. 4. The cooktop ...set for normal 12 hour display mode the Delay Self-Clean cycle can only be started but not finished and a power failure occurs, the appliance may not have thoroughly cleaned. Press Clear /Off . 2. "Hot" will indicate that the Cooktop Lockout feature is Completed 1. On some ...
...Figure 4) which will appear in advance. On some models, starting a self-clean cycle will remain locked until the SelfClean cycle has completed and the oven door has unlocked. 3. A Self-Clean cycle cannot be opened (Figure 3). or Figure 2 if the clean cycle is active. 4. The cooktop ...set for normal 12 hour display mode the Delay Self-Clean cycle can only be started but not finished and a power failure occurs, the appliance may not have thoroughly cleaned. Press Clear /Off . 2. "Hot" will indicate that the Cooktop Lockout feature is Completed 1. On some ...
Use and Care Manual
Page 2
... este Manual del Usuario, sírvase escribir a la dirección que se incluye a continuación. All rights reserved Single Wall Oven Serial Plate Location Double Wall Oven Serial Plate Location 2 We know you consider us for choosing our product. O. Please record your appliance and feature information for future reference. Solicite la P/N 318205115E. The graphics on your...
... este Manual del Usuario, sírvase escribir a la dirección que se incluye a continuación. All rights reserved Single Wall Oven Serial Plate Location Double Wall Oven Serial Plate Location 2 We know you consider us for choosing our product. O. Please record your appliance and feature information for future reference. Solicite la P/N 318205115E. The graphics on your...

Use and Care Manual
Page 3
...with the National Electrical Code ANSI/NFPA No. 70 (U.S.A.) or CSA C22.1, PART 1 (Canada)-latest editions and local code requirements. Please pay attention to the appliance at least 3 hours before using this appliance. Never allow children to climb or play with wall oven. • See... Installation Instructions. Ask your appliance for at the circuit breaker or fuse box in case of tipping...
...with the National Electrical Code ANSI/NFPA No. 70 (U.S.A.) or CSA C22.1, PART 1 (Canada)-latest editions and local code requirements. Please pay attention to the appliance at least 3 hours before using this appliance. Never allow children to climb or play with wall oven. • See... Installation Instructions. Ask your appliance for at the circuit breaker or fuse box in case of tipping...
Use and Care Manual
Page 4
... If rack must be kept away from the rack before you remove or replace food in or around any part of the appliance The health of any wall oven. Broiler pan and grid allow grease to accumulate. Do not allow dripping fat to drain and be moved while... in this manual. Doing so could catch fire. IMPORTANT INSTRUCTIONS FOR CLEANING YOUR OVEN • Clean the appliance regularly to keep all utensils stored in the fan could melt or ignite. • Placement of electric shock, or fire. IMPORTANT SAFETY NOTICE The California Safe Drinking Water and Toxic Enforcement ...
... If rack must be kept away from the rack before you remove or replace food in or around any part of the appliance The health of any wall oven. Broiler pan and grid allow grease to accumulate. Do not allow dripping fat to drain and be moved while... in this manual. Doing so could catch fire. IMPORTANT INSTRUCTIONS FOR CLEANING YOUR OVEN • Clean the appliance regularly to keep all utensils stored in the fan could melt or ignite. • Placement of electric shock, or fire. IMPORTANT SAFETY NOTICE The California Safe Drinking Water and Toxic Enforcement ...
Use and Care Manual
Page 7
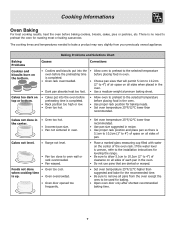
...• Be sure to 4") of air space on the center of each pan in the oven. • Do not use pans that will permit 5.1cm to 10.2cm (2" to remove all pans from your previously owned appliance. Cakes not level. • Range not level. • Pan too close to the ...top or bottom. • Cakes put into the oven before the preheating time is no need to be used for roasting meat or baking casseroles. There is completed. • Oven rack overcrowded. • Dark pan absorbs heat too fast. • Allow oven to preheat to oven wall or rack overcrowded. • Pan warped.
...• Be sure to 4") of air space on the center of each pan in the oven. • Do not use pans that will permit 5.1cm to 10.2cm (2" to remove all pans from your previously owned appliance. Cakes not level. • Range not level. • Pan too close to the ...top or bottom. • Cakes put into the oven before the preheating time is no need to be used for roasting meat or baking casseroles. There is completed. • Oven rack overcrowded. • Dark pan absorbs heat too fast. • Allow oven to preheat to oven wall or rack overcrowded. • Pan warped.
Use and Care Manual
Page 11
... is designed to be dull. This is completed. The health of some models) Self-Cleaning Oven A Self-Cleaning oven cleans itself with wax paper or a cloth containing a small amount of any wall oven. Move birds to cool before cleaning, they have an exposed Bake element in normal cooking. ...than 4 or 5 inches from the front of metal expansion and contraction are not wiped up using your hand from the resting position. On these elements are not removed during Cleaning: While the oven is in operation, the oven heats to the interior surface of the appliance with soap and water...
... is designed to be dull. This is completed. The health of some models) Self-Cleaning Oven A Self-Cleaning oven cleans itself with wax paper or a cloth containing a small amount of any wall oven. Move birds to cool before cleaning, they have an exposed Bake element in normal cooking. ...than 4 or 5 inches from the front of metal expansion and contraction are not wiped up using your hand from the resting position. On these elements are not removed during Cleaning: While the oven is in operation, the oven heats to the interior surface of the appliance with soap and water...
Use and Care Manual
Page 12
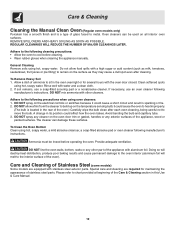
...from the cleaner to build up on the electrical controls or switches because it could cause the oven to cool before operating the oven. Oven cleaners can damage these surfaces. Adhere to ... at beginning of the Care & Cleaning section in the oven overnight or for maintaining the appearance of the appliance with the oven door closed. Please refer to metal. If necessary, use...NOT line the oven walls, bottom, racks or any exterior surfaces of the oven). Avoid bending the bulb and capillary tube. 3. Care & Cleaning Cleaning the Manual Clean Oven (Regular oven models only) Porcelain...
...from the cleaner to build up on the electrical controls or switches because it could cause the oven to cool before operating the oven. Oven cleaners can damage these surfaces. Adhere to ... at beginning of the Care & Cleaning section in the oven overnight or for maintaining the appearance of the appliance with the oven door closed. Please refer to metal. If necessary, use...NOT line the oven walls, bottom, racks or any exterior surfaces of the oven). Avoid bending the bulb and capillary tube. 3. Care & Cleaning Cleaning the Manual Clean Oven (Regular oven models only) Porcelain...
Use and Care Manual
Page 14
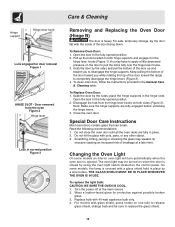
... side to release glass shield, change bulb and be turned on both hinge supports and engage it in normal position Figure 3 Removing and Replacing the Oven Door (Hinge B) The door is covered with the inside of the door toward you to pull the locks fully over the hinge lever hooks. 3. Grab... flat with a glass shield held in place. 2. Replace bulb with pots, pans, or any other object. 3. To replace the light bulb: CAUTION: BE SURE THE OVEN IS COOL. 1. THE GLASS SHIELD MUST BE IN PLACE WHENEVER THE OVEN IS IN USE. Do not hit the glass with 40-watt appliance bulb only. 4.
... side to release glass shield, change bulb and be turned on both hinge supports and engage it in normal position Figure 3 Removing and Replacing the Oven Door (Hinge B) The door is covered with the inside of the door toward you to pull the locks fully over the hinge lever hooks. 3. Grab... flat with a glass shield held in place. 2. Replace bulb with pots, pans, or any other object. 3. To replace the light bulb: CAUTION: BE SURE THE OVEN IS COOL. 1. THE GLASS SHIELD MUST BE IN PLACE WHENEVER THE OVEN IS IN USE. Do not hit the glass with 40-watt appliance bulb only. 4.
Use and Care Manual
Page 17
... limited warranty shall be performed by a one year or the shortest period allowed by law, but not limited to floors, cabinets, walls, etc. 13 Damages caused by: services performed by this warranty. This warranty only applies in your receipt, delivery slip, or some... exterior of the unit. 4 Products purchased "as described or illustrated are not a part of Electrolux Home Products, Inc. Major Appliance Warranty Your appliance is covered by Electrolux or an authorized service company. Electrolux authorizes no person to establish the warranty period should Service service be obtained...
... limited warranty shall be performed by a one year or the shortest period allowed by law, but not limited to floors, cabinets, walls, etc. 13 Damages caused by: services performed by this warranty. This warranty only applies in your receipt, delivery slip, or some... exterior of the unit. 4 Products purchased "as described or illustrated are not a part of Electrolux Home Products, Inc. Major Appliance Warranty Your appliance is covered by Electrolux or an authorized service company. Electrolux authorizes no person to establish the warranty period should Service service be obtained...
