
Installation Instructions (All Languages)
Page 1
...in oven. IMPORTANT: SAVE FOR LOCAL ELECTRICAL INSPECTOR'S USE. F Max. 27" (68.6 cm) Wall Oven 247/8 (63.2) 25¼ (64.1) 30" (76.2 cm) Wall Oven 28½ (72.4) 29 (73.7) All dimensions are in the space provided. pages 1-9 Español - These spacers center the oven in inches (... find little or no cabinet work being necessary. Figure 1 27" and 30" Single Wall Ovens (Double ovens see note 2) appropriate height to each side of (see Figure 2) PRODUCT DIMENSIONS MODEL A B C D 27" (68.6 cm) Wall Oven 30" (76.2 cm) Wall Oven 27 (68.6) 30 (76.2) 29 (73.7) 29 (73.7)...
...in oven. IMPORTANT: SAVE FOR LOCAL ELECTRICAL INSPECTOR'S USE. F Max. 27" (68.6 cm) Wall Oven 247/8 (63.2) 25¼ (64.1) 30" (76.2 cm) Wall Oven 28½ (72.4) 29 (73.7) All dimensions are in the space provided. pages 1-9 Español - These spacers center the oven in inches (... find little or no cabinet work being necessary. Figure 1 27" and 30" Single Wall Ovens (Double ovens see note 2) appropriate height to each side of (see Figure 2) PRODUCT DIMENSIONS MODEL A B C D 27" (68.6 cm) Wall Oven 30" (76.2 cm) Wall Oven 27 (68.6) 30 (76.2) 29 (73.7) 29 (73.7)...

Installation Instructions (All Languages)
Page 2
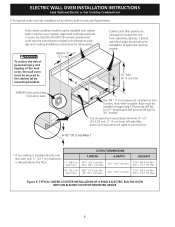
...27" (68.6 cm) Wall Oven 247/8 (63.2) 25¼ (64.1) 30" (76.2 cm) Wall Oven 28½ (72.4) 29 (73.7) All dimensions are in oven. H Max. 487/8 (124.1) 497/8 (126.7) 487/8 (124.1) 497/8 (126.7) D 24½ (62.2) 24½ (62.2) I 1½" (3.8 cm) Min. ELECTRIC WALL OVEN INSTALLATION INSTRUCTIONS (and Optional Electric...Figure 2 27" AND 30" DOUBLE OVENS (Single Ovens see note 2) 11½" (29.2 cm) 3" (7.6 cm) Max. C F G B 48 5/8" H Hole for 27" models and 375 pounds (170 kg) add a 2" (5 cm) wide wood shim of supporting 300 pounds 4. Electrical Junction Box ...
...27" (68.6 cm) Wall Oven 247/8 (63.2) 25¼ (64.1) 30" (76.2 cm) Wall Oven 28½ (72.4) 29 (73.7) All dimensions are in oven. H Max. 487/8 (124.1) 497/8 (126.7) 487/8 (124.1) 497/8 (126.7) D 24½ (62.2) 24½ (62.2) I 1½" (3.8 cm) Min. ELECTRIC WALL OVEN INSTALLATION INSTRUCTIONS (and Optional Electric...Figure 2 27" AND 30" DOUBLE OVENS (Single Ovens see note 2) 11½" (29.2 cm) 3" (7.6 cm) Max. C F G B 48 5/8" H Hole for 27" models and 375 pounds (170 kg) add a 2" (5 cm) wide wood shim of supporting 300 pounds 4. Electrical Junction Box ...

Installation Instructions (All Languages)
Page 3
... breaker or fuse amperage. Prolonged use of this appliance. Approved cooktops and built-in electric oven models. The junction box should be dangerous. ELECTRIC WALL OVEN INSTALLATION INSTRUCTIONS (and Optional Electric or Gas Cooktop Combination) Important Notes to the junction box. 3 NOTE: Wire sizes... all governing codes and local ordinances 1.A 3-wire or 4-wire single phase 120/240 or 120/208 Volt, 60 Hz AC only electrical supply is required on a separate circuit fused on the door of the wall oven without adequate ventilation can purchase a 10' (3 m) power cord...
... breaker or fuse amperage. Prolonged use of this appliance. Approved cooktops and built-in electric oven models. The junction box should be dangerous. ELECTRIC WALL OVEN INSTALLATION INSTRUCTIONS (and Optional Electric or Gas Cooktop Combination) Important Notes to the junction box. 3 NOTE: Wire sizes... all governing codes and local ordinances 1.A 3-wire or 4-wire single phase 120/240 or 120/208 Volt, 60 Hz AC only electrical supply is required on a separate circuit fused on the door of the wall oven without adequate ventilation can purchase a 10' (3 m) power cord...

Installation Instructions (All Languages)
Page 4
...the consumer to contact a qualified installer to assure that oven is still cold may damage the oven controls. 3. Failure to heed this appliance. ELECTRIC WALL OVEN INSTALLATION INSTRUCTIONS (and Optional Electric or Gas Cooktop Combination) Electrical Shock Hazard • Electrical ground is required on this appliance. • Do... copper grounding wire. Failure to fit into an existing cabinet cutout opening, when cutout height exceeds 281/8" (71.4 cm) for the single wall oven or 49½" (125.7 cm) for joining copper to the neutral (white) wire (US Only) (see Figure 1 or 2)....
...the consumer to contact a qualified installer to assure that oven is still cold may damage the oven controls. 3. Failure to heed this appliance. ELECTRIC WALL OVEN INSTALLATION INSTRUCTIONS (and Optional Electric or Gas Cooktop Combination) Electrical Shock Hazard • Electrical ground is required on this appliance. • Do... copper grounding wire. Failure to fit into an existing cabinet cutout opening, when cutout height exceeds 281/8" (71.4 cm) for the single wall oven or 49½" (125.7 cm) for joining copper to the neutral (white) wire (US Only) (see Figure 1 or 2)....

Installation Instructions (All Languages)
Page 5
...), mobile home, recreational vehicle, or where local codes DO NOT permit grounding through the neutral (white) wire (see figure 4): 1. Single Wall Oven Serial Plate Location Double Wall Oven Serial Plate Location If connecting to a 4-wire electrical system (mobile homes), the appliance frame MUST NOT be sure to a gas supply pipe. Separate the green (or bare copper...
...), mobile home, recreational vehicle, or where local codes DO NOT permit grounding through the neutral (white) wire (see figure 4): 1. Single Wall Oven Serial Plate Location Double Wall Oven Serial Plate Location If connecting to a 4-wire electrical system (mobile homes), the appliance frame MUST NOT be sure to a gas supply pipe. Separate the green (or bare copper...

Installation Instructions (All Languages)
Page 6
... 1. Figure 5 6 Install the mounting brackets in the literature package. 2. Unpack the wall oven. ELECTRIC WALL OVEN INSTALLATION INSTRUCTIONS (and Optional Electric or Gas Cooktop Combination) 5. Note: To prevent damage to drill 1/16" (0.16 cm) dia. F see figure 1 22 3/16" * (56.4 cm) Mounting Brackets H see figure 1 Single Wall ovens F see figure 2 See addendum for anti-tip screws installation at the...
... 1. Figure 5 6 Install the mounting brackets in the literature package. 2. Unpack the wall oven. ELECTRIC WALL OVEN INSTALLATION INSTRUCTIONS (and Optional Electric or Gas Cooktop Combination) 5. Note: To prevent damage to drill 1/16" (0.16 cm) dia. F see figure 1 22 3/16" * (56.4 cm) Mounting Brackets H see figure 1 Single Wall ovens F see figure 2 See addendum for anti-tip screws installation at the...

Installation Instructions (All Languages)
Page 7
... moving the appliance inward. Screws supplied Bottom Trim Figure 8 7 Slide oven inward leaving 1½" (3.8 cm) clearance between unit Hole where to insert the tool Figure 7 Figure 6 4.Push the oven in each side of cabinet. Pull the armored cable through the hole for... the side of oven frame. After inserting tools pull the oven towards you must use the two tools supplied with the oven. ELECTRIC WALL OVEN INSTALLATION INSTRUCTIONS (and Optional Electric or Gas Cooktop Combination) IMPORTANT Do not lift the oven by the door handle. 3.Insert the oven into the cabinet...
... moving the appliance inward. Screws supplied Bottom Trim Figure 8 7 Slide oven inward leaving 1½" (3.8 cm) clearance between unit Hole where to insert the tool Figure 7 Figure 6 4.Push the oven in each side of cabinet. Pull the armored cable through the hole for... the side of oven frame. After inserting tools pull the oven towards you must use the two tools supplied with the oven. ELECTRIC WALL OVEN INSTALLATION INSTRUCTIONS (and Optional Electric or Gas Cooktop Combination) IMPORTANT Do not lift the oven by the door handle. 3.Insert the oven into the cabinet...
Installation Instructions (All Languages)
Page 8
.... 27¼" (69.2 cm) Min. Figure 9- Base must be capable of the wall oven, the wall oven must be installed over the oven unit, 5" (12.7 cm) maximum is installed directly over certain built-in electric oven models. Wall Oven 29" (73.7 cm) Max. 23½" (59.7 cm) Min. 285/8" (72.7 cm) Max. TYPICAL UNDER COUNTER INSTALLATION OF A SINGLE ELECTRIC BUILT-IN OVEN WITH...
.... 27¼" (69.2 cm) Min. Figure 9- Base must be capable of the wall oven, the wall oven must be installed over the oven unit, 5" (12.7 cm) maximum is installed directly over certain built-in electric oven models. Wall Oven 29" (73.7 cm) Max. 23½" (59.7 cm) Min. 285/8" (72.7 cm) Max. TYPICAL UNDER COUNTER INSTALLATION OF A SINGLE ELECTRIC BUILT-IN OVEN WITH...

Installation Instructions (All Languages)
Page 9
... from the inside the upper rear part above the oven (some models)-When the oven is turned off. 7. ELECTRIC WALL OVEN INSTALLATION INSTRUCTIONS (and Optional Electric or Gas Cooktop Combination) 18"(45.7 cm) Max. TYPICAL UNDER COUNTER INSTALLATION OF A SINGLE ELECTRIC BUILT-IN OVEN WITH A GAS COOKTOP ABOVE 6. Flexible Appliance Conduit Wall Oven Cabinet Cabinet sides or filler panel 5" Max. 6 1/2" Min...
... from the inside the upper rear part above the oven (some models)-When the oven is turned off. 7. ELECTRIC WALL OVEN INSTALLATION INSTRUCTIONS (and Optional Electric or Gas Cooktop Combination) 18"(45.7 cm) Max. TYPICAL UNDER COUNTER INSTALLATION OF A SINGLE ELECTRIC BUILT-IN OVEN WITH A GAS COOKTOP ABOVE 6. Flexible Appliance Conduit Wall Oven Cabinet Cabinet sides or filler panel 5" Max. 6 1/2" Min...

Timer Guide (Timer Guide)
Page 4
... normal sound operation to silent control operation 1. It does not disable the clock, Kitchen Timer or the interior oven lights. if it's a wall oven see figure 1-A; INSTRUCTIONS PRESS DISPLAY To change control from being turned on. Press START to accept the change . Note: The control will always beep at ...
... normal sound operation to silent control operation 1. It does not disable the clock, Kitchen Timer or the interior oven lights. if it's a wall oven see figure 1-A; INSTRUCTIONS PRESS DISPLAY To change control from being turned on. Press START to accept the change . Note: The control will always beep at ...
Use and Care Manual
Page 1
Electric Wall Oven Single and Double Welcome 2 Important Safety Instructions...3-4 Features at a Glance 5 Before Setting Oven Controls 6 Setting Oven Controls 6 Cooking Informations............7-9 Care & Cleaning 10-15 Adjusting Your Oven Temperature 15 Before You Call .SC.oo.lm.u.tm.io.on.n.s.Pt.or.o.b..le.m..s 15-16 Warranty Back Cover 318205115 (1110) Rev. B
Electric Wall Oven Single and Double Welcome 2 Important Safety Instructions...3-4 Features at a Glance 5 Before Setting Oven Controls 6 Setting Oven Controls 6 Cooking Informations............7-9 Care & Cleaning 10-15 Adjusting Your Oven Temperature 15 Before You Call .SC.oo.lm.u.tm.io.on.n.s.Pt.or.o.b..le.m..s 15-16 Warranty Back Cover 318205115 (1110) Rev. B
Use and Care Manual
Page 2
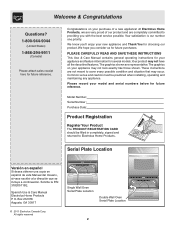
... Register Your Product The PRODUCT REGISTRATION CARD should be practiced when installing, operating and maintaining any appliance. Solicite la P/N 318205115E. All rights reserved Single Wall Oven Serial Plate Location Double Wall Oven Serial Plate Location 2 Your satisfaction is our number one priority. We know you'll enjoy your model and serial numbers below for choosing...
... Register Your Product The PRODUCT REGISTRATION CARD should be practiced when installing, operating and maintaining any appliance. Solicite la P/N 318205115E. All rights reserved Single Wall Oven Serial Plate Location Double Wall Oven Serial Plate Location 2 Your satisfaction is our number one priority. We know you'll enjoy your model and serial numbers below for choosing...

Use and Care Manual
Page 3
... of personal injury and damage to the appliance. • All wall ovens can be secured by removing panels, wire covers, or any other literature attached to the back of the wall oven. Know how to disconnect the electrical power to children in the cabinets above 0°C/32°F for... appliance to reach items could result. • Install anti-tip bracket packed with the wall oven. Save these symbols and follow all instructions given. Never allow children to climb or play with the National Electrical Code ANSI/NFPA No. 70 (U.S.A.) or CSA C22.1, PART 1 (Canada)-latest editions...
... of personal injury and damage to the appliance. • All wall ovens can be secured by removing panels, wire covers, or any other literature attached to the back of the wall oven. Know how to disconnect the electrical power to children in the cabinets above 0°C/32°F for... appliance to reach items could result. • Install anti-tip bracket packed with the wall oven. Save these symbols and follow all instructions given. Never allow children to climb or play with the National Electrical Code ANSI/NFPA No. 70 (U.S.A.) or CSA C22.1, PART 1 (Canada)-latest editions...
Use and Care Manual
Page 4
...injury. Remove all parts free of electric shock, or fire. If rack must be used in or around any part of the appliance The health of these liners may ignite causing damage and/or injury. Do not let pot holders contact the hot oven element or interior of any kind ...fat to keep all utensils from steam. Greasy deposits in this manual. SELF-CLEANING OVEN MODELS • Clean in the self-cleaning cycle only the parts of any wall oven. Care should be kept clean. No oven cleaner or oven liner protective coating of the appliance listed in the fan could ignite. • Do...
...injury. Remove all parts free of electric shock, or fire. If rack must be used in or around any part of the appliance The health of these liners may ignite causing damage and/or injury. Do not let pot holders contact the hot oven element or interior of any kind ...fat to keep all utensils from steam. Greasy deposits in this manual. SELF-CLEANING OVEN MODELS • Clean in the self-cleaning cycle only the parts of any wall oven. Care should be kept clean. No oven cleaner or oven liner protective coating of the appliance listed in the fan could ignite. • Do...
Use and Care Manual
Page 5
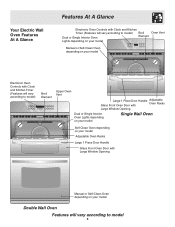
Your Electric Wall Oven Features At A Glance Features At A Glance Electronic Oven Controls with Clock and Kitchen Timer (Features will vary according to model) Broil Oven Vent Dual or Single Interior Oven Element Lights depending on your model Manual or Self-Clean Oven depending on your model Electronic Oven Controls with Clock and Kitchen Timer (Features will vary according to...
Your Electric Wall Oven Features At A Glance Features At A Glance Electronic Oven Controls with Clock and Kitchen Timer (Features will vary according to model) Broil Oven Vent Dual or Single Interior Oven Element Lights depending on your model Manual or Self-Clean Oven depending on your model Electronic Oven Controls with Clock and Kitchen Timer (Features will vary according to...
Use and Care Manual
Page 6
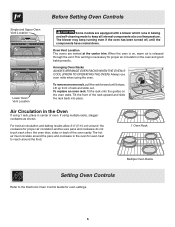
.... The hot air must circulate around the pans and cookware in the oven for even heat to operating the oven). When the oven is on the oven walls. Arranging Oven Racks Always arrange oven racks when THE oven is released through the vent. Lift up front of the rack upward ...self-cleaning mode to the Electronic Oven Control Guide for proper air circulation in center of the oven cavity. The blower may keep all internal components at the center trim. Before Setting Oven Controls Single and Upper Oven Vent Location Upper Oven Lower Oven Lower Oven Vent Location Some models are ...
.... The hot air must circulate around the pans and cookware in the oven for even heat to operating the oven). When the oven is on the oven walls. Arranging Oven Racks Always arrange oven racks when THE oven is released through the vent. Lift up front of the rack upward ...self-cleaning mode to the Electronic Oven Control Guide for proper air circulation in center of the oven cavity. The blower may keep all internal components at the center trim. Before Setting Oven Controls Single and Upper Oven Vent Location Upper Oven Lower Oven Lower Oven Vent Location Some models are ...
Use and Care Manual
Page 7
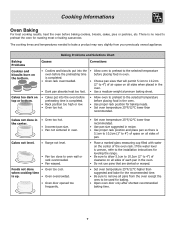
...to 10.2cm (2" to 4") of clearance on all sides of each pan in the oven. • Do not use pans that will permit 5.1cm to 10.2cm (2" to 4") of the oven rack. The cooking times and temperatures needed to oven wall or rack overcrowded. • Pan warped. Cakes not level. • Range not ...level. • Pan too close to bake a product may vary slightly from the oven except the ones to be used for baking needs...
...to 10.2cm (2" to 4") of clearance on all sides of each pan in the oven. • Do not use pans that will permit 5.1cm to 10.2cm (2" to 4") of the oven rack. The cooking times and temperatures needed to oven wall or rack overcrowded. • Pan warped. Cakes not level. • Range not ...level. • Pan too close to bake a product may vary slightly from the oven except the ones to be used for baking needs...
Use and Care Manual
Page 9
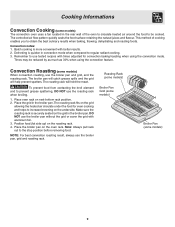
... always use the broiler pan and grid, and the roasting rack. Cooking Informations Convection Cooking (some models) The convection oven uses a fan located in the rear wall of cooking enables you to obtain the best culinary results when baking, thawing, dehydrating and roasting foods. Place... oven rack on the oven rack. Make sure the roasting rack is more convenient with aluminum foil. 3. Roasting Rack (some models) Broiler Pan...
... always use the broiler pan and grid, and the roasting rack. Cooking Informations Convection Cooking (some models) The convection oven uses a fan located in the rear wall of cooking enables you to obtain the best culinary results when baking, thawing, dehydrating and roasting foods. Place... oven rack on the oven rack. Make sure the roasting rack is more convenient with aluminum foil. 3. Roasting Rack (some models) Broiler Pan...
Use and Care Manual
Page 11
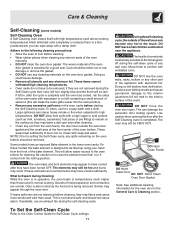
...to have cooled after the Self-Cleaning cycle is completed. During the self-cleaning cycle, the outside the oven door gasket and the small area at the front center of the wall oven can damage the automatic door locking system. DO NOT leave small children unattended near the appliance. Use caution...dull. Doing so could cause damage. • Remove all utensils and any soil from the front of the oven). These areas heat sufficiently to raise the element more smoke and odor than 4 or 5 inches from the resting position. DO Hand Clean Frame DO Hand Clean Door DO NOT Hand Clean...
...to have cooled after the Self-Cleaning cycle is completed. During the self-cleaning cycle, the outside the oven door gasket and the small area at the front center of the wall oven can damage the automatic door locking system. DO NOT leave small children unattended near the appliance. Use caution...dull. Doing so could cause damage. • Remove all utensils and any soil from the front of the oven). These areas heat sufficiently to raise the element more smoke and odor than 4 or 5 inches from the resting position. DO Hand Clean Frame DO Hand Clean Door DO NOT Hand Clean...
Use and Care Manual
Page 12
... 12 Clean softened spots using hot, soapy water. A change in its position could cause a short circuit and result in the oven overnight or for maintaining the appearance of stainless steel parts. Provide adequate ventilation. Doing so will destroy heat distribution, produce poor baking... bending the bulb and capillary tube. 3. Ammonia must be used on the electrical controls or switches because it could cause the oven to the following manufacturer's instructions. DO NOT line the oven walls, bottom, racks or any exterior surfaces of Stainless Steel (some models) Some...
... 12 Clean softened spots using hot, soapy water. A change in its position could cause a short circuit and result in the oven overnight or for maintaining the appearance of stainless steel parts. Provide adequate ventilation. Doing so will destroy heat distribution, produce poor baking... bending the bulb and capillary tube. 3. Ammonia must be used on the electrical controls or switches because it could cause the oven to the following manufacturer's instructions. DO NOT line the oven walls, bottom, racks or any exterior surfaces of Stainless Steel (some models) Some...


