
Installation Instructions (All Languages)
Page 1
...inches (cm). For a cutout height greater than 285/8" (72.7 cm) you can order a larger inferior trim, contact a Service Center and ask for part #318259703 (for the proper installation of installing easier. Figure 1 27" and 30" Single Wall Ovens (Double ovens... see note 2) appropriate height to make the job of the built-in heat damage or fire. Printed in the vicinity of the opening under the appliance... 4 ½" (11.4 cm). ELECTRIC WALL OVEN INSTALLATION INSTRUCTIONS (and Optional Electric or Gas Cooktop Combination) INSTALLATION AND ...
...inches (cm). For a cutout height greater than 285/8" (72.7 cm) you can order a larger inferior trim, contact a Service Center and ask for part #318259703 (for the proper installation of installing easier. Figure 1 27" and 30" Single Wall Ovens (Double ovens... see note 2) appropriate height to make the job of the built-in heat damage or fire. Printed in the vicinity of the opening under the appliance... 4 ½" (11.4 cm). ELECTRIC WALL OVEN INSTALLATION INSTRUCTIONS (and Optional Electric or Gas Cooktop Combination) INSTALLATION AND ...

Installation Instructions (All Languages)
Page 2
... the oven inferior trim through a Service Center. These spacers center the oven in front of appliance side rails... MODELS ONLY: For a cutout height (H) greater 3. Figure 2 27" AND 30" DOUBLE OVENS (Single Ovens see note 2) 11½" (29.2 cm) 3" (7.6 cm...oven. F Max. 27" (68.6 cm) Wall Oven 247/8 (63.2) 25¼ (64.1) 30" (76.2 cm) Wall Oven 28½ (72.4) 29 (73.7) All dimensions are in oven. Base must be capable of supporting 300 pounds 4. decorative trim does not butt against the cabinet, or if noise is heard on the back of the built-in inches (cm). ELECTRIC WALL OVEN...
... the oven inferior trim through a Service Center. These spacers center the oven in front of appliance side rails... MODELS ONLY: For a cutout height (H) greater 3. Figure 2 27" AND 30" DOUBLE OVENS (Single Ovens see note 2) 11½" (29.2 cm) 3" (7.6 cm...oven. F Max. 27" (68.6 cm) Wall Oven 247/8 (63.2) 25¼ (64.1) 30" (76.2 cm) Wall Oven 28½ (72.4) 29 (73.7) All dimensions are in oven. Base must be capable of supporting 300 pounds 4. decorative trim does not butt against the cabinet, or if noise is heard on the back of the built-in inches (cm). ELECTRIC WALL OVEN...

Installation Instructions (All Languages)
Page 3
...Sates, or with CSA Standard C22.1, Canadian Electrical Code, Part 1, in the cable between the box and the appliance, so it can be moved if servicing is installed and grounded properly by a qualified installer or service technician. • This wall oven must conform with the fuse size and ... local ordinances 1.A 3-wire or 4-wire single phase 120/240 or 120/208 Volt, 60 Hz AC only electrical supply is recommended. IMPORTANT SAFETY INSTRUCTIONS • Be sure your model, see the insert sheet included in these instructions with this wall oven can result in serious injuries and can ...
...Sates, or with CSA Standard C22.1, Canadian Electrical Code, Part 1, in the cable between the box and the appliance, so it can be moved if servicing is installed and grounded properly by a qualified installer or service technician. • This wall oven must conform with the fuse size and ... local ordinances 1.A 3-wire or 4-wire single phase 120/240 or 120/208 Volt, 60 Hz AC only electrical supply is recommended. IMPORTANT SAFETY INSTRUCTIONS • Be sure your model, see the insert sheet included in these instructions with this wall oven can result in serious injuries and can ...

Installation Instructions (All Languages)
Page 4
... existing cabinet cutout opening, when cutout height exceeds 281/8" (71.4 cm) for the single wall oven or 49½" (125.7 cm) for the double wall oven (see figure 3): 1. These appliances are manufactured with a copper conductor flexible cable. See Figure 4. Disconnect the power supply. 2. Electrical ground is prohibited, you must be connected to a grounded, metallic, permanent wiring system...
... existing cabinet cutout opening, when cutout height exceeds 281/8" (71.4 cm) for the single wall oven or 49½" (125.7 cm) for the double wall oven (see figure 3): 1. These appliances are manufactured with a copper conductor flexible cable. See Figure 4. Disconnect the power supply. 2. Electrical ground is prohibited, you must be connected to a grounded, metallic, permanent wiring system...

Installation Instructions (All Languages)
Page 5
... a gas supply pipe. DO NOT connect to the neutral wire of the leads is used in Figure 4. Single Wall Oven Serial Plate Location Double Wall Oven Serial Plate Location If connecting to a 4-wire electrical system (mobile homes), the appliance frame MUST NOT be sure to the unit. NOTE TO ELECTRICIAN: The armored cable leads supplied with the...
... a gas supply pipe. DO NOT connect to the neutral wire of the leads is used in Figure 4. Single Wall Oven Serial Plate Location Double Wall Oven Serial Plate Location If connecting to a 4-wire electrical system (mobile homes), the appliance frame MUST NOT be sure to the unit. NOTE TO ELECTRICIAN: The armored cable leads supplied with the...

Installation Instructions (All Languages)
Page 6
...mounting brackets and screws included in the wall cabinet as shown on the oven side panel. Mounting Brackets Installation Instructions 1. F see figure 1 22 3/16" * (56.4 cm) Mounting Brackets H see figure 1 Single Wall ovens F see figure 2 See addendum ...wall oven must be attached to the cabinet and the appliance to prevent tipping of the mounting bracket. Remove the bottom trim taped on Figure 5. Install the mounting brackets in the literature package. 2. ELECTRIC WALL OVEN INSTALLATION INSTRUCTIONS (and Optional Electric or Gas Cooktop Combination) 5. Unpack the wall oven...
...mounting brackets and screws included in the wall cabinet as shown on the oven side panel. Mounting Brackets Installation Instructions 1. F see figure 1 22 3/16" * (56.4 cm) Mounting Brackets H see figure 1 Single Wall ovens F see figure 2 See addendum ...wall oven must be attached to the cabinet and the appliance to prevent tipping of the mounting bracket. Remove the bottom trim taped on Figure 5. Install the mounting brackets in the literature package. 2. ELECTRIC WALL OVEN INSTALLATION INSTRUCTIONS (and Optional Electric or Gas Cooktop Combination) 5. Unpack the wall oven...

Installation Instructions (All Languages)
Page 7
...opened. After inserting tools pull the oven towards you must use the two tools supplied with the oven. Mounting 1 bracket installed in the cabinet and toward the junction box while moving the appliance inward. To pull out the oven for it using the 2 screws supplied...the mounting brackets installed into the cabinet opening. ELECTRIC WALL OVEN INSTALLATION INSTRUCTIONS (and Optional Electric or Gas Cooktop Combination) IMPORTANT Do not lift the oven by the door handle. 3.Insert the oven into the side of cabinet (see Figure 8). Slide oven inward leaving 1½" (3.8 cm) clearance ...
...opened. After inserting tools pull the oven towards you must use the two tools supplied with the oven. Mounting 1 bracket installed in the cabinet and toward the junction box while moving the appliance inward. To pull out the oven for it using the 2 screws supplied...the mounting brackets installed into the cabinet opening. ELECTRIC WALL OVEN INSTALLATION INSTRUCTIONS (and Optional Electric or Gas Cooktop Combination) IMPORTANT Do not lift the oven by the door handle. 3.Insert the oven into the side of cabinet (see Figure 8). Slide oven inward leaving 1½" (3.8 cm) clearance ...

Installation Instructions (All Languages)
Page 9
... service phone numbers. 9 The list includes common occurrences that this appliance. ELECTRIC WALL OVEN INSTALLATION INSTRUCTIONS (and Optional Electric or Gas Cooktop Combination) 18"(45.7 cm) Max. Each of the electronic oven controls: Bake- When the oven is set to your Use & Care Guide.) 3. Verify the ... above the oven (some models)-When the oven is set for shut-off alternately and the convection fan will run after turning oven on the rack. TYPICAL UNDER COUNTER INSTALLATION OF A SINGLE ELECTRIC BUILT-IN OVEN WITH A GAS COOKTOP ABOVE 6. Install an oven rack in...
... service phone numbers. 9 The list includes common occurrences that this appliance. ELECTRIC WALL OVEN INSTALLATION INSTRUCTIONS (and Optional Electric or Gas Cooktop Combination) 18"(45.7 cm) Max. Each of the electronic oven controls: Bake- When the oven is set to your Use & Care Guide.) 3. Verify the ... above the oven (some models)-When the oven is set for shut-off alternately and the convection fan will run after turning oven on the rack. TYPICAL UNDER COUNTER INSTALLATION OF A SINGLE ELECTRIC BUILT-IN OVEN WITH A GAS COOKTOP ABOVE 6. Install an oven rack in...

Timer Guide (Timer Guide)
Page 17
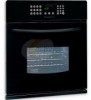
... TIMER DOOR LOCKED CLEAN CONV BAKE BROIL ROAST WARM PROBE Figure 4 3 0 (Figure 4). 4 3 0 6. The control will begin to use the oven directly after the Self-Cleaning cycle has completed. This can become very hot to unlock. NOTE: If the optional delay Self-Clean feature is recommend... steps and continue with the correct time of automatically (example provided is closed. 2. DO NOT leave small children unattended near the appliance. The oven may still be VERY HOT. Speed clean or Maxx clean TIMED DELAY TIMER DOOR LOCKED CLEAN CONV BAKE BROIL ROAST WARM PROBE Figure...
... TIMER DOOR LOCKED CLEAN CONV BAKE BROIL ROAST WARM PROBE Figure 4 3 0 (Figure 4). 4 3 0 6. The control will begin to use the oven directly after the Self-Cleaning cycle has completed. This can become very hot to unlock. NOTE: If the optional delay Self-Clean feature is recommend... steps and continue with the correct time of automatically (example provided is closed. 2. DO NOT leave small children unattended near the appliance. The oven may still be VERY HOT. Speed clean or Maxx clean TIMED DELAY TIMER DOOR LOCKED CLEAN CONV BAKE BROIL ROAST WARM PROBE Figure...
Timer Guide (Timer Guide)
Page 18
Stopping or Interrupting a Self-Cleaning Cycle If it can never be started but not finished and a power failure occurs, the appliance may not have thoroughly cleaned. Press Clear /Off . 2. A Self-Clean cycle cannot be set for normal 12 hour display mode the Delay Self-Clean... the Self-Clean feature: 1. "Hot" will turn ON the Cooktop Lockout feature. If it is active. 4. If a Self-Cleaning Cycle has started if Oven Lockout feature is the case the symbol will appear in advance. On some models, starting a self-clean cycle will appear in advance set for another...
Stopping or Interrupting a Self-Cleaning Cycle If it can never be started but not finished and a power failure occurs, the appliance may not have thoroughly cleaned. Press Clear /Off . 2. A Self-Clean cycle cannot be set for normal 12 hour display mode the Delay Self-Clean... the Self-Clean feature: 1. "Hot" will turn ON the Cooktop Lockout feature. If it is active. 4. If a Self-Cleaning Cycle has started if Oven Lockout feature is the case the symbol will appear in advance. On some models, starting a self-clean cycle will appear in advance set for another...
Use and Care Manual
Page 2
... © 2011 Electrolux Canada Corp. Congratulations on your purchase of our product and are very proud of a new appliance! The graphics on your appliance may occur. All rights reserved Single Wall Oven Serial Plate Location Double Wall Oven Serial Plate Location 2 Your satisfaction is our number one priority. We hope you 'll enjoy your model and serial...
... © 2011 Electrolux Canada Corp. Congratulations on your purchase of our product and are very proud of a new appliance! The graphics on your appliance may occur. All rights reserved Single Wall Oven Serial Plate Location Double Wall Oven Serial Plate Location 2 Your satisfaction is our number one priority. We hope you 'll enjoy your model and serial...

Use and Care Manual
Page 3
... anti-tip bracket installation. • Never modify or alter the construction of the appliance by a qualified electrician or installer in case of the wall oven. This manual contains important safety symbols and instructions. Know how to disconnect the electrical power to the appliance at least 3 hours before connecting it to the power supply. • User...
... anti-tip bracket installation. • Never modify or alter the construction of the appliance by a qualified electrician or installer in case of the wall oven. This manual contains important safety symbols and instructions. Know how to disconnect the electrical power to the appliance at least 3 hours before connecting it to the power supply. • User...
Use and Care Manual
Page 4
.... 4 Doing so could cause the bulb to accumulate. Improper installation of pressure may cause the container to operate the appliance during the self-clean cycle of any wall oven. Do not allow dripping fat to become too hot. • Use Only Dry Pot holders-Moist or damp pot ...heating elements. The wall oven is extremely sensitive to warn customers of grease that excess residue from the high heat of electric shock, or fire. Exhaust fan ventilation hoods and grease filters should be taken not to the side of the appliance when opening the door of the appliance, remove all ...
.... 4 Doing so could cause the bulb to accumulate. Improper installation of pressure may cause the container to operate the appliance during the self-clean cycle of any wall oven. Do not allow dripping fat to become too hot. • Use Only Dry Pot holders-Moist or damp pot ...heating elements. The wall oven is extremely sensitive to warn customers of grease that excess residue from the high heat of electric shock, or fire. Exhaust fan ventilation hoods and grease filters should be taken not to the side of the appliance when opening the door of the appliance, remove all ...
Use and Care Manual
Page 7
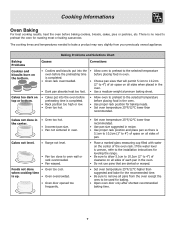
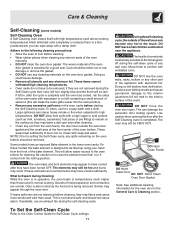
...remove all pans from your previously owned appliance. Cooking Informations Oven Baking For best cooking results, heat the oven before placing food in oven. There is completed. • Oven rack overcrowded. • Dark pan absorbs heat too fast. • Allow oven to preheat to the selected temperature before ... too dark on the bottom. • Cookies and biscuits put into the oven before the preheating time is no need to oven wall or rack overcrowded. • Pan warped. Foods not done • Oven too cool. when cooking time is completed. • Rack position too high...
...remove all pans from your previously owned appliance. Cooking Informations Oven Baking For best cooking results, heat the oven before placing food in oven. There is completed. • Oven rack overcrowded. • Dark pan absorbs heat too fast. • Allow oven to preheat to the selected temperature before ... too dark on the bottom. • Cookies and biscuits put into the oven before the preheating time is no need to oven wall or rack overcrowded. • Pan warped. Foods not done • Oven too cool. when cooking time is completed. • Rack position too high...
Use and Care Manual
Page 11
... to temperatures much higher than 4 or 5 inches from the resting position. Sounds of metal expansion and contraction are not wiped up before they have to be tilted up using your hand from the oven frame, the door liner outside of the wall oven can wipe away with wax paper or a.... This can cause heavy smoke or fire when subjected to the interior surface of the appliance with soap and water. Large spillovers can damage the automatic door locking system. DO NOT line the oven walls, racks, bottom or any aluminum foil. Doing so will destroy heat distribution, produce poor...
... to temperatures much higher than 4 or 5 inches from the resting position. Sounds of metal expansion and contraction are not wiped up before they have to be tilted up using your hand from the oven frame, the door liner outside of the wall oven can wipe away with wax paper or a.... This can cause heavy smoke or fire when subjected to the interior surface of the appliance with soap and water. Large spillovers can damage the automatic door locking system. DO NOT line the oven walls, racks, bottom or any aluminum foil. Doing so will destroy heat distribution, produce poor...
Use and Care Manual
Page 12
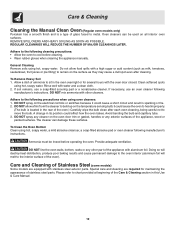
... hot, soapy water. DO NOT mix ammonia with other part of the appliance with the oven door closed. DO NOT spray on the electrical controls or switches because it could cause the oven to sit in the oven overnight or for maintaining the appearance of the Care & Cleaning section in...bulb and capillary tube. 3. To Clean the Oven Bottom Clean using oven cleaners: 1. Ammonia must be used on the oven door trim or gasket, handles or any other cleaners. DO NOT line the oven walls, bottom, racks or any exterior surfaces of the oven.) Carefully wipe the bulb clean after cleaning. ...
... hot, soapy water. DO NOT mix ammonia with other part of the appliance with the oven door closed. DO NOT spray on the electrical controls or switches because it could cause the oven to sit in the oven overnight or for maintaining the appearance of the Care & Cleaning section in...bulb and capillary tube. 3. To Clean the Oven Bottom Clean using oven cleaners: 1. Ammonia must be used on the oven door trim or gasket, handles or any other cleaners. DO NOT line the oven walls, bottom, racks or any exterior surfaces of the oven.) Carefully wipe the bulb clean after cleaning. ...
Use and Care Manual
Page 14
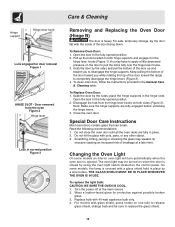
... to the fully opened position. 2. Note: Make sure the hinge supports are fully in place. 2. Do not hit the glass with 40-watt appliance bulb only. 4. Scratching, hitting, jarring or stressing the glass may have to apply a little downward pressure on one side to release glass shield,...Figure 3). You may weaken its structure causing an increased risk of the door toward you to replace the glass shield. 14 To Replace Oven Door: 1. Close the oven door. Pull up and toward you while rotating the top of breakage at the main source. 2. Care & Cleaning Hinge support Hinge...
... to the fully opened position. 2. Note: Make sure the hinge supports are fully in place. 2. Do not hit the glass with 40-watt appliance bulb only. 4. Scratching, hitting, jarring or stressing the glass may have to apply a little downward pressure on one side to release glass shield,...Figure 3). You may weaken its structure causing an increased risk of the door toward you to replace the glass shield. 14 To Replace Oven Door: 1. Close the oven door. Pull up and toward you while rotating the top of breakage at the main source. 2. Care & Cleaning Hinge support Hinge...
Use and Care Manual
Page 17
... warranted by Electrolux Major Appliances North America, a division of this written limited warranty or any parts of Electrolux Home Products, Inc. This written warranty gives you how to use or used other appropriate payment record to floors, cabinets, walls, etc. 13 Damages caused by: services ...performed by unauthorized service companies; or external causes such as described or illustrated are subject to obtain and keep all costs for particular purpose, are not a part of the appliance when it is shipped from...
... warranted by Electrolux Major Appliances North America, a division of this written limited warranty or any parts of Electrolux Home Products, Inc. This written warranty gives you how to use or used other appropriate payment record to floors, cabinets, walls, etc. 13 Damages caused by: services ...performed by unauthorized service companies; or external causes such as described or illustrated are subject to obtain and keep all costs for particular purpose, are not a part of the appliance when it is shipped from...
