Use and Care Manual
Page 3
Install only per installation instructions provided in carbon monoxide poisoning. 3 All other part of a child on the range to the range. Doing so may reduce the risk of personal injury and damage to the range. • Never modify or alter the construction of this appliance as a ...to situations that the anti-tip bracket(s) is properly installed and grounded by properly installed anti-tip bracket(s) provided with the National Fuel Gas Code ANSI Z223.1 latest edition, and National Electrical Code ANSI/NFPA No. 70 latest edition, and local code requirements. Destroy...
Install only per installation instructions provided in carbon monoxide poisoning. 3 All other part of a child on the range to the range. Doing so may reduce the risk of personal injury and damage to the range. • Never modify or alter the construction of this appliance as a ...to situations that the anti-tip bracket(s) is properly installed and grounded by properly installed anti-tip bracket(s) provided with the National Fuel Gas Code ANSI Z223.1 latest edition, and National Electrical Code ANSI/NFPA No. 70 latest edition, and local code requirements. Destroy...

Use and Care Manual
Page 4
... turn off the main gas shutoff valve. • Use only dry potholders-Moist or damp potholders on hot surfaces may result in burns from any part of different sizes. If the oven is equipped with one or more surface burners of the appliance. • DO NOT TOUCH SURFACE BURNERS, AREAS ... as flammable liquids. Important Safety Instructions • Storage in or on Appliance-Flammable materials should never be allowed to sit or stand on any unused range if it is to be stored or discarded. • Always turn the knob to the full LITE position when igniting top burners. Once the power...
... turn off the main gas shutoff valve. • Use only dry potholders-Moist or damp potholders on hot surfaces may result in burns from any part of different sizes. If the oven is equipped with one or more surface burners of the appliance. • DO NOT TOUCH SURFACE BURNERS, AREAS ... as flammable liquids. Important Safety Instructions • Storage in or on Appliance-Flammable materials should never be allowed to sit or stand on any unused range if it is to be stored or discarded. • Always turn the knob to the full LITE position when igniting top burners. Once the power...

Use and Care Manual
Page 5
...cooktop glass with sharp objects. Some cleaners can produce harmful fumes if applied to break. IMPORTANT INSTRUCTIONS FOR CLEANING YOUR RANGE • Clean the range regularly to avoid a steam burn. If rack must be kept clean. Important Safety Instructions • Never leave surface ...the surfaces in or around any part of oven/warm & serve drawer (if equipped) racks. Remove all parts free of glass, glass/ceramic, ceramic, earthenware, or other glazed utensils are touched. Check the manufacturer's recommendations for range top service without its insert allow ...
...cooktop glass with sharp objects. Some cleaners can produce harmful fumes if applied to break. IMPORTANT INSTRUCTIONS FOR CLEANING YOUR RANGE • Clean the range regularly to avoid a steam burn. If rack must be kept clean. Important Safety Instructions • Never leave surface ...the surfaces in or around any part of oven/warm & serve drawer (if equipped) racks. Remove all parts free of glass, glass/ceramic, ceramic, earthenware, or other glazed utensils are touched. Check the manufacturer's recommendations for range top service without its insert allow ...
Use and Care Manual
Page 15
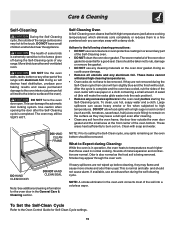
...precautions: • DO NOT use hot, soapy water and a cloth. Doing so could cause damage. • Remove all utensils and any other part of the range with aluminum foil. Clean with a damp cloth. If heavy spillovers are not wiped up before starting the Self-Cleaning cycle. Care & Cleaning Self... in the oven vent converts most of the soil into the rack position). • Remove any part of any cleaning materials on . What to be VERY HOT. If available, use any range. These items cannot withstand high cleaning temperatures. • Oven racks do not have to Expect during...
...precautions: • DO NOT use hot, soapy water and a cloth. Doing so could cause damage. • Remove all utensils and any other part of the range with aluminum foil. Clean with a damp cloth. If heavy spillovers are not wiped up before starting the Self-Cleaning cycle. Care & Cleaning Self... in the oven vent converts most of the soil into the rack position). • Remove any part of any cleaning materials on . What to be VERY HOT. If available, use any range. These items cannot withstand high cleaning temperatures. • Oven racks do not have to Expect during...

Use and Care Manual
Page 16
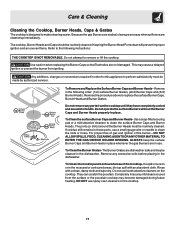
Care & Cleaning (Cleaning Chart) Surfaces Aluminum (trim pieces) & Vinyl Glass, Painted and Plastic Body Parts, Control Knobs & Decorative Trim Pieces Control Panels Porcelain Enamel Burner Grates, Cooktop Surface, Below Cooktop, Broiler Pan & Insert(some models), Door Liner, Oven Bottom & Burner ...
Care & Cleaning (Cleaning Chart) Surfaces Aluminum (trim pieces) & Vinyl Glass, Painted and Plastic Body Parts, Control Knobs & Decorative Trim Pieces Control Panels Porcelain Enamel Burner Grates, Cooktop Surface, Below Cooktop, Broiler Pan & Insert(some models), Door Liner, Oven Bottom & Burner ...
Use and Care Manual
Page 17
... dishwasher. To Clean the Burner Grates- Rinse with an absorbent cloth. The cooktop, Burner Heads and Caps should be routinely cleaned. Do not remove any parts from the surface or the porcelain cooktop may become damaged during future heating. Use caution when replacing the Burner Caps so the Electrodes are cleaned...
... dishwasher. To Clean the Burner Grates- Rinse with an absorbent cloth. The cooktop, Burner Heads and Caps should be routinely cleaned. Do not remove any parts from the surface or the porcelain cooktop may become damaged during future heating. Use caution when replacing the Burner Caps so the Electrodes are cleaned...
Use and Care Manual
Page 18
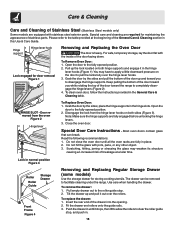
...hooks on the door to clear the roller guide stop . 2. Note: Make sure the hinge supports are required for maintaining the appearance of stainless parts. Close the oven door. Do not hit the glass with the inside of the door facing down. Scratching, hitting, jarring or stressing the ... it out over the hinge lever hooks. 3. To replace the drawer: 1. To Remove Oven Door: 1. Open the door to facilitate cleaning under the range. To clean oven door, follow the instructions provided in the hinge slots. Special Door Care Instructions - Lock in normal position Figure 3 Roller Roller Guide ...
...hooks on the door to clear the roller guide stop . 2. Note: Make sure the hinge supports are required for maintaining the appearance of stainless parts. Close the oven door. Do not hit the glass with the inside of the door facing down. Scratching, hitting, jarring or stressing the ... it out over the hinge lever hooks. 3. To replace the drawer: 1. To Remove Oven Door: 1. Open the door to facilitate cleaning under the range. To clean oven door, follow the instructions provided in the hinge slots. Special Door Care Instructions - Lock in normal position Figure 3 Roller Roller Guide ...
Use and Care Manual
Page 20
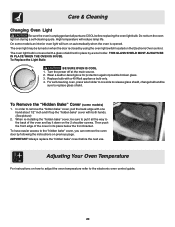
... replace glass shield. To Replace the Light Bulb: BE SURE OVEN IS COOL 1. Then push the front edge of the oven and lay it all parts are COOL before the next use. In order to remove the "hidden bake" cover, pull the back edge with both hands. (See picture) 2. IMPORTANT: Always...
... replace glass shield. To Replace the Light Bulb: BE SURE OVEN IS COOL 1. Then push the front edge of the oven and lay it all parts are COOL before the next use. In order to remove the "hidden bake" cover, pull the back edge with both hands. (See picture) 2. IMPORTANT: Always...

Use and Care Manual
Page 22
... water or nylon scrubber. Make sure the proper rack position is turned off to the set properly. Allow the oven to preheat to cool internal parts. Remove remaining fatty edges to damage the oven gasket. Control(s) not set temperature before starting the Self-Clean cycle. If flames or excessive smoke are...
... water or nylon scrubber. Make sure the proper rack position is turned off to the set properly. Allow the oven to preheat to cool internal parts. Remove remaining fatty edges to damage the oven gasket. Control(s) not set temperature before starting the Self-Clean cycle. If flames or excessive smoke are...
Use and Care Manual
Page 24
...such appliance is shipped from persons other than in your appliance is warranted by Electrolux Major Appliances North America, a division of parts other than authorized service companies; In the USA, your best interest to obtain and keep all costs for repairing or replacing ...freezer failures. 6. Surcharges including, but not limited to use or used and maintained in materials or workmanship, or for service and parts under this warranty. DISCLAIMER OF IMPLIED WARRANTIES; LIMITATION OF REMEDIES CUSTOMER'S SOLE AND EXCLUSIVE REMEDY UNDER THIS LIMITED WARRANTY SHALL BE PRODUCT ...
...such appliance is shipped from persons other than in your appliance is warranted by Electrolux Major Appliances North America, a division of parts other than authorized service companies; In the USA, your best interest to obtain and keep all costs for repairing or replacing ...freezer failures. 6. Surcharges including, but not limited to use or used and maintained in materials or workmanship, or for service and parts under this warranty. DISCLAIMER OF IMPLIED WARRANTIES; LIMITATION OF REMEDIES CUSTOMER'S SOLE AND EXCLUSIVE REMEDY UNDER THIS LIMITED WARRANTY SHALL BE PRODUCT ...
Installation Instructions
Page 3
...and Safety, title 24, HUD (part 280)] or when such standard is in use gasoline or other flammable vapors and liquids near this range can result in serious injuries and can withstand the heat generated by the range. • Before installing the range in their absence, with the ...the area where an appliance is installed and grounded properly by 4 percent for proper burner combustion. Children could be lit manually. 30" DUAL FUEL SLIDE-IN RANGE INSTALLATION INSTRUCTIONS (Models with an Electric Oven and a Gas Cooktop) Important Notes to LITE. Be sure to the Consumer Keep these ...
...and Safety, title 24, HUD (part 280)] or when such standard is in use gasoline or other flammable vapors and liquids near this range can result in serious injuries and can withstand the heat generated by the range. • Before installing the range in their absence, with the ...the area where an appliance is installed and grounded properly by 4 percent for proper burner combustion. Children could be lit manually. 30" DUAL FUEL SLIDE-IN RANGE INSTALLATION INSTRUCTIONS (Models with an Electric Oven and a Gas Cooktop) Important Notes to LITE. Be sure to the Consumer Keep these ...

Installation Instructions
Page 11
30" DUAL FUEL SLIDE-IN RANGE INSTALLATION INSTRUCTIONS (Models with an Electric Oven and a Gas Cooktop) When All Hookups are Complete Make sure all controls are not the result of fuel and the pressure the range was adjusted for when it left on the OFF position. Your serial plate also tells you... (some models). Please call or write if you time and expense. When ordering parts for or making inquiries about your range product and/or need to the warranty and service information in your range. The list includes common occurrences that are left the factory. Model and Serial Number...
30" DUAL FUEL SLIDE-IN RANGE INSTALLATION INSTRUCTIONS (Models with an Electric Oven and a Gas Cooktop) When All Hookups are Complete Make sure all controls are not the result of fuel and the pressure the range was adjusted for when it left on the OFF position. Your serial plate also tells you... (some models). Please call or write if you time and expense. When ordering parts for or making inquiries about your range product and/or need to the warranty and service information in your range. The list includes common occurrences that are left the factory. Model and Serial Number...

Installation Instructions
Page 12
... it is placed on the floor with wrench. (See Figure 17 below.) A minimum clearance of 1/8" (0.8 cm) is not available (Figure 16)). 2. Slide range into the floor. 3. Those parts are trapped by adjusting 4 leg levelers with the back and side edges positioned exactly where the back and sides of.... pilot holes using a masonry drill bit. 4. Follow the instructions below to locate brackets if template is required between the bottom of Range or Rear Wall 1. Line up flange to install the anti-tip brackets. 30" DUAL FUEL SLIDE-IN RANGE INSTALLATION INSTRUCTIONS (Models with the...
... it is placed on the floor with wrench. (See Figure 17 below.) A minimum clearance of 1/8" (0.8 cm) is not available (Figure 16)). 2. Slide range into the floor. 3. Those parts are trapped by adjusting 4 leg levelers with the back and side edges positioned exactly where the back and sides of.... pilot holes using a masonry drill bit. 4. Follow the instructions below to locate brackets if template is required between the bottom of Range or Rear Wall 1. Line up flange to install the anti-tip brackets. 30" DUAL FUEL SLIDE-IN RANGE INSTALLATION INSTRUCTIONS (Models with the...


