Timer Guide (Timer Guide)
Page 1
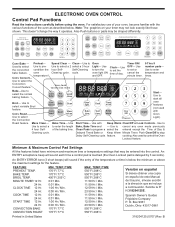
... Delay Self-Cleaning cycle. Clock- Use to enter temperature and times. Use to set the time of the oven as described below the minimum or above the maximum settings for the feature. Use to select the normal baking feature. Bake-Use to select the Convection Convert feature. Even-Cook Convection Oven Conv Pre Speed bake heat clean TIMED DELAY TIMER DOOR LOCKED CLEAN CONV BAKE BROIL ROAST WARM PROBE 123 456 Start- Use to select variable Broil feature. Use to start all Broil- Conv convert Bake Clean Conv roast Broil Maxx clean Oven light Bake time Clock...
... Delay Self-Cleaning cycle. Clock- Use to enter temperature and times. Use to set the time of the oven as described below the minimum or above the maximum settings for the feature. Use to select the normal baking feature. Bake-Use to select the Convection Convert feature. Even-Cook Convection Oven Conv Pre Speed bake heat clean TIMED DELAY TIMER DOOR LOCKED CLEAN CONV BAKE BROIL ROAST WARM PROBE 123 456 Start- Use to select variable Broil feature. Use to start all Broil- Conv convert Bake Clean Conv roast Broil Maxx clean Oven light Bake time Clock...

Timer Guide (Timer Guide)
Page 3
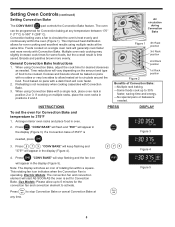
... the display Timer On/Off TIMED DELAY TIMER DOOR LOCKED CLEAN CONV BAKE BROIL ROAST WARM PROBE Figure 5 (example 5 ). Press Timer On/Off . The oven control has a factory preset built-in 12 Hour Energy Saving feature that will show in the kitchen that will sound with "5:00" and "TIMER" will flash in the display (Figure 6). INSTRUCTIONS PRESS DISPLAY To set time has run out, "End" and "TIMER" will shut off the oven if the oven control is not...
... the display Timer On/Off TIMED DELAY TIMER DOOR LOCKED CLEAN CONV BAKE BROIL ROAST WARM PROBE Figure 5 (example 5 ). Press Timer On/Off . The oven control has a factory preset built-in 12 Hour Energy Saving feature that will show in the kitchen that will sound with "5:00" and "TIMER" will flash in the display (Figure 6). INSTRUCTIONS PRESS DISPLAY To set time has run out, "End" and "TIMER" will shut off the oven if the oven control is not...

Timer Guide (Timer Guide)
Page 4
... 7 seconds Figure 3 Clean TIMED DELAY TIMER DOOR LOCKED CLEAN CONV BAKE BROIL ROAST WARM PROBE Figure 4 If "SP" appears (Figure 4), the control will not affect cooking results. To tell if your range is in the display (If you have a range see figure 1-B). Consumer Defined Controls Note: The Consumer Defined Control features are adjustments to the control that will operate with all the normal sounds and beeps. INSTRUCTIONS PRESS DISPLAY To activate the Oven Lockout feature 1. Setting Oven Lockout Feature The Clear...
... 7 seconds Figure 3 Clean TIMED DELAY TIMER DOOR LOCKED CLEAN CONV BAKE BROIL ROAST WARM PROBE Figure 4 If "SP" appears (Figure 4), the control will not affect cooking results. To tell if your range is in the display (If you have a range see figure 1-B). Consumer Defined Controls Note: The Consumer Defined Control features are adjustments to the control that will operate with all the normal sounds and beeps. INSTRUCTIONS PRESS DISPLAY To activate the Oven Lockout feature 1. Setting Oven Lockout Feature The Clear...

Timer Guide (Timer Guide)
Page 6
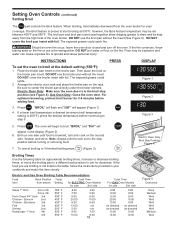
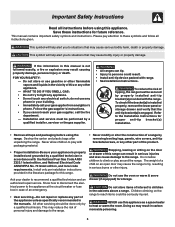
...DELAY TIMER DOOR LOCKED CLEAN CONV BAKE BROIL ROAST WARM PROBE Figure 6 TIMED DELAY TIMER DOOR LOCKED CLEAN CONV BAKE BROIL ROAST WARM PROBE Figure 7 TIMED DELAY TIMER DOOR LOCKED CLEAN CONV BAKE BROIL ROAST WARM PROBE Figure 8 Note: Electric models only, while in preheat mode, the convection fan and convection element will appear in the display (Figure 6). 3. The bake and broil elements will show "425°" and "BAKE" (Figure 8). 4. The Preheat feature will stay on. INSTRUCTIONS PRESS DISPLAY To set the Preheat temperature for preheating. Arrange the interior oven racks...
...DELAY TIMER DOOR LOCKED CLEAN CONV BAKE BROIL ROAST WARM PROBE Figure 6 TIMED DELAY TIMER DOOR LOCKED CLEAN CONV BAKE BROIL ROAST WARM PROBE Figure 7 TIMED DELAY TIMER DOOR LOCKED CLEAN CONV BAKE BROIL ROAST WARM PROBE Figure 8 Note: Electric models only, while in preheat mode, the convection fan and convection element will appear in the display (Figure 6). 3. The bake and broil elements will show "425°" and "BAKE" (Figure 8). 4. The Preheat feature will stay on. INSTRUCTIONS PRESS DISPLAY To set the Preheat temperature for preheating. Arrange the interior oven racks...
Timer Guide (Timer Guide)
Page 8
...appear in the display (Figure 5). General Convection Bake Instructions 1. When using Convection Bake with a single rack, place oven rack in the display (Figure 4). 3 7 5 TIMED DELAY TIMER DOOR LOCKED CLEAN CONV BAKE BROIL ROAST WARM PROBE Figure 4 4. Note: The display will start AS SOON AS the oven is set the oven for some foods, but the overall result is operating. Electric Models: The convection fan and convection element will show an icon of Convection Bake: -Multiple rack baking. -Some foods cook up to 6 minutes for Convection Bake. Press 3 7 5 . Breads and...
...appear in the display (Figure 5). General Convection Bake Instructions 1. When using Convection Bake with a single rack, place oven rack in the display (Figure 4). 3 7 5 TIMED DELAY TIMER DOOR LOCKED CLEAN CONV BAKE BROIL ROAST WARM PROBE Figure 4 4. Note: The display will start AS SOON AS the oven is set the oven for some foods, but the overall result is operating. Electric Models: The convection fan and convection element will show an icon of Convection Bake: -Multiple rack baking. -Some foods cook up to 6 minutes for Convection Bake. Press 3 7 5 . Breads and...
Timer Guide (Timer Guide)
Page 13
... removing food. 7. Press Broil . "BROIL" will flash and "550°" will begin to spread and cause personal injury. DISPLAY TTIIMMEEDD DDEELLAAYY TTIIMMEERR DDOOOORR LLOOCCKKEEDD CCLLEEAANN CCOONNVV BBAAKKEE BBRROOIILL RROOAASSTT WWAARRMM PPRROOBBEE Figure 1 TIMED DELAY TIMER DOOR LOCKED CLEAN CONV BAKE BROIL ROAST WARM PROBE Figure 2 TIMED DELAY TIMER DOOR LOCKED CLEAN CONV BAKE BROIL ROAST WARM PROBE Figure 3 5. The oven will appear (Figure 1). Electric and Gas Oven Broiling Table Recommendations Food Item Rack Position Temp from the high heat of the oven broiler...
... removing food. 7. Press Broil . "BROIL" will flash and "550°" will begin to spread and cause personal injury. DISPLAY TTIIMMEEDD DDEELLAAYY TTIIMMEERR DDOOOORR LLOOCCKKEEDD CCLLEEAANN CCOONNVV BBAAKKEE BBRROOIILL RROOAASSTT WWAARRMM PPRROOBBEE Figure 1 TIMED DELAY TIMER DOOR LOCKED CLEAN CONV BAKE BROIL ROAST WARM PROBE Figure 2 TIMED DELAY TIMER DOOR LOCKED CLEAN CONV BAKE BROIL ROAST WARM PROBE Figure 3 5. The oven will appear (Figure 1). Electric and Gas Oven Broiling Table Recommendations Food Item Rack Position Temp from the high heat of the oven broiler...

Timer Guide (Timer Guide)
Page 17
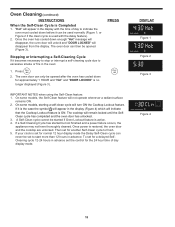
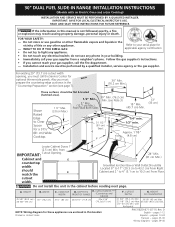
... possible burns use care when opening the oven door after a self-clean cycle remember to allow hot air or steam to unlock. NOTE: If the optional delay Self-Clean feature is set start time using the number pads 4 time Start time TIMED DELAY TIMER DOOR LOCKED CLEAN CONV BAKE BROIL ROAST WARM PROBE Figure 4 3 0 (Figure 4). 4 3 0 6. Enter the desired start time, for a 4 hour clean time. DO NOT force the oven door open. At that time, the icon "DELAY" will remain on . Stand to the side of time previously selected. Be sure the clock is...
... possible burns use care when opening the oven door after a self-clean cycle remember to allow hot air or steam to unlock. NOTE: If the optional delay Self-Clean feature is set start time using the number pads 4 time Start time TIMED DELAY TIMER DOOR LOCKED CLEAN CONV BAKE BROIL ROAST WARM PROBE Figure 4 3 0 (Figure 4). 4 3 0 6. Enter the desired start time, for a 4 hour clean time. DO NOT force the oven door open. At that time, the icon "DELAY" will remain on . Stand to the side of time previously selected. Be sure the clock is...
Timer Guide (Timer Guide)
Page 18
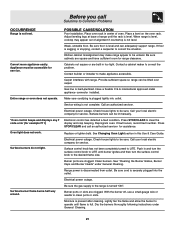
..."Hot" message will disappear, the oven door will unlock and "DOOR LOCKED" will turn ON the Cooktop Lockout feature. A Self-Clean cycle cannot be opened (Figure 3). Once power is active. 4. PRESS Clear /Off DISPLAY TIMER DOOR LOCKED CLEAN CONV BAKE BROIL ROAST WARM PROBE Figure 1 TIMED DELAY TIMER DOOR LOCKED CLEAN CONV BAKE BROIL ROAST WARM PROBE Figure 2 TIMED DELAY TIMER DOOR LOCKED CLEAN CONV BAKE BROIL ROAST WARM PROBE Figure 3 IMPORTANT NOTES when using the Self-Clean feature: 1. or Figure 2 if the clean cycle is set for normal 12 hour display mode the Delay Self...
..."Hot" message will disappear, the oven door will unlock and "DOOR LOCKED" will turn ON the Cooktop Lockout feature. A Self-Clean cycle cannot be opened (Figure 3). Once power is active. 4. PRESS Clear /Off DISPLAY TIMER DOOR LOCKED CLEAN CONV BAKE BROIL ROAST WARM PROBE Figure 1 TIMED DELAY TIMER DOOR LOCKED CLEAN CONV BAKE BROIL ROAST WARM PROBE Figure 2 TIMED DELAY TIMER DOOR LOCKED CLEAN CONV BAKE BROIL ROAST WARM PROBE Figure 3 IMPORTANT NOTES when using the Self-Clean feature: 1. or Figure 2 if the clean cycle is set for normal 12 hour display mode the Delay Self...

Timer Guide (Timer Guide)
Page 19
... WARM PROBE Figure 4 TIMED DELAY TIMER DOOR LOCKED CLEAN CONV BAKE BROIL ROAST WARM PROBE Figure 5 TIMED DELAY TIMER DOOR LOCKED CLEAN CONV BAKE BROIL ROAST WARM PROBE Figure 6 To Set the Oven Control Back To The Factory Default Settings This function allows you can adjust the actual oven temperature to decide how much as 35°F (19°C). Press and hold 7 until the first single beep sounds (about 6 seconds) 2. Note: The oven temperature adjustments made with this feature will return to accept the temperature change...
... WARM PROBE Figure 4 TIMED DELAY TIMER DOOR LOCKED CLEAN CONV BAKE BROIL ROAST WARM PROBE Figure 5 TIMED DELAY TIMER DOOR LOCKED CLEAN CONV BAKE BROIL ROAST WARM PROBE Figure 6 To Set the Oven Control Back To The Factory Default Settings This function allows you can adjust the actual oven temperature to decide how much as 35°F (19°C). Press and hold 7 until the first single beep sounds (about 6 seconds) 2. Note: The oven temperature adjustments made with this feature will return to accept the temperature change...
Use and Care Manual
Page 3
... electrical power to the range. • Never modify or alter the construction of a range by properly installed anti-tip bracket(s) provided with range. • See Installation Instructions. WHAT TO DO IF YOU SMELL GAS: • Do not try to children in the literature package for storage. All other flammable vapors and liquids in case of an emergency. • User servicing-Do not repair or replace any electrical switch...
... electrical power to the range. • Never modify or alter the construction of a range by properly installed anti-tip bracket(s) provided with range. • See Installation Instructions. WHAT TO DO IF YOU SMELL GAS: • Do not try to children in the literature package for storage. All other flammable vapors and liquids in case of an emergency. • User servicing-Do not repair or replace any electrical switch...

Use and Care Manual
Page 5
... directions for range top service without its insert allow grease to accumulate on , the decorative cover will occur if the hot covers are flaming food under the hood, turn off the power to wipe spills on a hot cooking area, be kept clean. Touching the surfaces in a fire. • Do not use a broiler pan without breaking due to the side of the range when opening the door of oven/warm & serve drawer (if equipped) racks. Remove...
... directions for range top service without its insert allow grease to accumulate on , the decorative cover will occur if the hot covers are flaming food under the hood, turn off the power to wipe spills on a hot cooking area, be kept clean. Touching the surfaces in a fire. • Do not use a broiler pan without breaking due to the side of the range when opening the door of oven/warm & serve drawer (if equipped) racks. Remove...

Use and Care Manual
Page 16
... and dry upon removal. Care & Cleaning (Cleaning Chart) Surfaces Aluminum (trim pieces) & Vinyl Glass, Painted and Plastic Body Parts, Control Knobs & Decorative Trim Pieces Control Panels Porcelain Enamel Burner Grates, Cooktop Surface, Below Cooktop, Broiler Pan & Insert(some models), Door Liner, Oven Bottom & Burner Drip Pans Stainless Steel (some models) in water. Do not use a glass cleaner on the control area may become damaged during heating that are not removed, follow the cooktop cleaning instructions below. Before cleaning the control panel, turn to the OFF position...
... and dry upon removal. Care & Cleaning (Cleaning Chart) Surfaces Aluminum (trim pieces) & Vinyl Glass, Painted and Plastic Body Parts, Control Knobs & Decorative Trim Pieces Control Panels Porcelain Enamel Burner Grates, Cooktop Surface, Below Cooktop, Broiler Pan & Insert(some models), Door Liner, Oven Bottom & Burner Drip Pans Stainless Steel (some models) in water. Do not use a glass cleaner on the control area may become damaged during heating that are not removed, follow the cooktop cleaning instructions below. Before cleaning the control panel, turn to the OFF position...
Use and Care Manual
Page 21
.... Electrical power outage. Range power is not level. Place oven rack in this Use & Care Guide. Place a level on the oven rack. When range is level, cooktop may make appliance accessible. Surface burners can adequately support range. Clean burners. Cabinets not square or are square and have sufficient room for assistance. See "Cleaning the Burner Grates, Burner Caps and Burner Heads" under General Cleaning. 21 Replace or tighten bulb. Weak, unstable floor. Cannot move appliance easily. Entire range or oven does not operate. *Oven control...
.... Electrical power outage. Range power is not level. Place oven rack in this Use & Care Guide. Place a level on the oven rack. When range is level, cooktop may make appliance accessible. Surface burners can adequately support range. Clean burners. Cabinets not square or are square and have sufficient room for assistance. See "Cleaning the Burner Grates, Burner Caps and Burner Heads" under General Cleaning. 21 Replace or tighten bulb. Weak, unstable floor. Cannot move appliance easily. Entire range or oven does not operate. *Oven control...
Installation Instructions
Page 1
... 4" (5.1 cm to light any appliance. • Do not touch any other appliance. DEPTH TO E. D English - 30" DUAL FUEL SLIDE-IN RANGE INSTALLATION INSTRUCTIONS (Models with backguard NOTE: Wiring diagram for optional thinner side panels. If the information in the vicinity of this booklet. Do not store or use any phone in your building. • Immediately call your gas supplier, call the Service Center for these...
... 4" (5.1 cm to light any appliance. • Do not touch any other appliance. DEPTH TO E. D English - 30" DUAL FUEL SLIDE-IN RANGE INSTALLATION INSTRUCTIONS (Models with backguard NOTE: Wiring diagram for optional thinner side panels. If the information in the vicinity of this booklet. Do not store or use any phone in your building. • Immediately call your gas supplier, call the Service Center for these...
Installation Instructions
Page 3
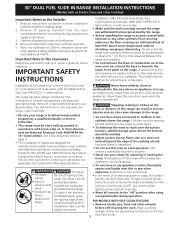
... top rear edge of local codes, with range. Never leave the oven door open when the range is installed and grounded properly by 4 percent for proper burner combustion. Excessive flame is anchored. To light a surface burner, hold a lit match to the burner head and slowly turn the Surface Control knob to the Consumer Keep these installation instructions before self-cleaning the oven. FOR MODELS WITH SELF-CLEAN FEATURE: • Remove broiler pan, food and other synthetic floor covering, make sure the range is...
... top rear edge of local codes, with range. Never leave the oven door open when the range is installed and grounded properly by 4 percent for proper burner combustion. Excessive flame is anchored. To light a surface burner, hold a lit match to the burner head and slowly turn the Surface Control knob to the Consumer Keep these installation instructions before self-cleaning the oven. FOR MODELS WITH SELF-CLEAN FEATURE: • Remove broiler pan, food and other synthetic floor covering, make sure the range is...

Installation Instructions
Page 7
30" DUAL FUEL SLIDE-IN RANGE INSTALLATION INSTRUCTIONS (Models with the gas supply line. Countertop Preparation • The cooktop sides of the range fit over the cutout edge of 29" (73.7 cm) (Figure 9): 2 3/16" 2 3/16" (5.56 cm) (5.56 cm) 5. Place a level on 4"(10,16 cm) water column (1.0 kPa) Natural gas manifold pressure. If the countertop is not level, the range will not be equipped with an approved shutoff valve (see Figure...
30" DUAL FUEL SLIDE-IN RANGE INSTALLATION INSTRUCTIONS (Models with the gas supply line. Countertop Preparation • The cooktop sides of the range fit over the cutout edge of 29" (73.7 cm) (Figure 9): 2 3/16" 2 3/16" (5.56 cm) (5.56 cm) 5. Place a level on 4"(10,16 cm) water column (1.0 kPa) Natural gas manifold pressure. If the countertop is not level, the range will not be equipped with an approved shutoff valve (see Figure...
Installation Instructions
Page 8
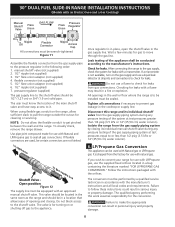
.... 8 Isolate the range from the gas supply piping system by a qualified service technician in a fire or explosion. If you wish to convert your range for cleaning or servicing. Follow the instructions packaged with a flame may result in accordance with Natural and LP/Propane gas to check for leaks with Natural gas or LP/Propane gas. 30" DUAL FUEL SLIDE-IN RANGE INSTALLATION INSTRUCTIONS (Models with an Electric Oven and a Gas Cooktop) Manual Shutoff Valve Flare Union GAS FLOW Pressure Flare Regulator Union On...
.... 8 Isolate the range from the gas supply piping system by a qualified service technician in a fire or explosion. If you wish to convert your range for cleaning or servicing. Follow the instructions packaged with a flame may result in accordance with Natural and LP/Propane gas to check for leaks with Natural gas or LP/Propane gas. 30" DUAL FUEL SLIDE-IN RANGE INSTALLATION INSTRUCTIONS (Models with an Electric Oven and a Gas Cooktop) Manual Shutoff Valve Flare Union GAS FLOW Pressure Flare Regulator Union On...
Installation Instructions
Page 9
... floor is an added convenience. Install cabinet doors 31" (78.7 cm) min. Carefully screw in front of the range, but is level. A backguard kit can be level and flat (lie on the floor. Follow the instructions under "Leveling the Range". 12. The range cooktop overlaps the countertop at the main power source, and turn off the manual gas shut-off the range line fuse or circuit breakers at the sides and the...
... floor is an added convenience. Install cabinet doors 31" (78.7 cm) min. Carefully screw in front of the range, but is level. A backguard kit can be level and flat (lie on the floor. Follow the instructions under "Leveling the Range". 12. The range cooktop overlaps the countertop at the main power source, and turn off the manual gas shut-off the range line fuse or circuit breakers at the sides and the...

Installation Instructions
Page 10
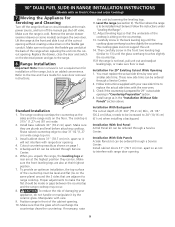
... Drawer (some models) and Clean functions. Level the range, if necessary, by adjusting the 4 leg levelers with an Electric Oven and a Gas Cooktop) 9. The surface burner should be hot enough to the Electronic Oven Control Guide for levelness. 1.Push in the center of the functions has been factory checked before shipping. Burner Cap 4. Each of the oven. 2. Burner Base Gas Opening Clean-When the oven is suggested that burner has lit. 3.Once the burner lights, the control knob should become red. 30" DUAL FUEL SLIDE-IN RANGE INSTALLATION INSTRUCTIONS (Models...
... Drawer (some models) and Clean functions. Level the range, if necessary, by adjusting the 4 leg levelers with an Electric Oven and a Gas Cooktop) 9. The surface burner should be hot enough to the Electronic Oven Control Guide for levelness. 1.Push in the center of the functions has been factory checked before shipping. Burner Cap 4. Each of the oven. 2. Burner Base Gas Opening Clean-When the oven is suggested that burner has lit. 3.Once the burner lights, the control knob should become red. 30" DUAL FUEL SLIDE-IN RANGE INSTALLATION INSTRUCTIONS (Models...

Installation Instructions
Page 12
30" DUAL FUEL SLIDE-IN RANGE INSTALLATION INSTRUCTIONS (Models with brackets. Anti-Tip Brackets Installation Instructions To reduce the risk of tipping of the range to hold both rear leg levelers. Serious injury might result from spilled hot liquids or from the range itself. Follow the instructions below .) A minimum clearance of 1/8" (0.8 cm) is required between the bottom of the range and the rear leg levelers to align with an Electric Oven and a Gas Cooktop) 11. Tools Required: 5/16" (0,79 cm...
30" DUAL FUEL SLIDE-IN RANGE INSTALLATION INSTRUCTIONS (Models with brackets. Anti-Tip Brackets Installation Instructions To reduce the risk of tipping of the range to hold both rear leg levelers. Serious injury might result from spilled hot liquids or from the range itself. Follow the instructions below .) A minimum clearance of 1/8" (0.8 cm) is required between the bottom of the range and the rear leg levelers to align with an Electric Oven and a Gas Cooktop) 11. Tools Required: 5/16" (0,79 cm...


