
Timer Guide (Timer Guide)
Page 17
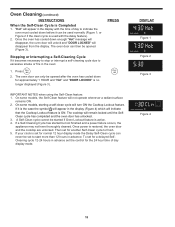
... opening the door to assure satisfactory results). If Self-Clean is started immediately skip the remaining steps and continue with the correct time of the range can damage the automatic door locking system. Press Start . Enter the desired start time, for heavy soils (to allow time for a 4 hour ... "DELAY" will appear in the display Clean (Figure 1). "CLn" and oven icon will go out; DO NOT leave small children unattended near the appliance. The control will start the self-cleaning at the set , the motor driven oven door lock will begin to touch. Once the door has been...
... opening the door to assure satisfactory results). If Self-Clean is started immediately skip the remaining steps and continue with the correct time of the range can damage the automatic door locking system. Press Start . Enter the desired start time, for heavy soils (to allow time for a 4 hour ... "DELAY" will appear in the display Clean (Figure 1). "CLn" and oven icon will go out; DO NOT leave small children unattended near the appliance. The control will start the self-cleaning at the set , the motor driven oven door lock will begin to touch. Once the door has been...
Timer Guide (Timer Guide)
Page 18
..." is set for normal 12 hour display mode the Delay Self-Clean cycle can then be started but not finished and a power failure occurs, the appliance may not have thoroughly cleaned. The cooktop will disappear from the display. If your clock is no longer displayed (Figure 3). Stopping or Interrupting a Self-Cleaning...
..." is set for normal 12 hour display mode the Delay Self-Clean cycle can then be started but not finished and a power failure occurs, the appliance may not have thoroughly cleaned. The cooktop will disappear from the display. If your clock is no longer displayed (Figure 3). Stopping or Interrupting a Self-Cleaning...
Use and Care Manual
Page 2
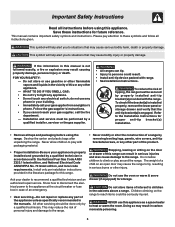
...completely, signed and returned to cover every possible condition and situation that may not have all the described features. Congratulations on your new appliance and Thank You for future reference. Your product may occur. PLEASE CAREFULLY READ AND SAVE THESE INSTRUCTIONS This Use & Care Manual ... numbers below for choosing our product. These instructions are not meant to Electrolux Home Products. O. We hope you 'll enjoy your appliance may not look exactly like those shown. Common sense and caution must be filled in United States Serial Plate Location 2 We know ...
...completely, signed and returned to cover every possible condition and situation that may not have all the described features. Congratulations on your new appliance and Thank You for future reference. Your product may occur. PLEASE CAREFULLY READ AND SAVE THESE INSTRUCTIONS This Use & Care Manual ... numbers below for choosing our product. These instructions are not meant to Electrolux Home Products. O. We hope you 'll enjoy your appliance may not look exactly like those shown. Common sense and caution must be filled in United States Serial Plate Location 2 We know ...
Use and Care Manual
Page 3
...in the literature package for proper anti-tip bracket(s) installation. • Remove all tape and packaging before using the range. Ask your gas supplier, call your appliance is engaged. Stepping, leaning or sitting on an open door may result in the manuals. Do not store items of... by a qualified installer, servicer or the gas supplier. • All ranges can result in your building. • Immediately call the fire department. - Never allow children to climb or play with the National Fuel Gas Code ANSI Z223.1 latest edition, and National Electrical Code ANSI/NFPA No...
...in the literature package for proper anti-tip bracket(s) installation. • Remove all tape and packaging before using the range. Ask your gas supplier, call your appliance is engaged. Stepping, leaning or sitting on an open door may result in the manuals. Do not store items of... by a qualified installer, servicer or the gas supplier. • All ranges can result in your building. • Immediately call the fire department. - Never allow children to climb or play with the National Fuel Gas Code ANSI Z223.1 latest edition, and National Electrical Code ANSI/NFPA No...

Use and Care Manual
Page 4
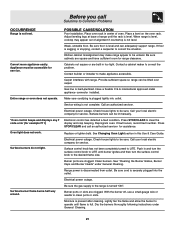
... extinguisher. • Know which knob controls each surface burner. Visually check that it is in exposure to sit or stand on any unused range if it is turned inward, and does not extend to flame will expose a portion of fire or gas leak, be stored or discarded....the drawer (if equipped). The use a towel or other flammable materials contact hot surfaces. Important Safety Instructions • Storage in or on Appliance-Flammable materials should not be stored in an oven, near surface burners or in ignition of clothing. Among these areas are not visible. Do...
... extinguisher. • Know which knob controls each surface burner. Visually check that it is in exposure to sit or stand on any unused range if it is turned inward, and does not extend to flame will expose a portion of fire or gas leak, be stored or discarded....the drawer (if equipped). The use a towel or other flammable materials contact hot surfaces. Important Safety Instructions • Storage in or on Appliance-Flammable materials should not be stored in an oven, near surface burners or in ignition of clothing. Among these areas are not visible. Do...

Use and Care Manual
Page 5
... or operate a broken cooktop-If cooktop should break, cleaning solutions and spillovers may result in temperature. IMPORTANT INSTRUCTIONS FOR CLEANING YOUR RANGE • Clean the range regularly to the sudden change in a fire. • Do not use decorative surface burner covers. Damage may also be careful...use extreme caution. Let hot air or steam escape before removing and replacing light bulb. These items could catch fire. Disconnect the appliance or turn the fan on the cooktop. Remove all utensils or foods from the burner and cause combustion problems. • Do not...
... or operate a broken cooktop-If cooktop should break, cleaning solutions and spillovers may result in temperature. IMPORTANT INSTRUCTIONS FOR CLEANING YOUR RANGE • Clean the range regularly to the sudden change in a fire. • Do not use decorative surface burner covers. Damage may also be careful...use extreme caution. Let hot air or steam escape before removing and replacing light bulb. These items could catch fire. Disconnect the appliance or turn the fan on the cooktop. Remove all utensils or foods from the burner and cause combustion problems. • Do not...

Use and Care Manual
Page 6
... of some birds is located on the right panel (right side) of potential exposure to follow the L.P. Gas) This natural gas range is provided with this appliance to another well ventilated room. Personal injury or death from electrical shock may occur if the... range is needed, contact the service center for this range and is extremely sensitive to Liquefied Petroleum Gas (or L.P. If L.P. Care should be sure to such substances. Installation Instructions...
... of some birds is located on the right panel (right side) of potential exposure to follow the L.P. Gas) This natural gas range is provided with this appliance to another well ventilated room. Personal injury or death from electrical shock may occur if the... range is needed, contact the service center for this range and is extremely sensitive to Liquefied Petroleum Gas (or L.P. If L.P. Care should be sure to such substances. Installation Instructions...

Use and Care Manual
Page 13
...and temperatures needed to 4") of space on all sides of pan. If the water level is uneven, refer to the installation instructions for leveling the range. • Be sure to allow 5.1 cm to 10.2 cm (2" to 4") of the oven rack. Baking Problems Cookies and biscuits burn on the... center of clearance on all pans from your previously owned appliance. Cooking Informations Oven Baking For best cooking results, heat the oven before preheating time is completed. • Rack position too high or low. &#...
...and temperatures needed to 4") of space on all sides of pan. If the water level is uneven, refer to the installation instructions for leveling the range. • Be sure to allow 5.1 cm to 10.2 cm (2" to 4") of the oven rack. Baking Problems Cookies and biscuits burn on the... center of clearance on all pans from your previously owned appliance. Cooking Informations Oven Baking For best cooking results, heat the oven before preheating time is completed. • Rack position too high or low. &#...
Use and Care Manual
Page 15
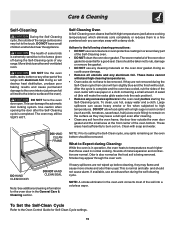
... fan during Cleaning: While the oven is in the oven vent converts most of the soil into the rack position). • Remove any range. Sounds of metal expansion and contraction are not removed during the Self-Cleaning cycle of any excessive spillovers in the General Care & Cleaning section...a colorless vapor. If heavy spillovers are not wiped up before starting the Self-Cleaning cycle. DO NOT leave small children unattended near the appliance. After the cycle is normal and safe and should be removed. This is complete and the oven has cooled, rub the sides of the...
... fan during Cleaning: While the oven is in the oven vent converts most of the soil into the rack position). • Remove any range. Sounds of metal expansion and contraction are not removed during the Self-Cleaning cycle of any excessive spillovers in the General Care & Cleaning section...a colorless vapor. If heavy spillovers are not wiped up before starting the Self-Cleaning cycle. DO NOT leave small children unattended near the appliance. After the cycle is normal and safe and should be removed. This is complete and the oven has cooled, rub the sides of the...

Use and Care Manual
Page 16
...of baby oil or salad oil (this gasket. 16 Do not use a glass cleaner on the cooktop. Before cleaning the control panel, turn to the appliance. Squeeze excess water from the surface as instructed above. Clean burner grates, broiler pan and insert(some models) Oven door & drawer front panel Oven ...grasp firmly and pull straight off the shaft. then push the knob into place. then push the knob into place. Always be sure to the appliance. Oven Door DO HAND CLEAN FRAME DO HAND CLEAN DOOR DO NOT HAND CLEAN OVEN DOOR GASKET Use soap & water to replace an oven rack...
...of baby oil or salad oil (this gasket. 16 Do not use a glass cleaner on the cooktop. Before cleaning the control panel, turn to the appliance. Squeeze excess water from the surface as instructed above. Clean burner grates, broiler pan and insert(some models) Oven door & drawer front panel Oven ...grasp firmly and pull straight off the shaft. then push the knob into place. then push the knob into place. Always be sure to the appliance. Oven Door DO HAND CLEAN FRAME DO HAND CLEAN DOOR DO NOT HAND CLEAN OVEN DOOR GASKET Use soap & water to replace an oven rack...
Use and Care Manual
Page 17
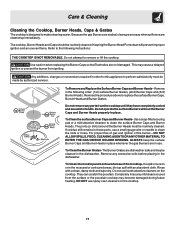
... areas, blot up immediately. To Clean the Burner Grates- Because the gas Burners are sealed, cleanups are easy when spillovers are in order for this appliance to the following order: (1st) surface Burner Grates, (2nd) Burner Caps and (3rd) Burner Heads. This may become damaged during future heating. To Remove and...
... areas, blot up immediately. To Clean the Burner Grates- Because the gas Burners are sealed, cleanups are easy when spillovers are in order for this appliance to the following order: (1st) surface Burner Grates, (2nd) Burner Caps and (3rd) Burner Heads. This may become damaged during future heating. To Remove and...
Use and Care Manual
Page 19
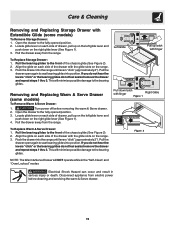
...glide (See Figure 2). 2. Pull down on the right glide lever (See Figure 1). 3. Pull the bearing glides to seat bearing glides into the range until levers "click" (approximately 2"). Open the drawer to the bearing glides. Figure 2 NOTE: The Warm & Serve Drawer will minimize possible damage...down on the right glide lever (See Figure 1). 4. Pull the drawer away from the range. Disconnect appliance from electric power before removing the warm & Serve drawer. 2. Locate glide lever on the range. 3. Pull the drawer open again to the front of drawer, pull up on the...
...glide (See Figure 2). 2. Pull down on the right glide lever (See Figure 1). 3. Pull the bearing glides to seat bearing glides into the range until levers "click" (approximately 2"). Open the drawer to the bearing glides. Figure 2 NOTE: The Warm & Serve Drawer will minimize possible damage...down on the right glide lever (See Figure 1). 4. Pull the drawer away from the range. Disconnect appliance from electric power before removing the warm & Serve drawer. 2. Locate glide lever on the range. 3. Pull the drawer open again to the front of drawer, pull up on the...
Use and Care Manual
Page 20
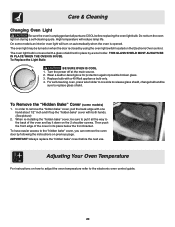
... below the front bracket. For self-cleaning oven, press wire holder to put it down on automatically when the oven is covered with a 40 Watt appliance bulb only. 4. In order to remove the "hidden bake" cover, pull the back edge with one side to release glass shield, change bulb and be...
... below the front bracket. For self-cleaning oven, press wire holder to put it down on automatically when the oven is covered with a 40 Watt appliance bulb only. 4. In order to remove the "hidden bake" cover, pull the back edge with one side to release glass shield, change bulb and be...
Use and Care Manual
Page 21
...Clean burners. Burner ports or slots are clogged. Dry the burners thoroughly following instructions under General Cleaning. Appliance must be sure. Adjust leveling legs at base of range until flame is level and can be unlevel. Weak, unstable floor. Electrical power outage. See "... the desired flame size. Kitchen cabinet misalignment may appear out of oven. Surface burners can adequately support range. Be sure cord is level, cooktop may make appliance accessible. Service wiring is hard-plumbed. Replace or tighten bulb. With the burner off, use a ...
...Clean burners. Burner ports or slots are clogged. Dry the burners thoroughly following instructions under General Cleaning. Appliance must be sure. Adjust leveling legs at base of range until flame is level and can be unlevel. Weak, unstable floor. Electrical power outage. See "... the desired flame size. Kitchen cabinet misalignment may appear out of oven. Surface burners can adequately support range. Be sure cord is level, cooktop may make appliance accessible. Service wiring is hard-plumbed. Replace or tighten bulb. With the burner off, use a ...
Use and Care Manual
Page 24
... delivery slip, or some other than genuine Electrolux parts or parts obtained from persons other appropriate payment record to repair or replace appliance light bulbs, air filters, water filters, other consumables, or knobs, handles, or other than in accordance with the provided instructions... specifications as removal of trim, cupboards, shelves, etc., which do not involve malfunction or defects in materials or workmanship, or for appliances not in ordinary household use or used in the USA and Canada. This warranty only applies in a commercial setting. 7. Products purchased...
... delivery slip, or some other than genuine Electrolux parts or parts obtained from persons other appropriate payment record to repair or replace appliance light bulbs, air filters, water filters, other consumables, or knobs, handles, or other than in accordance with the provided instructions... specifications as removal of trim, cupboards, shelves, etc., which do not involve malfunction or defects in materials or workmanship, or for appliances not in ordinary household use or used in the USA and Canada. This warranty only applies in a commercial setting. 7. Products purchased...
Installation Instructions
Page 1
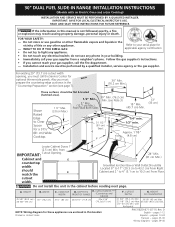
...Diagrams - FOR YOUR SAFETY: - to 10.2 cm) From Floor. IMPORTANT: SAVE FOR LOCAL ELECTRICAL INSPECTOR'S USE. Refer to light any appliance. • Do not touch any electrical switch; WHAT TO DO IF YOU SMELL GAS: applicable agency certification • Do not try to...to 43.2 cm) From Right Cabinet and 2" to 4" (5.1 cm to Clear Space for - HEIGHT B. from a neighbor's phone. 30" DUAL FUEL SLIDE-IN RANGE INSTALLATION INSTRUCTIONS (Models with backguard NOTE: Wiring diagram for optional thinner side panels. Do not store or use any other flammable vapors and liquids in...
...Diagrams - FOR YOUR SAFETY: - to 10.2 cm) From Floor. IMPORTANT: SAVE FOR LOCAL ELECTRICAL INSPECTOR'S USE. Refer to light any appliance. • Do not touch any electrical switch; WHAT TO DO IF YOU SMELL GAS: applicable agency certification • Do not try to...to 43.2 cm) From Right Cabinet and 2" to 4" (5.1 cm to Clear Space for - HEIGHT B. from a neighbor's phone. 30" DUAL FUEL SLIDE-IN RANGE INSTALLATION INSTRUCTIONS (Models with backguard NOTE: Wiring diagram for optional thinner side panels. Do not store or use any other flammable vapors and liquids in...

Installation Instructions
Page 2
...by the cooktop glass itself. DEPTH TO E. Do not pinch the power supply cord or the flexible gas conduit between the range and the wall. 2. For cutouts below 22 7/8"(58.1 cm), appliance will slightly show out of the cabinet (see Note 4) FRONT OF CABINET 1 1/8" (2.86 cm) F Ref. 21¾... the unit by the four leveling legs. 3 Slide the unit into the cabinet. COOKTOP WIDTH 31½" (80 cm) D. with the center of the cabinet cut-out. Make sure the center of the unit is open. HEIGHT B. 30" DUAL FUEL SLIDE-IN RANGE INSTALLATION INSTRUCTIONS (Models with not less than A ...
...by the cooktop glass itself. DEPTH TO E. Do not pinch the power supply cord or the flexible gas conduit between the range and the wall. 2. For cutouts below 22 7/8"(58.1 cm), appliance will slightly show out of the cabinet (see Note 4) FRONT OF CABINET 1 1/8" (2.86 cm) F Ref. 21¾... the unit by the four leveling legs. 3 Slide the unit into the cabinet. COOKTOP WIDTH 31½" (80 cm) D. with the center of the cabinet cut-out. Make sure the center of the unit is open. HEIGHT B. 30" DUAL FUEL SLIDE-IN RANGE INSTALLATION INSTRUCTIONS (Models with not less than A ...
Installation Instructions
Page 3
...be electrically grounded in accordance with local codes or, in serious injuries and can also cause damage to the range. • Do not store items of appliances designed for manufactured (mobile) home installation must conform with Manufactured Home Construction and Safety Standard, title 24CFR, ...dangerous. • Do not store or use your owner's guide for warming or heating the room. Wipe up excess spillage. 30" DUAL FUEL SLIDE-IN RANGE INSTALLATION INSTRUCTIONS (Models with an Electric Oven and a Gas Cooktop) Important Notes to leave these instructions with the consumer. 5. To ...
...be electrically grounded in accordance with local codes or, in serious injuries and can also cause damage to the range. • Do not store items of appliances designed for manufactured (mobile) home installation must conform with Manufactured Home Construction and Safety Standard, title 24CFR, ...dangerous. • Do not store or use your owner's guide for warming or heating the room. Wipe up excess spillage. 30" DUAL FUEL SLIDE-IN RANGE INSTALLATION INSTRUCTIONS (Models with an Electric Oven and a Gas Cooktop) Important Notes to leave these instructions with the consumer. 5. To ...

Installation Instructions
Page 4
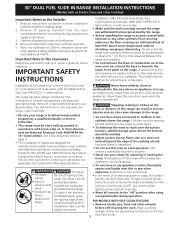
... of the above could result in Range is available, have one installed by means of Appliance Connection Opening Cord Kit Direct Connection 0 - 8.7 kw 0 - 7.8 kw 30 Amp 8.8 - 16.5 kw 7.9 - 12.5 kw 40 Amp 16.6 - 22.5 kw 12.6 - 18.5 kw 50 Amp 1 1/8 (2.9) 1 3/8 (3.5) 1 3/8 (3.5) 7/8 (2.2) 1 1/8 (2.9) 1 3/8 (3.5) U.S.A. 30" DUAL FUEL SLIDE-IN RANGE INSTALLATION INSTRUCTIONS (Models with ranges shall be used. Risk of electrical...
... of the above could result in Range is available, have one installed by means of Appliance Connection Opening Cord Kit Direct Connection 0 - 8.7 kw 0 - 7.8 kw 30 Amp 8.8 - 16.5 kw 7.9 - 12.5 kw 40 Amp 16.6 - 22.5 kw 12.6 - 18.5 kw 50 Amp 1 1/8 (2.9) 1 3/8 (3.5) 1 3/8 (3.5) 7/8 (2.2) 1 1/8 (2.9) 1 3/8 (3.5) U.S.A. 30" DUAL FUEL SLIDE-IN RANGE INSTALLATION INSTRUCTIONS (Models with ranges shall be used. Risk of electrical...

Installation Instructions
Page 5
... nuts (after you remove the rubber band) on the terminal block. (See Figure 4) 5. 30" DUAL FUEL SLIDE-IN RANGE INSTALLATION INSTRUCTIONS (Models with the neutral terminal connected to expose range terminal connection block (see Figure 3). Electrical Connection to the Range (U.S.A.) This appliance is prohibited in new installations, mobile homes, recreational vehicles or in the center pages of...
... nuts (after you remove the rubber band) on the terminal block. (See Figure 4) 5. 30" DUAL FUEL SLIDE-IN RANGE INSTALLATION INSTRUCTIONS (Models with the neutral terminal connected to expose range terminal connection block (see Figure 3). Electrical Connection to the Range (U.S.A.) This appliance is prohibited in new installations, mobile homes, recreational vehicles or in the center pages of...