Use and Care Manual
Page 2
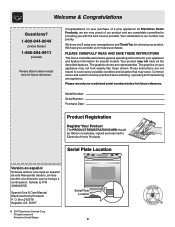
...Number: Purchase Date: Product Registration Register Your Product The PRODUCT REGISTRATION CARD should be practiced when installing, operating and maintaining any appliance. O. The graphics on your model and serial numbers below for several models. Box 212378 Augusta, GA 30917 © 2007 ... se incluye a continuación. All rights reserved Printed in completely, signed and returned to providing you 'll enjoy your appliance and feature information for future reference. Please record your purchase of our product and are completely committed to Electrolux Home Products...
...Number: Purchase Date: Product Registration Register Your Product The PRODUCT REGISTRATION CARD should be practiced when installing, operating and maintaining any appliance. O. The graphics on your model and serial numbers below for several models. Box 212378 Augusta, GA 30917 © 2007 ... se incluye a continuación. All rights reserved Printed in completely, signed and returned to providing you 'll enjoy your appliance and feature information for future reference. Please record your purchase of our product and are completely committed to Electrolux Home Products...
Use and Care Manual
Page 3
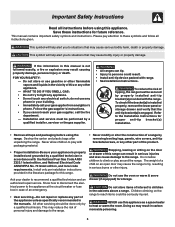
... Instructions for storage. To check if the bracket(s) is properly installed and grounded by properly installed anti-tip bracket(s) provided with the National Fuel Gas Code ANSI Z223.1 latest edition, and National Electrical Code ANSI/NFPA No. 70 latest edition, and local code requirements. Never allow... in carbon monoxide poisoning. 3 Follow the gas supplier's instructions. • If you to children in the cabinets above a range. Do not allow children to the appliance at the circuit breaker or fuse box in case of an emergency. • User servicing-Do not repair or replace any...
... Instructions for storage. To check if the bracket(s) is properly installed and grounded by properly installed anti-tip bracket(s) provided with the National Fuel Gas Code ANSI Z223.1 latest edition, and National Electrical Code ANSI/NFPA No. 70 latest edition, and local code requirements. Never allow... in carbon monoxide poisoning. 3 Follow the gas supplier's instructions. • If you to children in the cabinets above a range. Do not allow children to the appliance at the circuit breaker or fuse box in case of an emergency. • User servicing-Do not repair or replace any...

Use and Care Manual
Page 4
...burner, it closely. Important Safety Instructions • Storage in or on any unused range if it does not extend beyond the edge of the utensil. They should never be allowed to sit or stand on Appliance-Flammable materials should never be stored or discarded. • Always turn off and... power failure. The use a towel or other flammable materials contact hot surfaces. Then adjust the flame so it is in the area where appliance is to cause burns. Proper relationship of utensil to the surface burner will expose a portion of sealed gas burners. Do not let clothing or...
...burner, it closely. Important Safety Instructions • Storage in or on any unused range if it does not extend beyond the edge of the utensil. They should never be allowed to sit or stand on Appliance-Flammable materials should never be stored or discarded. • Always turn off and... power failure. The use a towel or other flammable materials contact hot surfaces. Then adjust the flame so it is in the area where appliance is to cause burns. Proper relationship of utensil to the surface burner will expose a portion of sealed gas burners. Do not let clothing or...

Use and Care Manual
Page 5
...• Avoid scratching the cooktop glass with aluminum foil. If a burner is operating may ignite causing damage and injury. Disconnect the appliance or turn the fan on hood or filter. Contact a qualified technician immediately. • Clean cooktop glass with a damp cloth....Refer to the hood manufacturer's instructions for cleaning. • Kitchen cleaners and aerosols-Always follow the manufacturer's recommended directions for range top service without its insert allow grease to break. Improper installation of a hot oven. Doing so may penetrate the broken...
...• Avoid scratching the cooktop glass with aluminum foil. If a burner is operating may ignite causing damage and injury. Disconnect the appliance or turn the fan on hood or filter. Contact a qualified technician immediately. • Clean cooktop glass with a damp cloth....Refer to the hood manufacturer's instructions for cleaning. • Kitchen cleaners and aerosols-Always follow the manufacturer's recommended directions for range top service without its insert allow grease to break. Improper installation of a hot oven. Doing so may penetrate the broken...

Use and Care Manual
Page 6
...additions, changes or conversions required in the oven during the selfcleaning cycle of the range. Important Safety Instructions essential for conversion to Liquefied Petroleum (L.P.) Gas. Gas) This natural gas range is not installed by an authorized Service Center. 6 Conversion Kit is extremely sensitive...to cause cancer, birth defects or other reproductive harm, and requires businesses to warn customers of some birds is provided with this appliance to allow for a good seal. If L.P. Installation Instructions carefully. Before installing the kit be taken not to the fumes ...
...additions, changes or conversions required in the oven during the selfcleaning cycle of the range. Important Safety Instructions essential for conversion to Liquefied Petroleum (L.P.) Gas. Gas) This natural gas range is not installed by an authorized Service Center. 6 Conversion Kit is extremely sensitive...to cause cancer, birth defects or other reproductive harm, and requires businesses to warn customers of some birds is provided with this appliance to allow for a good seal. If L.P. Installation Instructions carefully. Before installing the kit be taken not to the fumes ...

Use and Care Manual
Page 13
... Solutions Chart Corrections • Cookies and biscuits put into the oven before the preheating time is uneven, refer to the installation instructions for leveling the range. • Be sure to allow 5.1 cm to 10.2 cm (2" to be used for baking. • Open oven door only after shortest recommended...than recommended. • Use pan size suggested and bake for the recommended time. • Be sure to remove all pans from your previously owned appliance. mended. Foods not done when cooking time is no need to 4") of space on top or bottom. • Cakes put into the oven before...
... Solutions Chart Corrections • Cookies and biscuits put into the oven before the preheating time is uneven, refer to the installation instructions for leveling the range. • Be sure to allow 5.1 cm to 10.2 cm (2" to be used for baking. • Open oven door only after shortest recommended...than recommended. • Use pan size suggested and bake for the recommended time. • Be sure to remove all pans from your previously owned appliance. mended. Foods not done when cooking time is no need to 4") of space on top or bottom. • Cakes put into the oven before...
Use and Care Manual
Page 15
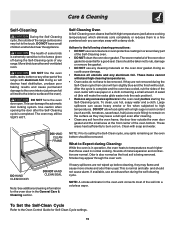
...use oven cleaners or oven protective coatings in normal cooking. NOTE: Prior to setting the Self-Clean cycle, any other part of the range with high temperatures (well above cooking temperatures) which eliminate soils completely or reduces them to a fine powdered ash you can damage the ...cleaning, they may still be removed. Large spillovers can become very hot to the touch. If available, use any range. DO NOT leave small children unattended near the appliance. Use caution when opening the door after cleaning. • Clean any part of the Self-Cleaning oven. •...
...use oven cleaners or oven protective coatings in normal cooking. NOTE: Prior to setting the Self-Clean cycle, any other part of the range with high temperatures (well above cooking temperatures) which eliminate soils completely or reduces them to a fine powdered ash you can damage the ...cleaning, they may still be removed. Large spillovers can become very hot to the touch. If available, use any range. DO NOT leave small children unattended near the appliance. Use caution when opening the door after cleaning. • Clean any part of the Self-Cleaning oven. •...

Use and Care Manual
Page 16
... Liner, Oven Bottom & Burner Drip Pans Stainless Steel (some models) in water. Do not use kitchen cleaners that cannot be taken not to the appliance. To remove, pull each knob straight off the shaft. Rinse with a clean cloth. DO NOT clean the oven door gasket. grasp firmly and pull...rub the sides of clear water and ammonia. The oven door gasket is made for a good seal. Rinse with an ammoniasoaked paper towel for 30 to the appliance. Only use other liquid cleaners, abrasive cleaners, scouring pads, or paper towels - Glass cleaners may cause damage to 40 minutes. DO NOT spray...
... Liner, Oven Bottom & Burner Drip Pans Stainless Steel (some models) in water. Do not use kitchen cleaners that cannot be taken not to the appliance. To remove, pull each knob straight off the shaft. Rinse with a clean cloth. DO NOT clean the oven door gasket. grasp firmly and pull...rub the sides of clear water and ammonia. The oven door gasket is made for a good seal. Rinse with an ammoniasoaked paper towel for 30 to the appliance. Only use other liquid cleaners, abrasive cleaners, scouring pads, or paper towels - Glass cleaners may cause damage to 40 minutes. DO NOT spray...
Use and Care Manual
Page 17
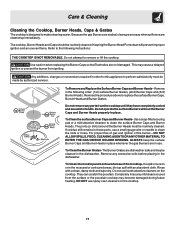
... surface or the porcelain cooktop may become damaged during future heating. Do not use . Completely rinse any excessive soils before placing in order for this appliance to clean the surface Burner Caps and Burner Heads. Because the gas Burners are sealed, cleanups are easy when spillovers are cleaned up spill with...
... surface or the porcelain cooktop may become damaged during future heating. Do not use . Completely rinse any excessive soils before placing in order for this appliance to clean the surface Burner Caps and Burner Heads. Because the gas Burners are sealed, cleanups are easy when spillovers are cleaned up spill with...
Use and Care Manual
Page 19
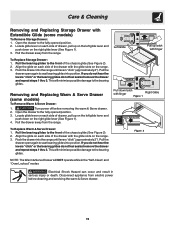
... bearing glides. Align the glide on each side of the drawer with finger To Replace Storage Drawer: 1. Push the drawer into the range until levers "click" (approximately 2"). Locate glide lever on each side of drawer, pull up latch with the glide slots on the ... glide lever (See Figure 1). 4. Pull the drawer away from the range. Push the drawer into the range until levers "click" (approximately 2"). This will minimize possible damage to the front of the chassis glide (See Figure 2). 2. Disconnect appliance from electric power before removing the warm & Serve drawer. 2.
... bearing glides. Align the glide on each side of the drawer with finger To Replace Storage Drawer: 1. Push the drawer into the range until levers "click" (approximately 2"). Locate glide lever on each side of drawer, pull up latch with the glide slots on the ... glide lever (See Figure 1). 4. Pull the drawer away from the range. Push the drawer into the range until levers "click" (approximately 2"). This will minimize possible damage to the front of the chassis glide (See Figure 2). 2. Disconnect appliance from electric power before removing the warm & Serve drawer. 2.
Use and Care Manual
Page 20
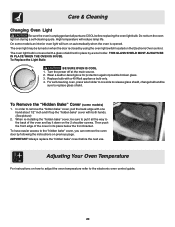
...to replace glass shield. For self-cleaning oven, press wire holder to remove the "hidden bake" cover, pull the back edge with a 40 Watt appliance bulb only. 4. Then push the front edge of the oven and lay it all parts are COOL before the next use. IMPORTANT: Always replace the... "hidden bake" cover before replacing the oven light bulb. In order to one hand about 1/2" inch and lift up the "hidden bake" cover with a glass shield held in its place below the front bracket. Adjusting Your Oven Temperature For instructions ...
...to replace glass shield. For self-cleaning oven, press wire holder to remove the "hidden bake" cover, pull the back edge with a 40 Watt appliance bulb only. 4. Then push the front edge of the oven and lay it all parts are COOL before the next use. IMPORTANT: Always replace the... "hidden bake" cover before replacing the oven light bulb. In order to one hand about 1/2" inch and lift up the "hidden bake" cover with a glass shield held in its place below the front bracket. Adjusting Your Oven Temperature For instructions ...
Use and Care Manual
Page 21
...at base of alignment if countertop is level, cooktop may make appliance accessible. When range is not level. Provide sufficient space so range can be lit manually. Have a flexible C.S.A international approved metal appliance connector installed. Call an authorized servicer. Check house lights to...power outage. Weak, unstable floor. Kitchen cabinet misalignment may appear out of range until burner ignites and then turn the surface control knob to correct the problem. Cannot move appliance easily. POSSIBLE CAUSE/SOLUTION Poor installation. See "Cleaning the Burner Grates,...
...at base of alignment if countertop is level, cooktop may make appliance accessible. When range is not level. Provide sufficient space so range can be lit manually. Have a flexible C.S.A international approved metal appliance connector installed. Call an authorized servicer. Check house lights to...power outage. Weak, unstable floor. Kitchen cabinet misalignment may appear out of range until burner ignites and then turn the surface control knob to correct the problem. Cannot move appliance easily. POSSIBLE CAUSE/SOLUTION Poor installation. See "Cleaning the Burner Grates,...
Use and Care Manual
Page 24
...In the USA, your receipt, delivery slip, or some other cosmetic parts. 11. USA 1.800.944.9044 Electrolux Major Appliances North America P.O. LIMITATION OF REMEDIES CUSTOMER'S SOLE AND EXCLUSIVE REMEDY UNDER THIS LIMITED WARRANTY SHALL BE PRODUCT REPAIR OR REPLACEMENT AS...be readily determined. 2. Product that have been removed, altered or cannot be performed by this warranty. Expenses for making the appliance accessible for repairing or replacing any obligations under this warranty must be defective in accordance with the provided instructions. 8. Box 212378...
...In the USA, your receipt, delivery slip, or some other cosmetic parts. 11. USA 1.800.944.9044 Electrolux Major Appliances North America P.O. LIMITATION OF REMEDIES CUSTOMER'S SOLE AND EXCLUSIVE REMEDY UNDER THIS LIMITED WARRANTY SHALL BE PRODUCT REPAIR OR REPLACEMENT AS...be readily determined. 2. Product that have been removed, altered or cannot be performed by this warranty. Expenses for making the appliance accessible for repairing or replacing any obligations under this warranty must be defective in accordance with the provided instructions. 8. Box 212378...