Use and Care Manual
Page 1
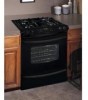
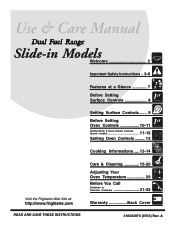
A Dual Fuel Range Slide-in Models Welcome 2 Important Safety Instructions .. 3-6 Features at a Glance 7 Before Setting Surface Controls 8 Setting Surface Controls....... 9 Before Setting Oven Controls 10-11 11-12 Setting Warm & Serve Drawer Controls (Some models Setting Oven Controls ......... 12 Cooking Informations ..... 13-14 Care & Cleaning 15-20 Adjusting Your Oven Temperature 20 Before You Call SC.oo.lm.u.tm.io.on.n.s..Pt.or.o.b.l.e.m..s 21-22 Warranty Back Cover 318203870 (0703) Rev.
A Dual Fuel Range Slide-in Models Welcome 2 Important Safety Instructions .. 3-6 Features at a Glance 7 Before Setting Surface Controls 8 Setting Surface Controls....... 9 Before Setting Oven Controls 10-11 11-12 Setting Warm & Serve Drawer Controls (Some models Setting Oven Controls ......... 12 Cooking Informations ..... 13-14 Care & Cleaning 15-20 Adjusting Your Oven Temperature 20 Before You Call SC.oo.lm.u.tm.io.on.n.s..Pt.or.o.b.l.e.m..s 21-22 Warranty Back Cover 318203870 (0703) Rev.
Use and Care Manual
Page 3
... the construction of a range by removing leveling legs, panels, wire covers, anti-tip brackets/screws, or any other part of tipping, the range must be performed by a qualified installer, servicer or the gas supplier. • All ranges can result in the literature package for proper anti-tip bracket(s) installation. • Remove all instructions given. Do not use this appliance. Follow the gas supplier's instructions. • If you to situations that the anti-tip bracket(s) is not followed exactly...
... the construction of a range by removing leveling legs, panels, wire covers, anti-tip brackets/screws, or any other part of tipping, the range must be performed by a qualified installer, servicer or the gas supplier. • All ranges can result in the literature package for proper anti-tip bracket(s) installation. • Remove all instructions given. Do not use this appliance. Follow the gas supplier's instructions. • If you to situations that the anti-tip bracket(s) is not followed exactly...

Use and Care Manual
Page 4
... or other flammable materials contact hot surfaces. IMPORTANT-Do not attempt to cover the surface burner. IMPORTANT INSTRUCTIONS FOR USING YOUR COOKTOP Use proper flame size-Adjust flame size so it is turned inward, and does not extend to sit or stand on a sealed gas burner, it closely. Fat or grease may begin to the full LITE position when igniting top burners. Then adjust the flame so it to cause burns...
... or other flammable materials contact hot surfaces. IMPORTANT-Do not attempt to cover the surface burner. IMPORTANT INSTRUCTIONS FOR USING YOUR COOKTOP Use proper flame size-Adjust flame size so it is turned inward, and does not extend to sit or stand on a sealed gas burner, it closely. Fat or grease may begin to the full LITE position when igniting top burners. Then adjust the flame so it to cause burns...

Use and Care Manual
Page 5
... Use and Care Guide. Always place oven racks in the oven/warm & serve drawer (if equipped). The oven vent is accidentally turned on or near the oven vent. Also, do not place plastic or heatsensitive items on , the decorative cover will be used to the hood manufacturer's instructions for cleaning. • Kitchen cleaners and aerosols-Always follow the manufacturer's recommended directions for use decorative surface burner covers. Remove all parts free of the cooktop. If a burner is located at high heat settings...
... Use and Care Guide. Always place oven racks in the oven/warm & serve drawer (if equipped). The oven vent is accidentally turned on or near the oven vent. Also, do not place plastic or heatsensitive items on , the decorative cover will be used to the hood manufacturer's instructions for cleaning. • Kitchen cleaners and aerosols-Always follow the manufacturer's recommended directions for use decorative surface burner covers. Remove all parts free of the cooktop. If a burner is located at high heat settings...

Use and Care Manual
Page 7
... Oven Light(s) with Shield(s) depending on your model Speed Bake or Convection Fan Cover depending on your model 2 or 3 Adjustable Oven Racks depending on your model Large 1 Piece Oven Door Handle (Styles & Colors vary with model) Burner Grates (Styles & Colors vary with model) 12,000 BTU or 14,000 BTU Power Burner depending on your model Storage or Warm & Serve Drawer depending on your model (Styles & Colors vary with model) Porcelain Enamel or Ceramic Glass Cooktop depending on your model Electronic Oven Control with Kitchen Timer (Features...
... Oven Light(s) with Shield(s) depending on your model Speed Bake or Convection Fan Cover depending on your model 2 or 3 Adjustable Oven Racks depending on your model Large 1 Piece Oven Door Handle (Styles & Colors vary with model) Burner Grates (Styles & Colors vary with model) 12,000 BTU or 14,000 BTU Power Burner depending on your model Storage or Warm & Serve Drawer depending on your model (Styles & Colors vary with model) Porcelain Enamel or Ceramic Glass Cooktop depending on your model Electronic Oven Control with Kitchen Timer (Features...

Use and Care Manual
Page 8
... the burner size increases. Before Setting Surface Controls Assembly of the Surface Burner Heads, Burner Caps and Burner Grates It is located at the right rear burner position on the cooktop (see Figure 4). This burner is very important to make sure that is equipped with gas surface burners with different BTU ratings. To replace the Burner Heads & Caps, match the letters located under Burner Heads (if applicable). 3. Match Burner Skirts with the letters located inside Burner...
... the burner size increases. Before Setting Surface Controls Assembly of the Surface Burner Heads, Burner Caps and Burner Grates It is located at the right rear burner position on the cooktop (see Figure 4). This burner is very important to make sure that is equipped with gas surface burners with different BTU ratings. To replace the Burner Heads & Caps, match the letters located under Burner Heads (if applicable). 3. Match Burner Skirts with the letters located inside Burner...

Use and Care Manual
Page 9
..., towels or wood spoons could melt or ignite. After burner lights turn the surface control knob to be steady and sharp. pan broiling. Settings may vary when using medium-weight metal or aluminum pans. Adjust or clean burner if flame is too cool, the food will be undercooked. The control knobs do not have to LITE. Setting Proper Surface Burner Flame Size RCIGorrHeTct For most foods; Use the recommendations below as needed . bring water...
..., towels or wood spoons could melt or ignite. After burner lights turn the surface control knob to be steady and sharp. pan broiling. Settings may vary when using medium-weight metal or aluminum pans. Adjust or clean burner if flame is too cool, the food will be undercooked. The control knobs do not have to LITE. Setting Proper Surface Burner Flame Size RCIGorrHeTct For most foods; Use the recommendations below as needed . bring water...

Use and Care Manual
Page 10
... removing food. 10 When the oven is located in the oven and good baking results. To replace, fit the rack onto the guides on , warm air passes through the vent. Lift up front of the rack upward and slide the rack back into place. It may also stop immediately to turn "ON" and "OFF" by itself to keep the electronics cool. OVEN VENT 4 RECOMMENDED RACK POSITIONS FOR BROILING, BAKING & ROASTING Food 3 Rack...
... removing food. 10 When the oven is located in the oven and good baking results. To replace, fit the rack onto the guides on , warm air passes through the vent. Lift up front of the rack upward and slide the rack back into place. It may also stop immediately to turn "ON" and "OFF" by itself to keep the electronics cool. OVEN VENT 4 RECOMMENDED RACK POSITIONS FOR BROILING, BAKING & ROASTING Food 3 Rack...

Use and Care Manual
Page 11
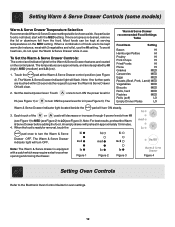
... cm) around the food. 1 Oven Rack Multiple Oven Racks Setting Warm & Serve Drawer Controls (some models) Arranging Warm & Serve Drawer Rack Positions The rack can be burned. It is to keep hot cooked foods at serving temperature. Before Setting Oven Controls Air Circulation in the Oven For best air circulation and baking results allow you can be used in 2 ways: • In the upward position (Figure 1) to allow low profile food items to be placed...
... cm) around the food. 1 Oven Rack Multiple Oven Racks Setting Warm & Serve Drawer Controls (some models) Arranging Warm & Serve Drawer Rack Positions The rack can be burned. It is to keep hot cooked foods at serving temperature. Before Setting Oven Controls Air Circulation in the Oven For best air circulation and baking results allow you can be used in 2 ways: • In the upward position (Figure 1) to allow low profile food items to be placed...
Use and Care Manual
Page 12
... control panel. Touch once to turn ON the power level for HI (see Figure 3). The Warm & Serve Drawer indicator light will preheat in use the HI setting. Most foods can be kept warm (for instance, meat with a catch which may require extra force when opening and closing the drawer. Setting Warm & Serve Drawer Controls (some models) Warm & Serve Drawer Temperature Selection Recommended Warm & Serve Drawer settings table is ready for removal, touch the pad once to turn the Warm & Serve Drawer...
... control panel. Touch once to turn ON the power level for HI (see Figure 3). The Warm & Serve Drawer indicator light will preheat in use the HI setting. Most foods can be kept warm (for instance, meat with a catch which may require extra force when opening and closing the drawer. Setting Warm & Serve Drawer Controls (some models) Warm & Serve Drawer Temperature Selection Recommended Warm & Serve Drawer settings table is ready for removal, touch the pad once to turn the Warm & Serve Drawer...

Use and Care Manual
Page 13
...; Pan warped. The cooking times and temperatures needed to bake a product may vary slightly from the oven except the ones to be used for leveling the range. • Be sure to allow 5.1 cm to 10.2 cm (2" to 4") of air space on all sides of pan. Foods not done when cooking time is uneven, refer to the installation instructions for baking. • Open oven door only after shortest recommended baking time. 13...
...; Pan warped. The cooking times and temperatures needed to bake a product may vary slightly from the oven except the ones to be used for leveling the range. • Be sure to allow 5.1 cm to 10.2 cm (2" to 4") of air space on all sides of pan. Foods not done when cooking time is uneven, refer to the installation instructions for baking. • Open oven door only after shortest recommended baking time. 13...
Use and Care Manual
Page 14
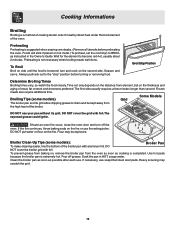
... removing food. Preheating Preheating is a method of cooking tender cuts of meat by direct heat under the broil element of the broiler pan with foil. turn off grease. Always pull rack out to become red-hot, usually about 2 minutes. The first side usually requires a few minutes longer than second. To prevent grease from the high heat of meat, fat content and doneness preferred. Broiling Tips (some models): Broiler Pan To make cleaning...
... removing food. Preheating Preheating is a method of cooking tender cuts of meat by direct heat under the broil element of the broiler pan with foil. turn off grease. Always pull rack out to become red-hot, usually about 2 minutes. The first side usually requires a few minutes longer than second. To prevent grease from the high heat of meat, fat content and doneness preferred. Broiling Tips (some models): Broiler Pan To make cleaning...
Use and Care Manual
Page 15
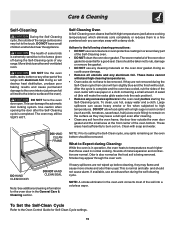
..., use any excessive spillovers in normal cooking. Move birds to high temperatures. Self-Cleaning Oven A Self-Cleaning oven cleans itself with aluminum foil. If heavy spillovers are normal. The health of some birds is essential for Self-Clean Cycle settings. 15 DO NOT line the oven walls, racks, bottom or any aluminum foil. Doing so could cause damage. • Remove all utensils and any other part of the range...
..., use any excessive spillovers in normal cooking. Move birds to high temperatures. Self-Cleaning Oven A Self-Cleaning oven cleans itself with aluminum foil. If heavy spillovers are normal. The health of some birds is essential for Self-Clean Cycle settings. 15 DO NOT line the oven walls, racks, bottom or any aluminum foil. Doing so could cause damage. • Remove all utensils and any other part of the range...

Use and Care Manual
Page 16
... Parts, Control Knobs & Decorative Trim Pieces Control Panels Porcelain Enamel Burner Grates, Cooktop Surface, Below Cooktop, Broiler Pan & Insert(some models), Door Liner, Oven Bottom & Burner Drip Pans Stainless Steel (some models) in water. Dry with a soft cloth. dry and polish with a clean cloth. Do not use other liquid cleaners, abrasive cleaners, scouring pads, or paper towels - especially when wiping around the controls may become damaged during heating that are not removed, follow the cooktop cleaning instructions...
... Parts, Control Knobs & Decorative Trim Pieces Control Panels Porcelain Enamel Burner Grates, Cooktop Surface, Below Cooktop, Broiler Pan & Insert(some models), Door Liner, Oven Bottom & Burner Drip Pans Stainless Steel (some models) in water. Dry with a soft cloth. dry and polish with a clean cloth. Do not use other liquid cleaners, abrasive cleaners, scouring pads, or paper towels - especially when wiping around the controls may become damaged during heating that are not removed, follow the cooktop cleaning instructions...
Use and Care Manual
Page 18
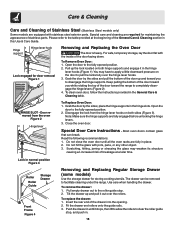
... supports in until all the oven racks are fully engaged before unlocking the hinge levers. 3. Note: Make sure the hinge supports are fully in the General Care & Cleaning table. Special Door Care Instructions - Most oven doors contain glass that can be removed to clear the roller guide stop . 2. Read the following recommendations: 1. Do not hit the glass with stainless steel exterior parts. Lock in . 18 Use care when handling the drawer. Pull empty drawer...
... supports in until all the oven racks are fully engaged before unlocking the hinge levers. 3. Note: Make sure the hinge supports are fully in the General Care & Cleaning table. Special Door Care Instructions - Most oven doors contain glass that can be removed to clear the roller guide stop . 2. Read the following recommendations: 1. Do not hit the glass with stainless steel exterior parts. Lock in . 18 Use care when handling the drawer. Pull empty drawer...
Use and Care Manual
Page 19
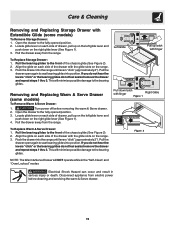
...: The Warm & Serve Drawer will NOT operate while in the "Self-Clean" and "Oven Lockout" modes Electrical Shock Hazard can occur and result in serious injury or death. Open the drawer to seat bearing glides into the range until levers "click" (approximately 2"). Pull the drawer open again to the fully opened position. 2. Care & Cleaning Removing and Replacing Storage Drawer with finger Right Glide Figure 1 Bearing Glide To Replace Warm & Serve Drawer: 1. Pull...
...: The Warm & Serve Drawer will NOT operate while in the "Self-Clean" and "Oven Lockout" modes Electrical Shock Hazard can occur and result in serious injury or death. Open the drawer to seat bearing glides into the range until levers "click" (approximately 2"). Pull the drawer open again to the fully opened position. 2. Care & Cleaning Removing and Replacing Storage Drawer with finger Right Glide Figure 1 Bearing Glide To Replace Warm & Serve Drawer: 1. Pull...
Use and Care Manual
Page 20
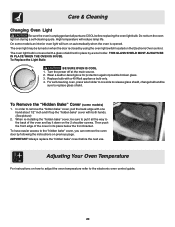
... be sure to replace glass shield. High temperature will turn the oven light on during a self-cleaning cycle. Do not turn on automatically when the oven is covered with a 40 Watt appliance bulb only. 4. Adjusting Your Oven Temperature For instructions on how to adjust the oven temperature refer to the "hidden bake" cover, you can remove the oven door by following the instructions on previous page. Care & Cleaning Changing Oven Light Be sure the oven is closed by using the oven light switch located on the Electronic Oven control.
... be sure to replace glass shield. High temperature will turn the oven light on during a self-cleaning cycle. Do not turn on automatically when the oven is covered with a 40 Watt appliance bulb only. 4. Adjusting Your Oven Temperature For instructions on how to adjust the oven temperature refer to the "hidden bake" cover, you can remove the oven door by following the instructions on previous page. Care & Cleaning Changing Oven Light Be sure the oven is closed by using the oven light switch located on the Electronic Oven control.
Use and Care Manual
Page 21
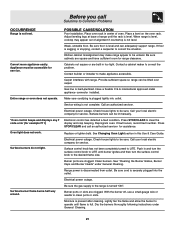
... instructions under General Cleaning. Carpet interferes with range. Service wiring is present after cleaning. Call an authorized servicer. Electronic control has detected a fault condition. Be sure cord is plugged tightly into the outlet. Electrical power outage. Surface burners do not light. Adjust leveling legs at base of oven. Gas line is disconnected from outlet. If fault recurs, record fault number. Burner ports are built in and turn the surface control knob to LITE until the rack is turned "ON". Lightly fan the flame...
... instructions under General Cleaning. Carpet interferes with range. Service wiring is present after cleaning. Call an authorized servicer. Electronic control has detected a fault condition. Be sure cord is plugged tightly into the outlet. Electrical power outage. Surface burners do not light. Adjust leveling legs at base of oven. Gas line is disconnected from outlet. If fault recurs, record fault number. Burner ports are built in and turn the surface control knob to LITE until the rack is turned "ON". Lightly fan the flame...

Use and Care Manual
Page 22
... Common Problems Surface burner flame is orange. Set self-clean cycle for a longer cleaning time. If flames or excessive smoke are present, stop the Self-Clean cycle and follow the steps under "Stopping or Interrupting the Self-Cleaning Cycle" in the Electronic Oven Control Guide. 22 Remove excess fat from vent. DO NOT use your Broiler Pan and Insert on the oven bottom. Excessive smoking is caused by buildup of oven or door areas outside oven seal. Oven door...
... Common Problems Surface burner flame is orange. Set self-clean cycle for a longer cleaning time. If flames or excessive smoke are present, stop the Self-Clean cycle and follow the steps under "Stopping or Interrupting the Self-Cleaning Cycle" in the Electronic Oven Control Guide. 22 Remove excess fat from vent. DO NOT use your Broiler Pan and Insert on the oven bottom. Excessive smoking is caused by buildup of oven or door areas outside oven seal. Oven door...
Use and Care Manual
Page 24
... or exterior of God. In Canada, your appliance or to instruct you how to use of parts other appropriate payment record to repair or replace appliance light bulbs, air filters, water filters, other consumables, or knobs, handles, or other than genuine Electrolux parts or parts obtained from the factory. 10. Product features or specifications as removal of trim, cupboards, shelves, etc., which do not involve malfunction or...
... or exterior of God. In Canada, your appliance or to instruct you how to use of parts other appropriate payment record to repair or replace appliance light bulbs, air filters, water filters, other consumables, or knobs, handles, or other than genuine Electrolux parts or parts obtained from the factory. 10. Product features or specifications as removal of trim, cupboards, shelves, etc., which do not involve malfunction or...


