
Installation Instructions
Page 1
... consumer • Keep these installation instructions before connecting the gas and electrical supply to the range. • Observe all instructions contained in your Use & Care Guide for proper installation. conversion kit. READ AND SAVE THESE INSTRUCTIONS FOR FUTURE REFERENCE. Range leveling leg Anti-Tip bracket To check if the anti-tip bracket is not followed exactly, a fire or explosion may be located on natural gas. If no L.P. Do not store or use both arms and grasp the rear...
... consumer • Keep these installation instructions before connecting the gas and electrical supply to the range. • Observe all instructions contained in your Use & Care Guide for proper installation. conversion kit. READ AND SAVE THESE INSTRUCTIONS FOR FUTURE REFERENCE. Range leveling leg Anti-Tip bracket To check if the anti-tip bracket is not followed exactly, a fire or explosion may be located on natural gas. If no L.P. Do not store or use both arms and grasp the rear...

Installation Instructions
Page 2
... an electrical power failure occurs during use, the surface burners will automatically re-ignite the oven burner when power resumes if the oven thermostat control was left in use in combination with linoleum or any other . Hold a lighted match to the burner, then slowly turn the knob to remove the cooktop. 2 DO NOT MAKE ANY ATTEMPT TO OPERATE THE ELECTRIC IGNITION OVEN DURING AN ELECTRICAL POWER FAILURE. Use extreme caution when lighting burners this range must conform with local codes...
... an electrical power failure occurs during use, the surface burners will automatically re-ignite the oven burner when power resumes if the oven thermostat control was left in use in combination with linoleum or any other . Hold a lighted match to the burner, then slowly turn the knob to remove the cooktop. 2 DO NOT MAKE ANY ATTEMPT TO OPERATE THE ELECTRIC IGNITION OVEN DURING AN ELECTRICAL POWER FAILURE. Use extreme caution when lighting burners this range must conform with local codes...

Installation Instructions
Page 4
... the cooking top or at the rear of the floor. to the BTU of pipe stub and shutoff valve. * Models without self-clean feature may have an additional 7 inches clearance from cooktop to combustible wall on either side of range above 36" height should be solid and level. The dimensions shown here must be installed for proper electric and gas supply, and stability of the range. INSTALLATION INSTRUCTIONS - FREESTANDING GAS RANGE Installation with...
... the cooking top or at the rear of the floor. to the BTU of pipe stub and shutoff valve. * Models without self-clean feature may have an additional 7 inches clearance from cooktop to combustible wall on either side of range above 36" height should be solid and level. The dimensions shown here must be installed for proper electric and gas supply, and stability of the range. INSTALLATION INSTRUCTIONS - FREESTANDING GAS RANGE Installation with...

Installation Instructions
Page 6
... air. INSTALLATION INSTRUCTIONS - Care must be reduced at least 11 inches. Seal any openings in the wall behind the range and in series with the kit for LP/Propane gas 10 inch manifold pressure, inlet pressure must be at the rate of range. A convertible pressure regulator is set to LP/ Propane use pipe joint sealant on 4" natural gas manifold pressure. Note: To prevent leaks use . Pressure regulator Flexible appliance conduit Flare union adaptor Flare union Manual adaptor shut-off the gas supply...
... air. INSTALLATION INSTRUCTIONS - Care must be reduced at least 11 inches. Seal any openings in the wall behind the range and in series with the kit for LP/Propane gas 10 inch manifold pressure, inlet pressure must be at the rate of range. A convertible pressure regulator is set to LP/ Propane use pipe joint sealant on 4" natural gas manifold pressure. Note: To prevent leaks use . Pressure regulator Flexible appliance conduit Flare union adaptor Flare union Manual adaptor shut-off the gas supply...

Installation Instructions
Page 9
... the igniter turns off . Flame should be checked after range and supply line connectors have an electric burner igniter. Check for operating instructions. c. If your model is set oven to cycle once. d. f. Adjust flame until burner ignites. Note: Air mixture adjustments are removed from supply lines. These control systems require no adjustment. There is a time lapse from LITE to lowest position. To maintain any set temperature, the glowing igniter will flow to the LITE position. b. Reset control to a light bulb. See User's Manual...
... the igniter turns off . Flame should be checked after range and supply line connectors have an electric burner igniter. Check for operating instructions. c. If your model is set oven to cycle once. d. f. Adjust flame until burner ignites. Note: Air mixture adjustments are removed from supply lines. These control systems require no adjustment. There is a time lapse from LITE to lowest position. To maintain any set temperature, the glowing igniter will flow to the LITE position. b. Reset control to a light bulb. See User's Manual...

Installation Instructions
Page 10
... the User's manual for servicing and cleaning. Finish removing the range for detailed cleaning instructions. Your identification plate also tells you time and expense. If the flame is proper, set the oven to disconnect the gas and electrical supply. INSTALLATION INSTRUCTIONS - Be sure to observe oven burner flame. To determine if the upper broil burner flame is a distinct blue, reduce the air shutter opening size. FREESTANDING GAS RANGE 10 Adjust air shutter - To remove...
... the User's manual for servicing and cleaning. Finish removing the range for detailed cleaning instructions. Your identification plate also tells you time and expense. If the flame is proper, set the oven to disconnect the gas and electrical supply. INSTALLATION INSTRUCTIONS - Be sure to observe oven burner flame. To determine if the upper broil burner flame is a distinct blue, reduce the air shutter opening size. FREESTANDING GAS RANGE 10 Adjust air shutter - To remove...
Complete Owners Guide
Page 3
... or death. Installation and service must be performed by a qualified installer, servicer, or the gas supplier. something written down to these symbols and follow this symbol to light any appliance. • Do not touch any electrical switch. • Do not use gasoline or other appliance. IMPORTANT SAFETY INSTRUCTIONS Read all instructions before using this or any phone in this manual are not meant...
... or death. Installation and service must be performed by a qualified installer, servicer, or the gas supplier. something written down to these symbols and follow this symbol to light any appliance. • Do not touch any electrical switch. • Do not use gasoline or other appliance. IMPORTANT SAFETY INSTRUCTIONS Read all instructions before using this or any phone in this manual are not meant...
Complete Owners Guide
Page 4
... instructions for future reference 4 Do not remove model/ serial number plate. Refer to the anti-tip bracket installation instructions supplied with your appliance: Remove all tape and packaging before turning on the power to the appliance. IMPORTANT SAFETY INSTRUCTIONS WARNING Tip Over Hazard • A child or adult can tip the range and be sure the appliance has been in temperatures above 32ºF (0ºC) for unpacking, installing, and servicing your range for use...
... instructions for future reference 4 Do not remove model/ serial number plate. Refer to the anti-tip bracket installation instructions supplied with your appliance: Remove all tape and packaging before turning on the power to the appliance. IMPORTANT SAFETY INSTRUCTIONS WARNING Tip Over Hazard • A child or adult can tip the range and be sure the appliance has been in temperatures above 32ºF (0ºC) for unpacking, installing, and servicing your range for use...
Complete Owners Guide
Page 7
... adjacent surface burners. Touching surfaces in temperature. Proper relationship of glass, glass/ceramic, ceramic, earthenware, or other items. Using the proper cookware on . Only certain types of utensil to direct contact and may ignite, or a pan that burner has lit. IMPORTANT INSTRUCTIONS FOR USING YOUR OVEN Protective liners-Do not use . Once the power resumes, reset the clock and the oven function. Only use of undersized cookware may expose a portion of the utensil. Adjust flame size...
... adjacent surface burners. Touching surfaces in temperature. Proper relationship of glass, glass/ceramic, ceramic, earthenware, or other items. Using the proper cookware on . Only certain types of utensil to direct contact and may ignite, or a pan that burner has lit. IMPORTANT INSTRUCTIONS FOR USING YOUR OVEN Protective liners-Do not use . Once the power resumes, reset the clock and the oven function. Only use of undersized cookware may expose a portion of the utensil. Adjust flame size...

Complete Owners Guide
Page 8
... hood or filter. CAUTION Before manually cleaning any part of the broiler. Greasy deposits in desired location while oven is essential for use a broiler pan without its insert. Ask your dealer, distributor, service agent, or manufacturer about problems or conditions you do not let potholder contact hot burner or element in this manual. Always place oven racks in the fan could ignite. IMPORTANT INSTRUCTIONS FOR CLEANING YOUR APPLIANCE IMPORTANT INSTRUCTIONS FOR SELF CLEANING OVENS CAUTION Before using self clean, remove broiler pan...
... hood or filter. CAUTION Before manually cleaning any part of the broiler. Greasy deposits in desired location while oven is essential for use a broiler pan without its insert. Ask your dealer, distributor, service agent, or manufacturer about problems or conditions you do not let potholder contact hot burner or element in this manual. Always place oven racks in the fan could ignite. IMPORTANT INSTRUCTIONS FOR CLEANING YOUR APPLIANCE IMPORTANT INSTRUCTIONS FOR SELF CLEANING OVENS CAUTION Before using self clean, remove broiler pan...

Complete Owners Guide
Page 19
... oven racks are level before starting a self clean cycle. Figure 12: Oven rack types • Flat oven racks may be placed in the oven and good baking results. Steam or moisture may be hot enough to the oven interior. Doing so will be damaged and all of these liners may be used for proper air circulation in most oven rack positions. To remove - BEFORE SETTING OVEN CONTROLS Oven Vent Location The oven is normal. Pull the oven rack...
... oven racks are level before starting a self clean cycle. Figure 12: Oven rack types • Flat oven racks may be placed in the oven and good baking results. Steam or moisture may be hot enough to the oven interior. Doing so will be damaged and all of these liners may be used for proper air circulation in most oven rack positions. To remove - BEFORE SETTING OVEN CONTROLS Oven Vent Location The oven is normal. Pull the oven rack...

Complete Owners Guide
Page 20
Use to set Broil feature. 3. Broil - Circulates the oven heat evenly and continuously for cleaning light soils. 15. Quick Preheat - Use to select Bake feature. 2. Also will turn on internal light when checking on when the oven door is delayed 3 seconds). Use set a self clean cycle between 2 and 4hrs. 14. Use to set or cancel the minute timer. Table 1: Minimum/Maximum time and temperatures Feature Mode Min.Temp. / Time Max Temp. /Time Quick Preheat 170°F (77°C) 550°F (288°C) Bake 170°F (77...
Use to set Broil feature. 3. Broil - Circulates the oven heat evenly and continuously for cleaning light soils. 15. Quick Preheat - Use to select Bake feature. 2. Also will turn on internal light when checking on when the oven door is delayed 3 seconds). Use set a self clean cycle between 2 and 4hrs. 14. Use to set or cancel the minute timer. Table 1: Minimum/Maximum time and temperatures Feature Mode Min.Temp. / Time Max Temp. /Time Quick Preheat 170°F (77°C) 550°F (288°C) Bake 170°F (77...

Complete Owners Guide
Page 22
... oven control has a factory preset built-in 12 hour Energy Saving feature that will begin unlocking the oven door automatically. To change temperature display mode from °F to show either °F or ºC oven temperatures. Press START to operate without audible tones. Important note: The oven temperature display cannot be programmed for use. When the word DOOR with a lock icon will be changed during the cooking process or if a delay start has been set or self clean...
... oven control has a factory preset built-in 12 hour Energy Saving feature that will begin unlocking the oven door automatically. To change temperature display mode from °F to show either °F or ºC oven temperatures. Press START to operate without audible tones. Important note: The oven temperature display cannot be programmed for use. When the word DOOR with a lock icon will be changed during the cooking process or if a delay start has been set or self clean...

Complete Owners Guide
Page 26
... The Delay Start feature may increase the cooking time necessary for best results. Press START 6. Enter 3 7 5 using a 24 hr clock. SETTING OVEN CONTROLS Setting Convection Convert Pressing the Convect Convert key automatically converts the cooking temperature entered for any convection function is active, the convection fan will stop rotating until the oven door is closed. • Do not open the oven door often. WARNING Food Poisoning Hazard. To program oven for convection bake with Convection Bake, Convection Roast, Convection Convert, Bake, Broil and Self Clean functions. 26...
... The Delay Start feature may increase the cooking time necessary for best results. Press START 6. Enter 3 7 5 using a 24 hr clock. SETTING OVEN CONTROLS Setting Convection Convert Pressing the Convect Convert key automatically converts the cooking temperature entered for any convection function is active, the convection fan will stop rotating until the oven door is closed. • Do not open the oven door often. WARNING Food Poisoning Hazard. To program oven for convection bake with Convection Bake, Convection Roast, Convection Convert, Bake, Broil and Self Clean functions. 26...
Complete Owners Guide
Page 27
...: OPEN DOOR BROIL SHUT OFF: If the oven door is direct heat cooking and may be set with foil - Setting Broil Use the broil function to cook foods that require direct exposure to radiant heat for 5 minutes before adding food. WARNING Should an oven fire occur, leave the oven door closed . 3. Press Broil. Position bakeware in oven. 4. SETTING OVEN CONTROLS To set to any time, press OFF. Broil may be purchased from www.frigidaire.com 27 Press START. 5. To cancel broil at any temperature...
...: OPEN DOOR BROIL SHUT OFF: If the oven door is direct heat cooking and may be set with foil - Setting Broil Use the broil function to cook foods that require direct exposure to radiant heat for 5 minutes before adding food. WARNING Should an oven fire occur, leave the oven door closed . 3. Press Broil. Position bakeware in oven. 4. SETTING OVEN CONTROLS To set to any time, press OFF. Broil may be purchased from www.frigidaire.com 27 Press START. 5. To cancel broil at any temperature...
Complete Owners Guide
Page 43
...-free cleaning pad. 7. orifice port slots ignition port ignitor To avoid possible burns, do not attempt to , break, or mark the ceramic glass surface, permanently damaging the cooktop surface. Routinely clean the cooktop. Keeping the surface burner head ports and slots clean will click into place on a hot cooktop can wiggle the cap to test placement, it may fuse to operate the surface burners without the burner caps. • Do not use spray oven...
...-free cleaning pad. 7. orifice port slots ignition port ignitor To avoid possible burns, do not attempt to , break, or mark the ceramic glass surface, permanently damaging the cooktop surface. Routinely clean the cooktop. Keeping the surface burner head ports and slots clean will click into place on a hot cooktop can wiggle the cap to test placement, it may fuse to operate the surface burners without the burner caps. • Do not use spray oven...
Complete Owners Guide
Page 47
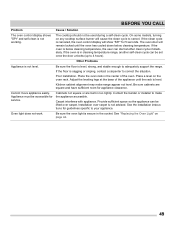
... broil element or burner. Oven control panel beeps and displays any F or E code error. Set the clock with the problem listed. Oven portion of day. Be sure the regulator gas valve is open. See "Setting the Clock" on oven surfaces. Center food in the oven. To clear the error, press the OFF key on page 37 if you time and expense. in this checklist. Remove excess fat from oven vent. Grease or food splatters will turn off if the oven door...
... broil element or burner. Oven control panel beeps and displays any F or E code error. Set the clock with the problem listed. Oven portion of day. Be sure the regulator gas valve is open. See "Setting the Clock" on oven surfaces. Center food in the oven. To clear the error, press the OFF key on page 37 if you time and expense. in this checklist. Remove excess fat from oven vent. Grease or food splatters will turn off if the oven door...
Complete Owners Guide
Page 48
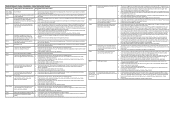
... gas line. Refer to LITE ( ). conversion kit instructions to clean the burner head slots and ignition ports. Oven racks discolored or do not ignite. Soil not completely removed after cleaning, lightly fan the flame and allow the burner to burn on page 43 for additional cleaning instructions. self clean. Clean these areas before starting self clean. With the burner OFF and cool, use a small-gauge wire or needle to correct. Circuit is securely plugged into the power outlet. With the surface burner...
... gas line. Refer to LITE ( ). conversion kit instructions to clean the burner head slots and ignition ports. Oven racks discolored or do not ignite. Soil not completely removed after cleaning, lightly fan the flame and allow the burner to burn on page 43 for additional cleaning instructions. self clean. Clean these areas before starting self clean. With the burner OFF and cool, use a small-gauge wire or needle to correct. Circuit is securely plugged into the power outlet. With the surface burner...
Complete Owners Guide
Page 49
... be set once the door unlocks (up to 4 hours). Contact the builder or installer to make range appear not level. Be sure the oven light is level. If the clean cycle is canceled, the oven control display will remain locked until the rack is secure in the center of the appliance until the oven has cooled down below cleaning temperature, the user can start another self-clean cycle can be used during a self-clean cycle...
... be set once the door unlocks (up to 4 hours). Contact the builder or installer to make range appear not level. Be sure the oven light is level. If the clean cycle is canceled, the oven control display will remain locked until the rack is secure in the center of the appliance until the oven has cooled down below cleaning temperature, the user can start another self-clean cycle can be used during a self-clean cycle...
Wiring Diagram
Page 2
... power. With an ohmmeter, verify the switch is active. 2. If the door switch is found to gas models and typically occurs when the user turns on the door switch plunger when the door is only applicable to be cleared, the board/springs alignment within the enclosure. If the switch and wiring are good and the problem persists, replace the oven relay board. SCC Self-Clean Cancel 1. This error is locked...
... power. With an ohmmeter, verify the switch is active. 2. If the door switch is found to gas models and typically occurs when the user turns on the door switch plunger when the door is only applicable to be cleared, the board/springs alignment within the enclosure. If the switch and wiring are good and the problem persists, replace the oven relay board. SCC Self-Clean Cancel 1. This error is locked...


