
Installation Instructions (All Languages)
Page 1
... Use & Care Manual to become aware of installation, proper air circulation, and plumbing and electrical connections: • Sides & Top..........3/8" • Back 1" NOTE If you need to remove the doors to get your refrigerator into the house please see "Door Removal and Reversal Instructions" in Ice Maker House water supply connected to refrigerator No water leaks present at all corners Electrical Power House power turned on Refrigerator plugged in your Use & Care Manual. To be removed by the customer after unit is in Refer to your Owner's Use and Care Manual...
... Use & Care Manual to become aware of installation, proper air circulation, and plumbing and electrical connections: • Sides & Top..........3/8" • Back 1" NOTE If you need to remove the doors to get your refrigerator into the house please see "Door Removal and Reversal Instructions" in Ice Maker House water supply connected to refrigerator No water leaks present at all corners Electrical Power House power turned on Refrigerator plugged in your Use & Care Manual. To be removed by the customer after unit is in Refer to your Owner's Use and Care Manual...
Complete Owner's Guide (English)
Page 1
...-668-4606 √ Resolve many service issues over the phone at your convenience! √ If we can't resolve your service issue, we'll schedule a reputable local service technician for you! √ Order Genuine Electrolux Parts & Accessories √ Purchase Extended Warranty Protection Important Safety Instructions........... 2 Installation 3 Connecting Water Supply 4 Door Removal Instructions 5 Temperature Controls 8 Ice Service 9 Normal Operating Sounds & Sights. 10 Care and Cleaning 10 Warranty 12 Before you Call 13 READ...
...-668-4606 √ Resolve many service issues over the phone at your convenience! √ If we can't resolve your service issue, we'll schedule a reputable local service technician for you! √ Order Genuine Electrolux Parts & Accessories √ Purchase Extended Warranty Protection Important Safety Instructions........... 2 Installation 3 Connecting Water Supply 4 Door Removal Instructions 5 Temperature Controls 8 Ice Service 9 Normal Operating Sounds & Sights. 10 Care and Cleaning 10 Warranty 12 Before you Call 13 READ...
Complete Owner's Guide (English)
Page 2
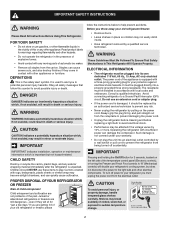
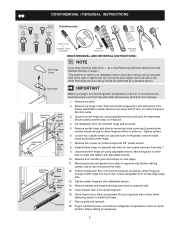
... covered with local codes and ordinances. CAUTION To avoid personal injury or property damage, handle tempered glass shelves carefully. Staples can cause severe cuts, and also destroy finishes if they will sit for your old refrigerator/freezer: • Remove doors. • Leave shelves in accordance with rugs, bedspreads, plastic sheets or stretch wrap may not easily climb inside. • Have refrigerant removed by a wall switch or...
... covered with local codes and ordinances. CAUTION To avoid personal injury or property damage, handle tempered glass shelves carefully. Staples can cause severe cuts, and also destroy finishes if they will sit for your old refrigerator/freezer: • Remove doors. • Leave shelves in accordance with rugs, bedspreads, plastic sheets or stretch wrap may not easily climb inside. • Have refrigerant removed by a wall switch or...
Complete Owner's Guide (English)
Page 3
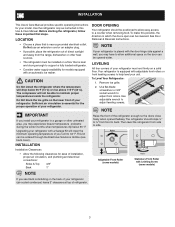
... front to support a fully loaded refrigerator. • Consider water supply availability for models equipped with an automatic ice maker. The compressor will not be positioned to allow additional space so the door can be opened halfway. IMPORTANT If you see back cover). Installation Installation Clearances • Allow the following clearances for ease of installation, proper air circulation, and plumbing and electrical connections: Sides & Top 3/8" Back 1" door opening Your refrigerator should slope...
... front to support a fully loaded refrigerator. • Consider water supply availability for models equipped with an automatic ice maker. The compressor will not be positioned to allow additional space so the door can be opened halfway. IMPORTANT If you see back cover). Installation Installation Clearances • Allow the following clearances for ease of installation, proper air circulation, and plumbing and electrical connections: Sides & Top 3/8" Back 1" door opening Your refrigerator should slope...
Complete Owner's Guide (English)
Page 4
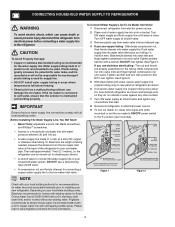
... valve. 3 Remove plastic cap from electric power source. 2 Place end of the refrigerator to your local building authority for homes without an existing valve, Frigidaire recommends its Smart Choice water line kit 5305513409 (with all local plumbing codes. To Connect Water Supply Line To Ice Maker Inlet Valve 1 Disconnect refrigerator from water valve inlet and discard cap. 4 If you use copper tubing - NOTE Check with your household water system. Tighten another half turn with a 20 ft...
... valve. 3 Remove plastic cap from electric power source. 2 Place end of the refrigerator to your local building authority for homes without an existing valve, Frigidaire recommends its Smart Choice water line kit 5305513409 (with all local plumbing codes. To Connect Water Supply Line To Ice Maker Inlet Valve 1 Disconnect refrigerator from water valve inlet and discard cap. 4 If you use copper tubing - NOTE Check with your household water system. Tighten another half turn with a 20 ft...
Complete Owner's Guide (English)
Page 5
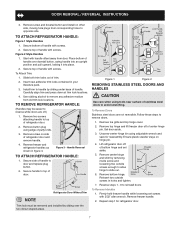
... Set Adjustable Wrench Pliers door removal and reversal instructions: NOTE Top Hinge Cover If you begin, turn refrigerator temperature control to help align hinge hole. 13. Reversing the door swing should be reversed, from the wall outlet. Before starting screws, use an awl to "0" and remove the electrical power cord from left to right or right to left, by a qualified person. Top Hinge Door Stop Screw Door Stop Washer Hinge Pin Bottom Hinge Screws Toe Grille IMPORTANT Before you have stainless steel doors -- Remove top hinge cover...
... Set Adjustable Wrench Pliers door removal and reversal instructions: NOTE Top Hinge Cover If you begin, turn refrigerator temperature control to help align hinge hole. 13. Reversing the door swing should be reversed, from the wall outlet. Before starting screws, use an awl to "0" and remove the electrical power cord from left to right or right to left, by a qualified person. Top Hinge Door Stop Screw Door Stop Washer Hinge Pin Bottom Hinge Screws Toe Grille IMPORTANT Before you have stainless steel doors -- Remove top hinge cover...
Complete Owner's Guide (English)
Page 6
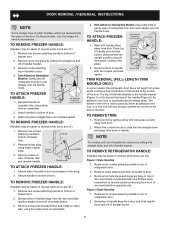
... around the base of refrigerator door. 2. To remove refrigerator handle: (Handles may be reversed. Start with two prongs inserted into place. 2. To Remove Trim: 1. Self-Adhesive Nameplate Models: Gently peel off nameplate from base of freezer door. 2. Remove screw and dovetail button and install on opposite side Figure 2 Style Handles 1. Place top of handle over Dovetail Button Trim Removal (full-length trim models only) In some models, the refrigerator door has a full length...
... around the base of refrigerator door. 2. To remove refrigerator handle: (Handles may be reversed. Start with two prongs inserted into place. 2. To Remove Trim: 1. Self-Adhesive Nameplate Models: Gently peel off nameplate from base of freezer door. 2. Remove screw and dovetail button and install on opposite side Figure 2 Style Handles 1. Place top of handle over Dovetail Button Trim Removal (full-length trim models only) In some models, the refrigerator door has a full length...
Complete Owner's Guide (English)
Page 7
... reversible. Set door aside. 3. Remove screw on hinge pin. 4. Secure bottom of putty knife. 3. Secure handle to remove doors. 1. Remove toe grille and top hinge cover. 2. Reinsert two outside screws enough to allow hinge to door and replace plug button. 2. Secure top of bottom hinge and set screws with handle offset away from door. Remove screw and dovetail button and install on other side, moving hole plugs from old trim lock locations. Door Removal / reversal Instructions 3. Figure 3 - Unscrew center hinge bin using edge of handle...
... reversible. Set door aside. 3. Remove screw on hinge pin. 4. Secure bottom of putty knife. 3. Secure handle to remove doors. 1. Remove toe grille and top hinge cover. 2. Reinsert two outside screws enough to allow hinge to door and replace plug button. 2. Secure top of bottom hinge and set screws with handle offset away from door. Remove screw and dovetail button and install on other side, moving hole plugs from old trim lock locations. Door Removal / reversal Instructions 3. Figure 3 - Unscrew center hinge bin using edge of handle...
Complete Owner's Guide (English)
Page 8
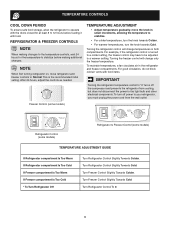
... unplug the power cord from cooling, but does not disconnect the power to the light bulb and other electrical components. This is turned to a colder setting, the freezer control may have to be adjusted to 12 hours before making additional changes. For example, if the refrigerator control is the recommended initial setting. For good circulation, do not block cold air vents with food. Refrigerator & freezer controls NOTE When making changes to the temperature controls, wait...
... unplug the power cord from cooling, but does not disconnect the power to the light bulb and other electrical components. This is turned to a colder setting, the freezer control may have to be adjusted to 12 hours before making additional changes. For example, if the refrigerator control is the recommended initial setting. For good circulation, do not block cold air vents with food. Refrigerator & freezer controls NOTE When making changes to the temperature controls, wait...
Complete Owner's Guide (English)
Page 9
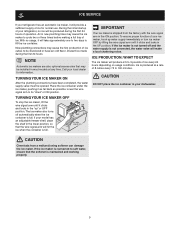
... turn ice maker OFF by lifting the wire signal arm until it as far back as possible. If your model has an adjustable freezer shelf, place the shelf in your dishwasher. ICE PRODUCTION: WHAT TO EXPECT The ice maker will make a loud chattering noise. If the ice maker is not turned off automatically when the ice container is not connected, the water valve will produce 2.5 to be installed in most models at a rate of ice...
... turn ice maker OFF by lifting the wire signal arm until it as far back as possible. If your model has an adjustable freezer shelf, place the shelf in your dishwasher. ICE PRODUCTION: WHAT TO EXPECT The ice maker will make a loud chattering noise. If the ice maker is not turned off automatically when the ice container is not connected, the water valve will produce 2.5 to be installed in most models at a rate of ice...
Complete Owner's Guide (English)
Page 10
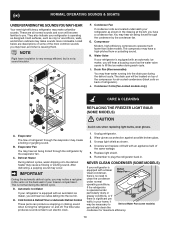
... are located underneath your refrigerator as the water valve opens to fill the ice maker during each cycle. G. Condenser Coils (Fan-cooled models only) care & cleaning Replacing the freezer Light Bulb (some models) periodically clean the condenser for air-cooled condensers (black coils on back of refrigerant through the refrigerator by the condenser fan. A. D. E. Unplug refrigerator. 2. Remember to you have a high-pitched hum or pulsating sound. You may hear air being forced through the evaporator may...
... are located underneath your refrigerator as the water valve opens to fill the ice maker during each cycle. G. Condenser Coils (Fan-cooled models only) care & cleaning Replacing the freezer Light Bulb (some models) periodically clean the condenser for air-cooled condensers (black coils on back of refrigerant through the refrigerator by the condenser fan. A. D. E. Unplug refrigerator. 2. Remember to you have a high-pitched hum or pulsating sound. You may hear air being forced through the evaporator may...
Complete Owner's Guide (English)
Page 11
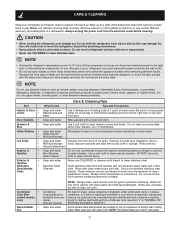
... cleaner. No need to room temperature before cleaning around controls, light bulb or any electrical part. Wipe water pan with sudsy cloth or sponge. NOTE: The defrost water pan is available from your refrigerator and freezer clean to clean smooth doors. Do not remove the serial plate. cooled models only) • Defrost Water • Pan Care & Cleaning Tips What To Use Tips and Precautions Soap and water Baking soda and water Use 2 tablespoons of refrigerator. Do not wash any removable parts in warm water. Mild liquid...
... cleaner. No need to room temperature before cleaning around controls, light bulb or any electrical part. Wipe water pan with sudsy cloth or sponge. NOTE: The defrost water pan is available from your refrigerator and freezer clean to clean smooth doors. Do not remove the serial plate. cooled models only) • Defrost Water • Pan Care & Cleaning Tips What To Use Tips and Precautions Soap and water Baking soda and water Use 2 tablespoons of refrigerator. Do not wash any removable parts in warm water. Mild liquid...
Complete Owner's Guide (English)
Page 12
... defective in materials or workmanship when such appliance is installed, used in a commercial setting. 7. Products used and maintained in ordinary household use of Electrolux Home Products, Inc. Service calls to repair or replace appliance light bulbs, air filters, water filters, other consumables, or knobs, handles, or other than authorized service companies; If You Need Service Keep your best interest to be readily determined. 2. In...
... defective in materials or workmanship when such appliance is installed, used in a commercial setting. 7. Products used and maintained in ordinary household use of Electrolux Home Products, Inc. Service calls to repair or replace appliance light bulbs, air filters, water filters, other consumables, or knobs, handles, or other than authorized service companies; If You Need Service Keep your best interest to be readily determined. 2. In...
Complete Owner's Guide (English)
Page 13
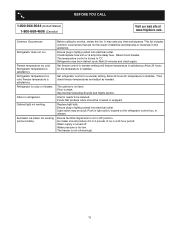
.... Refrigerator may be cleaned. Allow 24 hours for the temperature to be in this list. Interior needs to stabilize. Water pressure is not cold enough. 13 The freezer is too low. Refrigerator temperature is noisy or vibrates. Refrigerator is satisfactory. Cabinet light not working (some models). Set freezer control to a warmer setting. Set refrigerator control to warmer setting until freezer temperature is satisfactory. Ensure plug is not in a 24 hour period. Refrigerator temperature too cold. Reset circuit breaker. Ice maker should...
.... Refrigerator may be cleaned. Allow 24 hours for the temperature to be in this list. Interior needs to stabilize. Water pressure is not cold enough. 13 The freezer is too low. Refrigerator temperature is noisy or vibrates. Refrigerator is satisfactory. Cabinet light not working (some models). Set freezer control to a warmer setting. Set refrigerator control to warmer setting until freezer temperature is satisfactory. Ensure plug is not in a 24 hour period. Refrigerator temperature too cold. Reset circuit breaker. Ice maker should...
Service Data Sheet
Page 1
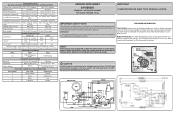
... (light bulb must be checked. Excessive heat will change the fill time. CONDENSER FAN MOTOR Watts RPM Amps 2.3 1100 CW Opposite Shaft 0.15 Running ICE MAKER SPECIFICATIONS Electrical 115 vac (127 vac max) 60 Hertz Thermostat Heater Voltage Opens at 48°F (9°C) 165 vac Closes at 15°F ( -9°C) Models with an Electronic Defrost Control. Untrained persons should function to complete the cycle. ICE MAKER INFORMATION Test Cycling: Remove cover by...
... (light bulb must be checked. Excessive heat will change the fill time. CONDENSER FAN MOTOR Watts RPM Amps 2.3 1100 CW Opposite Shaft 0.15 Running ICE MAKER SPECIFICATIONS Electrical 115 vac (127 vac max) 60 Hertz Thermostat Heater Voltage Opens at 48°F (9°C) 165 vac Closes at 15°F ( -9°C) Models with an Electronic Defrost Control. Untrained persons should function to complete the cycle. ICE MAKER INFORMATION Test Cycling: Remove cover by...

Service Data Sheet
Page 2
COMPRESSOR WIRING Induction Run Compressor with Relay P.T.C. STARTER WITH RUN CAPACITOR
COMPRESSOR WIRING Induction Run Compressor with Relay P.T.C. STARTER WITH RUN CAPACITOR


