Use and Care Guide
Page 1
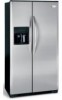
Includes Connecting 4 - 5 IHousehold Water Supply to refrigerator Door Removal Instructions 6 Features at a Glance 7 Temperature Controls 8 - 9 Looking Inside 10 - 11 Automatic Ice and Water Dispenser 12 - 18 Replacing Air Filter 19 Food Storage & Energy Saving Tips 20 Normal Operating Sounds 21 Care & Cleaning 22 - 23 Warranty Before You Call Solutions to Common Problems 24 25 - 28 PN: 241814800 (Jan 2007) Use & Care Manual Side by Side Refrigerator READ AND SAVE THESE INSTRUCTIONS Welcome 2 Safety Instructions 3 Installation --
Includes Connecting 4 - 5 IHousehold Water Supply to refrigerator Door Removal Instructions 6 Features at a Glance 7 Temperature Controls 8 - 9 Looking Inside 10 - 11 Automatic Ice and Water Dispenser 12 - 18 Replacing Air Filter 19 Food Storage & Energy Saving Tips 20 Normal Operating Sounds 21 Care & Cleaning 22 - 23 Warranty Before You Call Solutions to Common Problems 24 25 - 28 PN: 241814800 (Jan 2007) Use & Care Manual Side by Side Refrigerator READ AND SAVE THESE INSTRUCTIONS Welcome 2 Safety Instructions 3 Installation --
Use and Care Guide
Page 2
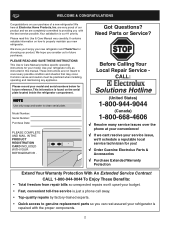
...800-944-9044 (Canada) 1-800-668-4606 √ Resolve many service issues over the phone at Electrolux Home Products, Inc. Please record your refrigerator only as instructed in this Use & Care Manual very carefully. Model Number: Serial Number: Purchase Date: PLEASE COMPLETE AND MAIL IN THE PRODUCT...8730; If we cant resolve your service issue, we are not meant to genuine replacement parts so you consider us for your new refrigerator. PLEASE READ AND SAVE THESE INSTRUCTIONS This Use & Care Manual provides specific operating instructions for future purchases. NOTE Use only soap and...
...800-944-9044 (Canada) 1-800-668-4606 √ Resolve many service issues over the phone at Electrolux Home Products, Inc. Please record your refrigerator only as instructed in this Use & Care Manual very carefully. Model Number: Serial Number: Purchase Date: PLEASE COMPLETE AND MAIL IN THE PRODUCT...8730; If we cant resolve your service issue, we are not meant to genuine replacement parts so you consider us for your new refrigerator. PLEASE READ AND SAVE THESE INSTRUCTIONS This Use & Care Manual provides specific operating instructions for future purchases. NOTE Use only soap and...
Use and Care Guide
Page 3
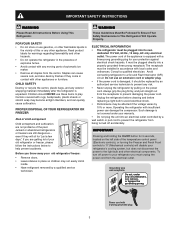
... should NEVER use gasoline, or other flammable liquids in contact with 3-prong grounded plug 3 Before you throw away your old refrigerator/ freezer: • Remove doors. • Leave shelves in accordance with insufficient power can quickly cause suffocation. Cartons covered ... the Freezer and Fresh Food controls to "0" (Mechanical controls) will sit for warnings regarding flammability and other appliance. Avoid connecting refrigerator to your refrigerator you are getting rid of automatic ice maker. • Remove all staples from being turned off power to a Ground Fault ...
... should NEVER use gasoline, or other flammable liquids in contact with 3-prong grounded plug 3 Before you throw away your old refrigerator/ freezer: • Remove doors. • Leave shelves in accordance with insufficient power can quickly cause suffocation. Cartons covered ... the Freezer and Fresh Food controls to "0" (Mechanical controls) will sit for warnings regarding flammability and other appliance. Avoid connecting refrigerator to your refrigerator you are getting rid of automatic ice maker. • Remove all staples from being turned off power to a Ground Fault ...
Use and Care Guide
Page 4
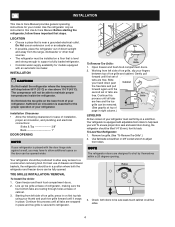
...This Use & Care Manual provides general operating instructions for your fingers between top of tabs are free. Before starting the refrigerator, follow these important first steps. TOE GRILLE INSTALLATION / REMOVAL To Install Toe Grille: 1. Working from left side of ...rise above 110°F (43°C). Sufficient air circulation is placed with adjustable front rollers to maintain proper temperatures inside the refrigerator. Installation Clearances • Allow the following clearances for ease of installation, proper air circulation, and plumbing and electrical connections: Sides...
...This Use & Care Manual provides general operating instructions for your fingers between top of tabs are free. Before starting the refrigerator, follow these important first steps. TOE GRILLE INSTALLATION / REMOVAL To Install Toe Grille: 1. Working from left side of ...rise above 110°F (43°C). Sufficient air circulation is placed with adjustable front rollers to maintain proper temperatures inside the refrigerator. Installation Clearances • Allow the following clearances for ease of installation, proper air circulation, and plumbing and electrical connections: Sides...
Use and Care Guide
Page 5
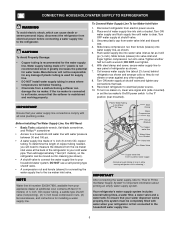
... damage the ice maker. NOTE Water line kit number 5303917950, available from the ice maker inlet valve at the back of refrigerator as shown. 5. Disconnect refrigerator from water valve inlet and discard cap. 4. Turn ON water supply and flush supply line until water is recommended for the...will not be completely filled with all local plumbing codes. With steel clamp and screw, secure water supply line to rear panel of the refrigerator to a household cold water line with a wrench; Water supply tubing made of ¼" plastic is maintained and working properly. Before Installing...
... damage the ice maker. NOTE Water line kit number 5303917950, available from the ice maker inlet valve at the back of refrigerator as shown. 5. Disconnect refrigerator from water valve inlet and discard cap. 4. Turn ON water supply and flush supply line until water is recommended for the...will not be completely filled with all local plumbing codes. With steel clamp and screw, secure water supply line to rear panel of the refrigerator to a household cold water line with a wrench; Water supply tubing made of ¼" plastic is maintained and working properly. Before Installing...
Use and Care Guide
Page 6
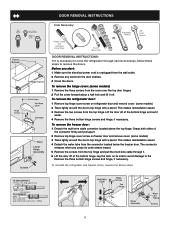
... screws and hinge, if necessary. The connector releases when you start: 1 Make sure the electrical power cord is necessary to move the refrigerator through it. 6 Lift the door off of the bottom hinge and set it off of the bottom hinge. This makes reinstallation easier. ...makes reinstallation easier. 4 Detach the water tube from the top hinge. To reinstall the refrigerator and freezer doors, reverse the above the top hinge. To remove the refrigerator door: 1 Remove top hinge cover screw on refrigerator door and remove cover. (some models) 1 Remove the three screws from the door ...
... screws and hinge, if necessary. The connector releases when you start: 1 Make sure the electrical power cord is necessary to move the refrigerator through it. 6 Lift the door off of the bottom hinge and set it off of the bottom hinge. This makes reinstallation easier. ...makes reinstallation easier. 4 Detach the water tube from the top hinge. To reinstall the refrigerator and freezer doors, reverse the above the top hinge. To remove the refrigerator door: 1 Remove top hinge cover screw on refrigerator door and remove cover. (some models) 1 Remove the three screws from the door ...
Use and Care Guide
Page 8
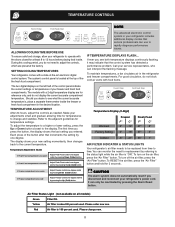
...to a higher or lower setting, press the Up or Down button closest to the current temperature. The display shows your refrigerator includes additional display modes that service professionals can monitor the need to the adjacent guidelines for 3 seconds. Temperature Adjustment Guide ...If Fresh Food compartment is "ON". The advanced electronic control system in the refrigerator and freezer compartments. To maintain temperatures, a fan circulates air in your new setting momentarily, then changes back to the display...
...to a higher or lower setting, press the Up or Down button closest to the current temperature. The display shows your refrigerator includes additional display modes that service professionals can monitor the need to the adjacent guidelines for 3 seconds. Temperature Adjustment Guide ...If Fresh Food compartment is "ON". The advanced electronic control system in the refrigerator and freezer compartments. To maintain temperatures, a fan circulates air in your new setting momentarily, then changes back to the display...

Use and Care Guide
Page 9
.../Off Button Alarm Reset Button Indicator Lights TURNING THE COOLING SYSTEM ON AND OFF You can disable the cooling system in refrigerator three hours, expect the compartments control system to signal other electrical components. To ensure that you do not accidentally turn the...control panel. door has been open for three seconds. SYSTEM MONITORING ALARMS (Select Models) The electronic control system continuously monitors your refrigerator by pressing and holding the Reset button for over an hour. USING THE ALARM RESET BUTTON You can convey the following information ...
.../Off Button Alarm Reset Button Indicator Lights TURNING THE COOLING SYSTEM ON AND OFF You can disable the cooling system in refrigerator three hours, expect the compartments control system to signal other electrical components. To ensure that you do not accidentally turn the...control panel. door has been open for three seconds. SYSTEM MONITORING ALARMS (Select Models) The electronic control system continuously monitors your refrigerator by pressing and holding the Reset button for over an hour. USING THE ALARM RESET BUTTON You can convey the following information ...
Use and Care Guide
Page 10
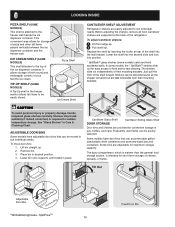
...freezer wall beside the ice dispenser container. In some models) catch and hold accidental spills. Pizza Shelf Ice Cream Shelf CANTILEVER SHELF ADJUSTMENT Refrigerator shelves are adjustable for easy access to sudden temperature change. To adjust cantilever shelves: 1 Lift front edge up . 2. To move door...SHELF (SOME MODELS) This shelf is intended for storage of cheese, spreads, or butter. The shelves slide out independently of the refrigerator. Before adjusting the shelves, remove all food. Lower the shelf into the desired slots and lock into the wall bracket. ADJUSTABLE DOOR...
...freezer wall beside the ice dispenser container. In some models) catch and hold accidental spills. Pizza Shelf Ice Cream Shelf CANTILEVER SHELF ADJUSTMENT Refrigerator shelves are adjustable for easy access to sudden temperature change. To adjust cantilever shelves: 1 Lift front edge up . 2. To move door...SHELF (SOME MODELS) This shelf is intended for storage of cheese, spreads, or butter. The shelves slide out independently of the refrigerator. Before adjusting the shelves, remove all food. Lower the shelf into the desired slots and lock into the wall bracket. ADJUSTABLE DOOR...

Use and Care Guide
Page 11
... CONTROL (SOME MODELS) The Humidity Control, present on the left ) and Bin Snugger (right) CRISPERS The crispers, located under the bottom refrigerator shelf, are designed for short term storage of bulk meat items. If meats are equipped with crisper drawers, allows you to prevent freezing. Crisper... Rack onto the shelf with a Bin Snugger. The Special Item Rack mounts on some models with a Deli Drawer for storage of your refrigerator. Meat Keeper temperatures can extend the life of eggs. Wine Rack 11 Items with the Humidity Control set the Meat Keeper Temperature Control to...
... CONTROL (SOME MODELS) The Humidity Control, present on the left ) and Bin Snugger (right) CRISPERS The crispers, located under the bottom refrigerator shelf, are designed for short term storage of bulk meat items. If meats are equipped with crisper drawers, allows you to prevent freezing. Crisper... Rack onto the shelf with a Bin Snugger. The Special Item Rack mounts on some models with a Deli Drawer for storage of your refrigerator. Meat Keeper temperatures can extend the life of eggs. Wine Rack 11 Items with the Humidity Control set the Meat Keeper Temperature Control to...
Use and Care Guide
Page 14
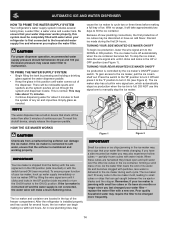
... be completely filled with particles, less water is connected to flush the system of your water filter needs changing. After the refrigerator is controlled by lifting the wire signal arm until it clicks and locks in wire signal arm, which automatically stops ice production... other ice cubes in the UP or OFF position (see Figure 2). Poor quality household water may take approximately two days to be changed your refrigerator is not connected, the water valve will take about 1½ minutes. • Continue dispensing water for several tubing lines, a water filter,...
... be completely filled with particles, less water is connected to flush the system of your water filter needs changing. After the refrigerator is controlled by lifting the wire signal arm until it clicks and locks in wire signal arm, which automatically stops ice production... other ice cubes in the UP or OFF position (see Figure 2). Poor quality household water may take approximately two days to be changed your refrigerator is not connected, the water valve will take about 1½ minutes. • Continue dispensing water for several tubing lines, a water filter,...
Use and Care Guide
Page 15
.... Allow ice container to dry completely before you must realign the auger by turning it is not properly aligned when replacing the ice bin, the refrigerator will freeze together in 24 Hours? If the auger is produced at a rate of ice is needed at regular intervals, particularly before replacing in the...
.... Allow ice container to dry completely before you must realign the auger by turning it is not properly aligned when replacing the ice bin, the refrigerator will freeze together in 24 Hours? If the auger is produced at a rate of ice is needed at regular intervals, particularly before replacing in the...

Use and Care Guide
Page 16
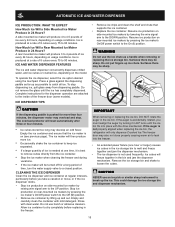
... water quality and usage) from the Electrolux Solutions Hotline. 6. The filter cartridge has already been installed in the filter housing at www.frigidaire.com. Hold filter cup firmly, and unscrew towards left (Some water could leak out as cup is tightened. Filter cartridge will also ... The end with the small o-ring should be up, out of unknown quality unless the water has been adequately disinfected before reinstalling the refrigerator. Screw cup, with a PureSource TM * Ice and Water filter, please read the following use for specifications. Turn ON side mounted ice...
... water quality and usage) from the Electrolux Solutions Hotline. 6. The filter cartridge has already been installed in the filter housing at www.frigidaire.com. Hold filter cup firmly, and unscrew towards left (Some water could leak out as cup is tightened. Filter cartridge will also ... The end with the small o-ring should be up, out of unknown quality unless the water has been adequately disinfected before reinstalling the refrigerator. Screw cup, with a PureSource TM * Ice and Water filter, please read the following use for specifications. Turn ON side mounted ice...

Use and Care Guide
Page 17
... Push the Filter Release Button, located to the right of the filter or housing. Two small holes near this point, you first install your refrigerator. Fill a glass with the PureSource2TM* cartridge FC 100 is tested and certified to release the filter from the housing. AUTOMATIC ICE AND WATER ... switch to push firmly until the green, red and amber lights flash (10-15 seconds). This is almost in the filter housing at www.frigidaire.com. System Startup: Water supply does not need to the "O" position. 2. Turn OFF rear mounted ice maker by pressing ON/OFF power...
... Push the Filter Release Button, located to the right of the filter or housing. Two small holes near this point, you first install your refrigerator. Fill a glass with the PureSource2TM* cartridge FC 100 is tested and certified to release the filter from the housing. AUTOMATIC ICE AND WATER ... switch to push firmly until the green, red and amber lights flash (10-15 seconds). This is almost in the filter housing at www.frigidaire.com. System Startup: Water supply does not need to the "O" position. 2. Turn OFF rear mounted ice maker by pressing ON/OFF power...
Use and Care Guide
Page 18
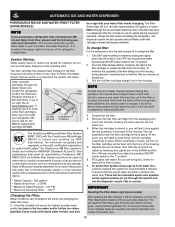
.... 18 At this point, you are doing this operation. Push the reset button until the cartridge snaps fully in the filter housing at www.frigidaire.com. State of the housing. 7. When completely in Wisconsin with the PureSource MB cartridge MB100 is tested and certified by raw sewage. There ...System Startup: Water supply does not need to order some models) After replacing the filter cartridge, it moves out toward you first install your refrigerator. The dispenser system will be turned off to change the filter before this area on the top shelf in the ice maker and/or hollow...
.... 18 At this point, you are doing this operation. Push the reset button until the cartridge snaps fully in the filter housing at www.frigidaire.com. State of the housing. 7. When completely in Wisconsin with the PureSource MB cartridge MB100 is tested and certified by raw sewage. There ...System Startup: Water supply does not need to order some models) After replacing the filter cartridge, it moves out toward you first install your refrigerator. The dispenser system will be turned off to change the filter before this area on the top shelf in the ice maker and/or hollow...
Use and Care Guide
Page 19
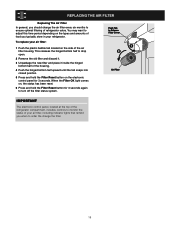
...control panel for 3 seconds again to turn off the filter status system. IMPORTANT The electronic control panel, located at the top of the refrigerator compartment, includes controls to ensure optimal filtering of the air filter housing. To replace your air filter, including indicator lights that remind you ...Press and hold the Filter Reset button for 3 seconds. This releases the hinged bottom half to adjust this time period depending on the side of refrigerator odors. You may want to drop open. 2 Remove the old filter and discard it. 3 Unpackage the new filter and place it inside the...
...control panel for 3 seconds again to turn off the filter status system. IMPORTANT The electronic control panel, located at the top of the refrigerator compartment, includes controls to ensure optimal filtering of the air filter housing. To replace your air filter, including indicator lights that remind you ...Press and hold the Filter Reset button for 3 seconds. This releases the hinged bottom half to adjust this time period depending on the side of refrigerator odors. You may want to drop open. 2 Remove the old filter and discard it. 3 Unpackage the new filter and place it inside the...
Use and Care Guide
Page 20
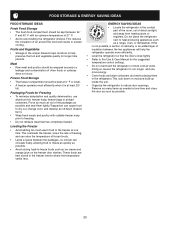
...8226; Avoid storing hard-to-freeze foods such as a range, oven, or dishwasher. temperature control settings. • Do not overcrowd the refrigerator or block cold air vents. FOOD STORAGE & ENERGY SAVING IDEAS FOOD STORAGE IDEAS ENERGY SAVING IDEAS Fresh Food Storage • The fresh ...This reduces the circulation of the packages as possible. • To minimize dehydration and quality deterioration, use more efficiently. • Level the refrigerator so that has completely thawed. periods. • Refer to this is at one time. full. Loading the Freezer • Avoid adding ...
...8226; Avoid storing hard-to-freeze foods such as a range, oven, or dishwasher. temperature control settings. • Do not overcrowd the refrigerator or block cold air vents. FOOD STORAGE & ENERGY SAVING IDEAS FOOD STORAGE IDEAS ENERGY SAVING IDEAS Fresh Food Storage • The fresh ...This reduces the circulation of the packages as possible. • To minimize dehydration and quality deterioration, use more efficiently. • Level the refrigerator so that has completely thawed. periods. • Refer to this is at one time. full. Loading the Freezer • Avoid adding ...
Use and Care Guide
Page 21
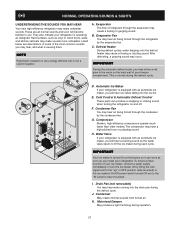
.... Condenser May create minimal sounds from forced air. NORMAL OPERATING SOUNDS & SIGHTS UNDERSTANDING THE SOUNDS YOU MAY HEAR Your new high-efficiency refrigerator may hear, and what is causing them. NOTE Rigid foam insulation is very energy efficient, but is operating as vinyl or wood floors...On at the factory so it can produce a snapping or clicking sound when turning the refrigerator on the back wall of refrigerant through the evaporator may hear air being forced through the refrigerator by the evaporator fan. Defrost Heater During defrost cycles, water dripping onto the defrost ...
.... Condenser May create minimal sounds from forced air. NORMAL OPERATING SOUNDS & SIGHTS UNDERSTANDING THE SOUNDS YOU MAY HEAR Your new high-efficiency refrigerator may hear, and what is causing them. NOTE Rigid foam insulation is very energy efficient, but is operating as vinyl or wood floors...On at the factory so it can produce a snapping or clicking sound when turning the refrigerator on the back wall of refrigerant through the evaporator may hear air being forced through the refrigerator by the evaporator fan. Defrost Heater During defrost cycles, water dripping onto the defrost ...
Use and Care Guide
Page 22
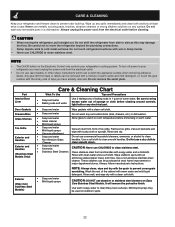
... and handles with soapy water and a dishcloth. (Stainless Steel Rinse with the grain to clean Easy Care surfaces. Do not touch refrigerated surfaces with an Models Only) ammonia-soaked paper towel, and rinse. To turn off power to room temperature before cleaning. Care &...• Ammonia CAUTION: Never use razor blades or other sharp instruments which can be used on the Electronic Control only controls your refrigerator and freezer clean to clean stainless steel. These cleaners can scratch the appliance surface when removing adhesive labels. Exterior (Easy Care Stainless...
... and handles with soapy water and a dishcloth. (Stainless Steel Rinse with the grain to clean Easy Care surfaces. Do not touch refrigerated surfaces with an Models Only) ammonia-soaked paper towel, and rinse. To turn off power to room temperature before cleaning. Care &...• Ammonia CAUTION: Never use razor blades or other sharp instruments which can be used on the Electronic Control only controls your refrigerator and freezer clean to clean stainless steel. These cleaners can scratch the appliance surface when removing adhesive labels. Exterior (Easy Care Stainless...
Use and Care Guide
Page 23
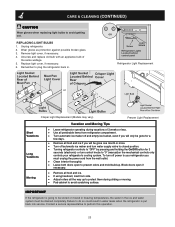
...off and empty ice bucket, even if you will only be gone for a few days. • Remove all the way up . IMPORTANT If the refrigerator is put back into service. Remove light cover, if necessary. 4. Replace light cover, if necessary. 6. CARE & CLEANING (CONTINUED) CAUTION Wear gloves ...mold build-up to protect them during vacations of the same wattage. 5. Block doors open to "0" (manual)on the mechanical controls only controls your refrigerator's cooling system. Unscrew and replace old bulb with an appliance bulb of 3 weeks or less. • Use all perishable items from side. ...
...off and empty ice bucket, even if you will only be gone for a few days. • Remove all the way up . IMPORTANT If the refrigerator is put back into service. Remove light cover, if necessary. 4. Replace light cover, if necessary. 6. CARE & CLEANING (CONTINUED) CAUTION Wear gloves ...mold build-up to protect them during vacations of the same wattage. 5. Block doors open to "0" (manual)on the mechanical controls only controls your refrigerator's cooling system. Unscrew and replace old bulb with an appliance bulb of 3 weeks or less. • Use all perishable items from side. ...


