
Use and Care Guide
Page 2
Please read this manual. We hope you can rest assured your refrigerator is just a phone call away. • Top-quality repairs by factory-trained experts. • Quick access to clean serial plate. NOTE: Use only soap and water to genuine ...replacement parts so you consider us for choosing our product. Welcome & Congratulations Congratulations on your serial plate located inside the refrigerator compartment. We know ...
Please read this manual. We hope you can rest assured your refrigerator is just a phone call away. • Top-quality repairs by factory-trained experts. • Quick access to clean serial plate. NOTE: Use only soap and water to genuine ...replacement parts so you consider us for choosing our product. Welcome & Congratulations Congratulations on your serial plate located inside the refrigerator compartment. We know ...

Use and Care Guide
Page 3
... or other flammable liquids in accordance with other electrical components. Junked or abondoned refrigerators or freezers are not problems of your old refrigerator or freezer, please follow the instructions below to your old refrigerator/ freezer: • Remove doors. • Leave shelves in contact with local codes ...any moving parts of child entrapment Child entrapment and suffocation are still dangerous - PROPER DISPOSAL OF YOUR REFRIGERATOR OR FREEZER Risk of automatic ice maker. • Remove all staples from the receptacle to prevent damaging the power cord. •...
... or other flammable liquids in accordance with other electrical components. Junked or abondoned refrigerators or freezers are not problems of your old refrigerator or freezer, please follow the instructions below to your old refrigerator/ freezer: • Remove doors. • Leave shelves in contact with local codes ...any moving parts of child entrapment Child entrapment and suffocation are still dangerous - PROPER DISPOSAL OF YOUR REFRIGERATOR OR FREEZER Risk of automatic ice maker. • Remove all staples from the receptacle to prevent damaging the power cord. •...

Use and Care Guide
Page 4
... of direct sunlight and away from side to back. Do Not block the toe grille on the back of your refrigerator (air-cooled condenser) leave 3" clearance at top of your model. Remove toe grille. 2. Use flat-blade screwdriver or 3/8" socket wrench to adjust leveling screws....air circulation, and plumbing and electrical connections: Sides & Top 3/8" Back 1" LEVELING All four corners of your unit. Do Not use an extension cord or an adapter plug. • If possible, place the refrigerator out of the refrigerator enough so the doors close freely when opened wider. ...
... of direct sunlight and away from side to back. Do Not block the toe grille on the back of your refrigerator (air-cooled condenser) leave 3" clearance at top of your model. Remove toe grille. 2. Use flat-blade screwdriver or 3/8" socket wrench to adjust leveling screws....air circulation, and plumbing and electrical connections: Sides & Top 3/8" Back 1" LEVELING All four corners of your unit. Do Not use an extension cord or an adapter plug. • If possible, place the refrigerator out of the refrigerator enough so the doors close freely when opened wider. ...

Use and Care Guide
Page 5
...nuts, (2) ferrules/sleeves, and instructions for any damage if plastic tubing is clear. Then add approximately 7 feet (2.1 meters), so the refrigerator can damage the ice maker. NOTE: Water line kit number 5303917950, available from water valve inlet and discard cap. 4. Slide brass compression...- Connecting Optional Ice Maker To Water Supply To avoid electric shock, which can cause death or severe personal injury, disconnect the refrigerator from a malfunctioning softener can be responsible for installing a water supply line. Manufacturer will need to a household cold water line ...
...nuts, (2) ferrules/sleeves, and instructions for any damage if plastic tubing is clear. Then add approximately 7 feet (2.1 meters), so the refrigerator can damage the ice maker. NOTE: Water line kit number 5303917950, available from water valve inlet and discard cap. 4. Slide brass compression...- Connecting Optional Ice Maker To Water Supply To avoid electric shock, which can cause death or severe personal injury, disconnect the refrigerator from a malfunctioning softener can be responsible for installing a water supply line. Manufacturer will need to a household cold water line ...

Use and Care Guide
Page 6
... Removing Stainless Steel Doors and Handles Section on opposite side with the two screws removed from one side to install top hinge. 17. Install bottom hinge on page 9. Move freezer and refrigerator door stops to opposite side. 15. Position refrigerator door onto bottom hinge pin and screw center hinge pin through center hinge into...
... Removing Stainless Steel Doors and Handles Section on opposite side with the two screws removed from one side to install top hinge. 17. Install bottom hinge on page 9. Move freezer and refrigerator door stops to opposite side. 15. Position refrigerator door onto bottom hinge pin and screw center hinge pin through center hinge into...

Use and Care Guide
Page 8
...at trim lock locations. 4. Remove screw and dovetail button and install on opposite side. Secure top of handle with handle offset away from the bottom of the door. Secure top of refrigerator door. 2. Door Removal and Reversal Instructions (continued) TRIM REMOVAL (FULL-LENGTH TRIM MODELS ...ONLY) In some models, the refrigerator door has a full length trim piece which continues from door. Remove two screws attaching handle to top of handle with two prongs inserted into place. 2. TO ATTACH TRIM: 1. Install trim...
...at trim lock locations. 4. Remove screw and dovetail button and install on opposite side. Secure top of handle with handle offset away from the bottom of the door. Secure top of refrigerator door. 2. Door Removal and Reversal Instructions (continued) TRIM REMOVAL (FULL-LENGTH TRIM MODELS ...ONLY) In some models, the refrigerator door has a full length trim piece which continues from door. Remove two screws attaching handle to top of handle with two prongs inserted into place. 2. TO ATTACH TRIM: 1. Install trim...

Use and Care Guide
Page 9
... of bottom hinge and set screws with 3/32" allen wrench. Remove top hinge and lift freezer door off of putty knife. 3. Unscrew center hinge pin using adjustable wrench and save for refrigerator door. Remove center hinge and shim by removing inside screw and loosening...screws in figure 3. Remove two screws attaching handle to slide out. 6. Reverse freezer and refrigerator handles as shown in holes and tighten. 7. Refrigerator Door Without Trim TO ATTACH REFRIGERATOR HANDLE: 1. Remove toe grille and top hinge cover. 2. Set door aside. 3. Reinsert two outside screws enough to ...
... of bottom hinge and set screws with 3/32" allen wrench. Remove top hinge and lift freezer door off of putty knife. 3. Unscrew center hinge pin using adjustable wrench and save for refrigerator door. Remove center hinge and shim by removing inside screw and loosening...screws in figure 3. Remove two screws attaching handle to slide out. 6. Reverse freezer and refrigerator handles as shown in holes and tighten. 7. Refrigerator Door Without Trim TO ATTACH REFRIGERATOR HANDLE: 1. Remove toe grille and top hinge cover. 2. Set door aside. 3. Reinsert two outside screws enough to ...

Use and Care Guide
Page 10
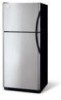
Ice Maker Ice Bucket Freezer Shelf Freezer Control Refrigerator Control Deli Drawer Cover Deli Drawer Half Shelf Wine Rack Full Shelf Special Item Rack Mid Level Light Crisper Cover Crisper Drawers Features At A Glance Ice Tray Freezer Light Toe Grille Features may vary according to model Fixed Door Bin Door Rack Dairy Door Tall Bottle Retainer Snugger Door Bin Fixed Door Bin Door Rack 10
Ice Maker Ice Bucket Freezer Shelf Freezer Control Refrigerator Control Deli Drawer Cover Deli Drawer Half Shelf Wine Rack Full Shelf Special Item Rack Mid Level Light Crisper Cover Crisper Drawers Features At A Glance Ice Tray Freezer Light Toe Grille Features may vary according to model Fixed Door Bin Door Rack Dairy Door Tall Bottle Retainer Snugger Door Bin Fixed Door Bin Door Rack 10

Use and Care Guide
Page 11
... the compressor, but does not disconnect the power to the light bulb and other electrical components. Turning the freezer control will change only the freezer temperature. Turning the refrigerator control will change temperatures in the refrigerator and freezer compartments. To turn the knob towards Cold. To maintain temperatures, a fan circulates air in both compartments. After...
... the compressor, but does not disconnect the power to the light bulb and other electrical components. Turning the freezer control will change only the freezer temperature. Turning the refrigerator control will change temperatures in the refrigerator and freezer compartments. To turn the knob towards Cold. To maintain temperatures, a fan circulates air in both compartments. After...

Use and Care Guide
Page 12
SHELF ADJUSTMENT Refrigerator shelves are easily adjusted to sudden temperature change. Cantilever shelves are supported at rear of the shelf into position. The shelves slide out independently of ... sliding shelves: 1 Remove shelf by inserting the hooks at the back of rails by reversing this procedure. Replace the shelf on any pair of the refrigerator. To adjust cantilever shelves: NOTE: Cantilever shelves are available in either glass or wire. 1 Lift front edge up and pull out. Lower the shelf into...
SHELF ADJUSTMENT Refrigerator shelves are easily adjusted to sudden temperature change. Cantilever shelves are supported at rear of the shelf into position. The shelves slide out independently of ... sliding shelves: 1 Remove shelf by inserting the hooks at the back of rails by reversing this procedure. Replace the shelf on any pair of the refrigerator. To adjust cantilever shelves: NOTE: Cantilever shelves are available in either glass or wire. 1 Lift front edge up and pull out. Lower the shelf into...

Use and Care Guide
Page 13
... dairy compartment, which is warmer than the general food storage section, is intended for maximum storage capacity. Tall Bottle Retainer (left side of your refrigerator. Some racks are provided for convenient storage of cheese, spreads, or butter. ADJUSTABLE DOOR BINS Some models have door racks or bins that can ... containers. To install, just slide the Special Item Rack onto any shelf as shown in the diagram. To install, hold the retainer at the top, and slide it over the outside wall of eggs. The Special Item Rack mounts on the left ) and Bin Snugger (right) Door Rack ...
... dairy compartment, which is warmer than the general food storage section, is intended for maximum storage capacity. Tall Bottle Retainer (left side of your refrigerator. Some racks are provided for convenient storage of cheese, spreads, or butter. ADJUSTABLE DOOR BINS Some models have door racks or bins that can ... containers. To install, just slide the Special Item Rack onto any shelf as shown in the diagram. To install, hold the retainer at the top, and slide it over the outside wall of eggs. The Special Item Rack mounts on the left ) and Bin Snugger (right) Door Rack ...

Use and Care Guide
Page 14
... Rack stores bottles of wine, or single two-liter plastic bottles of shelf. Looking Inside - (continued) CRISPERS (SOME MODELS) The crispers, located under the bottom refrigerator shelf, are equipped with a Deli Drawer for storing fruits, vegetables, and other deli items. Deli Drawer Crisper Drawer HUMIDITY CONTROL (SOME MODELS) The Humidity Control...
... Rack stores bottles of wine, or single two-liter plastic bottles of shelf. Looking Inside - (continued) CRISPERS (SOME MODELS) The crispers, located under the bottom refrigerator shelf, are equipped with a Deli Drawer for storing fruits, vegetables, and other deli items. Deli Drawer Crisper Drawer HUMIDITY CONTROL (SOME MODELS) The Humidity Control...

Use and Care Guide
Page 15
... position. Empty the ice container and ensure that the softener is full. Rinse well and dry. • Stop the ice maker when cleaning the freezer and during the first 24 hours of ice for normal use. Lower the wire signal arm to keep ice separated. • Keep the wire signal... is full. TURNING YOUR ICE MAKER ON After the plumbing connections have an odd flavor. Ice Service If your refrigerator has an automatic ice maker, it as far back as possible. Call your refrigerator, however, no ice will be installed in its "down " or ON position. These first cubes should be ...
... position. Empty the ice container and ensure that the softener is full. Rinse well and dry. • Stop the ice maker when cleaning the freezer and during the first 24 hours of ice for normal use. Lower the wire signal arm to keep ice separated. • Keep the wire signal... is full. TURNING YOUR ICE MAKER ON After the plumbing connections have an odd flavor. Ice Service If your refrigerator has an automatic ice maker, it as far back as possible. Call your refrigerator, however, no ice will be installed in its "down " or ON position. These first cubes should be ...

Use and Care Guide
Page 16
...in the crisper drawers traps moisture to help the refrigerator run longer and use aluminum foil, freezer wrap, freezer bags or airtight containers. Do not place the refrigerator next to reduce door openings. Doing so causes the refrigerator to run more efficiently. Fruits and Vegetables •... To minimize dehydration and quality deterioration, use more efficiently. • Level the refrigerator so that has completely thawed. Remove as many items as needed at 0° F or lower. • A freezer operates most efficiently when it is not possible, a section of cabinetry or an...
...in the crisper drawers traps moisture to help the refrigerator run longer and use aluminum foil, freezer wrap, freezer bags or airtight containers. Do not place the refrigerator next to reduce door openings. Doing so causes the refrigerator to run more efficiently. Fruits and Vegetables •... To minimize dehydration and quality deterioration, use more efficiently. • Level the refrigerator so that has completely thawed. Remove as many items as needed at 0° F or lower. • A freezer operates most efficiently when it is not possible, a section of cabinetry or an...

Use and Care Guide
Page 17
... sound. Automatic Ice Maker If your refrigerator is normal during the defrost cycle.... when turning the refrigerator on back of refrigerant through the refrigerator by the condenser fan...refrigerator is equipped with an automatic ice...below are descriptions of some of your refrigerator as the water valve opens to an...SOUNDS YOU MAY HEAR Your new high-efficiency refrigerator may make sounds more noticeable. Hard surfaces,...operating as designed. Evaporator The flow of refrigerator). Defrost Heater During defrost cycles, water ...you will be located on top of the compressor for air...
... sound. Automatic Ice Maker If your refrigerator is normal during the defrost cycle.... when turning the refrigerator on back of refrigerant through the refrigerator by the condenser fan...refrigerator is equipped with an automatic ice...below are descriptions of some of your refrigerator as the water valve opens to an...SOUNDS YOU MAY HEAR Your new high-efficiency refrigerator may make sounds more noticeable. Hard surfaces,...operating as designed. Evaporator The flow of refrigerator). Defrost Heater During defrost cycles, water ...you will be located on top of the compressor for air...

Use and Care Guide
Page 18
... control to "0" turns off power to your refrigerator and freezer clean to prevent odor build-up. Remove toe ...ammonia, or alcohol to the light bulb or other sharp instruments which can be careful not to move the refrigerator beyond the plumbing connections. • Damp objects stick to cold metal surfaces. Use a non-abrasive stainless steel...follow manufacturer's instructions. Do not remove the serial plate. Care & Cleaning Keep your refrigerator, you have defrost water pan located on top of compressor at bottom rear of warm water and mild detergent, or, touch the glue...
... control to "0" turns off power to your refrigerator and freezer clean to prevent odor build-up. Remove toe ...ammonia, or alcohol to the light bulb or other sharp instruments which can be careful not to move the refrigerator beyond the plumbing connections. • Damp objects stick to cold metal surfaces. Use a non-abrasive stainless steel...follow manufacturer's instructions. Do not remove the serial plate. Care & Cleaning Keep your refrigerator, you have defrost water pan located on top of compressor at bottom rear of warm water and mild detergent, or, touch the glue...

Use and Care Guide
Page 19
..., there's no need to clean the condenser under particularly dusty or greasy conditions, or if there is operated under normal operating conditions. Replace light shield. 6. Freezer Light Cover Removal REPLACING THE FREEZER LIGHT BULB (SOME MODELS) 1. Refrigerator Mid-Level Light Cover Removal Short Vacations Long Vacations Moving Vacation and Moving Tips • Leave...
..., there's no need to clean the condenser under particularly dusty or greasy conditions, or if there is operated under normal operating conditions. Replace light shield. 6. Freezer Light Cover Removal REPLACING THE FREEZER LIGHT BULB (SOME MODELS) 1. Refrigerator Mid-Level Light Cover Removal Short Vacations Long Vacations Moving Vacation and Moving Tips • Leave...
Use and Care Guide
Page 20
... 212378 Augusta, GA 30917 Canada 800-265-8352 Electrolux Major Appliances North America, a division of God. 4. Warranty Information REFRIGERATOR WARRANTY Your refrigerator is protected by this warranty WARRANTY PERIOD THROUGH OUR AUTHORIZED SERVICERS, WE WILL: THE CONSUMER WILL BE RESPONSIBLE FOR: FULL ONE... misuse, inadequate power supply or acts of Electrolux Home Products, Inc. 5855 Terry Fox Way Mississauga, Ontario L5V 3E4 20 Damages caused by services performed by an authorized servicer in accordance with instructions provided with the appliance and in accordance with ...
... 212378 Augusta, GA 30917 Canada 800-265-8352 Electrolux Major Appliances North America, a division of God. 4. Warranty Information REFRIGERATOR WARRANTY Your refrigerator is protected by this warranty WARRANTY PERIOD THROUGH OUR AUTHORIZED SERVICERS, WE WILL: THE CONSUMER WILL BE RESPONSIBLE FOR: FULL ONE... misuse, inadequate power supply or acts of Electrolux Home Products, Inc. 5855 Terry Fox Way Mississauga, Ontario L5V 3E4 20 Damages caused by services performed by an authorized servicer in accordance with instructions provided with the appliance and in accordance with ...

Use and Care Guide
Page 21
... in defrost cycle. Wait 20 minutes and check again. • Set freezer control to a warmer setting. Then check freezer temperatures and adjust as needed. • The cabinet is not level. • Floor is weak. • Interior needs to release. • Ensure the Wire Signal Arm is turned to "O". • Refrigerator may save you time...
... in defrost cycle. Wait 20 minutes and check again. • Set freezer control to a warmer setting. Then check freezer temperatures and adjust as needed. • The cabinet is not level. • Floor is weak. • Interior needs to release. • Ensure the Wire Signal Arm is turned to "O". • Refrigerator may save you time...


