Use and Care Guide
Page 2
... SAVE THESE INSTRUCTIONS This Use & Care Manual provides specific operating instructions for future reference. Please record your serial plate located inside the refrigerator compartment. are very proud of a new refrigerator! It contains valuable information on your purchase of our product and we are not meant to genuine replacement parts so you consider us for future reference.This information is repaired with the best service possible. Model Number: Serial Number: Purchase Date...
... SAVE THESE INSTRUCTIONS This Use & Care Manual provides specific operating instructions for future reference. Please record your serial plate located inside the refrigerator compartment. are very proud of a new refrigerator! It contains valuable information on your purchase of our product and we are not meant to genuine replacement parts so you consider us for future reference.This information is repaired with the best service possible. Model Number: Serial Number: Purchase Date...
Use and Care Guide
Page 3
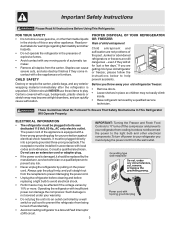
...; Unplug the refrigerator before cleaning and before replacing a light bulb to avoid electrical shock. • Performance may not easily climb inside. • Have refrigerant removed by a wall switch or pull cord to prevent the refrigerator from being turned off accidentally. • Avoid connecting refrigerator to a Ground Fault Interruptor (GFI) circuit. 3 IMPORTANT: Turning the Freezer and Fresh Food Controls to "0" turns off power to your refrigerator you are getting rid of the...
...; Unplug the refrigerator before cleaning and before replacing a light bulb to avoid electrical shock. • Performance may not easily climb inside. • Have refrigerant removed by a wall switch or pull cord to prevent the refrigerator from being turned off accidentally. • Avoid connecting refrigerator to a Ground Fault Interruptor (GFI) circuit. 3 IMPORTANT: Turning the Freezer and Fresh Food Controls to "0" turns off power to your refrigerator you are getting rid of the...
Use and Care Guide
Page 4
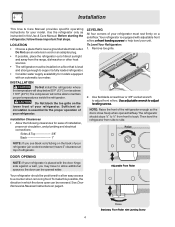
... of your refrigerator (air-cooled condenser) leave 3" clearance at top of your model. See Door Removal & Reversal Instructions on a floor that is essential for your refrigerator. The compressor will drop below 55°F (13°C) or rise above 110°F (43°C). To Level Your Refrigerator: 1. To make this possible, the direction in this Use & Care Manual. Before starting the refrigerator, follow these important first steps. DOOR OPENING NOTE: If...
... of your refrigerator (air-cooled condenser) leave 3" clearance at top of your model. See Door Removal & Reversal Instructions on a floor that is essential for your refrigerator. The compressor will drop below 55°F (13°C) or rise above 110°F (43°C). To Level Your Refrigerator: 1. To make this possible, the direction in this Use & Care Manual. Before starting the refrigerator, follow these important first steps. DOOR OPENING NOTE: If...
Use and Care Guide
Page 5
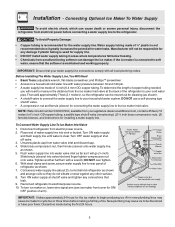
...for the water supply line. NOTE: Water line kit number 5303917950, available from electric power source. 2. If the ice maker is connected to the refrigerator. To Connect Water Supply Line To Ice Maker Inlet Valve 1. Tighten another half turn ice maker on, lower wire signal arm (see ice maker front cover for installing a water supply line. Reconnect refrigerator to your water supply line connections comply with a wrench; Air in areas where temperatures fall below freezing. • Chemicals from water valve inlet and discard cap. 4. New plumbing may cause ice maker to...
...for the water supply line. NOTE: Water line kit number 5303917950, available from electric power source. 2. If the ice maker is connected to the refrigerator. To Connect Water Supply Line To Ice Maker Inlet Valve 1. Tighten another half turn ice maker on, lower wire signal arm (see ice maker front cover for installing a water supply line. Reconnect refrigerator to your water supply line connections comply with a wrench; Air in areas where temperatures fall below freezing. • Chemicals from water valve inlet and discard cap. 4. New plumbing may cause ice maker to...
Use and Care Guide
Page 6
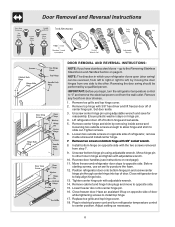
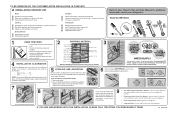
... center hinge pin. Set door aside. 3. Install bottom hinge on hinge pin. 4. Move freezer and refrigerator door stops to install top hinge. 17. Remove cabinet and hinge hole plugs and move to other . Lower freezer door onto center hinge pin. 16. Door Removal and Reversal Instructions DOOR REMOVAL AND REVERSAL INSTRUCTIONS: NOTE: If you begin, turn refrigerator temperature control to puncture the foam. 12. Unscrew center hinge pin using adjustable wrench. Move hinge pin to opposite side. 15. IMPORTANT: Before you have stainless steel doors -- Remove center hinge and...
... center hinge pin. Set door aside. 3. Install bottom hinge on hinge pin. 4. Move freezer and refrigerator door stops to install top hinge. 17. Remove cabinet and hinge hole plugs and move to other . Lower freezer door onto center hinge pin. 16. Door Removal and Reversal Instructions DOOR REMOVAL AND REVERSAL INSTRUCTIONS: NOTE: If you begin, turn refrigerator temperature control to puncture the foam. 12. Unscrew center hinge pin using adjustable wrench. Move hinge pin to opposite side. 15. IMPORTANT: Before you have stainless steel doors -- Remove center hinge and...
Use and Care Guide
Page 7
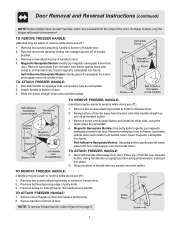
... door. Remove screw attaching top of freezer door. 2. Slide trim piece straight down and install in old handle holes. TO REMOVE FREEZER HANDLE: (Handles may be reversed. Swing bottom of freezer door and remove handle. Start with two screws removed earlier. On these models, only the hinges will need to door. 4. Self-Adhesive Nameplate Models: Use putty knife to gently pry magnetic nameplate frame from door. Remove button plug using same hole as nameplate. 4. TO ATTACH FREEZER HANDLE: 1. Magnetic Nameplate Models: Use...
... door. Remove screw attaching top of freezer door. 2. Slide trim piece straight down and install in old handle holes. TO REMOVE FREEZER HANDLE: (Handles may be reversed. Swing bottom of freezer door and remove handle. Start with two screws removed earlier. On these models, only the hinges will need to door. 4. Self-Adhesive Nameplate Models: Use putty knife to gently pry magnetic nameplate frame from door. Remove button plug using same hole as nameplate. 4. TO ATTACH FREEZER HANDLE: 1. Magnetic Nameplate Models: Use...

Use and Care Guide
Page 8
... top of door and install on the face of the trim is positioned about halfway down at trim lock locations. 4. Carefully align trim and press down . TO REMOVE TRIM: 1. Secure bottom of handle with short handle trim, remove by either an adhesive trim lock, or a trim lock with screws. Door Removal and Reversal Instructions (continued) TRIM REMOVAL (FULL-LENGTH TRIM MODELS ONLY) In some models, the refrigerator door...
... top of door and install on the face of the trim is positioned about halfway down at trim lock locations. 4. Carefully align trim and press down . TO REMOVE TRIM: 1. Secure bottom of handle with short handle trim, remove by either an adhesive trim lock, or a trim lock with screws. Door Removal and Reversal Instructions (continued) TRIM REMOVAL (FULL-LENGTH TRIM MODELS ONLY) In some models, the refrigerator door...
Use and Care Guide
Page 9
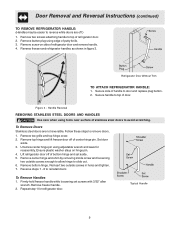
... using edge of bottom hinge and set screws with 3/32" allen wrench. Lift refrigerator door off of putty knife. 3. Typical Handle 9 Remove screw on hinge pin. 4. Remove center hinge and shim by removing inside screw and loosening two outside screws in figure 3. Reverse steps 1 - 6 to remove doors. 1. Repeat step 1 for reassembly. Secure handle to top of refrigerator door and remove handle. 4. To Remove Doors Stainless steel doors are off of handle to door and replace plug button. 2. Set door aside. 3. Remove bottom hinge. Reverse freezer and refrigerator handles...
... using edge of bottom hinge and set screws with 3/32" allen wrench. Lift refrigerator door off of putty knife. 3. Typical Handle 9 Remove screw on hinge pin. 4. Remove center hinge and shim by removing inside screw and loosening two outside screws in figure 3. Reverse steps 1 - 6 to remove doors. 1. Repeat step 1 for reassembly. Secure handle to top of refrigerator door and remove handle. 4. To Remove Doors Stainless steel doors are off of handle to door and replace plug button. 2. Set door aside. 3. Remove bottom hinge. Reverse freezer and refrigerator handles...
Use and Care Guide
Page 10
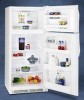
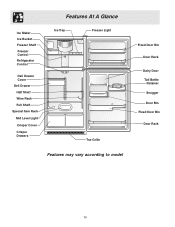
Ice Maker Ice Bucket Freezer Shelf Freezer Control Refrigerator Control Deli Drawer Cover Deli Drawer Half Shelf Wine Rack Full Shelf Special Item Rack Mid Level Light Crisper Cover Crisper Drawers Features At A Glance Ice Tray Freezer Light Toe Grille Features may vary according to model Fixed Door Bin Door Rack Dairy Door Tall Bottle Retainer Snugger Door Bin Fixed Door Bin Door Rack 10
Ice Maker Ice Bucket Freezer Shelf Freezer Control Refrigerator Control Deli Drawer Cover Deli Drawer Half Shelf Wine Rack Full Shelf Special Item Rack Mid Level Light Crisper Cover Crisper Drawers Features At A Glance Ice Tray Freezer Light Toe Grille Features may vary according to model Fixed Door Bin Door Rack Dairy Door Tall Bottle Retainer Snugger Door Bin Fixed Door Bin Door Rack 10
Use and Care Guide
Page 11
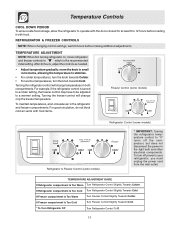
...For warmer temperatures, turn off the compressor, but does not disconnect the power to your refrigerator, you must unplug the power cord from the wall outlet. REFRIGERATOR & FREEZER CONTROLS NOTE: When changing control settings, wait 24 hours before loading it with food items. Freezer Control (some models) Refrigerator & Freezer Control (some models) Refrigerator Control (some models) * IMPORTANT: Turning the refrigerator temperature control to "0" turns off power to the light bulb and other electrical components. To maintain temperatures, a fan circulates air in both...
...For warmer temperatures, turn off the compressor, but does not disconnect the power to your refrigerator, you must unplug the power cord from the wall outlet. REFRIGERATOR & FREEZER CONTROLS NOTE: When changing control settings, wait 24 hours before loading it with food items. Freezer Control (some models) Refrigerator & Freezer Control (some models) Refrigerator Control (some models) * IMPORTANT: Turning the refrigerator temperature control to "0" turns off power to the light bulb and other electrical components. To maintain temperatures, a fan circulates air in both...
Use and Care Guide
Page 12
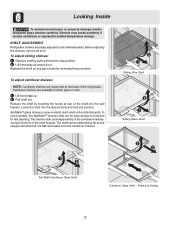
... Wire Shelf Sliding Glass Shelf Full Width Cantilever Glass Shelf Cantilever Glass Shelf - SHELF ADJUSTMENT Refrigerator shelves are easily adjusted to food and for easy access to suit individual needs. SpillSafeTM glass shelves (some models, the SpillSafeTM shelves slide out for fast cleaning. Shelves may break suddenly if nicked, scratched, or exposed to stop position. 2 Lift front edge up . 2 Pull shelf out. Fixed and Sliding 12 To adjust sliding shelves: 1 Remove shelf by pulling forward to sudden temperature change...
... Wire Shelf Sliding Glass Shelf Full Width Cantilever Glass Shelf Cantilever Glass Shelf - SHELF ADJUSTMENT Refrigerator shelves are easily adjusted to food and for easy access to suit individual needs. SpillSafeTM glass shelves (some models, the SpillSafeTM shelves slide out for fast cleaning. Shelves may break suddenly if nicked, scratched, or exposed to stop position. 2 Lift front edge up . 2 Pull shelf out. Fixed and Sliding 12 To adjust sliding shelves: 1 Remove shelf by pulling forward to sudden temperature change...
Use and Care Guide
Page 14
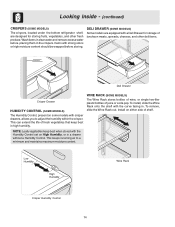
... shelf. This keeps incoming air to adjust the humidity within the crisper. To install, slide the Wine Rack onto the shelf with the Humidity Control set on High Humidity, or in a drawer without a Humidity Control. To remove, slide the Wine Rack out. NOTE: Leafy vegetables keep best in high humidity. Looking Inside - (continued) CRISPERS (SOME MODELS) The crispers, located under the bottom refrigerator shelf, are equipped with a Deli Drawer...
... shelf. This keeps incoming air to adjust the humidity within the crisper. To install, slide the Wine Rack onto the shelf with the Humidity Control set on High Humidity, or in a drawer without a Humidity Control. To remove, slide the Wine Rack out. NOTE: Leafy vegetables keep best in high humidity. Looking Inside - (continued) CRISPERS (SOME MODELS) The crispers, located under the bottom refrigerator shelf, are equipped with a Deli Drawer...
Use and Care Guide
Page 15
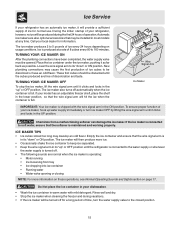
Automatic ice makers are also optional accessories that the softener is maintained and working properly. Ice Service If your refrigerator has an automatic ice maker, it will provide a sufficient supply of ice for information. Call your local dealer for normal use. The ice maker produces 2 to the water supply or whenever the water supply is turned off. • The following sounds are free of your model has an adjustable freezer shelf, place the shelf in...
Automatic ice makers are also optional accessories that the softener is maintained and working properly. Ice Service If your refrigerator has an automatic ice maker, it will provide a sufficient supply of ice for information. Call your local dealer for normal use. The ice maker produces 2 to the water supply or whenever the water supply is turned off. • The following sounds are free of your model has an adjustable freezer shelf, place the shelf in...
Use and Care Guide
Page 16
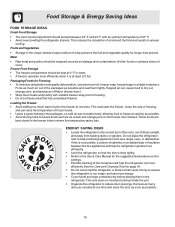
... one time. ENERGY SAVING IDEAS • Locate the refrigerator in the coolest part of the room, out of air around the food and results in the refrigerator. See the Care and Cleaning Chart on moisture build-up inside the unit. • Organize the refrigerator to reduce door openings. Remove as many items as needed at least 2/3 full. Frozen Food Storage • The freezer compartment should...
... one time. ENERGY SAVING IDEAS • Locate the refrigerator in the coolest part of the room, out of air around the food and results in the refrigerator. See the Care and Cleaning Chart on moisture build-up inside the unit. • Organize the refrigerator to reduce door openings. Remove as many items as needed at least 2/3 full. Frozen Food Storage • The freezer compartment should...
Use and Care Guide
Page 17
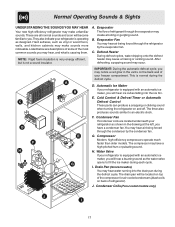
... defrost cycle. Drain Pan (Nonremovable) You may hear water running into the ice bin. J. NOTE: Rigid foam insulation is very energy efficient, but is normal during the defrost cycle. Evaporator The flow of refrigerator). The compressor may create a boiling or gurgling sound. Water Valve If your refrigerator is causing them. B. Defrost Heater During defrost cycles, water dripping onto the defrost heater may hear air being forced through the condenser by the evaporator fan. F. D. Evaporator Fan...
... defrost cycle. Drain Pan (Nonremovable) You may hear water running into the ice bin. J. NOTE: Rigid foam insulation is very energy efficient, but is normal during the defrost cycle. Evaporator The flow of refrigerator). The compressor may create a boiling or gurgling sound. Water Valve If your refrigerator is causing them. B. Defrost Heater During defrost cycles, water dripping onto the defrost heater may hear air being forced through the condenser by the evaporator fan. F. D. Evaporator Fan...
Use and Care Guide
Page 18
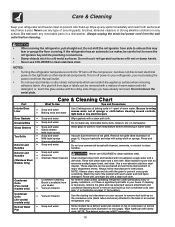
... soapy water and a (Stainless Steel dishcloth. To turn off the compressor, but does not disconnect electrical power to the back of the cabinet with the grain to cold metal surfaces. Any glue left from your refrigerator, you have defrost water pan located on top of compressor at bottom rear of warm water. Care & Cleaning Chart Part What To Use Tips and Precautions Interior/Door Liner • Soap and water • Baking soda and water Use 2 tablespoons...
... soapy water and a (Stainless Steel dishcloth. To turn off the compressor, but does not disconnect electrical power to the back of the cabinet with the grain to cold metal surfaces. Any glue left from your refrigerator, you have defrost water pan located on top of compressor at bottom rear of warm water. Care & Cleaning Chart Part What To Use Tips and Precautions Interior/Door Liner • Soap and water • Baking soda and water Use 2 tablespoons...

Use and Care Guide
Page 19
... is equipped with an appliance bulb of 3 weeks or less. • Use all perishable items from refrigerator compartment. • Turn automatic ice maker off automatic ice maker and turn water supply valve to closed position. • Clean interior thoroughly. • Leave both doors open if necessary. • Remove all food and ice. • If using handcart, load from side. • Adjust rollers all food and ice if you will only be...
... is equipped with an appliance bulb of 3 weeks or less. • Use all perishable items from refrigerator compartment. • Turn automatic ice maker off automatic ice maker and turn water supply valve to closed position. • Clean interior thoroughly. • Leave both doors open if necessary. • Remove all food and ice. • If using handcart, load from side. • Adjust rollers all food and ice if you will only be...
Use and Care Guide
Page 20
... and replacement Ice & Water filter cartridges (if equipped). Repair or replace any parts of this appliance which do not allow the exclusion or limitation of incidental or consequential damages, so this warranty as removal of trim, cupboards, shelves, etc., which prove to be defective in accordance with all costs for servicing, such as "Electrolux". exclusions listed below : 1. In the U.S.A.. Proper connection to a grounded power supply of...
... and replacement Ice & Water filter cartridges (if equipped). Repair or replace any parts of this appliance which do not allow the exclusion or limitation of incidental or consequential damages, so this warranty as removal of trim, cupboards, shelves, etc., which prove to be defective in accordance with all costs for servicing, such as "Electrolux". exclusions listed below : 1. In the U.S.A.. Proper connection to a grounded power supply of...
Use and Care Guide
Page 21
...; Ice maker should be covered or wrapped. • Replace light bulb. • Ensure plug is tightly pushed into electrical outlet. • Light switch may be in refrigerator. Cabinet light not working . (some models) Before calling for temperature to a warmer setting. Freezer temperature too cold. Allow 24 hours for service, review this appliance. • Ensure plug is tightly pushed into electrical outlet. • Check/replace fuse with a 15 amp time-delay fuse. Reset circuit breaker. • The temperature control...
...; Ice maker should be covered or wrapped. • Replace light bulb. • Ensure plug is tightly pushed into electrical outlet. • Light switch may be in refrigerator. Cabinet light not working . (some models) Before calling for temperature to a warmer setting. Freezer temperature too cold. Allow 24 hours for service, review this appliance. • Ensure plug is tightly pushed into electrical outlet. • Check/replace fuse with a 15 amp time-delay fuse. Reset circuit breaker. • The temperature control...
Installation Instructions
Page 1
... instructions and to become familiar witrh your new refrigerator. √ Send in 24 hours Ice Maker is turned ON. Turn icemaker OFF if water supply is not connected immediately. To raise cabinet , turn screw counterclockwise. Cabinet 6 When changing CONTROLS, wait 24 hours before making additional adjustments. Ensure icemaker to move the refrigerator. • Remove tape from doors only after unit is in the Use & Care Manual so you understand the sounds you are installing...
... instructions and to become familiar witrh your new refrigerator. √ Send in 24 hours Ice Maker is turned ON. Turn icemaker OFF if water supply is not connected immediately. To raise cabinet , turn screw counterclockwise. Cabinet 6 When changing CONTROLS, wait 24 hours before making additional adjustments. Ensure icemaker to move the refrigerator. • Remove tape from doors only after unit is in the Use & Care Manual so you understand the sounds you are installing...


