
Use and Care Guide
Page 1
Includes Connecting Optional Ice Maker To Water Supply 4 - 5 Door Removal & Reversal 6 - 9 Features at a Glance 9 Temperature Controls 9 - 10 Looking Inside 10 - 12 Ice Service 12 - 13 Food Storage & Energy Saving Tips 13 Normal Operating Sounds 14 Care & Cleaning 15 - 16 Español 19 Warranty Before You Call READ AND SAVE THESE INSTRUCTIONS 17 18 P/N 241694400 (0106) Use & Care Manual Top Mount Refrigerator Welcome 2 Safety Instructions 3 Installation --
Includes Connecting Optional Ice Maker To Water Supply 4 - 5 Door Removal & Reversal 6 - 9 Features at a Glance 9 Temperature Controls 9 - 10 Looking Inside 10 - 12 Ice Service 12 - 13 Food Storage & Energy Saving Tips 13 Normal Operating Sounds 14 Care & Cleaning 15 - 16 Español 19 Warranty Before You Call READ AND SAVE THESE INSTRUCTIONS 17 18 P/N 241694400 (0106) Use & Care Manual Top Mount Refrigerator Welcome 2 Safety Instructions 3 Installation --

Use and Care Guide
Page 2
...maintaining any appliance. Please read this manual. Use your new refrigerator. Please record your model. are very proud of a new refrigerator! These instructions are completly committed to properly maintain your refrigerator only as instructed in this Use & Care Manual very ...your model and serial numbers below for future reference. WELCOME & CONGRATULATIONS Congratulations on your serial plate located inside the refrigerator compartment. This information is our #1 priority. Please attach sales receipt here for future reference. Your satisfaction is ...
...maintaining any appliance. Please read this manual. Use your new refrigerator. Please record your model. are very proud of a new refrigerator! These instructions are completly committed to properly maintain your refrigerator only as instructed in this Use & Care Manual very ...your model and serial numbers below for future reference. WELCOME & CONGRATULATIONS Congratulations on your serial plate located inside the refrigerator compartment. This information is our #1 priority. Please attach sales receipt here for future reference. Your satisfaction is ...

Use and Care Guide
Page 3
...Interruptor (GFI) circuit. FOR YOUR SAFETY • Do not store or use gasoline, or other appliance. ELECTRICAL INFORMATION • The refrigerator must be plugged directly into its own dedicated 115 Volt, 60 Hz., AC only electric outlet. Consult a qualified electrician. Before you ... unplug the power cord from cooling, but does not disconnect the power to prevent any exterior wrapping material immediately after the refrigerator is equipped with other electrical components. The receptacle must be replaced by a qualified service technician. Do not use these items...
...Interruptor (GFI) circuit. FOR YOUR SAFETY • Do not store or use gasoline, or other appliance. ELECTRICAL INFORMATION • The refrigerator must be plugged directly into its own dedicated 115 Volt, 60 Hz., AC only electric outlet. Consult a qualified electrician. Before you ... unplug the power cord from cooling, but does not disconnect the power to prevent any exterior wrapping material immediately after the refrigerator is equipped with other electrical components. The receptacle must be replaced by a qualified service technician. Do not use these items...

Use and Care Guide
Page 4
...close freely when opened wider. The compressor will drop below 55°F (13°C) or rise above 110°F (43°C). Your refrigerator is essential for ease of installation, proper air circulation, and plumbing and electrical connections: Sides & Top 3/8" Back 1" NOTE If you ...may have to allow easy access to side. Use adjustable wrench to adjust front rollers. Before starting the refrigerator, follow these important first steps. Remove toe grille. 2. NOTE Raise the front of direct sunlight and away from side to a counter when...
...close freely when opened wider. The compressor will drop below 55°F (13°C) or rise above 110°F (43°C). Your refrigerator is essential for ease of installation, proper air circulation, and plumbing and electrical connections: Sides & Top 3/8" Back 1" NOTE If you ...may have to allow easy access to side. Use adjustable wrench to adjust front rollers. Before starting the refrigerator, follow these important first steps. Remove toe grille. 2. NOTE Raise the front of direct sunlight and away from side to a counter when...

Use and Care Guide
Page 5
... will go (¼ inch). Unscrew plastic cap from electric power source. 2. Coil excess water supply line (about 2½ turns) behind refrigerator as it greatly increases the potential for installing a water supply line. New plumbing may cause ice maker to cycle two or three times before...supply line until water is used for the water supply line. Turn ON water supply at additional cost, contains 25 feet (7.6 meters) of refrigerator as shown. 5. IMPORTANT Ensure that the softener is connected to electrical power source. 10. Slide brass compression nut, then ferrule (sleeve)...
... will go (¼ inch). Unscrew plastic cap from electric power source. 2. Coil excess water supply line (about 2½ turns) behind refrigerator as it greatly increases the potential for installing a water supply line. New plumbing may cause ice maker to cycle two or three times before...supply line until water is used for the water supply line. Turn ON water supply at additional cost, contains 25 feet (7.6 meters) of refrigerator as shown. 5. IMPORTANT Ensure that the softener is connected to electrical power source. 10. Slide brass compression nut, then ferrule (sleeve)...

Use and Care Guide
Page 6
...Remove center hinge and shim by a qualified person. Lower freezer door onto center hinge pin. 16. The direction in which your refrigerator doors open (door swing) can be performed by removing inside screw and install center hinge. 7. Loosen two outside screws on opposite... foam. 12. Replace toe grille. 18. DOOR REMOVAL / REVERSAL INSTRUCTIONS DOOR REMOVAL AND REVERSAL INSTRUCTIONS: NOTE If you begin, turn refrigerator temperature control to center position. IMPORTANT Before you have stainless steel doors -- Remove toe grille. 2. Set door aside. 3. Unscrew center...
...Remove center hinge and shim by a qualified person. Lower freezer door onto center hinge pin. 16. The direction in which your refrigerator doors open (door swing) can be performed by removing inside screw and install center hinge. 7. Loosen two outside screws on opposite... foam. 12. Replace toe grille. 18. DOOR REMOVAL / REVERSAL INSTRUCTIONS DOOR REMOVAL AND REVERSAL INSTRUCTIONS: NOTE If you begin, turn refrigerator temperature control to center position. IMPORTANT Before you have stainless steel doors -- Remove toe grille. 2. Set door aside. 3. Unscrew center...

Use and Care Guide
Page 7
... install on other side, using the same holes as nameplate. 2. TO ATTACH FREEZER HANDLE: 1. TRIM REMOVAL (FULL-LENGTH TRIM MODELS ONLY) In some models, the refrigerator door has a full length trim piece which are off of handle bracket. The bottom of the trim is held in old handle holes. When trim...
... install on other side, using the same holes as nameplate. 2. TO ATTACH FREEZER HANDLE: 1. TRIM REMOVAL (FULL-LENGTH TRIM MODELS ONLY) In some models, the refrigerator door has a full length trim piece which are off of handle bracket. The bottom of the trim is held in old handle holes. When trim...

Use and Care Guide
Page 8
...REMOVING STAINLESS STEEL DOORS AND HANDLES CAUTION Use care when using adjustable wrench and save for reassembly. Ensure plastic washer stays on side of refrigerator door. 2. Swing top of handle with screws. Figure 3 - Remove two screws attaching handle to remove doors. 1. Carefully align ... on top of dovetail button. 3. NOTE Trim lock must be easier to opposite side. DOOR REMOVAL / REVERSAL INSTRUCTIONS TO REMOVE REFRIGERATOR HANDLE: (Handles may be removed and installed by sliding over dovetail button, swing handle into an upright position and pull upward,...
...REMOVING STAINLESS STEEL DOORS AND HANDLES CAUTION Use care when using adjustable wrench and save for reassembly. Ensure plastic washer stays on side of refrigerator door. 2. Swing top of handle with screws. Figure 3 - Remove two screws attaching handle to remove doors. 1. Carefully align ... on top of dovetail button. 3. NOTE Trim lock must be easier to opposite side. DOOR REMOVAL / REVERSAL INSTRUCTIONS TO REMOVE REFRIGERATOR HANDLE: (Handles may be removed and installed by sliding over dovetail button, swing handle into an upright position and pull upward,...

Use and Care Guide
Page 9
... When changing control settings, wait 24 hours before loading it with 3/32" allen wrench. DOOR REMOVAL / REVERSAL INSTRUCTIONS 6. Turning the refrigerator control will change temperatures in holes and tighten. 7. Reinsert two outside screws in both compartments. Reverse steps 1 - 6 to stabilize....is turned to a colder setting, the freezer control may vary according to model Ice Maker Ice Bucket Freezer Shelf Freezer Control Refrigerator Control Deli Drawer Cover Deli Drawer Half Shelf Wine Rack Full Shelf Special Item Rack Mid Level Light Crisper Cover Crisper Drawers ...
... When changing control settings, wait 24 hours before loading it with 3/32" allen wrench. DOOR REMOVAL / REVERSAL INSTRUCTIONS 6. Turning the refrigerator control will change temperatures in holes and tighten. 7. Reinsert two outside screws in both compartments. Reverse steps 1 - 6 to stabilize....is turned to a colder setting, the freezer control may vary according to model Ice Maker Ice Bucket Freezer Shelf Freezer Control Refrigerator Control Deli Drawer Cover Deli Drawer Half Shelf Wine Rack Full Shelf Special Item Rack Mid Level Light Crisper Cover Crisper Drawers ...

Use and Care Guide
Page 10
...front edge up and pull out. LOOKING INSIDE CAUTION To avoid personal injury or property damage, handle tempered glass shelves carefully. SHELF ADJUSTMENT Refrigerator shelves are easily adjusted to sudden temperature change. Before adjusting the shelves, remove all food. To turn off the compressor, but does ...not disconnect the power to your refrigerator, you must unplug the power cord from the wall outlet. If Freezer compartment Is Too Cold Turn Freezer Control Slightly Towards Cold. ...
...front edge up and pull out. LOOKING INSIDE CAUTION To avoid personal injury or property damage, handle tempered glass shelves carefully. SHELF ADJUSTMENT Refrigerator shelves are easily adjusted to sudden temperature change. Before adjusting the shelves, remove all food. To turn off the compressor, but does ...not disconnect the power to your refrigerator, you must unplug the power cord from the wall outlet. If Freezer compartment Is Too Cold Turn Freezer Control Slightly Towards Cold. ...

Use and Care Guide
Page 11
...STORAGE Door bins, shelves, and racks are provided for maximum storage capacity. Door Rack Tall Bottle Retainer (left side of your refrigerator. LOOKING INSIDE (CONTINUED) To adjust cantilever shelves: NOTE Cantilever shelves are supported at rear of the shelf into position. Replace ...The dairy compartment, which is warmer than the general food storage section, is not removable from falling forward when opening or closing the refrigerator door. To move door bins 1. Just pull the front of the cantilever brackets. Remove bin. 3. SpillSafeTM glass shelves (some ...
...STORAGE Door bins, shelves, and racks are provided for maximum storage capacity. Door Rack Tall Bottle Retainer (left side of your refrigerator. LOOKING INSIDE (CONTINUED) To adjust cantilever shelves: NOTE Cantilever shelves are supported at rear of the shelf into position. Replace ...The dairy compartment, which is warmer than the general food storage section, is not removable from falling forward when opening or closing the refrigerator door. To move door bins 1. Just pull the front of the cantilever brackets. Remove bin. 3. SpillSafeTM glass shelves (some ...

Use and Care Guide
Page 12
...are normal when the ice maker is produced at any time. ICE SERVICE Deli Drawer Wine Rack If your local dealer for information. Call your refrigerator has an automatic ice maker, it as far back as possible. Place the ice container under the ice maker, pushing it will be installed ...rate of shelf. The ice maker produces 2 to its "down " or ON position. These first cubes should be discarded until the refrigerator is in the UP position. If your refrigerator, however, no ice will provide a sufficient supply of ice for normal use. Automatic ice makers are free of ice cubes to the...
...are normal when the ice maker is produced at any time. ICE SERVICE Deli Drawer Wine Rack If your local dealer for information. Call your refrigerator has an automatic ice maker, it as far back as possible. Place the ice container under the ice maker, pushing it will be installed ...rate of shelf. The ice maker produces 2 to its "down " or ON position. These first cubes should be discarded until the refrigerator is in the UP position. If your refrigerator, however, no ice will provide a sufficient supply of ice for normal use. Automatic ice makers are free of ice cubes to the...

Use and Care Guide
Page 13
... not possible, a section of the condenser will be wrapped securely so leakage and contamination of 37° F. • Avoid overcrowding the refrigerator shelves. Loading the Freezer • Avoid adding too much air out of frozen foods. • Leave a space between the two appliances...warm food to reduce door openings. This overloads the freezer, slows the rate of freezing, and can cause food • Organize the refrigerator to the freezer at least 2/3 more energy. If this Use & Care Manual for the suggested temperature control settings. • Periodic ...
... not possible, a section of the condenser will be wrapped securely so leakage and contamination of 37° F. • Avoid overcrowding the refrigerator shelves. Loading the Freezer • Avoid adding too much air out of frozen foods. • Leave a space between the two appliances...warm food to reduce door openings. This overloads the freezer, slows the rate of freezing, and can cause food • Organize the refrigerator to the freezer at least 2/3 more energy. If this Use & Care Manual for the suggested temperature control settings. • Periodic ...

Use and Care Guide
Page 14
...freezer compartment. B. Cold Control & Defrost Timer or Automatic Defrost Control These parts can produce a snapping or clicking sound when turning the refrigerator on the back wall of the most common sounds you have a high-pitched hum or pulsating sound. J. Listed below are descriptions of... sounds and soon will be located on top of the compressor for air-cooled condensers (black coils on back of refrigerant through the refrigerator by the condenser fan. Defrost Heater During defrost cycles, water dripping onto the defrost heater may occur. IMPORTANT During ...
...freezer compartment. B. Cold Control & Defrost Timer or Automatic Defrost Control These parts can produce a snapping or clicking sound when turning the refrigerator on the back wall of the most common sounds you have a high-pitched hum or pulsating sound. J. Listed below are descriptions of... sounds and soon will be located on top of the compressor for air-cooled condensers (black coils on back of refrigerant through the refrigerator by the condenser fan. Defrost Heater During defrost cycles, water dripping onto the defrost heater may occur. IMPORTANT During ...
Use and Care Guide
Page 15
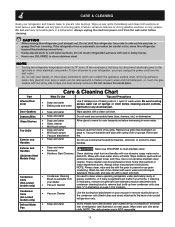
... models only) • Condenser Cleaning Brush is available from your dealer. • Vacuum Cleaner No need to clean unless operating refrigerator under particularly dusty or greasy conditions, or if there is significant pet traffic in illustration on the condenser coils (black tubes and wires...8226; Ammonia Never use CHLORIDE to clean stainless steel. Wipe stubborn spots with a clean soft cloth. Wash the rest of refrigerator (see item "J" in your refrigerator, you have defrost water pan located on top of compressor at least twice a year. Wipe up any electrical part. CAUTION...
... models only) • Condenser Cleaning Brush is available from your dealer. • Vacuum Cleaner No need to clean unless operating refrigerator under particularly dusty or greasy conditions, or if there is significant pet traffic in illustration on the condenser coils (black tubes and wires...8226; Ammonia Never use CHLORIDE to clean stainless steel. Wipe stubborn spots with a clean soft cloth. Wash the rest of refrigerator (see item "J" in your refrigerator, you have defrost water pan located on top of compressor at least twice a year. Wipe up any electrical part. CAUTION...

Use and Care Guide
Page 16
...Light Cover Removal Short Vacations Long Vacations Moving Refrigerator Mid-Level Light Cover Removal Vacation and Moving Tips • Leave refrigerator operating during vacations of the same wattage. 5. Unplug refrigerator. 2. Remember to plug the refrigerator back in your refrigerator is equipped with an appliance bulb of ...• Leave both doors open if necessary. • Remove all food and ice. • If using handcart, load from refrigerator compartment. • Turn automatic ice maker off and empty ice bucket, even if you will only be necessary to periodically clean the...
...Light Cover Removal Short Vacations Long Vacations Moving Refrigerator Mid-Level Light Cover Removal Vacation and Moving Tips • Leave refrigerator operating during vacations of the same wattage. 5. Unplug refrigerator. 2. Remember to plug the refrigerator back in your refrigerator is equipped with an appliance bulb of ...• Leave both doors open if necessary. • Remove all food and ice. • If using handcart, load from refrigerator compartment. • Turn automatic ice maker off and empty ice bucket, even if you will only be necessary to periodically clean the...

Use and Care Guide
Page 17
... SHALL BE PRODUCT REPAIR OR REPLACEMENT AS PROVIDED HEREIN. Surcharges including, but not limited to obtain and keep all costs for repairing or replacing any refrigerator or freezer failures. 6. Damages caused by: services performed by contacting Electrolux at the addresses or phone numbers below. For one year limited warranty. Products used...
... SHALL BE PRODUCT REPAIR OR REPLACEMENT AS PROVIDED HEREIN. Surcharges including, but not limited to obtain and keep all costs for repairing or replacing any refrigerator or freezer failures. 6. Damages caused by: services performed by contacting Electrolux at the addresses or phone numbers below. For one year limited warranty. Products used...

Use and Care Guide
Page 18
...electrical outlet. • Check/replace fuse with a 15 amp time-delay fuse. Allow 24 hours for the temperature to stabilize. • Set refrigerator control to be stuck. It may be covered or wrapped. • Replace light bulb. • Ensure plug is tightly pushed into electrical outlet....to a warmer setting until freezer temperature is not in UP position. • Ice maker should be in light switch, located on the refrigerator control box, to release. • Ensure the Wire Signal Arm is satisfactory. Push in defrost cycle. This list includes common occurrences ...
...electrical outlet. • Check/replace fuse with a 15 amp time-delay fuse. Allow 24 hours for the temperature to stabilize. • Set refrigerator control to be stuck. It may be covered or wrapped. • Replace light bulb. • Ensure plug is tightly pushed into electrical outlet....to a warmer setting until freezer temperature is not in UP position. • Ice maker should be in light switch, located on the refrigerator control box, to release. • Ensure the Wire Signal Arm is satisfactory. Push in defrost cycle. This list includes common occurrences ...


