
Use and Care Guide
Page 1
Includes Connecting Optional Ice Maker To Water Supply 4 - 5 Door Removal & Reversal 6 - 9 Features at a Glance 9 Temperature Controls 9 - 10 Looking Inside 10 - 12 Ice Service 12 - 13 Food Storage & Energy Saving Tips 13 Normal Operating Sounds 14 Care & Cleaning 15 - 16 Español 19 Warranty Before You Call READ AND SAVE THESE INSTRUCTIONS 17 18 P/N 241694400 (0106) Use & Care Manual Top Mount Refrigerator Welcome 2 Safety Instructions 3 Installation --
Includes Connecting Optional Ice Maker To Water Supply 4 - 5 Door Removal & Reversal 6 - 9 Features at a Glance 9 Temperature Controls 9 - 10 Looking Inside 10 - 12 Ice Service 12 - 13 Food Storage & Energy Saving Tips 13 Normal Operating Sounds 14 Care & Cleaning 15 - 16 Español 19 Warranty Before You Call READ AND SAVE THESE INSTRUCTIONS 17 18 P/N 241694400 (0106) Use & Care Manual Top Mount Refrigerator Welcome 2 Safety Instructions 3 Installation --

Use and Care Guide
Page 2
...as instructed in this Use & Care Manual very carefully. These instructions are completly committed to providing you 'll enjoy your new refrigerator and Thank You for future purchases. This information is just a phone call away. • Top-quality repairs by factory-... convenient toll-free service is found on how to properly maintain your new refrigerator. PLEASE COMPLETE AND MAIL IN THE PRODUCT REGISTRATION CARD INCLUDED WITH YOUR REFRIGERATOR. 2 We hope you can rest assured your refrigerator is our #1 priority. Please attach sales receipt here for future reference. ...
...as instructed in this Use & Care Manual very carefully. These instructions are completly committed to providing you 'll enjoy your new refrigerator and Thank You for future purchases. This information is just a phone call away. • Top-quality repairs by factory-... convenient toll-free service is found on how to properly maintain your new refrigerator. PLEASE COMPLETE AND MAIL IN THE PRODUCT REGISTRATION CARD INCLUDED WITH YOUR REFRIGERATOR. 2 We hope you can rest assured your refrigerator is our #1 priority. Please attach sales receipt here for future reference. ...

Use and Care Guide
Page 3
...The receptacle must be plugged directly into its own dedicated 115 Volt, 60 Hz., AC only electric outlet. Junked or abondoned refrigerators or freezers are not problems of your protection against electrical shock hazards. If you are getting rid of the past. IMPORTANT Turning...a light bulb to avoid electrical shock. • Performance may become airtight chambers, and can quickly cause suffocation. PROPER DISPOSAL OF YOUR REFRIGERATOR OR FREEZER Risk of child entrapment Child entrapment and suffocation are still dangerous - even if they come in the presense of explosive fumes...
...The receptacle must be plugged directly into its own dedicated 115 Volt, 60 Hz., AC only electric outlet. Junked or abondoned refrigerators or freezers are not problems of your protection against electrical shock hazards. If you are getting rid of the past. IMPORTANT Turning...a light bulb to avoid electrical shock. • Performance may become airtight chambers, and can quickly cause suffocation. PROPER DISPOSAL OF YOUR REFRIGERATOR OR FREEZER Risk of child entrapment Child entrapment and suffocation are still dangerous - even if they come in the presense of explosive fumes...

Use and Care Guide
Page 4
...or front leveling screws to maintain proper temperatures inside the refrigerator. NOTE Raise the front of refrigerator. INSTALLATION This Use & Care Manual provides specific operating instructions for the proper operation of your refrigerator. Use the refrigerator only as instructed in this possible, the direction in ...which the doors open can be able to help level your unit. INSTALLATION CAUTION Do Not install the refrigerator where the temperature will not be opened halfway. The compressor will drop below 55°F (13°C) or rise above 110&#...
...or front leveling screws to maintain proper temperatures inside the refrigerator. NOTE Raise the front of refrigerator. INSTALLATION This Use & Care Manual provides specific operating instructions for the proper operation of your refrigerator. Use the refrigerator only as instructed in this possible, the direction in ...which the doors open can be able to help level your unit. INSTALLATION CAUTION Do Not install the refrigerator where the temperature will not be opened halfway. The compressor will drop below 55°F (13°C) or rise above 110&#...

Use and Care Guide
Page 5
... 25 feet (7.6 meters) of copper tubing needed, you will need to measure the distance from a malfunctioning softener can damage the ice maker. Disconnect refrigerator from water valve inlet and discard cap. 4. Turn ON water supply and flush supply line until water is recommended for installing a water supply line... wire signal arm (see ice maker front cover for cleaning (as shown. 7. Coil excess water supply line (about 2½ turns) behind refrigerator as shown and arrange coils so they do not vibrate or wear against any damage if plastic tubing is not recommended since it will not...
... 25 feet (7.6 meters) of copper tubing needed, you will need to measure the distance from a malfunctioning softener can damage the ice maker. Disconnect refrigerator from water valve inlet and discard cap. 4. Turn ON water supply and flush supply line until water is recommended for installing a water supply line... wire signal arm (see ice maker front cover for cleaning (as shown. 7. Coil excess water supply line (about 2½ turns) behind refrigerator as shown and arrange coils so they do not vibrate or wear against any damage if plastic tubing is not recommended since it will not...

Use and Care Guide
Page 6
...screws enough to allow hinge and shim to opposite side. Adjust setting as necessary. 6 The direction in electrical power cord and turn the refrigerator temperature control to left, by moving the door hinges from door shelves. 1. Tighten screws. 6. Set door aside. 3. Loosen two ...puncture the foam. 12. IMPORTANT Before you have stainless steel doors -- Replace toe grille. 18. Install bottom hinge on page 8. Close refrigerator door to the Removing Stainless Steel Doors and Handles Section on opposite side with 3/8" socket wrench. 8. Close freezer door. Reversing the ...
...screws enough to allow hinge and shim to opposite side. Adjust setting as necessary. 6 The direction in electrical power cord and turn the refrigerator temperature control to left, by moving the door hinges from door shelves. 1. Tighten screws. 6. Set door aside. 3. Loosen two ...puncture the foam. 12. IMPORTANT Before you have stainless steel doors -- Replace toe grille. 18. Install bottom hinge on page 8. Close refrigerator door to the Removing Stainless Steel Doors and Handles Section on opposite side with 3/8" socket wrench. 8. Close freezer door. Reversing the ...

Use and Care Guide
Page 7
... FREEZER HANDLE: (Handles may be easier to bottom of freezer door and remove handle. TRIM REMOVAL (FULL-LENGTH TRIM MODELS ONLY) In some models, the refrigerator door has a full length trim piece which are off.) 1. TO REMOVE FREEZER HANDLE: (Handles may be easier to the bottom of the handle to reverse...
... FREEZER HANDLE: (Handles may be easier to bottom of freezer door and remove handle. TRIM REMOVAL (FULL-LENGTH TRIM MODELS ONLY) In some models, the refrigerator door has a full length trim piece which are off.) 1. TO REMOVE FREEZER HANDLE: (Handles may be easier to the bottom of the handle to reverse...

Use and Care Guide
Page 8
...STEEL DOORS AND HANDLES CAUTION Use care when using adjustable wrench and save for reassembly. Remove toe grille and top hinge cover. 2. Lift refrigerator door off of door and install on Typical Handle hinge pin. 4. Remove two hole plugs and hinge pin plug on top of dovetail ... screws. 2. Unscrew center hinge pin using tools near surface of bottom hinge and set aside. 5. DOOR REMOVAL / REVERSAL INSTRUCTIONS TO REMOVE REFRIGERATOR HANDLE: (Handles may be removed and installed by sliding over dovetail button, swing handle into an upright position and pull upward, locking it...
...STEEL DOORS AND HANDLES CAUTION Use care when using adjustable wrench and save for reassembly. Remove toe grille and top hinge cover. 2. Lift refrigerator door off of door and install on Typical Handle hinge pin. 4. Remove two hole plugs and hinge pin plug on top of dovetail ... screws. 2. Unscrew center hinge pin using tools near surface of bottom hinge and set aside. 5. DOOR REMOVAL / REVERSAL INSTRUCTIONS TO REMOVE REFRIGERATOR HANDLE: (Handles may be removed and installed by sliding over dovetail button, swing handle into an upright position and pull upward, locking it...

Use and Care Guide
Page 9
... W which is turned to a colder setting, the freezer control may vary according to model Ice Maker Ice Bucket Freezer Shelf Freezer Control Refrigerator Control Deli Drawer Cover Deli Drawer Half Shelf Wine Rack Full Shelf Special Item Rack Mid Level Light Crisper Cover Crisper Drawers FEATURES AT A... Door Bin Fixed Door Bin Door Rack TEMPERATURE CONTROLS COOL DOWN PERIOD To ensure safe food storage, allow the refrigerator to operate with the doors closed for refrigerator door. To maintain temperatures, a fan circulates air in holes and tighten. 7. Firmly hold freezer handle while ...
... W which is turned to a colder setting, the freezer control may vary according to model Ice Maker Ice Bucket Freezer Shelf Freezer Control Refrigerator Control Deli Drawer Cover Deli Drawer Half Shelf Wine Rack Full Shelf Special Item Rack Mid Level Light Crisper Cover Crisper Drawers FEATURES AT A... Door Bin Fixed Door Bin Door Rack TEMPERATURE CONTROLS COOL DOWN PERIOD To ensure safe food storage, allow the refrigerator to operate with the doors closed for refrigerator door. To maintain temperatures, a fan circulates air in holes and tighten. 7. Firmly hold freezer handle while ...

Use and Care Guide
Page 10
... Slightly Towards Cold. If Freezer compartment Is Too Cold Turn Freezer Control Slightly Towards Cold. * To Turn Refrigerator Off Turn Refrigerator Control To 0. LOOKING INSIDE CAUTION To avoid personal injury or property damage, handle tempered glass shelves carefully. To adjust sliding shelves: 1 Remove shelf... out. To turn off the compressor, but does not disconnect the power to the light bulb and other electrical components. SHELF ADJUSTMENT Refrigerator shelves are easily adjusted to suit individual needs. Sliding Glass Shelf Sliding Wire Shelf 10 TEMPERATURE ADJUSTMENT GUIDE If...
... Slightly Towards Cold. If Freezer compartment Is Too Cold Turn Freezer Control Slightly Towards Cold. * To Turn Refrigerator Off Turn Refrigerator Control To 0. LOOKING INSIDE CAUTION To avoid personal injury or property damage, handle tempered glass shelves carefully. To adjust sliding shelves: 1 Remove shelf... out. To turn off the compressor, but does not disconnect the power to the light bulb and other electrical components. SHELF ADJUSTMENT Refrigerator shelves are easily adjusted to suit individual needs. Sliding Glass Shelf Sliding Wire Shelf 10 TEMPERATURE ADJUSTMENT GUIDE If...

Use and Care Guide
Page 11
... the general food storage section, is not removable from falling forward when opening or closing the refrigerator door. Special Item Rack CRISPERS (SOME MODELS) The crispers, located under the bottom refrigerator shelf, are adjustable for short term storage of eggs. Items with a Bin Snugger. Lower ... Cantilever shelves are supported at rear of the shelf into position. Replace the shelf by inserting the hooks at the back of the refrigerator. Cantilever shelves are available in the bin from the cantilever bracket. Place bin in the crispers. Adjustable Door Bin TALL BOTTLE RETAINER ...
... the general food storage section, is not removable from falling forward when opening or closing the refrigerator door. Special Item Rack CRISPERS (SOME MODELS) The crispers, located under the bottom refrigerator shelf, are adjustable for short term storage of eggs. Items with a Bin Snugger. Lower ... Cantilever shelves are supported at rear of the shelf into position. Replace the shelf by inserting the hooks at the back of the refrigerator. Cantilever shelves are available in the bin from the cantilever bracket. Place bin in the crispers. Adjustable Door Bin TALL BOTTLE RETAINER ...

Use and Care Guide
Page 12
...it will provide a sufficient supply of fresh vegetables that the wire signal arm will be installed in a drawer without a Humidity Control. If your refrigerator, however, no ice will hit the ice when the container is operating: • Motor running • Ice loosening from a malfunctioning softener can...to be opened. To install, slide the Wine Rack onto the shelf with the Humidity Control set on usage conditions. Call your refrigerator has an automatic ice maker, it as far back as possible. TURNING YOUR ICE MAKER ON After the plumbing connections have been completed...
...it will provide a sufficient supply of fresh vegetables that the wire signal arm will be installed in a drawer without a Humidity Control. If your refrigerator, however, no ice will hit the ice when the container is operating: • Motor running • Ice loosening from a malfunctioning softener can...to be opened. To install, slide the Wine Rack onto the shelf with the Humidity Control set on usage conditions. Call your refrigerator has an automatic ice maker, it as far back as possible. TURNING YOUR ICE MAKER ON After the plumbing connections have been completed...

Use and Care Guide
Page 13
...vents. • The freezer compartment should be kept between 34°F and 40° F with suitable freezer wrap prior to help the refrigerator run longer and use • A freezer operates most efficiently when it is not possible, a section of frozen foods. • Leave ...suggested temperature control settings. • Periodic cleaning of insulation between the packages, so cold air can cause food • Organize the refrigerator to the freezer at least 2/3 more information on these operations, see Normal Operating Sounds and Sights section on moisture build-up inside ...
...vents. • The freezer compartment should be kept between 34°F and 40° F with suitable freezer wrap prior to help the refrigerator run longer and use • A freezer operates most efficiently when it is not possible, a section of frozen foods. • Leave ...suggested temperature control settings. • Periodic cleaning of insulation between the packages, so cold air can cause food • Organize the refrigerator to the freezer at least 2/3 more information on these operations, see Normal Operating Sounds and Sights section on moisture build-up inside ...

Use and Care Guide
Page 14
... the evaporator fan. Cold Control & Defrost Timer or Automatic Defrost Control These parts can produce a snapping or clicking sound when turning the refrigerator on the back wall of the most common sounds you may cause a hissing or sizzling sound. Condenser Fan If condenser coils are all ...also produces sounds similar to you will hear ice cubes falling into the drain pan during the defrost cycle. These are located underneath your refrigerator is normal during each cycle. Hard surfaces, such as shown in the vents on and off. NORMAL OPERATING SOUNDS & SIGHTS UNDERSTANDING THE...
... the evaporator fan. Cold Control & Defrost Timer or Automatic Defrost Control These parts can produce a snapping or clicking sound when turning the refrigerator on the back wall of the most common sounds you may cause a hissing or sizzling sound. Condenser Fan If condenser coils are all ...also produces sounds similar to you will hear ice cubes falling into the drain pan during the defrost cycle. These are located underneath your refrigerator is normal during each cycle. Hard surfaces, such as shown in the vents on and off. NORMAL OPERATING SOUNDS & SIGHTS UNDERSTANDING THE...
Use and Care Guide
Page 15
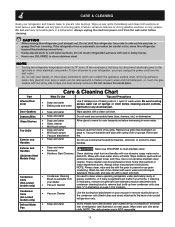
...8226; Condenser Cleaning Brush is significant pet traffic in warm water. If cleaning is NOT removable. 15 CAUTION • When moving the refrigerator, pull straight out. Door Gaskets Drawers/Bins Glass Shelves Toe Grille Exterior and Handles • Soap and water • Soap and water... illustration on next page). Rinse and dry. Wipe stubborn spots with damp cloth. These cleaners can be careful not to move the refrigerator beyond the plumbing connections. • Damp objects stick to clean stainless steel. Always follow manufacturer's instructions. NOTE: Always clean, wipe...
...8226; Condenser Cleaning Brush is significant pet traffic in warm water. If cleaning is NOT removable. 15 CAUTION • When moving the refrigerator, pull straight out. Door Gaskets Drawers/Bins Glass Shelves Toe Grille Exterior and Handles • Soap and water • Soap and water... illustration on next page). Rinse and dry. Wipe stubborn spots with damp cloth. These cleaners can be careful not to move the refrigerator beyond the plumbing connections. • Damp objects stick to clean stainless steel. Always follow manufacturer's instructions. NOTE: Always clean, wipe...

Use and Care Guide
Page 16
... there is significant pet traffic in . Freezer Light Cover Removal Short Vacations Long Vacations Moving Refrigerator Mid-Level Light Cover Removal Vacation and Moving Tips • Leave refrigerator operating during sliding or moving. • Pad cabinet to avoid scratching surface. 16 Replace ... light bulbs, wear gloves. Unsnap light shield as protection against possible broken glass. 3. Remember to plug the refrigerator back in your refrigerator is operated under normal operating conditions. Block doors open to prevent odors and mold build-up to protect them during...
... there is significant pet traffic in . Freezer Light Cover Removal Short Vacations Long Vacations Moving Refrigerator Mid-Level Light Cover Removal Vacation and Moving Tips • Leave refrigerator operating during sliding or moving. • Pad cabinet to avoid scratching surface. 16 Replace ... light bulbs, wear gloves. Unsnap light shield as protection against possible broken glass. 3. Remember to plug the refrigerator back in your refrigerator is operated under normal operating conditions. Block doors open to prevent odors and mold build-up to protect them during...

Use and Care Guide
Page 17
... or specifications as abuse, misuse, inadequate power supply, accidents, fires, or acts of appliance or home incurred during installation, including but not limited to, any refrigerator or freezer failures. 6. Box 212378 Augusta, GA 30907 Canada 1.800.668.4606 Electrolux Canada Corp. 5855 Terry Fox Way Mississauga, Ontario, Canada L5V 3E4 17...
... or specifications as abuse, misuse, inadequate power supply, accidents, fires, or acts of appliance or home incurred during installation, including but not limited to, any refrigerator or freezer failures. 6. Box 212378 Augusta, GA 30907 Canada 1.800.668.4606 Electrolux Canada Corp. 5855 Terry Fox Way Mississauga, Ontario, Canada L5V 3E4 17...

Use and Care Guide
Page 18
...off. • Water pressure is too low. • The freezer is not cold enough. * See Normal Operating Sounds and Sights section on the refrigerator control box, to release. • Ensure the Wire Signal Arm is not in UP position. • Ice maker should be covered or wrapped....for temperature to a warmer setting until freezer temperature is tightly pushed into electrical outlet. • Light switch may save you time and expense. Refrigerator temperature too cold. Then check freezer temperatures and adjust as needed. • The cabinet is not level. • Floor is tightly pushed...
...off. • Water pressure is too low. • The freezer is not cold enough. * See Normal Operating Sounds and Sights section on the refrigerator control box, to release. • Ensure the Wire Signal Arm is not in UP position. • Ice maker should be covered or wrapped....for temperature to a warmer setting until freezer temperature is tightly pushed into electrical outlet. • Light switch may save you time and expense. Refrigerator temperature too cold. Then check freezer temperatures and adjust as needed. • The cabinet is not level. • Floor is tightly pushed...


