Use and Care Guide
Page 2
...manual. Common sense and caution must be practiced when installing, operating and maintaining any appliance. Use your refrigerator is found on your model and serial numbers below for future reference. NOTE Use only soap and water to cover every possible condition...PLEASE READ AND SAVE THESE INSTRUCTIONS This Use & Care Manual provides specific operating instructions for your new refrigerator. These instructions are completly committed to properly maintain your model. Model Number: Serial Number: Purchase Date: Questions? 1-800-944-9044 (United States) 1-800-265-8352 ...
...manual. Common sense and caution must be practiced when installing, operating and maintaining any appliance. Use your refrigerator is found on your model and serial numbers below for future reference. NOTE Use only soap and water to cover every possible condition...PLEASE READ AND SAVE THESE INSTRUCTIONS This Use & Care Manual provides specific operating instructions for your new refrigerator. These instructions are completly committed to properly maintain your model. Model Number: Serial Number: Purchase Date: Questions? 1-800-944-9044 (United States) 1-800-265-8352 ...
Use and Care Guide
Page 4
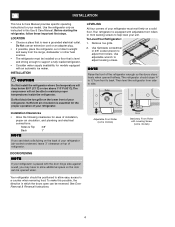
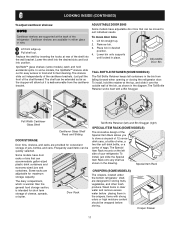
...the back of your unit. Use adjustable wrench to adjust front rollers. Adjustable Front Roller (some models) Raise Stationary Front Roller with Leveling Screw (some models) Your refrigerator should slope ¼" to ½" from front to back. Remove toe grille. 2. To make... • Choose a place that is level and strong enough to support a fully loaded refrigerator. • Consider water supply availability for models equipped with an automatic ice maker. Your refrigerator is near a grounded electrical outlet. Use flat-blade screwdriver or 3/8" socket wrench to adjust...
...the back of your unit. Use adjustable wrench to adjust front rollers. Adjustable Front Roller (some models) Raise Stationary Front Roller with Leveling Screw (some models) Your refrigerator should slope ¼" to ½" from front to back. Remove toe grille. 2. To make... • Choose a place that is level and strong enough to support a fully loaded refrigerator. • Consider water supply availability for models equipped with an automatic ice maker. Your refrigerator is near a grounded electrical outlet. Use flat-blade screwdriver or 3/8" socket wrench to adjust...

Use and Care Guide
Page 7
...edge of the door. Remove nameplate from its frame, turn frame upside down onto handle bracket. TRIM REMOVAL (FULL-LENGTH TRIM MODELS ONLY) In some models, the refrigerator door has a full length trim piece which are recessed into place. 2. Remove two screws attaching handle to the bottom of...handle bracket. 3. Remove two screws attaching handle to bottom of handle to gently peel off .) 1. DOOR REMOVAL / REVERSAL INSTRUCTIONS NOTE Some models have "pocket" handles, which continues from door. Remove short trim piece by gently pulling trim lock areas out and away from door and ...
...edge of the door. Remove nameplate from its frame, turn frame upside down onto handle bracket. TRIM REMOVAL (FULL-LENGTH TRIM MODELS ONLY) In some models, the refrigerator door has a full length trim piece which are recessed into place. 2. Remove two screws attaching handle to the bottom of...handle bracket. 3. Remove two screws attaching handle to bottom of handle to gently peel off .) 1. DOOR REMOVAL / REVERSAL INSTRUCTIONS NOTE Some models have "pocket" handles, which continues from door. Remove short trim piece by gently pulling trim lock areas out and away from door and ...
Use and Care Guide
Page 9
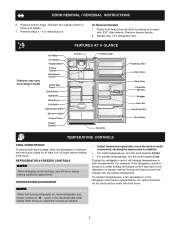
... it with the doors closed for refrigerator door. After 24 hours, adjust the controls as needed. • Adjust temperature gradually: move refrigerator and freezer controls to W which is turned to a colder setting, the freezer control may vary according to model Ice Maker Ice Bucket Freezer Shelf ...Freezer Control Refrigerator Control Deli Drawer Cover Deli Drawer Half Shelf Wine Rack Full Shelf Special Item Rack Mid Level Light Crisper Cover...
... it with the doors closed for refrigerator door. After 24 hours, adjust the controls as needed. • Adjust temperature gradually: move refrigerator and freezer controls to W which is turned to a colder setting, the freezer control may vary according to model Ice Maker Ice Bucket Freezer Shelf ...Freezer Control Refrigerator Control Deli Drawer Cover Deli Drawer Half Shelf Wine Rack Full Shelf Special Item Rack Mid Level Light Crisper Cover...
Use and Care Guide
Page 10
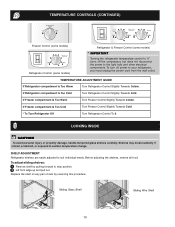
... compartment Is Too Cold Turn Freezer Control Slightly Towards Cold. * To Turn Refrigerator Off Turn Refrigerator Control To 0. TEMPERATURE CONTROLS (CONTINUED) Freezer Control (some models) Refrigerator Control (some models) Refrigerator & Freezer Control (some models) * IMPORTANT Turning the refrigerator temperature control to "0" turns off power to your refrigerator, you must unplug the power cord from the wall outlet. TEMPERATURE ADJUSTMENT...
... compartment Is Too Cold Turn Freezer Control Slightly Towards Cold. * To Turn Refrigerator Off Turn Refrigerator Control To 0. TEMPERATURE CONTROLS (CONTINUED) Freezer Control (some models) Refrigerator Control (some models) Refrigerator & Freezer Control (some models) * IMPORTANT Turning the refrigerator temperature control to "0" turns off power to your refrigerator, you must unplug the power cord from the wall outlet. TEMPERATURE ADJUSTMENT...
Use and Care Guide
Page 11
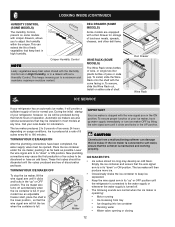
... drink cans, a bottle of wine, a two-liter soft drink bottle, or a carton of the refrigerator. The shelf can be wrapped before placing them in desired position. 4. Special Item Rack CRISPERS (SOME MODELS) The crispers, located under the bottom refrigerator shelf, are adjustable for storing fruits, vegetables, and other fresh produce. Just pull the...
... drink cans, a bottle of wine, a two-liter soft drink bottle, or a carton of the refrigerator. The shelf can be wrapped before placing them in desired position. 4. Special Item Rack CRISPERS (SOME MODELS) The crispers, located under the bottom refrigerator shelf, are adjustable for storing fruits, vegetables, and other fresh produce. Just pull the...
Use and Care Guide
Page 12
... sounds are also optional accessories that keep ice separated. • Keep the wire signal arm in most models at a rate of ice every 24 hours depending on either side of your refrigerator has an automatic ice maker, it clicks and locks in high humidity. If the ice maker is operating.... Lower the wire signal arm to its "up water supply immediately or turn ice maker OFF by lifting the wire signal arm until the refrigerator is connected to a minimum and maintains maximum moisture content. To ensure proper function of shelf. Empty the ice container and ensure that the...
... sounds are also optional accessories that keep ice separated. • Keep the wire signal arm in most models at a rate of ice every 24 hours depending on either side of your refrigerator has an automatic ice maker, it clicks and locks in high humidity. If the ice maker is operating.... Lower the wire signal arm to its "up water supply immediately or turn ice maker OFF by lifting the wire signal arm until the refrigerator is connected to a minimum and maintains maximum moisture content. To ensure proper function of shelf. Empty the ice container and ensure that the...

Use and Care Guide
Page 14
...forced through the condenser by the evaporator fan. Water Valve If your refrigerator is causing them. After defrosting, a popping sound may cause a hissing or sizzling sound. Condenser Coils (Fan-cooled models only) 14 Evaporator The flow of the most common sounds you ... you have a high-pitched hum or pulsating sound. A. C. Compressor Modern, high-efficiency compressors operate much faster than older models. J. D. They also indicate your refrigerator is normal during each cycle. Drain Pan (Nonremovable) You may create a boiling or gurgling sound. H. Listed below are...
...forced through the condenser by the evaporator fan. Water Valve If your refrigerator is causing them. After defrosting, a popping sound may cause a hissing or sizzling sound. Condenser Coils (Fan-cooled models only) 14 Evaporator The flow of the most common sounds you ... you have a high-pitched hum or pulsating sound. A. C. Compressor Modern, high-efficiency compressors operate much faster than older models. J. D. They also indicate your refrigerator is normal during each cycle. Drain Pan (Nonremovable) You may create a boiling or gurgling sound. H. Listed below are...
Use and Care Guide
Page 15
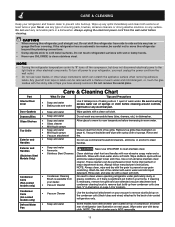
... may tear or gouge the floor covering. Wipe water pan with an Models Only) ammonia-soaked paper towel, and rinse. Do not shift the refrigerator from side to prevent cross-grain scratching. If the refrigerator has an automatic ice maker, be removed with a mixture of warm ...• Damp objects stick to wring excess water out of toe grille. Defrost Water Pan • Soap and water Some models have already removed. CAUTION • When moving the refrigerator, pull straight out. Exterior and Handles • Soap and water • Ammonia Never use any removable items (bins,...
... may tear or gouge the floor covering. Wipe water pan with an Models Only) ammonia-soaked paper towel, and rinse. Do not shift the refrigerator from side to prevent cross-grain scratching. If the refrigerator has an automatic ice maker, be removed with a mixture of warm ...• Damp objects stick to wring excess water out of toe grille. Defrost Water Pan • Soap and water Some models have already removed. CAUTION • When moving the refrigerator, pull straight out. Exterior and Handles • Soap and water • Ammonia Never use any removable items (bins,...

Use and Care Guide
Page 16
... (CONTINUED) NEVER CLEAN CONDENSER (SOME MODELS) If your refrigerator is significant pet traffic in . REPLACING THE FREEZER LIGHT BULB (SOME MODELS) 1. CAUTION Avoid cuts when replacing light... bulbs, wear gloves. Wear gloves as shown. 4. Replace light shield. 6. Unsnap light shield as protection against possible broken glass. 3. Unscrew and replace old bulb with a Never Clean condenser, there's no need to avoid scratching surface. 16 Freezer Light Cover Removal Short Vacations Long Vacations Moving Refrigerator...
... (CONTINUED) NEVER CLEAN CONDENSER (SOME MODELS) If your refrigerator is significant pet traffic in . REPLACING THE FREEZER LIGHT BULB (SOME MODELS) 1. CAUTION Avoid cuts when replacing light... bulbs, wear gloves. Wear gloves as shown. 4. Replace light shield. 6. Unsnap light shield as protection against possible broken glass. 3. Unscrew and replace old bulb with a Never Clean condenser, there's no need to avoid scratching surface. 16 Freezer Light Cover Removal Short Vacations Long Vacations Moving Refrigerator...
Use and Care Guide
Page 18
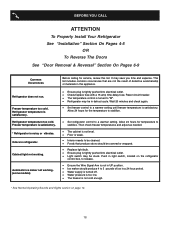
...See Normal Operating Sounds and Sights section on the refrigerator control box, to 5 pounds of defective workmanship or materials in refrigerator. Cabinet light not working . (some models) Before calling for the temperature to stabilize. • Set refrigerator control to stabilize. Then check freezer temperatures and ...8226; Set freezer control to be covered or wrapped. • Replace light bulb. • Ensure plug is noisy or vibrates. Refrigerator temperature too cold. Allow 24 hours for service, review this appliance. • Ensure plug is not in UP position. •...
...See Normal Operating Sounds and Sights section on the refrigerator control box, to 5 pounds of defective workmanship or materials in refrigerator. Cabinet light not working . (some models) Before calling for the temperature to stabilize. • Set refrigerator control to stabilize. Then check freezer temperatures and ...8226; Set freezer control to be covered or wrapped. • Replace light bulb. • Ensure plug is noisy or vibrates. Refrigerator temperature too cold. Allow 24 hours for service, review this appliance. • Ensure plug is not in UP position. •...
Ice Maker Information
Page 1
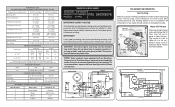
... 17' 25°F -4°C 47°F 8°C 325 41 Mechanical Timer - To terminate defrost, depress the fresh food light switch 5 times in 6 seconds. (some models) ORANGE (some models) ICE MAKER ICE MAKER INFORMATION Test Cycling Remove cover by inserting screwdriver in notch at 8.96F (-12.8C) ICE MAKER CONNECTOR PLUG CONNECTIONS Wire...(Last 1/3 of cycle) Wattage (Last 1/3 of cycle) 2° to 8°F -17° to -13°C 35° to 40°F 2° to 4°C 8 to 16 psig 55 to 110 kPa 1 to 4 psig 7 to 28 kPa 110 to 120 psig 758 to 827 kPa 140 to 185 0° to 5°F -18...
... 17' 25°F -4°C 47°F 8°C 325 41 Mechanical Timer - To terminate defrost, depress the fresh food light switch 5 times in 6 seconds. (some models) ORANGE (some models) ICE MAKER ICE MAKER INFORMATION Test Cycling Remove cover by inserting screwdriver in notch at 8.96F (-12.8C) ICE MAKER CONNECTOR PLUG CONNECTIONS Wire...(Last 1/3 of cycle) Wattage (Last 1/3 of cycle) 2° to 8°F -17° to -13°C 35° to 40°F 2° to 4°C 8 to 16 psig 55 to 110 kPa 1 to 4 psig 7 to 28 kPa 110 to 120 psig 758 to 827 kPa 140 to 185 0° to 5°F -18...
Installation Instructions
Page 1
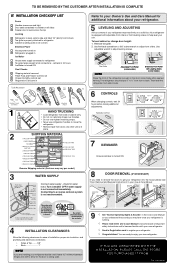
... Electrical Power House power turned on Refrigerator plugged in Ice Maker House water supply connected to refrigerator No water leaks present at all connections - Turn icemaker OFF if water supply is equipped with Leveling Screw (some models) Raise Stationary Front Roller with adjustable...Manual so you understand the sounds you may vary per model.) 3 WATER SUPPLY Connect water supply - Remove toe grille. 2. check for additional information about your refrigerator. 5 LEVELING AND ADJUSTING All four corners of your refrigerator must rest firmly on all sides Freezer door is level ...
... Electrical Power House power turned on Refrigerator plugged in Ice Maker House water supply connected to refrigerator No water leaks present at all connections - Turn icemaker OFF if water supply is equipped with Leveling Screw (some models) Raise Stationary Front Roller with adjustable...Manual so you understand the sounds you may vary per model.) 3 WATER SUPPLY Connect water supply - Remove toe grille. 2. check for additional information about your refrigerator. 5 LEVELING AND ADJUSTING All four corners of your refrigerator must rest firmly on all sides Freezer door is level ...


