
Installation Instructions (All Languages)
Page 1
... direct sunlight and close and seal properly). 1 • Doors should align with set screw): Open Door Hinge Flange Set Screw (some models) 4 Hinge 1 Before leveling either door, remove set Registration Card sent in Ice Maker House water supply connected to...• Never use refrigerator handles to move it will impair cooling ability of your dealer, a self-piercing shut-off valve for choosing Frigidaire. 8 Installation Checkoff List Doors Door seals completely to an electrical power source until water is essential for proper operation...
... direct sunlight and close and seal properly). 1 • Doors should align with set screw): Open Door Hinge Flange Set Screw (some models) 4 Hinge 1 Before leveling either door, remove set Registration Card sent in Ice Maker House water supply connected to...• Never use refrigerator handles to move it will impair cooling ability of your dealer, a self-piercing shut-off valve for choosing Frigidaire. 8 Installation Checkoff List Doors Door seals completely to an electrical power source until water is essential for proper operation...
Service Data Sheet
Page 1
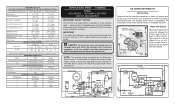
AUTOMATIC DEFROST SIDE BY SIDE MODELS important safety notice The information provided herein is designed to 20cc (.68 oz.). caution: All electrical parts and wiring must be working). Excessive heat will ... Ground 2 Yellow Water Valve 3 Black Line 4 Lt. BLU GRN / yEL BLK BLU MOLD HEATER GRN / yEL P-1 MOL D MOUN TING PLATE SHUT-OF F SWITCH LT. Some models) 1100 CW Opposite Shaft .03 Running 8.0 2550 CW Opposite Shaft .07 Running ICE MAKER SPECIFICATIONS Electrical 115 vac (127 vac max) 60 Hertz Thermostat Opens...
AUTOMATIC DEFROST SIDE BY SIDE MODELS important safety notice The information provided herein is designed to 20cc (.68 oz.). caution: All electrical parts and wiring must be working). Excessive heat will ... Ground 2 Yellow Water Valve 3 Black Line 4 Lt. BLU GRN / yEL BLK BLU MOLD HEATER GRN / yEL P-1 MOL D MOUN TING PLATE SHUT-OF F SWITCH LT. Some models) 1100 CW Opposite Shaft .03 Running 8.0 2550 CW Opposite Shaft .07 Running ICE MAKER SPECIFICATIONS Electrical 115 vac (127 vac max) 60 Hertz Thermostat Opens...
Use and Care Guide
Page 3
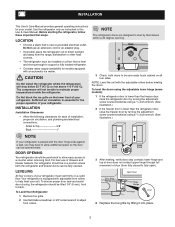
...that is level and strong enough to support a fully loaded refrigerator. • Consider water supply availability for the proper operation of your model. The compressor will drop below 55°F (13°C) or rise above 110°F (43°C). To level the doors using the... by turning the adjustment screw counterclockwise using a ⁷/16 inch wrench. (See illustration.) 2 If the freezer door is essential for models equipped with adjustable front rollers to help level your refrigerator is near a grounded electrical outlet. Raise 3 Check both the refrigerator and freezer...
...that is level and strong enough to support a fully loaded refrigerator. • Consider water supply availability for the proper operation of your model. The compressor will drop below 55°F (13°C) or rise above 110°F (43°C). To level the doors using the... by turning the adjustment screw counterclockwise using a ⁷/16 inch wrench. (See illustration.) 2 If the freezer door is essential for models equipped with adjustable front rollers to help level your refrigerator is near a grounded electrical outlet. Raise 3 Check both the refrigerator and freezer...
Use and Care Guide
Page 5
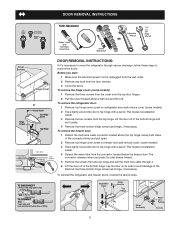
... 2 Remove any food from the top hinge. To remove the refrigerator door: 1 Remove top hinge cover screw on refrigerator door and remove cover. (some models) 3 Trace lightly around the door's top hinge with a pencil. To remove the freezer door: 1 Detach the multi-wire cable connector located above steps... from the connector located below the freezer door. Grasp both sides of fitting 2. Lay the door on freezer door and remove cover. (some models) 2 Trace lightly around the door's top hinge with a pencil. Top Hinge Screw Top Hinge Cover Screw Bottom Hinge Screw or tO DISCONNECt ...
... 2 Remove any food from the top hinge. To remove the refrigerator door: 1 Remove top hinge cover screw on refrigerator door and remove cover. (some models) 3 Trace lightly around the door's top hinge with a pencil. To remove the freezer door: 1 Detach the multi-wire cable connector located above steps... from the connector located below the freezer door. Grasp both sides of fitting 2. Lay the door on freezer door and remove cover. (some models) 2 Trace lightly around the door's top hinge with a pencil. Top Hinge Screw Top Hinge Cover Screw Bottom Hinge Screw or tO DISCONNECt ...
Use and Care Guide
Page 6
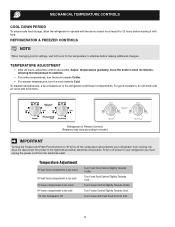
... changing control settings, wait 24 hours for at least 8 to stabilize before loading it with food items. Refrigerator & Freezer Controls (Features may vary according to model.) IMPORTANT Turning the Freezer and Fresh Food Controls to "0" turns off power to stabilize. • For colder temperatures, turn the knob towards Cold. Temperature adjustment...
... changing control settings, wait 24 hours for at least 8 to stabilize before loading it with food items. Refrigerator & Freezer Controls (Features may vary according to model.) IMPORTANT Turning the Freezer and Fresh Food Controls to "0" turns off power to stabilize. • For colder temperatures, turn the knob towards Cold. Temperature adjustment...
Use and Care Guide
Page 7
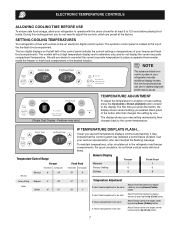
... to operate with the doors closed for reference only, and do not display the current accurate compartment temperature. During this cooling period, you entered. The models with a 2-digit temperature display are preset at the top of your new setting momentarily, then changes back to the current temperature. Temperature Control Range Freezer...
... to operate with the doors closed for reference only, and do not display the current accurate compartment temperature. During this cooling period, you entered. The models with a 2-digit temperature display are preset at the top of your new setting momentarily, then changes back to the current temperature. Temperature Control Range Freezer...
Use and Care Guide
Page 8
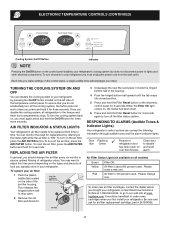
... for three more seconds. You may want to turn off the air filter, press the Air Filter button. Air filter is about 80 percent used . frigidaire.com. To turn the cooling system back on, you press and hold the Filter Reset button for and reset over five minutes. Once you typically... to drop open for 3 seconds again to adjust this time period depending on the types and amounts of food you disable the cooling system, all models) Green Yellow Red Filter OK. alarm. Please change the air filter every six months to the status light while the air filter is "ON". To...
... for three more seconds. You may want to turn off the air filter, press the Air Filter button. Air filter is about 80 percent used . frigidaire.com. To turn the cooling system back on, you press and hold the Filter Reset button for and reset over five minutes. Once you typically... to drop open for 3 seconds again to adjust this time period depending on the types and amounts of food you disable the cooling system, all models) Green Yellow Red Filter OK. alarm. Please change the air filter every six months to the status light while the air filter is "ON". To...
Use and Care Guide
Page 9
... of its specified life cycle. Red The filter is still operating within its useful life. LOCK The Ice & Water Dispenser can be locked out to model. WATER To Unlock Press the LOCK Touch Pad 7 for 3-5 seconds to preserve freshness, push the Touch Pad 1 for 3-5 seconds until the Red light above the...
... of its specified life cycle. Red The filter is still operating within its useful life. LOCK The Ice & Water Dispenser can be locked out to model. WATER To Unlock Press the LOCK Touch Pad 7 for 3-5 seconds to preserve freshness, push the Touch Pad 1 for 3-5 seconds until the Red light above the...
Use and Care Guide
Page 10
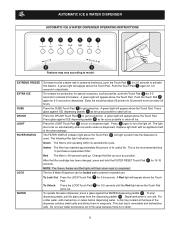
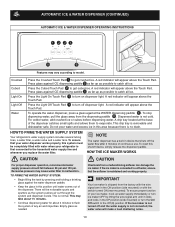
... water filter. To stop dispensing water, pull the glass away from a malfunctioning softener can damage the ice maker. If the ice maker is connected to model. Automatic Ice & Water Dispenser (Continued) Automatic Ice & Water Dispenser Operating Instructions 1234 5 6 Features may vary according to soft water, ensure that the softener is maintained...
... water filter. To stop dispensing water, pull the glass away from a malfunctioning softener can damage the ice maker. If the ice maker is connected to model. Automatic Ice & Water Dispenser (Continued) Automatic Ice & Water Dispenser Operating Instructions 1234 5 6 Features may vary according to soft water, ensure that the softener is maintained...
Use and Care Guide
Page 12
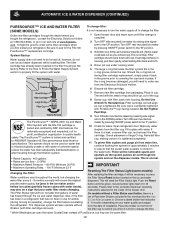
.... Place in the ice maker and/or hollow ice cubes (partially frozen cubes with water inside), may also be good to order some models) After replacing the filter cartridge, it is tested and certified by lowering wire signal arm to change the filter. * White Westinghouse uses...Choose a dated sticker that your water quality and usage) from packaging. The filter cartridge has already been installed in the filter housing at www.frigidaire. Turn OFF rear mounted ice maker by pressing ON/OFF power switch to order one from the Electrolux Solutions Hotline. 6 Discard old filter ...
.... Place in the ice maker and/or hollow ice cubes (partially frozen cubes with water inside), may also be good to order some models) After replacing the filter cartridge, it is tested and certified by lowering wire signal arm to change the filter. * White Westinghouse uses...Choose a dated sticker that your water quality and usage) from packaging. The filter cartridge has already been installed in the filter housing at www.frigidaire. Turn OFF rear mounted ice maker by pressing ON/OFF power switch to order one from the Electrolux Solutions Hotline. 6 Discard old filter ...

Use and Care Guide
Page 13
... The clip assembly holds the filter cartridge firmly in the filter housing at www.frigidaire. As you will ensure the highest possible water quality. This is stored in place. IMPORTANT Resetting The Filter Status Light (some models) After replacing the filter cartridge, it moves out toward you will turn the water.... It would be flush with filter cartridge removed and bypass installed). Automatic Ice & Water Dispenser (continued) PureSource2TM* Ice and Water Front Filter (some models) Order new filter cartridges through the system and out the dispenser nozzle.
... The clip assembly holds the filter cartridge firmly in the filter housing at www.frigidaire. As you will ensure the highest possible water quality. This is stored in place. IMPORTANT Resetting The Filter Status Light (some models) After replacing the filter cartridge, it moves out toward you will turn the water.... It would be flush with filter cartridge removed and bypass installed). Automatic Ice & Water Dispenser (continued) PureSource2TM* Ice and Water Front Filter (some models) Order new filter cartridges through the system and out the dispenser nozzle.
Use and Care Guide
Page 14
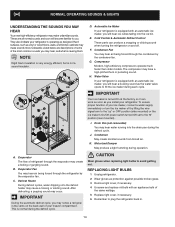
... Control These parts can work as soon as you may notice a red glow in . 14 G. Compressor Modern, high-efficiency compressors operate much faster than older models. IMPORTANT D E OR D B A C F Your ice maker is turned On at the factory so it can produce a snapping or clicking sound when turning the refrigerator on the...
... Control These parts can work as soon as you may notice a red glow in . 14 G. Compressor Modern, high-efficiency compressors operate much faster than older models. IMPORTANT D E OR D B A C F Your ice maker is turned On at the factory so it can produce a snapping or clicking sound when turning the refrigerator on the...
Use and Care Guide
Page 15
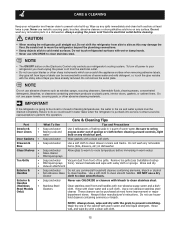
... and water Wipe gaskets with warm water and mild liquid detergent. Vacuum backside and wipe with bleach to clean stainless steel. Exterior & Handles (Stainless Steel Models Only) • Soap and water • Stainless Steel Cleaners Never use paper towels, scouring pads, or other sharp instruments which can be removed with a mixture...
... and water Wipe gaskets with warm water and mild liquid detergent. Vacuum backside and wipe with bleach to clean stainless steel. Exterior & Handles (Stainless Steel Models Only) • Soap and water • Stainless Steel Cleaners Never use paper towels, scouring pads, or other sharp instruments which can be removed with a mixture...
Use and Care Guide
Page 18
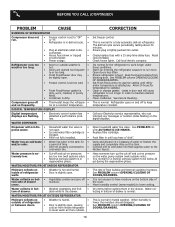
... inside of drawer. Allow 24 hours for the refrigerator to maintain desired temperatures. Open household water line valve. Replace filter cartridge. Move humidity control (some models) to the kitchen faucet. See PROBLEM column OPENING/CLOSING OF DOORS/DRAWERS. 18 cover. • Water collects in humid weather. WATER/MOISTURE/FROST OUTSIDE REFRIGERATOR...
... inside of drawer. Allow 24 hours for the refrigerator to maintain desired temperatures. Open household water line valve. Replace filter cartridge. Move humidity control (some models) to the kitchen faucet. See PROBLEM column OPENING/CLOSING OF DOORS/DRAWERS. 18 cover. • Water collects in humid weather. WATER/MOISTURE/FROST OUTSIDE REFRIGERATOR...
Use and Care Guide
Page 19
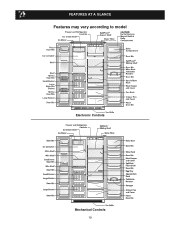
Features At A Glance Features may vary according to model Electronic Controls Mechanical Controls 19
Features At A Glance Features may vary according to model Electronic Controls Mechanical Controls 19


