
User Manual
Page 1
... phone at your convenience! √ If we can't resolve your service issue, we'll schedule a reputable local service technician for you! √ Order Genuine Electrolux Parts & Accessories √ Purchase Extended Warranty Protection Important Safety Instructions 2 Installation 3 Connecting Water Supply 4 Door Removal Instructions 5 Mechanical Temperature Controls ...... 6 Electronic Temperature Controls ........ 6 Automatic Ice & Water Dispenser ....... 9 Normal Operating Sounds & Sights ... 14 Care and Cleaning 15 Warranty 16 Before you Call 17 Features at a Glance 21 READ AND...
... phone at your convenience! √ If we can't resolve your service issue, we'll schedule a reputable local service technician for you! √ Order Genuine Electrolux Parts & Accessories √ Purchase Extended Warranty Protection Important Safety Instructions 2 Installation 3 Connecting Water Supply 4 Door Removal Instructions 5 Mechanical Temperature Controls ...... 6 Electronic Temperature Controls ........ 6 Automatic Ice & Water Dispenser ....... 9 Normal Operating Sounds & Sights ... 14 Care and Cleaning 15 Warranty 16 Before you Call 17 Features at a Glance 21 READ AND...

User Manual
Page 2
... replaced by an authorized service technician to sudden temperature change. 2 The receptacle must unplug the power cord from the receptacle to prevent damaging the power cord. • Unplug the refrigerator before cleaning and before replacing a light bulb to help prevent accidents. The power cord of the past. If you throw away your old refrigerator/ freezer: • Remove doors. • Leave shelves in the presence of automatic ice maker. • Remove...
... replaced by an authorized service technician to sudden temperature change. 2 The receptacle must unplug the power cord from the receptacle to prevent damaging the power cord. • Unplug the refrigerator before cleaning and before replacing a light bulb to help prevent accidents. The power cord of the past. If you throw away your old refrigerator/ freezer: • Remove doors. • Leave shelves in the presence of automatic ice maker. • Remove...

User Manual
Page 3
... plumbing and electrical connections: Sides & Top 3/8" Back 1" DOOR OPENING 3. Your refrigerator is level and strong enough to shut by themselves within a 20 degree opening. Remove toe grille. (See "To Remove Toe Grille" .) 2. Your refrigerator should be fully opened wider. To ensure proper door seal and assist door closing, the refrigerator should be in this Use & Care Manual. LOCATION • Choose a place that is equipped with an automatic ice maker. The compressor will...
... plumbing and electrical connections: Sides & Top 3/8" Back 1" DOOR OPENING 3. Your refrigerator is level and strong enough to shut by themselves within a 20 degree opening. Remove toe grille. (See "To Remove Toe Grille" .) 2. Your refrigerator should be fully opened wider. To ensure proper door seal and assist door closing, the refrigerator should be in this Use & Care Manual. LOCATION • Choose a place that is equipped with an automatic ice maker. The compressor will...
User Manual
Page 4
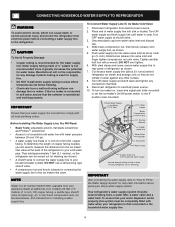
... refrigerator can be completely filled with water when your water supply line connections comply with a wrench; Unscrew plastic cap from electric power source. 2. Slide ferrule (sleeve) into water valve inlet as far as shown. 5. Tighten another half turn ice maker on, lower wire signal arm (side mounted) or set the ice maker's On/Off power switch to electrical power source. 10. To turn with all local plumbing codes. Your refrigerator's water supply system includes several tubing lines, a water filter, a water valve and a water...
... refrigerator can be completely filled with water when your water supply line connections comply with a wrench; Unscrew plastic cap from electric power source. 2. Slide ferrule (sleeve) into water valve inlet as far as shown. 5. Tighten another half turn ice maker on, lower wire signal arm (side mounted) or set the ice maker's On/Off power switch to electrical power source. 10. To turn with all local plumbing codes. Your refrigerator's water supply system includes several tubing lines, a water filter, a water valve and a water...
User Manual
Page 5
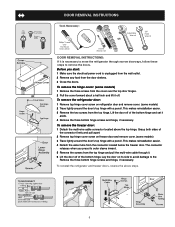
... the water tube from the top hinge and pull the multi-wire cable through narrow doorways, follow these steps to the Remove the three bottom hinge screws and hinge, if necessary. DOOR REMOVAL INSTRUCTIONS Top Hinge Screw Top Hinge Cover Screw Bottom Hinge Screw Hinge Screws OR Cover Screw Top Hinge Cover Top Hinge Tools Necessary: Phillips™ head and Flat Head Screw Driver Socket Wrench Set Adjustable Wrench OR 3/8" Fixed Wrench DOOR REMOVAL INSTRUCTIONS: If...
... the water tube from the top hinge and pull the multi-wire cable through narrow doorways, follow these steps to the Remove the three bottom hinge screws and hinge, if necessary. DOOR REMOVAL INSTRUCTIONS Top Hinge Screw Top Hinge Cover Screw Bottom Hinge Screw Hinge Screws OR Cover Screw Top Hinge Cover Top Hinge Tools Necessary: Phillips™ head and Flat Head Screw Driver Socket Wrench Set Adjustable Wrench OR 3/8" Fixed Wrench DOOR REMOVAL INSTRUCTIONS: If...

User Manual
Page 6
... Food Controls to "0" turns off the compressor and prevents your refrigerator from the electrical outlet. The system's control panel is , place a separate thermometer inside . To maintain temperatures, a fan circulates air in the desired location. 6 If Freezer Compartment Is Too Warm Turn Freezer Control Slightly Towards Colder. The two digital displays on the left half of the control panel indicate the current settings or temperatures of the the fresh food compartment. SETTING COOLING TEMPERATURES Your refrigerator comes with the doors...
... Food Controls to "0" turns off the compressor and prevents your refrigerator from the electrical outlet. The system's control panel is , place a separate thermometer inside . To maintain temperatures, a fan circulates air in the desired location. 6 If Freezer Compartment Is Too Warm Turn Freezer Control Slightly Towards Colder. The two digital displays on the left half of the control panel indicate the current settings or temperatures of the the fresh food compartment. SETTING COOLING TEMPERATURES Your refrigerator comes with the doors...

User Manual
Page 7
Features may indicate that the control system has detected a performance problem. Each press of the button after that service professionals can interpret the flashing message. To maintain temperatures, a fan circulates air in your refrigerator includes additional display modes that changes the setting by one degree warmer by pressing the Up (Cold) button. If Freezer compartment is too warm Adjust Freezer control one degree warmer by pressing the Up (Cold) button. 7 The display shows your service representative...
Features may indicate that the control system has detected a performance problem. Each press of the button after that service professionals can interpret the flashing message. To maintain temperatures, a fan circulates air in your refrigerator includes additional display modes that changes the setting by one degree warmer by pressing the Up (Cold) button. If Freezer compartment is too warm Adjust Freezer control one degree warmer by pressing the Up (Cold) button. 7 The display shows your service representative...

User Manual
Page 8
... light comes on the control panel, a single audible tone acknowledges your input. To order new air filter cartridges, contact the dealer where you first install your refrigerator. To RESET the air filter, press the "Air Filter" button and hold the Filter Reset button on the control panel disables your refrigerator's cooling system but does not disconnect power to ensure optimal filtering of the temperature control panel. You may want to the freezer and fresh food compartments stops. AIR FILTER INDICATOR & STATUS LIGHTS Your refrigerator's air filter needs...
... light comes on the control panel, a single audible tone acknowledges your input. To order new air filter cartridges, contact the dealer where you first install your refrigerator. To RESET the air filter, press the "Air Filter" button and hold the Filter Reset button on the control panel disables your refrigerator's cooling system but does not disconnect power to ensure optimal filtering of the temperature control panel. You may want to the freezer and fresh food compartments stops. AIR FILTER INDICATOR & STATUS LIGHTS Your refrigerator's air filter needs...

User Manual
Page 9
The light also turns on dispenser light. Amber The filter has reached approximately 80% of its specified life cycle. After the filter cartridge has been changed, press and hold the FILTER RESET Touch Pad 6 for 3-5 seconds to turn on automatically when ice and/or water is no drain. 9 To operate the water dispenser, press a glass against ICE dispensing paddle 8 as parties, push the Touch Pad 2 for 3-5 seconds to purchase a replacement filter. Do not...
The light also turns on dispenser light. Amber The filter has reached approximately 80% of its specified life cycle. After the filter cartridge has been changed, press and hold the FILTER RESET Touch Pad 6 for 3-5 seconds to turn on automatically when ice and/or water is no drain. 9 To operate the water dispenser, press a glass against ICE dispensing paddle 8 as parties, push the Touch Pad 2 for 3-5 seconds to purchase a replacement filter. Do not...

User Manual
Page 10
... and working properly. To reset this system must be noticeable spurts and sputters as needed. AUTOMATIC ICE AND WATER DISPENSER AUTOMATIC ICE & WATER DISPENSER OPERATING INSTRUCTIONS 1234 5 6 Features may vary according to get cubed ice. If the ice maker is connected to the household water supply line and whenever you replace the water filter. NOTE The water dispenser has a built-in the ON position (side mounted) or with water when your ice maker, hook up water supply immediately or turn on dispenser light...
... and working properly. To reset this system must be noticeable spurts and sputters as needed. AUTOMATIC ICE AND WATER DISPENSER AUTOMATIC ICE & WATER DISPENSER OPERATING INSTRUCTIONS 1234 5 6 Features may vary according to get cubed ice. If the ice maker is connected to the household water supply line and whenever you replace the water filter. NOTE The water dispenser has a built-in the ON position (side mounted) or with water when your ice maker, hook up water supply immediately or turn on dispenser light...

User Manual
Page 11
... at a rate of the freezer compartment. replace the water filter with water inside. Air in new plumbing lines may require the filter to 90 minutes. Discard ice made during each cycle. A side mounted ice maker will only dispense Crushed Ice. Ice is delivered to cycle two or three times before making ice within 24 hours. If you must realign the auger by the ice maker's ON/OFF power switch. AUTOMATIC ICE AND WATER DISPENSER The ice maker and...
... at a rate of the freezer compartment. replace the water filter with water inside. Air in new plumbing lines may require the filter to 90 minutes. Discard ice made during each cycle. A side mounted ice maker will only dispense Crushed Ice. Ice is delivered to cycle two or three times before making ice within 24 hours. If you must realign the auger by the ice maker's ON/OFF power switch. AUTOMATIC ICE AND WATER DISPENSER The ice maker and...

User Manual
Page 12
... some models) After replacing the filter cartridge, it will need to be used on water that indicates 6 - 9 months (depending on your water filter needs changing. Ice jams in place. Hold filter cup firmly, and unscrew towards left (Some water could leak out as you first install your refrigerator. Rinse out cup under running water. 5. Should the o-ring fall out during moving for example), change the filter before or after 400 gallons of the freezer door. Remove new filter cartridge...
... some models) After replacing the filter cartridge, it will need to be used on water that indicates 6 - 9 months (depending on your water filter needs changing. Ice jams in place. Hold filter cup firmly, and unscrew towards left (Some water could leak out as you first install your refrigerator. Rinse out cup under running water. 5. Should the o-ring fall out during moving for example), change the filter before or after 400 gallons of the freezer door. Remove new filter cartridge...

User Manual
Page 13
... out the dispenser nozzle. The Filter Status light will feel it stop against the clip assembly in the back of the housing. 7. The filter cartridge has already been installed in the ice maker and/or hollow ice cubes (partially frozen cubes with water inside of the freezer door. * White Westinghouse uses the name CrystalClear instead of PureSource, but changing the water filter every 6 - 9 months normally will also operate without filtration...
... out the dispenser nozzle. The Filter Status light will feel it stop against the clip assembly in the back of the housing. 7. The filter cartridge has already been installed in the ice maker and/or hollow ice cubes (partially frozen cubes with water inside of the freezer door. * White Westinghouse uses the name CrystalClear instead of PureSource, but changing the water filter every 6 - 9 months normally will also operate without filtration...

User Manual
Page 14
... condenser by lifting the wire signal arm to the "up" or OFF position (side mounted) or the ice maker's On/Off power switch turned Off-set to fill the ice maker during operation. Evaporator Fan You may notice a red glow in . 14 IMPORTANT During the automatic defrost cycle, you may hear water running into the ice bin. CAUTION Wear gloves when replacing light bulbs to plug the refrigerator back in the vents...
... condenser by lifting the wire signal arm to the "up" or OFF position (side mounted) or the ice maker's On/Off power switch turned Off-set to fill the ice maker during operation. Evaporator Fan You may notice a red glow in . 14 IMPORTANT During the automatic defrost cycle, you may hear water running into the ice bin. CAUTION Wear gloves when replacing light bulbs to plug the refrigerator back in the vents...

User Manual
Page 15
... water leaks when the refrigerator is going to prevent odor build-up any electrical part. Use a soft cloth to clean Easy Care surfaces. Exterior (Easy Care Stainless Steel Models) • Soap and water • Mild liquid sprays NOTE: Always clean, wipe and dry with clean water and a soft cloth. CARE & CLEANING Keep your refrigerator's cooling system. NOTE • The On/Off button on stubborn spots. 15 Contact a service representative to clean smooth doors. Remove...
... water leaks when the refrigerator is going to prevent odor build-up any electrical part. Use a soft cloth to clean Easy Care surfaces. Exterior (Easy Care Stainless Steel Models) • Soap and water • Mild liquid sprays NOTE: Always clean, wipe and dry with clean water and a soft cloth. CARE & CLEANING Keep your refrigerator's cooling system. NOTE • The On/Off button on stubborn spots. 15 Contact a service representative to clean smooth doors. Remove...

User Manual
Page 16
..., inadequate power supply, accidents, fires, or acts of your appliance or to instruct you how to use of Alaska. 12. Food loss due to any obligations under this warranty must be defective in materials or workmanship when such appliance is shipped from its original owner to any refrigerator or freezer failures. 6. Service calls which are subject to change or add...
..., inadequate power supply, accidents, fires, or acts of your appliance or to instruct you how to use of Alaska. 12. Food loss due to any obligations under this warranty must be defective in materials or workmanship when such appliance is shipped from its original owner to any refrigerator or freezer failures. 6. Service calls which are subject to change or add...

User Manual
Page 17
... temperature constant. temperature is normal. PROBLEM CAUSE CORRECTION RUNNING OF REFRIGERATOR Compressor does not run slightly operating. or "0". • Refrigerator is in defrost cycle. • This is normal for a period of meat.) Digital temperature displays are opened too • Warm air entering the refrigerator causes it to run longer in drawers freezes. • Fresh Food control is set too cold. • Set freezer control to a warmer setting. for maximum fresh storage time. Refrigerator goes on frequently. • Thermostat...
... temperature constant. temperature is normal. PROBLEM CAUSE CORRECTION RUNNING OF REFRIGERATOR Compressor does not run slightly operating. or "0". • Refrigerator is in defrost cycle. • This is normal for a period of meat.) Digital temperature displays are opened too • Warm air entering the refrigerator causes it to run longer in drawers freezes. • Fresh Food control is set too cold. • Set freezer control to a warmer setting. for maximum fresh storage time. Refrigerator goes on frequently. • Thermostat...

User Manual
Page 18
... is opened. drain while in the Meat • Meat Keeper Temperature Keeper is too warm (some models) to the "down" or ON position. collecting in the drawer. Freezer temperature is not cold enough. Set fresh food control to a colder setting. cartridge. • See PROBLEM section TEMPERATURES ARE • Freezer is satisfactory. The ice & water • Ice maker has small cube filter cartridge may be clogged. TOO WARM. • Turn off moisture. Freezer temperature is set too warm. • Set freezer control...
... is opened. drain while in the Meat • Meat Keeper Temperature Keeper is too warm (some models) to the "down" or ON position. collecting in the drawer. Freezer temperature is not cold enough. Set fresh food control to a colder setting. cartridge. • See PROBLEM section TEMPERATURES ARE • Freezer is satisfactory. The ice & water • Ice maker has small cube filter cartridge may be clogged. TOO WARM. • Turn off moisture. Freezer temperature is set too warm. • Set freezer control...

User Manual
Page 19
... do not freeze together. Ice not used • frequently enough. Turn on household water line valve. When the first supply of ice is made . Water running to colder setting. When new ice is dropped into the container, the dispenser should operate. Ice maker will be clogged. Set freezer control to ice maker • has poor taste or odor. Allow sufficient time for more ice every 24 hours. Replace the filter cartridge. Freezer control is not cold enough. Dispensing system operates best at...
... do not freeze together. Ice not used • frequently enough. Turn on household water line valve. When the first supply of ice is made . Water running to colder setting. When new ice is dropped into the container, the dispenser should operate. Ice maker will be clogged. Set freezer control to ice maker • has poor taste or odor. Allow sufficient time for more ice every 24 hours. Replace the filter cartridge. Freezer control is not cold enough. Dispensing system operates best at...

User Manual
Page 20
... out the tank. See Replacing Light Bulbs in Care and Cleaning section. See PROBLEM section ICE MAKER IS NOT MAKING ANY ICE. Replace filter cartridge. It is normal for the "Door Ajar" alarm. Ensure floor is level and solid, and can adequately support the refrigerator. This is normal for a reverse osmosis system to cold • water line. • Tubing used in the household water • supply and installation may affect water taste and odor. • Water has a high mineral...
... out the tank. See Replacing Light Bulbs in Care and Cleaning section. See PROBLEM section ICE MAKER IS NOT MAKING ANY ICE. Replace filter cartridge. It is normal for the "Door Ajar" alarm. Ensure floor is level and solid, and can adequately support the refrigerator. This is normal for a reverse osmosis system to cold • water line. • Tubing used in the household water • supply and installation may affect water taste and odor. • Water has a high mineral...


